CAMDEN CV-940 Series Installation Instructions Manual Download Page 6

CV-940 Series

Page 6 of 19

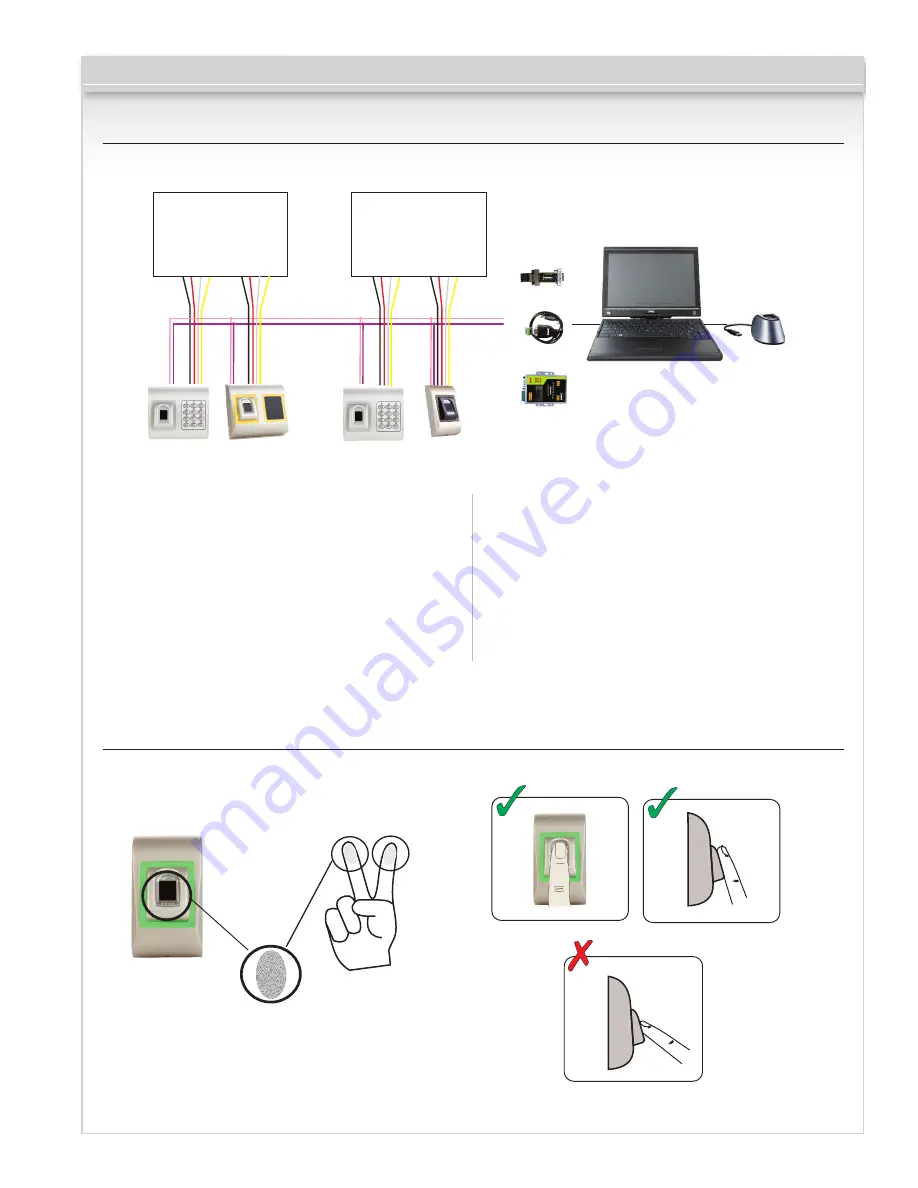
6. Connecting Biometric Readers To Third Party Controllers

•  Connect the lines D0, D1, Gnd and +12V to the third  

  party controller.
•  Connect the RS485 Line (A, B) to the converter.  

  Connect the converter in the PC.
•  Fingerprint enrollment is done from the PC Software.  

  Connection between the Biometric readers and the PC  

  must be established.

•  The Biometric readers communicate with each other  

  with a RS485 and with the PC Software through  

  a Converter.
•  The RS485 Line should be configured in the form of  

  a daisy chain, NOT in a form of a star. Keep the stubs  

  from the RS485 backbone as short as possible (not  

  more than 16 ft. (5 meters).

•  Only one converter per installation is needed,  

  not per reader.

CBMS Software

RS485   

A

RS485   B

A

B

3rd party controller

- + D0 D1

- + D0 D1

3rd party controller

- + D0 D1

- + D0 D1

CV-940-SER

CV-940-USB

CV-940-TCP

CV-350ER

USB Desktop Reader

optional

7. Enrollment

Summary of Contents for CV-940 Series

Page 1: ...CV 940 Series Biometric Fingerprint Reader Installation Instructions...

Page 2: ...ingerprints from a Reader 08 8 3 Enrolling Fingerprints from Desktop Reader 09 8 4 Deleting Fingerprints 10 8 5 Uploading the Fingerprints to the Biometric Readers 10 8 6 Firmware Update 11 8 7 Sensor...

Page 3: ...unit from the wall Fingerprint capacity up to 9500 fingerprints Technology Biometry Authentication Finger Fingerprints per user 1 10 fingerprints Interface Wiegand 8 to 128 bits Default Wiegand 26bit...

Page 4: ...ensor1 Exit Button1 Exit Button2 GND GND Free In 2 Free In 2 Free In 1 Free In 1 Rx Tx Busy System OK Door 1 Door 2 Free Out 1 Free Out 2 TCP IP Earth 12Vdc Out 12V gnd D1 D0 12V gnd led2 led1 12V IN1...

Page 5: ...ted and shielded with a min 0 01 in 0 2 mm 2 cross section Connect the ground 0V of each unit in the RS485 Line using a third wire in the same cable The shield of the communication cable between two d...

Page 6: ...stablished The Biometric readers communicate with each other with a RS485 and with the PC Software through a Converter The RS485 Line should be configured in the form of a daisy chain NOT in a form of...

Page 7: ...l appear Biometric Go to that tab and put the serial number of the Biometric Reader 8 3 Important Note The serial number of the reader can be found on a sticker inside the reader on the packaging box...

Page 8: ...ave New and the fingerprint will be sent automatically to all Biometric Readers where that user has access i e to all the readers according to the Access Level assign to that user Example If the user...

Page 9: ...l be sent automatically to all Biometric Readers where that user has access i e to all the readers according to the Access Level assigned to that user If the reader is off line the fingers will be sen...

Page 10: ...Go to the fingertip that needs to be deleted right click and select Delete for one finger or Delete All for all fingers of the User Click Save Changes With this procedure the User s fingerprints are d...

Page 11: ...mmunication device in between during the entire process 8 18 8 19 8 20 8 21 Page 11 of 19 8 7 Sensor Calibration Right click on the biometric reader and select Calibrate and wait for confirmation mess...

Page 12: ...readers PIN Codes management and transfer PIN Code length configuration 1 to 8 digits and PIN Code transfer Wiegand Output Configuration The Wiegand output of the Biometric reader can be customized b...

Page 13: ...click on reader and select Check Version If reader is not online following line is added on top of the event table 9 3 Delete Reader 9 2 Edit Reader Right click on the reader and select Delete reader...

Page 14: ...10 4 In these 25 sec the reader will continuously blink in orange 6 Repeat point 4 5 for each finger that should be enrolled 7 Click on Save New and the fingerprint will be sent automatically to all B...

Page 15: ...ingerprint will be sent automatically to all Biometric Readers where that user has access i e to all the readers according to the Access Level assigned to that user If the reader is off line the finge...

Page 16: ...to the fingertip that needs to be deleted right click and select Delete for one finger or Delete All for all fingers of the User Click Save Changes With this procedure the User s fingerprints are del...

Page 17: ...t Select Wiegand menu from Settings Fig 10 12 At Wiegand setup window select one from customs Wiegand Fig 10 13 Set Wiegand parameter Click on Save button Note Wiegand settings are out of scope for co...

Page 18: ...ock is shown bellow Parity bit bit 1 8 bits header 16 bits user code 2 bytes Parity bit bit 26 P1 XXXXXXXX XXXXYYYY YYYYYYYY P2 Example 170 31527 1 1 0 1 0 1 0 1 0 0 1 1 1 1 0 1 1 0 0 1 0 0 1 1 1 0 No...

Page 19: ...the access is denied If the user is not deleted from the reader and the same user is enrolled again with new ID the reader will recognize the finger with the first ID To resolve this delete all users...

Reviews: