Chapter 1: Product description
Accessing and Configuring cnPilot Devices via the
local GUI (without cnMaestro)
Page
1-8
Accessing and Configuring cnPilot Devices via the
local GUI (without cnMaestro)
Before configuring your router, please see the procedure below for instructions on connecting the
cnPilot Home device in your network.
Procedure 2 Configuring the Router
1.
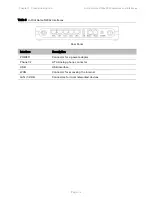
Connect analog phone to ATA Port with an RJ11 cable.
2.
Connect the WAN port to the Internet via your network’s modem/switch/router/ADSL
equipment using an Ethernet cable.
3.
If desired, connect one of 4 available LAN ports to your PC or networked device with an
Ethernet cable. cnPilot Home devices allow you to connect up to 4 PCs (or other Ethernet-
connected devices) directly.
4.
Connect one end of the power cord to the power port of the device. Connect the other end
to the wall outlet.
5.
Push the ON/OFF button to power on the router.
6.
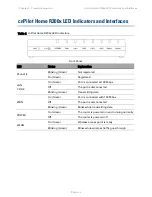
Check the Power, WAN, and LAN LEDs to confirm network connectivity.
Warning
Please do not attempt to use unsupported power adapters and do not remove power
during configuring or updating the cnPilot Home R200x/R201x device. Using other
power adapters may damage the cnPilot Home R200x/R201x and will void the
manufacturer warranty.
Summary of Contents for cnPilot Home R200
Page 8: ...Tables Page vi Table 83 Operating mode 3 107 Table 84 System log 3 108 Table 85 Logout 3 108...
Page 43: ...Chapter 3 System planning Status Page 3 3 Status Table 15 Status Page...
Page 44: ...Chapter 3 System planning Status Page 3 4...
Page 104: ...Chapter 3 System planning FXS1 Page 3 64 Answered Calls Missed Calls...
Page 107: ...Chapter 3 System planning Security Page 3 67 Content Filtering Table 63 Content filtering...

