


5
Vi s i t u s o n l i n e a t c a l i fo n e. co m
Vi s i t u s o n l i n e a t c a l i fo n e. co m
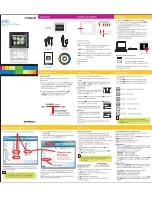
Getting Started
When the ‘Power’ button (1) is depressed the LED (2) to the left of the LCD display (3) will be red for standby mode. Pushing the LED
will cause the LED to be green indicating the unit is fully powered up.
• Depressing the ‘Tape’ (4) button will cause the LCD display to show ‘Tape’.
• Depressing the ‘AM/FM’ (5) button will cause the LCD display to show ‘AM’ or ‘FM’.
• Depressing the ‘CD’ (6) button will cause the LCD display to show ‘Disc’.
Digital Volume Control
• Press ‘VOL
q
(7) to reduce or ‘VOL
p
(8) to increase the volume.Tthe level will be shown in the LCD panel.
Minimum volume will show ‘00’ and maximum volume is ‘40’ on the LCD display.
Treble and Bass Controls
‘TREBLE
p
(9) and ‘TREBLE
q
(10) can be used to adjust the Treble up and down respectively, while ‘BASS
p
(11) and ‘BASS
q
(12)
can be used to adjust the Bass up and down respectively. Both Treble and Bass can be adjusted in the range of +5 to –5.
EQ Control
Press ‘EQ’ (9) to select the equalizer as sequence.
Radio Function
• Press ‘AM/FM’ (5) to select the desired reception band. Extend the telescoping antenna (13) for FM. There is a built-in antenna
for AM reception. For FM stereo reception the ‘stereo’ will show on the LCD display.
• Press the ‘TUNER
p
(14) or ‘TUNER
q
(15) button repeatedly until the desired station shows on the LCD display.
• To automatically scan through the frequency bands, hold the ‘TUNER’ button down until you see the speed of the LCD
display increase. Scanning will stop when a strong signal is detected.
continued page 6
Radio Function
continued
VOL 04
VOLUME
Electronic Volume Control Display
BASS
TREBLE
TRE+2
BA-1
570
AM
KHz
AM BAND SELECTION
califone_2395IR_manual.indd 8
9/14/07 4:34:45 PM