Dual Axle
King Pin
Brass Set
Screw
E-Clip
2-56 SH
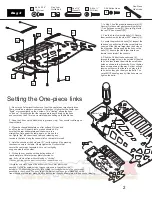
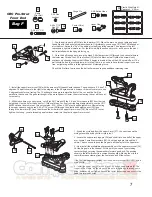
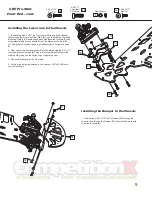
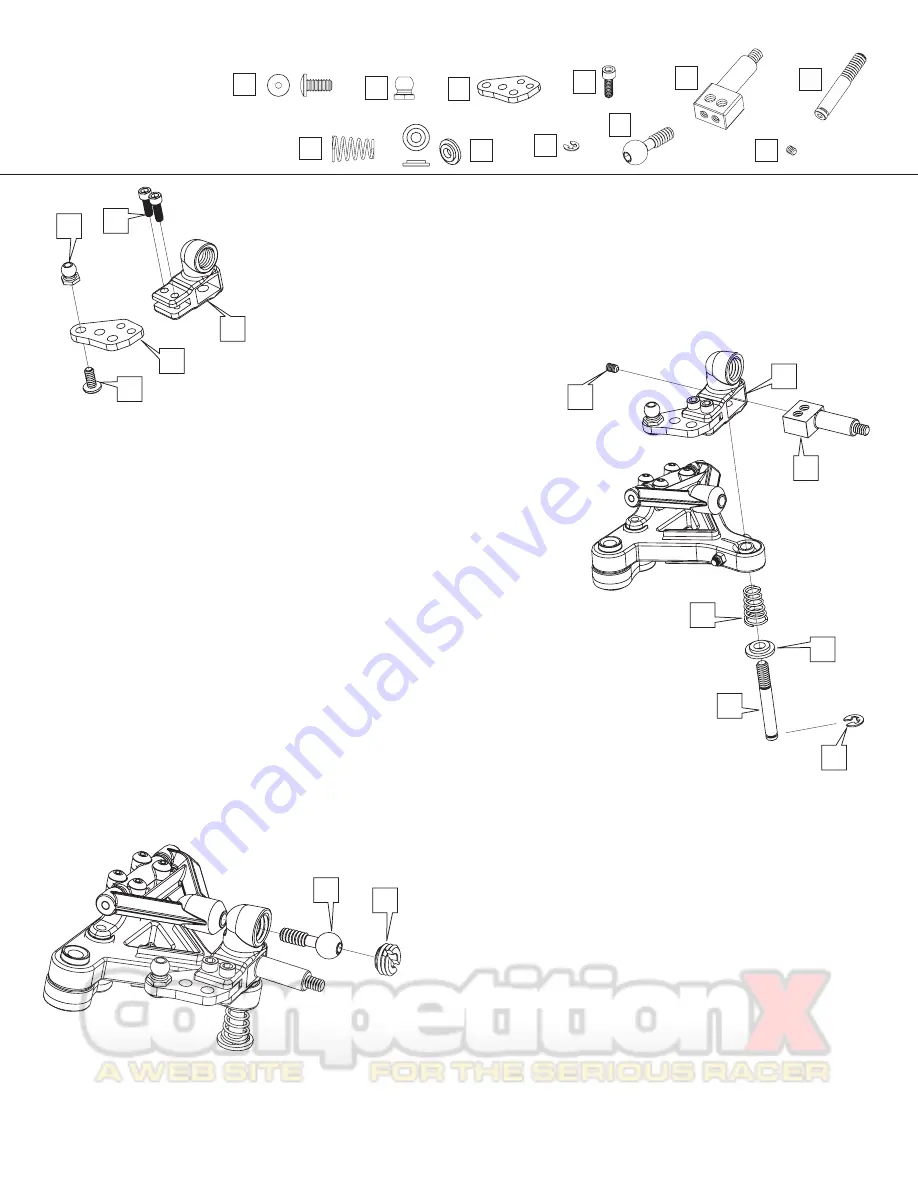
1 - Build up the left and right steering blocks [42] as shown to the left. Start by threading the red button head screw
[22] through the graphite steering arm [43] and into the red low profile ball [12].
2 - Then, slide the graphite steering arm assembly into the steering block, lining up the 2 mounting holes. Using the
black 2-56 socket head screws [44], fasten the arm to the steering block. DO NOT OVER tighten. You will drive the
screw through the steering block, deforming the part.
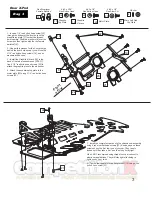
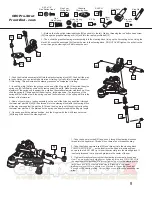
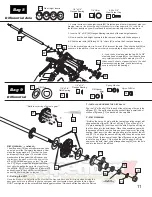
1 - Push the Dual aluminum axle [45] into the plastic steering block [42]. Push it all the way
in firmly. Notice you can install the axle inline or trailing. Typically, this is installed inline for
1/10th racing. This will increase the steering response as compared to trailing.
2 - Insert the e-clip [48] into the groove on the end of the King pin [46]. Next, slide the nylon
spring cup [50] all the way down until it rests against the e-clip. Make sure the larger
diameter of the spring cup is against the e-clip and the smaller diameter side faces up. Now
slide the spring [47] down against the spring cup, large side down. The larger end of the
spring will fit over the step in the spring cup, and the smaller end of the spring will fit into the
bottom of the lower arm.
3 - Now put your king pin / spring assembly on the end of the Allen key and slide it through
the lower arm pivot ball [30], & then thread it into the steering block (with the steering block
all the way down against the pivot ball). Thread the king pin in until the spring just touches
the lower arm pivot ball. The preload on the spring can be adjusted with the king pin length.
4 - Once happy with the preload position, lock the king pin with the 4-40 brass set screw
[49] through the back of the steering block.
CRC Pro-Strut
Front End - cont.
Red Low-
Profile Ball
12
4-40 x 1/4”
Red Button Head
22
45
42
46
47
48
49
45
46
49
48
44
Upper
Ball
51
42
22
43
12
44
Graphite
Steering Arm
43
8
Red
Side Spring
47
50
Nylon Spring
Cup
50
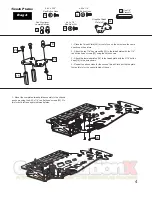
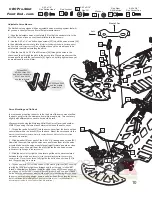
1 - Take the upper pivot ball [51] and push it though the steering block and
thread into the upper arm. Thread it in so there are no threads showing.
2 - Take the slotted capture insert [52] and thread it into the steering block.
THIS IS A BIT TRICKY .... as the insert must be fitted at a down angle as
shown to the left. DO NOT try to insert it horizontally into the steering block. It
is actually threaded in at a down angle toward the center of the car.
3 - Tighten this capture insert so that the steering movement is bound and
slow. Yes, we are actually slightly over tightening this piece FOR NOW. With
the steering movement bound from over tightening, move the steering to it’s
limits, back and forth. What we are doing is “breaking in” the upper
ball/capture insert. After a minute or so of break in, loosen the insert just
enough so the steering is free. Not too much or you will induce excessive free
play.
51
52


