


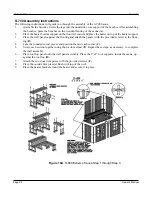


S-800 Extreme Assembly Instructions
The following instructions will guide you through the assembly of the S-800 Sauna.
NOTE
:
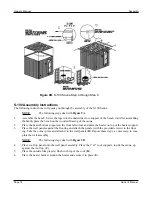
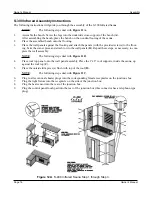
The following steps deal with
Figure 16A.
1.
Assemble the bench. Screw the legs into the underside cross-support of the bench (
A
).
After assembling the bench, place the bench on the wooden flooring of the sauna.
2.
Place the heater bottom support on the front left corner and the place the heater on top of the heater
support.
3.
Place the wall panels against the flooring and attach the panels (with the provided screws) to the floor-
ing. Attach the center peices and place between the two front and two back panels. Then place the cor-
ner piece and attach it to the wall panels (
B
). Repeat these steps, as necessary, to complete the wall
assembly.
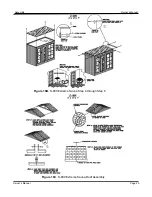
NOTE
:
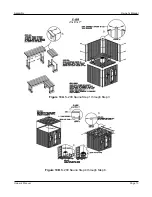
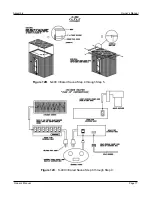
The following steps deal with
Figure 16B
.
4.
Place roof top panel onto the wall panel assembly. Place the 1”x2” roof supports, inside the sauna, up
against the roof top (
C
).
5.
Place the outside trim piece(s) flush with top of the roof (
D
).
6.
Place the heater bracket around the heater and secure it in place (
E
).
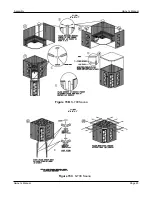
NOTE
:
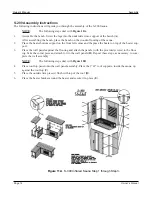
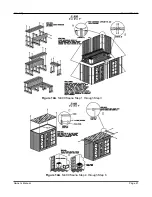
The following steps deal with
Figure 16C
.
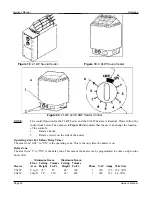
1.
Take each roof section and place side-by-side. Make sure the cross-beams are exposed and facing each
other. There are pre-drilled holes at each end of the roof sections; make sure these holes line up.
2.
Place one bolt with one washer and slide into pre-drilled hole. Place a nut and washer on the other end
of the bolt and tighten (
G
).
3.
Begin placing single-sided composition shingles on the bottom of the roof and nail into place. Then
place double composition shingle directly over single shingle. Repeat this process until both sides are
completely done (
F
).
4.
Place the last shingle in the middle of the two piece roof and nail into place.
Page 26
Owner’s Manual
Owner’s Manual
Assembly


