background image

ASSEMBLY INSTRUCTIONS

Tools needed: Phillips Head Screwdriver

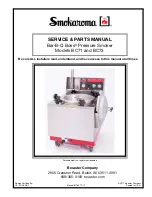
Step 3 – Install Wood Pellet Tray

Slide the wood pellet tray into the corresponding 

• 

supports, insuring that the tray is placed to com-
pletely enclose the heating element with the two 
surfaces of the tray.

Step 4 – Drip Pan Placement

Set Drip Pan on the floor of the inside of smoker, 

• 

below the wood pellet tray.  The raised edges of 
the pan should be face up in order to catch any 
juices that may drip from meat.  

Be sure that the pan does not obstruct the smok-

• 

er door from closing.

Step 5 – Rack Placement

Set metal racks on rack support shafts located 

• 

on the sidewalls inside the smoker.  It is not nec-
essary to use all 5 metal racks when smoking; 
racks can be set at various height levels accord-
ing to the size of meats being smoked.  


Note:  The small rack always 


rests on the lowest support shaft  


adjacent to the wood pellet tray.

PELLET TRAY

DRIP PAN

WATER PAN

METAL RACK

Summary of Contents for Electric Smoker

Page 1: ...ons Tool needed for assembly Phillips Head Screwdriver WARNING CARBON MONOXIDE HAZARD BURNING WOOD GIVES OFF CARBON MONOXIDE THIS CAN CAUSE DEATH Warnings Safety Concerns Read and follow the warnings...

Page 2: ...ric smoker close supervision is an absolute necessity Never operate this appliance after it has malfunctioned or damage has occurred to the unit Contact Bruce Foods Corporation s customer service depa...

Page 3: ...peration The tray is always hot when electric smoker is in use To disconnect the electric smoker turn control panel off then remove plug from outlet Unplug from outlet when not in use and prior to cle...

Page 4: ...WS 2 ES3 WHEEL SCREWS 8 ES9 SMALL COOKING RACK 1 ES10 WATER PAN ES6 WOOD PELLET TRAY ES7 DRIP PAN ES11 SIDE ACCESS WOOD PELLET CHUTE CAP 1 PARTS LIST ES1 Front Legs 2 ES2 Wheels 2 ES3 Wheel Screws 8 E...

Page 5: ...ker Insert each of the legs into one of the holes on the front corners of the appliance and rotate clockwise to secure the legs The height may be adjusted by loosening and tightening the legs WARNING...

Page 6: ...tray The raised edges of the pan should be face up in order to catch any juices that may drip from meat Be sure that the pan does not obstruct the smok er door from closing Step 5 Rack Placement Set...

Page 7: ...ctly above the wood pellet chute and below the supports for the fourth rack Step 7 Securing Wood Pellet Chute Cap Prior to powering on the unit ensure the wood pellet chute cap located on the exte rio...

Page 8: ...rally Heat the smoker to 225 F 4 Place 1 4 cup Wood Pellets into the wood pellet chute and ensure that no pellets remain in chute after loading Smoke for two hours Congratulations Your smoker is ready...

Page 9: ...f wood chips at a time Add more pellets or chips as needed Adding wood pellets during smoking process Caution Keep smoker door closed when adding wood pellets or chips Note Wood pellet chute will be h...

Page 10: ...Push TIME button again to lock in hours The minutes LED will start blinking Set the minutes by using Push TIME for timer to begin HEAT WILL TURN OFF WHEN TIME HAS EXPIRED Resetting control panel If co...

Page 11: ...smoker will occur This is normal Periodically check grease trap and empty when necessary Smoker door should stay closed throughout the cooking process Open the door only when truly required Once open...

Page 12: ...tly over the heat source Indirect heat is similar to roast ing and is recommended when grilling larger pieces of meat with the grill cover down and the meat placed so as to avoid the direct heat sourc...

Page 13: ...meat When the meat reaches temperature it is important to remove the meat from the smoker to avoid drying it out For long smoke times baste the meat during those occasions when you open the smoker to...

Page 14: ...t smoke flavors while also inhibiting bacterial spoilage You can also utilize marinades to flavor and tenderize large cuts of meat from both the inside and outside and through addi tion of the marinad...

Page 15: ...s cooked It is the form of cooking this booklet references Foods for hot smoking would normally be eaten soon after they are prepared Hot smoked foods may be cured brined or marinated or basted Additi...

Page 16: ...of the meat so meat can close up behind the needle Do not pull the needle completely out of the puncture hole unless to reload with liquid Use the same hole to angle into the other areas of the meat s...

Page 17: ...Tie turkey legs together and brush with vegetable oil Sprinkle liberally with Cajun Injector Quick Shake Cajun Shake seasoning Set the Cajun Injector smoker tem perature to 225 F and allow for 35 40...

Page 18: ...Place 1 4 cup Oak or Pecan Wood Pellets into wood pellet chute and ensure that no pellets remain in chute after loading Smoke for about 15 20 minutes or until shrimp are opaque Basil Wrapped Smoked C...

Page 19: ...un Injector Smoker Kit containing 1 16 ounce jar Cajun Injector Smoking Brine 1 16 ounce jar Cajun Injector Basting Spray 1 16 ounce jar Cajun Injector BBQ Finishing Sauce 1 3 ounce pecan smoker pelle...

Page 20: ...and ensure that no pellets remain in chute after loading Let the roast smoke for about 4 5 hours at 225 F Use the basting spray again about 2 hours into the smoking process After four hours check int...

Page 21: ...ck internal temperature of the pork it should be near 165 F When internal temperature is 165 F pull the pork off the smoker Allow to rest for 15 minutes before carving Cajun Injector Honey Bacon BBQ S...

Page 22: ...at 165 F pull the pork butt off the smoker Allow to rest for 15 minutes before carving Cajun Injector Butter Flavored Smoked Chicken Prep Time 15 minutes Cook Time 4 5 hours Yield 4 6 servings Ingred...

Page 23: ...5 F When internal temperature is 165 F pull the pork off the smoker Allow to rest for 15 minutes before carving Cajun Injector Hickory Smoked Brisket Prep time 20 minutes Cook time 7 hours Yield 24 6o...

Page 24: ...ssaire pour l assemblage Tournevis cruciforme AVERTISSEMENT RISQUE D OXYDE DE CARBONE LE BOIS BR LANT D GAGE DE L OXYDE DE CARBONE POUVANT CAUSER LA MORT Avertissements et directives de s curit Lire e...

Page 25: ...dans le secteur du fumeur lectrique la surveillance troite est une n cessit absolue Ne jamais utilis cet appareil apr s qu il ait mal fonctionn ou qu il ait t en dommag Entrer en contact avec le servi...

Page 26: ...orceaux de bois une fois que le fumeur est en marche Le plateau est tou jours chaud quand le fumeur lectrique est en service Pour d connecter le fumeur lectrique fermer le paneau de contr le et enleve...

Page 27: ...e l acc s lat ral de scendeur de granule 1 POUR TOUTES PIECES MANQUANTES APPELER LE SERVICE APR S VENTE DE BRUCE FOODS CORPORATION AU 1 800 229 9082 LISTE DE PI CES ES1 PIEDS AVANT 2 ES2 ROUE 2 ES8 GR...

Page 28: ...e l appareil et tour ner le boulon dans le sens des aiguilles d une montre pour s curiser les pieds La hauteur peut tre ajust e en vissant ou d vissant le boulon du pieds du fume AVERTISSEMENT V rifie...

Page 29: ...ut afin d attraper le jus qui peut s goutter de la viande Assurez vous que le plateau soit suffisemment ins r profond ment afin qu il n emp che la fermeture de la porte du fumeur tape 5 Placement des...

Page 30: ...hon du descen deur de granul s de bois Avant de mettre en fonction l appareil assu rer que le bouchon du descendeur de granu l s de bois situ sur le c t droit ext rieur du fumeur est en place et solid...

Page 31: ...une temp rature de 225 F 108 C Ins rer l quivalent de 4 1 4 tasse de granul s de bois dans le descendeur de granul s de bois et s assurer qu aucun granul s ne demeurent dans le descendeur apr s charge...

Page 32: ...s ou de morceaux de bois suivant le besoin Ajouter les granul s de bois pendant le fumage Attention Maintenir la porte du fumeur ferm e lorsque vous ajoutez les granul s ou les morceaux de bois A Note...

Page 33: ...oter Le chauffage ne commencera pas avant que la minuterie soit r gl e R glage de la minuterie Pousser le bouton TIME Temps Affichage par LED afficant les heures clignotera R gler les heures en Poussa...

Page 34: ...la trappe de graisse de votre fumeur et vider la si n c ssaire La porte du fumeur doit rester ferm e durant tout le proc d de cuisson Ouvrez la porte seulement si c est absolument n c ssaire Une fois...

Page 35: ......

Reviews: