background image

AVALON Gourmet rev. 7 2013/04

www.cafection.com      

(800) 561-6162

30

INSTALLATION AND SERVICE MANUAL for AVALON 

Gourmet

Service Software

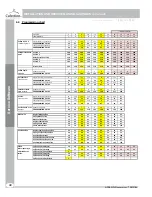
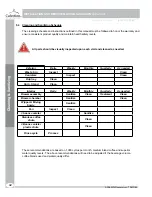
4.4  Programming chart

 GOURMET PROGRAMMING CHART

7

8

9

10

11

12

13

14

16

18

20

5

6

7

8

9

10

11

12

14

16

18

7,5

9

10,5

12

13,5

15

16,5

18

21

24

27

23

27

32

36

41

45

50

27

32

36

41

8,5

10,2

11,9

13,6

15,3

17

18,7

20,4

23,8

27,2

30,6

26

31

36

41

46

51

56

31

36

41

46

200

200

200

200

200

200

200

200

200

200

200

100

100

100

100

100

100

100

100

100

100

100

118

118

118

118

118

118

118

118

118

118

118

150

150

150

150

170

170

170

150

150

150

150

100

100

100

100

100

100

100

100

100

100

100

120

120

120

120

170

170

170

120

120

120

120

5

6

7

8

9

10

11

12

14

16

18

70

88

106

124

142

160

178

88

106

124

142

14

16,8

19,6

22,4

25,2

28

30,8

33,6

39,2

29

35

41

47

53

59

65

71

83

16

19,2

22,4

25,6

28,8

32

35,2

38,4

44,8

32

39

46

53

60

67

74

81

95

5

6

7

8

9

10

11

12

14

90

105

120

135

150

166

181

211

242

14

16,8

19,6

22,4

25,2

28

30,8

33,6

39,2

29

35

41

47

53

59

65

71

83

16

19,2

22,4

25,6

28,8

32

35,2

38,4

44,8

32

39

46

53

60

67

74

81

95

5

6

7

8

9

10

11

12

14

80

96

112

118

134

160

176

192

208

23

27

32

36

41

45

50

55

64

26

31

36

41

46

51

56

61

71

15

25

35

45

55

66

76

86

97

29

35

41

47

53

59

65

71

83

32

39

46

53

60

67

74

81

95

72

76

80

84

89

94

98

103

107

23

27

32

36

41

45

50

55

64

26

31

36

41

46

51

56

61

71

10

18

30

42

54

65

77

89

102

29

35

41

47

53

59

65

71

83

32

39

46

53

60

67

74

81

95

72

76

80

84

88

93

97

101

105

13

15

17

19

21

23

25

15

17

19

21

14

17

19

21

24

26

29

17

19

21

24

1

13

15

17

19

21

23

25

15

17

19

21

14

17

19

21

24

26

29

17

19

21

24

2

Coffee #1, 2

 & 

3  

*Coffee in grams

Regular Coffee (1,5 gr/ liquid oz)

PROGRAMMING VALUE

Strong Coffee (1,7 gr/liquid oz)

PROGRAMMING VALUE

**DOUBLE BREW

Configurable Pause 
times 

Pause # 1
Pause # 2
Delay before Pause #3
Pause # 3
Pause # 5

CUP SIZE
LIQUID OUNCE

Grinder time

Coffee liquid       
L

iquid OZ

QUANTITY OF LIQUID

PROGRAMMING VALUE

Hot Chocolate    
*

Soluble in grams

Regular chocolate (2,8 gr/liquid oz)

PROGRAMMING VALUE

Strong chocolate (3,2 gr/liquid oz)

PROGRAMMING VALUE

Chocolate Liquid       

Liquid in ounces

QUANTITY OF LIQUID

PROGRAMMING VALUE

Vanilla                 
*

Soluble in grams

Regular Vanilla (2,8 gr/liquid oz)

PROGRAMMING VALUE

Strong Vanilla (3,2 gr/ liquid oz)

PROGRAMMING VALUE

Vanilla liquid   

Liquid 

in ounces

QUANTITY OF LIQUID

PROGRAMMING VALUE

Mokaccino

Regular Moka Coffee
Strong Moka Coffee
Moka Coffee Water
Regular Choco Moka
Strong Choco Moka 
Choco Moka Water

Vanilla Coffee      

Regular Vanilla Coffee, Coffee
Strong Vanilla Coffee,Coffee
Vanilla Coffee Water
Vanilla Coffee, Regular Vanilla
Vanilla Coffee, Strong Vanilla
Vanilla Water, Vanilla Coffee

50/50                            
Water quantity is 
adjusted by the 
coffee

.    

Coffee # 1 50/50 regular
Coffee # 1 50/50 strong
Coffee # 1 50/50 by default
Coffee # 2 50/50 regular
Coffee # 2 50/50 strong
Coffee # 2 50/50 by default

MA 2012-08-09

Summary of Contents for AVALON Gourmet

Page 1: ...N AND SERVICE MANUAL for AVALON Gourmet Manufactured by Cafection Enterprises Inc 2355 Dalton Quebec Quebec G1P 3S3 Canada Tel 1 800 561 6162 Fax 1 800 463 2739 avalon cafection com www cafection com...

Page 2: ...nts 8 3 1 1 Operating environment 8 3 1 2 Power supply 8 3 1 3 Water supply 8 3 1 4 Tools required 8 3 1 5 Clearances 8 3 2 Unpacking 9 3 3 Leveling the equipment 10 3 4 Hot water tank preparation 10...

Page 3: ...ervice overlay 28 4 3 Main menu description 29 4 4 Programming chart 30 4 5 Multi cup and Free Mode Key 32 5 CLEANING AND SANITIZING 32 5 1 Automatic rinsing function 32 5 2 Cleaning and sanitizing in...

Page 4: ...5 6 4 Hot Water Tank 46 6 5 Grinder 47 7 SERVICING PARTS 48 7 1 Draining the hot water tank 48 7 2 Shutdown Storage 49 7 2 1 Storing the brewer assembly 49 Annex 1 Installing water flow restrictor on...

Page 5: ...e this equipment other than for its intended use This equipment contains hot water never move when full This brewing equipment is intended for indoor installation only 1 3 Power supply Always use a gr...

Page 6: ...valon brewer that have not been purchased from Cafection The following circumstances will void the warranty policy Improper installation or operation of the equipment Abuse or neglect including but no...

Page 7: ...fection will check the parts and apply a credit to your account or exchange the merchandise if the warranty is applicable Only guaranteed parts are authorized for return 7 We suggest you keep replacem...

Page 8: ...3 8 O D dedicated line branched off a larger line An easily accessible shut off valve up stream of the unit is highly recommended for ease of installation Water pressure should be at least 20 PSI and...

Page 9: ...see if any damage has occurred in shipment NOTE See transport liabilities in section 2 3 on page 7 The parts and accessories that are shipped separately need to be installed on your equipment In each...

Page 10: ...a leveled position 3 4 Hot water tank preparation Make sure equipment is unplugged 3 4 1 Tank lid preparation 1 You can acces the water tank by removing the water tank access door or the back panel 2...

Page 11: ...will not be activated and the unit will automatically shut down sensing an overflow situation It is important to verify that the Overflow cup is in place with the highest side in front and secured we...

Page 12: ...r on the shelf by aligning the 3 transmissions of the canister with the 3 motors already fixed on the shelf and the 2 pins on the other side of the shelf Push backward to fix in place 3 5 2 Lock the c...

Page 13: ...l ensure no sediment from a new installation can get in the equipment 2 The incoming water supply should have a shut off valve connected in line Water supply should be a plastic 1 4 or 3 8 O D dedicat...

Page 14: ...he OFF position before plugging in the unit 2 Locate the unit s 6 feet power cord and plug it into its own grounded electrical outlet 3 Reach to the back of the brewer and toggle the power switch to t...

Page 15: ...me is needed to heat the new incoming water up to setpoint You can also take the water s brewing temperature manually by ordering a cup of hot water and measuring its temperature with a thermometer Th...

Page 16: ...n 1 Screw the overflow drip tray support 05CAB11 under the base of the brewer using the 2 screws included 2 Take out the 2 wires with connectors found inside the brewer using the chute hole and connec...

Page 17: ...VALON Gourmet rev 7 2013 04 3 9 2 Drip tray installation 1 Insert the drip tray support 05DOR02 in the door 2 Set the drip tray 05CAB17 on the support 05DOR02 inside the restraint 3 Install the metal...

Page 18: ...d at a time you will reduce the risk of cross contamination of products Unlock the cover of the canister and open the plastic top cap Do not overfill the canister Using a step stool will help you see...

Page 19: ...nsert the chute base inside the chute hole of the cabinet 3 Insert the large waste chute into the chute base 4 Install the front panel by aligning the metal bracket behind the front panel with the met...

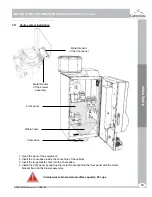
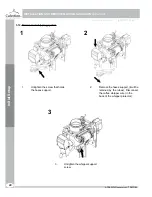
Page 20: ...L for AVALON Gourmet 3 12 Brewer and whipping system 3 1 2 1 Untighten the screw that holds the hoses support 2 Remove the hoses support it will be retained by the tubes Disconnect the coffee whipper...

Page 21: ...2013 04 4 5 6 Funnel 4 Remove the spout with the coffee whipper by simply pulling it towards you 5 Cut the filter paper Then lower the latch of the brewer to unlock it 6 Withdraw the funnel and the p...

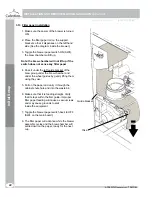
Page 22: ...er paper 4 Pass it under the left guide bracket of the brew group under the brew chamber and under the wheel guides by gently lifting them using the yoke 5 Pull on the paper and carry it through the c...

Page 23: ...as a reminder You need to be sure that the brewer is clean safe and functioning once you re ready to leave it on site What to check Inlet valve is free from leaks Verify that it is secure and not ove...

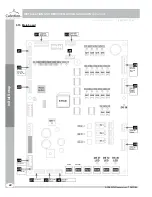
Page 24: ...800 561 6162 24 INSTALLATION AND SERVICE MANUAL for AVALON Gourmet Initial Setup 3 15 Main board Coffee and ingredients motors Whippers and valves Free mode key Overflow Filter paper Brewer cam Low wa...

Page 25: ...itch SW5 Black DS12 Allows the neutralization of the ingredient dispensing motors At OFF the motors will not dispense ingredients 7 Water Switch SW6 Black DS36 Allow the neutralization of the 4 water...

Page 26: ...2 Turn off the machine and unplug from the outlet 3 Open the door and remove the lexan plate via the 4 screws 4 Locate the microcontroller the black square piece in the middle of the board with a whi...

Page 27: ...for the following steps refer to overlay If you wait more than 45 seconds without pressing on anything you will exit automatically the menu and you will have to start over 4 Start with setting up the...

Page 28: ...om 800 561 6162 28 INSTALLATION AND SERVICE MANUAL for AVALON Gourmet Initial Setup 4 2 Service overlay Access to the main menu Confirm change Cancel Access to the parameters of the liquids Rinse Hidd...

Page 29: ...mat to offer 1 or 2 cup sizes Win option counter Set a number of cups before the machine allows to give a free cup of coffee ex 1 free coffee every 10 cups Overflow detection Enable Disable the overfl...

Page 30: ...4 26 31 36 41 46 51 56 61 71 10 18 30 42 54 65 77 89 102 29 35 41 47 53 59 65 71 83 32 39 46 53 60 67 74 81 95 72 76 80 84 88 93 97 101 105 13 15 17 19 21 23 25 15 17 19 21 14 17 19 21 24 26 29 17 19...

Page 31: ...t Blend Water Hot Shot Blend Long Espresso Water Coffee Cafe Latte Coffee 1 by default Coffee by default FACTORY SETTING Regular Coffee Regular Moka Coffee 2 by default Coffee 1 Hot Shot Blend Cafe La...

Page 32: ...ect the amout of cup that you need The unit will brew the amount of cup selected in a row Press Cancel to stop the brewing process You can get up to 9 cup Turn the key OFF to return to the regular mod...

Page 33: ...ng the unit with water For the sanitation process to work effectively the part must be cleaned and free of all visible food soil completely rinsed and preferably air dried Wiping with towels or cloths...

Page 34: ...ly Weekly Monthly Quarterly As needed Waste bin Inspect Clean Canisters Inspect Clean Drip tray Clean Unit Stand Clean Interior Daily Weekly Monthly Quarterly As needed Brewer assembly Sanitize Clean...

Page 35: ...se cabinet After removing all food soils thoroughly dry with a clean soft cloth Non food contact Parts to be verified and wiped clean Plastic Top Cap Stand optionnal Metal Cabinet Plastic Door Exterio...

Page 36: ...rned on and off This factory set counter can be adjusted to the waste bin size used See the machine parameters for more instructions on changing the setting How to empty the stand waste bin 1 Open the...

Page 37: ...re cleaning with water Interior Parts to be cleaned Canisters Coffee brewer Coffee funnel Fan Stainless coffee chute 3 Beans hopper plastic chute 5 7 1 Coffee canisters Removing canisters for cleaning...

Page 38: ...00 cycles To ensure a consistent product quality we recommend removing and emptying the canisters on a monthly basis This will ensure that the product does not adhere to the walls of the canister 1 Un...

Page 39: ...ll parts have been replaced correctly Brewer funnel Frequency As needed or weekly If there are coffee grounds accumulated remove the assembly for manual cleaning under hot water 1 Remove the brown wat...

Page 40: ...dient switch to Off SW6 on the main board 4 Select a small regular coffee on the membrane keypad and hit start 5 Once the brew chamber is filled with water turn the brewer OFF via the main switch at t...

Page 41: ...tector 4 Unplug the 2 connectors from the solenoid 5 Remove the stainless chute by unscrewing the 2 screws 6 Clean the stainless chute by rinsing with hot water 7 Make sure it is dry before reinstalli...

Page 42: ...ster Frequency Monthly or every 1 000 cycles 1 Open the door of the machine 2 Remove the plastic top fitting part 3 Remove the plastic top cap 4 Unlock the 3 bean canister 5 Remove the 3 bean canister...

Page 43: ...t them from failing With adequate maintenance you will extend the life of your unit and deliver a consistent high quality beverage The preventive maintenance schedule and instructions below must be fo...

Page 44: ...les For a minimum charge CAFECTION will completely clean and replace all necessary parts such as the cylinder the piston seal and the screen and seal which are all responsible for the vacuum extractio...

Page 45: ...mounting seal c If the coffee valve leaks via the tubing water will accumulate in the brew chamber If it drips all night the first coffee of the morning may cause the chamber to flood since it contain...

Page 46: ...d any problems related with mineral deposits over time we recommend having the water tank assembly delimed to remove all scale in the unit Upon visual inspection you may wish to replace the element pr...

Page 47: ...ercial grade burr grinder that minimizes the temperature increase in the finished product of ground coffee The motor of the grinder has a lifetime warranty The ground coffee particle size is very impo...

Page 48: ...water to cool prior to emptying the tank Make sure you have a 0 8 gallon container suitable for holding hot water 1 Turn off and unplug the brewer 2 Turn off the main water supply to the machine 3 Re...

Page 49: ...down the water level switch s arm with a tie wrap to keep the float from pulling down on the switch during transportation Do not overtighten this may damage the switch this is simply to keep the floa...

Page 50: ...in the water entry Push all the way in It should be a tight fit STEP 4 Reinstall the bowl Make sure the outside of bowl is clean and apply milk label on the bowl STEP 5 Programming the water value On...

Page 51: ...INSTALLATION AND SERVICE MANUAL for AVALON Gourmet 51 www cafection com 800 561 6162 AVALON Gourmet rev 7 2013 04 Annex Annex 2 Full maintenance schedule...

Page 52: ...AVALON Gourmet rev 7 2013 04 www cafection com 800 561 6162 52 INSTALLATION AND SERVICE MANUAL for AVALON Gourmet Annex Annex 3 Monthly maintenance schedule...

Page 53: ...INSTALLATION AND SERVICE MANUAL for AVALON Gourmet 53 www cafection com 800 561 6162 AVALON Gourmet rev 7 2013 04 Annex Annex 4 Weekly maintenance schedule...

Page 54: ...AVALON Gourmet rev 7 2013 04 www cafection com 800 561 6162 54 INSTALLATION AND SERVICE MANUAL for AVALON Gourmet Annex Annex 4 Waste chute position without filtration system...

Page 55: ...INSTALLATION AND SERVICE MANUAL for AVALON Gourmet 55 www cafection com 800 561 6162 AVALON Gourmet rev 7 2013 04 Annex Annex 5 Waste chute position with filtration system...

Reviews: