background image

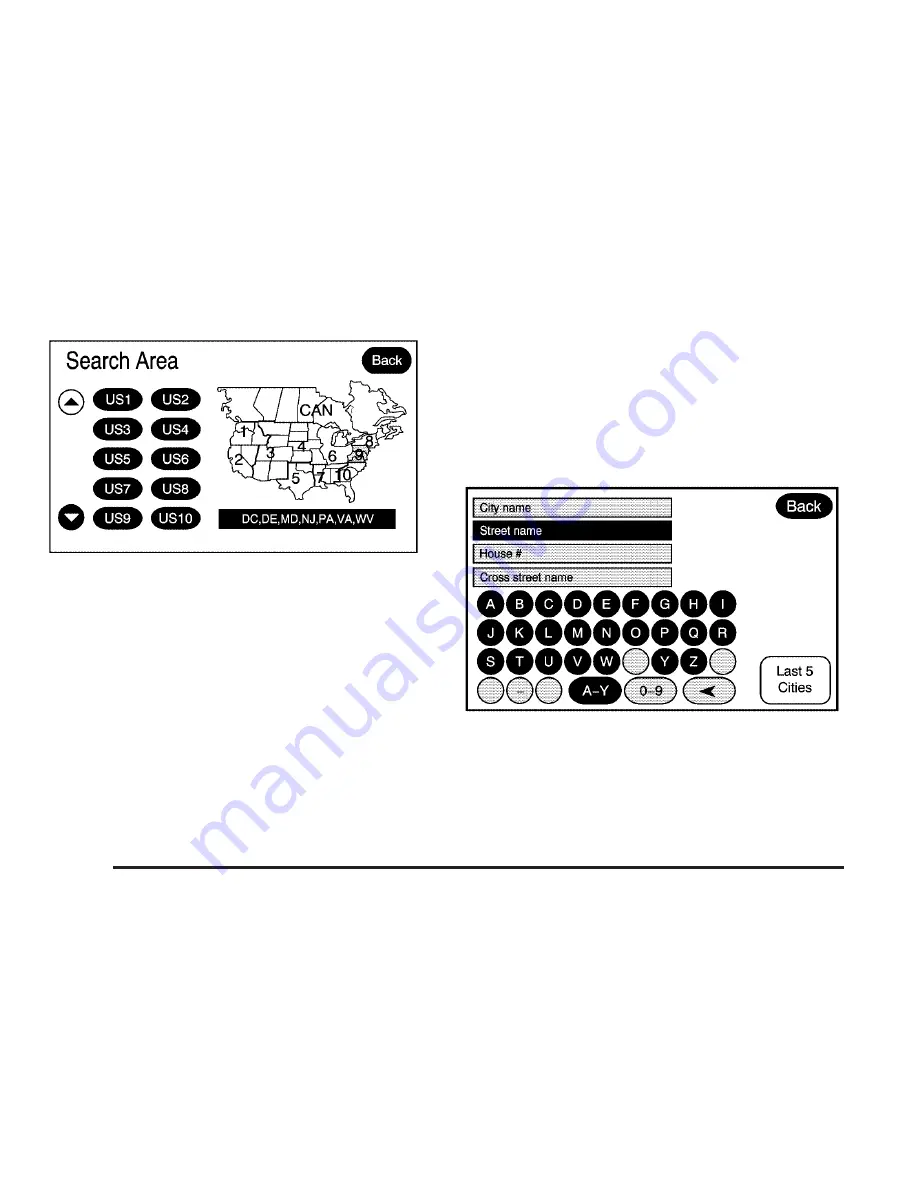
Touch the Change Search Area screen button to view the
Search Area screen. Touch the numbered screen button
to the left of the search area map that corresponds with
the numbered region and to view a list of states included
in the region selected. The selected area will be
highlighted on the map. Touch the down arrow to select
CAN (Canada). Touch the back screen button to return to
the Destination Entry screen and to store the selected
region.

To enter a destination, choose from one of the following
destination entry methods:

Address Entry

C

Address Entry: The address entry destination

method allows you to input an address by providing the
system with a city name or a street name.

To enter a destination by inputting the city name first,
do the following:

1. Touch the City name button.

2. Input the City Name using the keyboard or touch

the Last 5 Cities screen button.

2-12

Summary of Contents for 2006 DTS

Page 1: ...Overview 1 2 Features and Controls 2 1 Features and Controls 2 2 Navigation Audio System 3 1 Navigation Audio System 3 2 Voice Recognition 4 1 Voice Recognition 4 2 Index 1 2006 Cadillac DTS Navigati...

Page 2: ...s in the product after that time without notice For vehicles first sold in Canada substitute the name General Motors of Canada Limited for Cadillac Motor Car Division whenever it appears in this manua...

Page 3: ...Overview 1 2 Navigation System Overview 1 2 Getting Started 1 4 Cleaning the Video Screen 1 10 Section 1 Overview 1 1...

Page 4: ...Overview Navigation System Overview 1 2...

Page 5: ...ge 2 2 for more information K FAV Favorite Key See Hard Keys under Using the Navigation System on page 2 2 for more information L V Zoom In Touch Screen Button See Map Scales under Maps on page 2 4 fo...

Page 6: ...urself with all of its controls hard keys on the faceplate and touch sensitive screen buttons Familiarize yourself with its operation Set up your audio by presetting your favorite stations setting the...

Page 7: ...the navigation screen frequently or for too long while driving can cause a crash and you or others can be injured or killed Keep your eyes and mind on the road and avoid looking too long or too often...

Page 8: ...To do so reference the following topics Language English Metric To change the language of the navigation screens see Driver Information Center DIC Vehicle Personalization in the Index of your vehicle...

Page 9: ...that contains your final destination The system will return to the Destination Entry menu See Destination on page 2 11 for more information Entering an Address To set a destination by entering a stree...

Page 10: ...uidance mode See Address Entry under Destination on page 2 11 for more information Entering a Point of Interest POI To set a destination by entering a Point of Interest POI do the following 1 Press th...

Page 11: ...ation The address book screen will appear 5 Select the Name screen button An alpha keyboard will display Input the name 6 Press and hold one of the screen buttons at the bottom of the screen until a p...

Page 12: ...anceled once you arrive at your final destination To cancel guidance prior to arrival at the final destination do the following 1 Press the DEST hard key 2 Press the Cancel Guidance screen button Guid...

Page 13: ...mbols 2 6 Destination 2 11 Configure Menu 2 26 Global Positioning System GPS 2 32 Vehicle Positioning 2 33 Problems with Route Guidance 2 34 If the System Needs Service 2 35 Ordering Map DVDs 2 35 Dat...

Page 14: ...ion Z CD DVD Eject Press the eject button to eject CDs or DVDs See CD DVD Player on page 3 11 for more information NAV Navigation Press this key to view your vehicle s current position on the map scre...

Page 15: ...s button may toggle to A Y 0 9 Numbers Select this screen button to select numbers 9 Space Select the space screen button to enter a space between characters or the words of a name q Backspace Select...

Page 16: ...is delivered from the factory Installing the Map DVD When your vehicle is delivered from the factory the dealer may have installed the map DVD If the map DVD was not installed use the following direct...

Page 17: ...river Information Center DIC Controls and Displays in the Index of your vehicle s owner manual Scrolling the Map Touch anywhere on the map screen and the scroll symbol will appear Use this feature to...

Page 18: ...n as this symbol It indicates the current position and heading direction of your vehicle on the map The destination symbol will appear on the map after a route has been planned marking your final dest...

Page 19: ...symbol indicates the map with North Up known as North Up mode While in North Up mode the vehicle icon will follow the north direction on the map regardless of which direction the vehicle is traveling...

Page 20: ...I icons from the map Displaying POI icons on the map let you know where POIs are located This screen will appear after selecting the POI screen button Select one of the POI categories to display or to...

Page 21: ...POI to the address book See Nav under Configure Menu on page 2 26 for information on editing address book entries Go Press this screen button to make this POI a destination or a waypoint Map Press th...

Page 22: ...ore the point in the address book See Address Book under Destination on page 2 11 for more information Driving on a Route When a destination has been routed and you are driving on route the map screen...

Page 23: ...our destination and route settings See Destination on page 2 10 For example if you were traveling from Michigan to Florida change the region currently selected in the search area to Florida Enter a de...

Page 24: ...da Touch the back screen button to return to the Destination Entry screen and to store the selected region To enter a destination choose from one of the following destination entry methods Address Ent...

Page 25: ...rect prefix Dr Ln St etc from the list 6 The numeric keyboard will display allowing you to enter the house number The system will list the house number range that is available for the street 7 Select...

Page 26: ...ormation To enter a destination by inputting a cross street do the following 1 Select the Street screen button from the address menu and start inputting the street name using the alpha keyboard A list...

Page 27: ...the alpha keyboard or select a category from the category list To use the point of interest destination entry method by inputting the name do the following 1 Use the alpha keyboard to enter the POI na...

Page 28: ...e list of available POIs 4 Select the Go screen button next to the POI The map screen will display 5 Select the route preference Fastest Shortest or Other The system will calculate the route and the r...

Page 29: ...rted on Your Route later in this section for more information Address Book The address book entry method allows you to select a destination by selecting an address that has been stored in your address...

Page 30: ...nd the area that you would like to select as your destination Pressing holding and dragging on the map will activate fast scrolling 3 Press touch once on the area that you would like to set as your de...

Page 31: ...the latitude coordinate 4 Input the numeric portion of the latitude coordinate using the keyboard 5 Touch E east or W west next to Long longitude to enter the direction of the longitude coordinate 6 I...

Page 32: ...Select the desired preset destination from the Destination Entry screen The screen buttons are labeled with the name that was selected for the destination when it was stored 2 Select the route prefer...

Page 33: ...acent street name to avoid the maneuver The map screen will display Select the Fastest Shortest or Other screen buttons Press the Start Guidance screen button The route will re calculate without the s...

Page 34: ...ination This button will toggle between slow and fast speed u Fast Forward Skip Select this screen button to go to the next waypoint or to the final destination Detour Detour Select this screen button...

Page 35: ...Destination previously for more information 4 Select the route preference Fastest Shortest or Other The system will calculate the route and the route will be highlighted 5 Select the Start Guidance s...

Page 36: ...n hold Resume Guidance Press this screen button from the Route screen to resume guidance on the current route Cancel Guidance Press this screen button from the Route screen to cancel the current route...

Page 37: ...nd hold one of the buttons at the bottom of the screen until a pop up confirmation displays The name will appear in that preset destination screen button and is now available to select from the Destin...

Page 38: ...P Digital Signal Processing adjustments See Navigation Audio System on page 3 2 for more information Radio Press the MENU key to enter the Menu options then press the MENU key repeatedly until Radio i...

Page 39: ...eference Touch the Route Preference screen button to change route options when the system calculates a route Allow highway This feature allows the system to use major roads when calculating a planned...

Page 40: ...Select the Edit View Address Book screen button 4 Select the address book entry to change 5 Touch the Phone screen button and use the numeric keyboard to input or change the phone number 6 Touch the O...

Page 41: ...hard key 2 Select the NAV screen button 3 Select the Edit View Address Book screen button 4 Select the address book entry to delete 5 Press and hold the Delete screen button until the delete all addr...

Page 42: ...d touch the OK screen button to proceed to the navigation system See Getting Started on page 1 4 for more information Coverage Touch this screen button to view the areas covered by the map DVD Touch t...

Page 43: ...rast Mode Touch this screen button to change the brightness contrast and mode of the display Brightness Touch the plus or minus screen buttons to increase or decrease the brightness of the screen _ Co...

Page 44: ...your vehicle is not receiving signals from the satellites a symbol will appear on the map screen Refer to Symbols on page 2 6 This system may not be available or interference may occur if the followi...

Page 45: ...ation is set incorrectly The vehicle is traveling at high speed The vehicle changes directions more than once or when the vehicle is turning on a turn table in a parking lot The vehicle is entering an...

Page 46: ...ay take a long time to operate automatic rerouting during high speed driving Automatic rerouting may display a route returning to the set waypoint if you are heading for a destination without passing...

Page 47: ...nd Hawaii and portions of Canada are contained on one DVD disc The map database contains three different levels of coverage detailed areas non detailed areas and limited guidance areas Detailed areas...

Page 48: ...NOTES 2 36...

Page 49: ...Navigation Audio System 3 2 CD DVD Player 3 11 Auxiliary Devices 3 21 Section 3 Navigation Audio System 3 1...

Page 50: ...compatible with your vehicle before installing it See Accessories and Modifications in the Index of your vehicle s owner manual Your vehicle has a feature called Retained Accessory Power RAP With RAP...

Page 51: ...will split between the audio screen and the map screen All changing a station functions can be performed from this screen If you do not want to view a split screen or you are not on a map screen pres...

Page 52: ...s from the category list When listening to XM stations you will be able to select all of the categories when using the right and left arrow screen buttons on the main audio screen The categories when...

Page 53: ...tation or touch the ALL screen button to select the station 5 Press and hold one of the preset screen buttons for more than two seconds or until you hear a beep 6 Repeat the steps for each preset Soun...

Page 54: ...ings for each preset and source To not use an automatic equalization setting press a screen button that will change the treble mid bass balance or fade This will take the system out of the equalizatio...

Page 55: ...screen button to receive no information Number of Preset Pages Touch the Number of Preset Pages screen button to change the number of preset pages 1 through 6 that you will be able to set preset stat...

Page 56: ...n To turn it off touch the OFF screen button again AudioPilot automatically adjusts the volume level of the audio so that it always sounds the same to you The feature is most effective at lower volume...

Page 57: ...act XM at www xmradio com or call 1 800 852 XMXM 9696 When XM is active the channel name and number song title and artist will be displayed on the screen XM Radio Messages Radio Display Message Condit...

Page 58: ...on is available at this time on this channel The system is working properly Not Found No channel available for the chosen category There are no channels available for the selected category The system...

Page 59: ...will pull it in and the CD should begin playing While playing a CD the navigation system is available If you insert a CD with the system off and the ignition on it will start to play When you insert...

Page 60: ...CDs in good condition without any label load one CD at a time and keep the CD player and the loading slot free of foreign materials liquids and debris Do not add any label to a CD it could get caught...

Page 61: ...n tracks press and hold the right arrow until you hear a beep The CD will go to the next track play for 10 seconds then go on to the next track Touch either arrow to stop scanning The CD will mute whi...

Page 62: ...e radio will display ROOT When the CD contains only playlists and compressed audio files but no folders all files will be located under the root folder The left and right arrow buttons will search pla...

Page 63: ...D R the sound quality may be reduced due to CD R quality the method of recording the quality of the music that has been recorded and the way the CD R has been handled There may be an increase in skipp...

Page 64: ...EEK Press the right arrow to go to the next selection on the disc If playing the last track of the disc pressing the right arrow will seek to the first track of the disc Press the left arrow to go to...

Page 65: ...are three ways to play a DVD Once a DVD is inserted the system will automatically start play of the DVD If you are on a map screen touch the DVD screen button Press the AUDIO hard key then touch the D...

Page 66: ...highlighted option Return Touch this button to go back to the last menu Back Touch this button to go back to the main menu Move Touch this button to move the cursor buttons back and forth from the bo...

Page 67: ...uage parental level and aspect Brightness Touch the up or down screen arrows to increase or decrease the brightness of the screen _ Contrast Touch the up or down screen arrows to increase or decrease...

Page 68: ...ected any DVD with a rating above G will not be able to be watched without input of the password When the parental level is first entered a keyboard will appear on the display and a four digit passwor...

Page 69: ...not be available on all DVDs q Page Press this button to go to the previous scene This button is not available when the DVD is stopped Page r Press this button to go to the next scene This button is n...

Page 70: ...NOTES 3 22...

Page 71: ...Voice Recognition 4 2 Section 4 Voice Recognition 4 1...

Page 72: ...ng Commands When a multiple command is available choose the command that best works for you Words that are in brackets are optional For example for the command Radio band select FM stating Radio FM or...

Page 73: ...description of each The commands are listed with the optional words in brackets To use the voice commands refer to the instructions listed previously Voicetag Commands The following are voicetag comm...

Page 74: ...mands you can access by clearly stating the commands exactly as they are written The commands are only available when you are in one of the following audio modes AM FM or XM if equipped Radio This com...

Page 75: ...s folder on the MP3 or audio DVD CD help DVD help Disc help This command instructs the system to assist with CD and DVD commands Auxiliary Commands The following auxiliary commands can be accessed by...

Page 76: ...NOTES 4 6...

Page 77: ...ian Owners ii Canceling Guidance 1 10 CD Player 3 11 CD Player 3 11 CD DVD Player 3 11 Cleaning the Video Screen 1 10 D Database Coverage Explanations 2 35 Destination 2 11 Display 2 31 Driving on a R...

Page 78: ...obal Positioning System GPS 2 32 Guidance Volume 1 10 H Hard Keys 2 2 I Installing the Map DVD 2 4 L Language English Metric 1 6 M Map Adjustments 2 5 Map Scales 2 5 Maps 2 4 N Nav Navigation 2 26 Nav...

Page 79: ...adio 2 26 3 2 Radio Data System RDS 3 8 Radio Menu 3 7 Regional Maps 2 4 S Scrolling the Map 2 5 Setting Radio Station Presets 1 6 Setting the Search Area 2 5 Setting the Search Area Entering an Addre...

Page 80: ...Traveling Across Regions 2 11 U Using an MP3 CD 3 13 Using Your Stored Preset Destinations 1 9 V Vehicle Positioning 2 33 Video Screen Cleaning 1 10 Voice Recognition 4 2 Voice Recognition Commands 4...

Reviews: