background image

10.  Tie a knot loop approximately 12” down on the new replacement line. Grasp 

the line and pull it towards the knot loop behind the nozzle.  Untwist the portion 
of webbing between the nozzle and the screwdriver that secures the webbing.  
Check  that  the  screwdriver  is  still  vertical,  and  has  not  rotated  during  line 
replacement.  If so, reorient the screwdriver to its original position.  Also check 
that the black mark is still on the upper portion of webbing.

13.  Extract  the  line  and  untie  the  knot  loop.    A  second  pair  of  hands  will  be 

required to help secure the webbing.  Return the new line into the housing 
slowly,  in  a  controlled  manner,  while  maintaining  a  secure  grip  on  the  line. 
 

14.  Inspect prior to use by extracting all of the line, and returning it once again to 

the housing.  Check for smooth operation and proper line retraction.

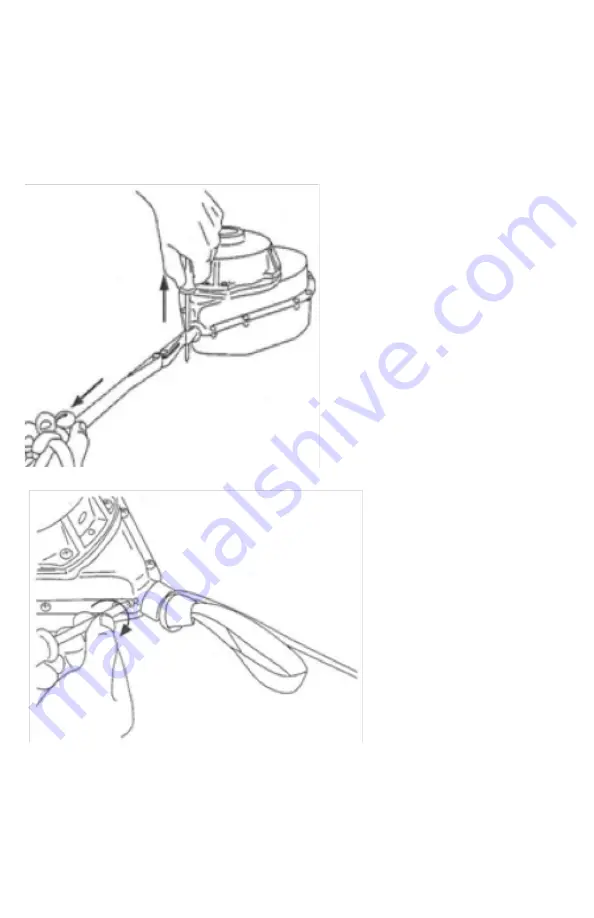
11.  With  the  nozzle  slot  oriented 

vertically, and no twists in the line, 
apply  tension  to  the  nozzle  and 
knot loop while removing the duct 
tape and screwdriver that secured 
the webbing 

(Figure 11).  Feed the 

line back into the housing until the 
nozzle  and  knot  loop  are  against 
the housing.  Press the nozzle into 
the housing so that the nozzle slot 
remains  vertical,  and  the  nozzle 
screw  hole  is  aligned  with  the 
housing screw hole.  Again make 
certain  that  the  webbing  has  not 
twisted as the nozzle is installed. 
 

12.  Install  the  sheet  metal  screw 

through  the  housing  screw  hole 
and  into  the  nozzle  screw  hole 
(Figure 12).    Tighten  the  screw 
until snug.  Avoid over-tightening, 
as you may strip the threads of the 
nozzle.

Figure 11

Figure 12

10.

11.

12.

13.

14.

Summary of Contents for Perfect Descent

Page 1: ...g System are responsible for the safety and supervision of climbers using this equipment C3 Manufacturing requires all operators to be trained before using this product These instructions must be prov...

Page 2: ...laced twice annually or after 5 000 climb lower cycles whichever comes first The enclosed kit may also be used to replace the carabiner if upon inspection it does not function properly is damaged or w...

Page 3: ...action or have someone hold the Perfect Descent handle while the line is being extracted 2 Remove the Phillips head screw located near the line nozzle Figure 2 3 Note the vertical orientation of the w...

Page 4: ...placement Release the webbing making certain that the line is adequately secured and that the screwdriver will not slip loose or rotate Place some duct tape across the screwdriver and housing nose to...

Page 5: ...nch secure the new replacement line to the blue webbing by running the bolt through the hole in the blue webbing and into the threaded dowel pin Figure 9 9 While tightening the bolt ensure that the tw...

Page 6: ...ct prior to use by extracting all of the line and returning it once again to the housing Check for smooth operation and proper line retraction 11 With the nozzle slot oriented vertically and no twists...

Page 7: ...e line dragging on the housing impeding retraction If you suspect that the line has become twisted during the replacement process remove the Perfect Descent from use until the unit can be returned to...

Page 8: ...further information 3809 Norwood Drive Unit 4 Littleton CO 80125 Phone 303 953 0874 Fax 303 862 8442 Info PerfectDescent com www PerfectDescent com Perfect Descent Climbing Systems is a division of C3...

Reviews: