background image

3

pulling it up

 (see Fig. 4)

. Avoid over-turning or forcing the diopter mechanism. If you are unable to bring the object 

into focus for your right eye by adjusting the diopter ring, make sure the left side is still in focus (repeat steps #2-4 if 

necessary). The diopter adjustment essentially provides “fine focus” on one side of the binocular (right only) to allow 

for slight differences in the vision of your left and right eyes.

6.  Your binocular should now be adjusted for your eyes. Focusing for any distance can now be done simply by turning 

the center focus knob. Make a note of your diopter setting (position of plus and minus marks on diopter ring relative 

to index mark on binocular below the ring) for future reference in case the ring is moved accidentally or by another 

person using your binocular. The diopter ring can be pushed down to lock it in place on the 10x42 model.

NECKSTRAP ATTACHMENT

To attach the neckstrap, thread the ends of the neckstrap through the strap lug 

(Fig. 5)

 on each side of the binocular, then back through the plastic buckle on 

the strap 

(Fig. 6)

. Adjust the position of the binoculars on your chest as they hang 

around your neck to your preference, by changing the length of the strap section 

which passes through the strap channel and buckle by an equal amount on each 

side. If you prefer to use an aftermarket strap that has metal O-rings, attach them 

to a plastic zip tie placed on the strap lugs rather than installing them directly on 

the lug, to avoid damaging the finish on the binocular via contact with the rings.

TRIPOD MOUNTING (10x36 and 10x42 models only)

To attach the binocular to a tripod or monopod, unscrew or pull off the cap which covers the 

threaded socket at the far end of the center hinge 

(Fig. 7)

, and set it aside in a safe place. Use 

a compatible binocular tripod adapter accessory (90

o

 angle bracket), such as the Bushnell 

#161002CM, to attach your 10x36 or 10x42 Nitro binocular to any standard tripod in a 

horizontal position to provide a stable image during prolonged viewing. 

WATERPROOF / FOGPROOF

Getting caught in a heavy downpour of rain, or accidentally splashing your Nitro binocular during a boating excursion 

won’t be a problem. The binocular is manufactured and tested to withstand water exposure up to IPX7 standards. Fogproof 

protection is achieved from dry nitrogen purging that removes all internal air, which can retain moisture.
All exterior lens surfaces have our new EXO Barrier™ coating (in addition to full multi-coating). EXO Barrier, quite simply, 

is the best protective lens coating technology Bushnell has ever developed. Added at the end of the coating process, 

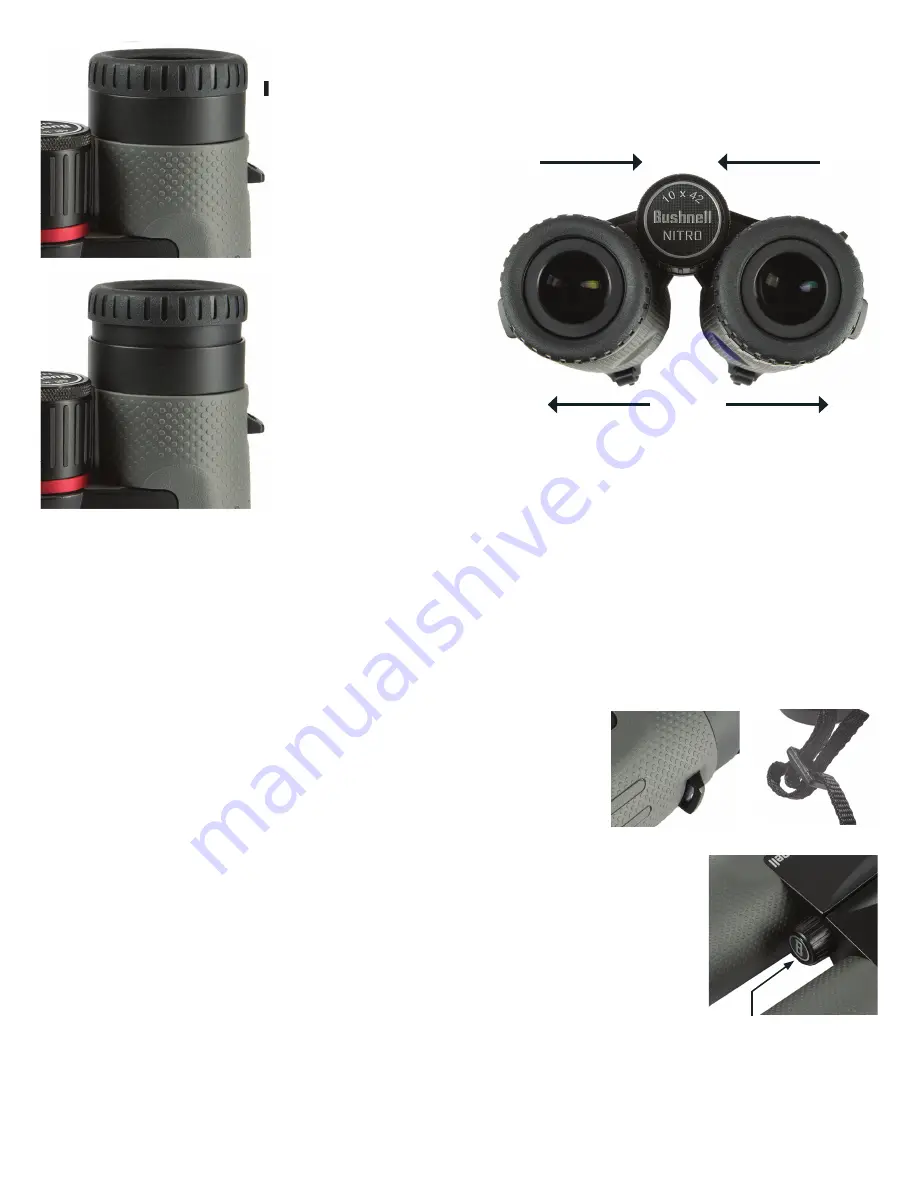
Fig. 2  Eyecup in “Up” Position 

(for use without eyeglasses)

Fig. 1  Eyecup in “Down” Position 

(for use with eyeglasses)

Fig. 3  

Interpupillary 

Distance Adjustment

Wide IPD

Narrow IPD

Fig. 7  Tripod Socket Cap

Fig. 5  Strap Lug 

Fig. 6  Strap  & Buckle

Summary of Contents for Nitro BN1025G

Page 1: ...Model BN1025G BN1036G BN1042G 5 18 BINOCULAR OWNER S GUIDE NITRO...

Page 2: ...through them as you normally would Don t worry about focus yet 2 Grasp each side of the binocular firmly Move the left and right sides closer together or farther apart Fig 3 next page until you see a...

Page 3: ...termarket strap that has metal O rings attach them to a plastic zip tie placed on the strap lugs rather than installing them directly on the lug to avoid damaging the finish on the binocular via conta...

Page 4: ...re it is securely fastened to the binocular before placing it around your neck 4 Store your binocular in a cool dry place whenever possible CLEANING 1 First blow or brush away any dust or debris on th...

Page 5: ...atteries cosmetic damage damage caused by failing to properly maintain the product loss theft damage as a result of unauthorized repair modification or disassembly intentional damage misuse or abuse a...

Page 6: ...il 1 Orientez les jumelles vers un mur blanc ou une partie blanche dans le ciel Tenez les jumelles et regardez travers comme vous le feriez normalement Ne vous pr occupez pas encore de la mise au poin...

Page 7: ...re faites passer les extr mit s de celle ci dans les attaches pr vues cet effet Fig 5 de chaque c t des jumelles puis de nouveau dans la boucle en plastique de la bandouli re Fig 6 Ajustez la position...

Page 8: ...ropri tout instrument optique de pointe vous pourrez profiter de vos jumelles Bushnell Nitro pendant de longues ann es 2 vitez les chocs violents Posez d licatement vos jumelles sur les surfaces dures...

Page 9: ...atteries d g tsesth tiques dommagescaus sparund fautd entretiendu produit perte vol dommages r sultant d une r paration d une modification ou d un d montage non autoris dommages utilisation mauvaise e...

Page 10: ...r todav a 2 Sujete firmemente cada lado de los prism ticos Acerque o separe los lados derecho e izquierdo fig 3 siguiente p gina hasta que vea una sola imagen sin reas sombreadas AJUSTE DE FOCO Y DIOP...

Page 11: ...dad en cada lado Si prefiere usar una correa de posventa con anillos met licos eng nchelos en una cremallera de pl stico que hay en las leng etas en vez de instalarlas directamente en ella para evitar...

Page 12: ...s 3 Tire de la correa despu s de colocarla para asegurarse de que est bien encajada en los prism ticos antes de pon rsela en el cuello 4 Guarde sus prism ticos en un lugar seco y fresco siempre que se...

Page 13: ...as da o est tico da o causado por no mantener adecuadamente el producto p rdida robo da os como resultado de una reparaci n modificaci n o desensamblaje no autorizado da o intencional mal uso o abuso...

Page 14: ...glas an Ihre IPD oder Ihren Auge zu Auge Abstand an 1 Richten Sie es auf eine wei e Wand oder einen freien Bereich des Himmels Halten Sie das Fernglas und schauen Sie ganz normal hindurch K mmern Sie...

Page 15: ...Fixierung nach unten gedr ckt werden BEFESTIGUNG DES TRAGERIEMENS Um den Trageriemen zu befestigen f deln Sie dessen Enden durch die Riemen sen Abb 5 auf jeder Seite des Fernglases und dann zur ck dur...

Page 16: ...shnell Nitro Fernglas wird Ihnen Jahre lang problemlos gute Dienste leisten wenn es die normale Pflege bekommt welches Sie jedem feinen optischen Ger t zukommen lassen w rden 2 Vermeiden Sie harte St...

Page 17: ...ht ordnungsgem e Wartung entstandene Sch den Verlust Diebstahl Sch den durch unbefugte Reparatur nderung oder Demontage vors tzliche Besch digung missbr uchliche oder unsachgem e Verwendung und gew hn...

Page 18: ...si farebbe normalmente Non preoccuparsi ancora della messa a fuoco 2 Afferrare saldamente il binocolo dai lati Avvicinare i lati destro e sinistro o allontanarli Fig 3 pagina successiva fino a quando...

Page 19: ...nghia che passa attraverso la guida e la fibbia di una misura uguale su entrambi i lati Se si preferisce utilizzare una tracolla non originale dotata di anelli in metallo fissarli a una fascetta di pl...

Page 20: ...2 Evitare il contatto con oggetti affilati Sulle superfici dure appoggiare il binocolo delicatamente 3 Tirare la tracolla dopo averla allacciata e assicurarsi che sia fissata saldamente al binocolo p...

Page 21: ...batterie danni estetici danni causati dalla mancata corretta manutenzione del prodotto perdita furto danni dovuti a riparazione modifica o smontaggio non autorizzati danni intenzionali uso improprio...

Page 22: ...2018 Bushnell Outdoor Products Bushnell denote trademarks of Bushnell Outdoor Products www bushnell com 9200 Cody Overland Park KS 66214...

Reviews: