background image

23

using your oniX350 gPs receiVer : name & icon editing

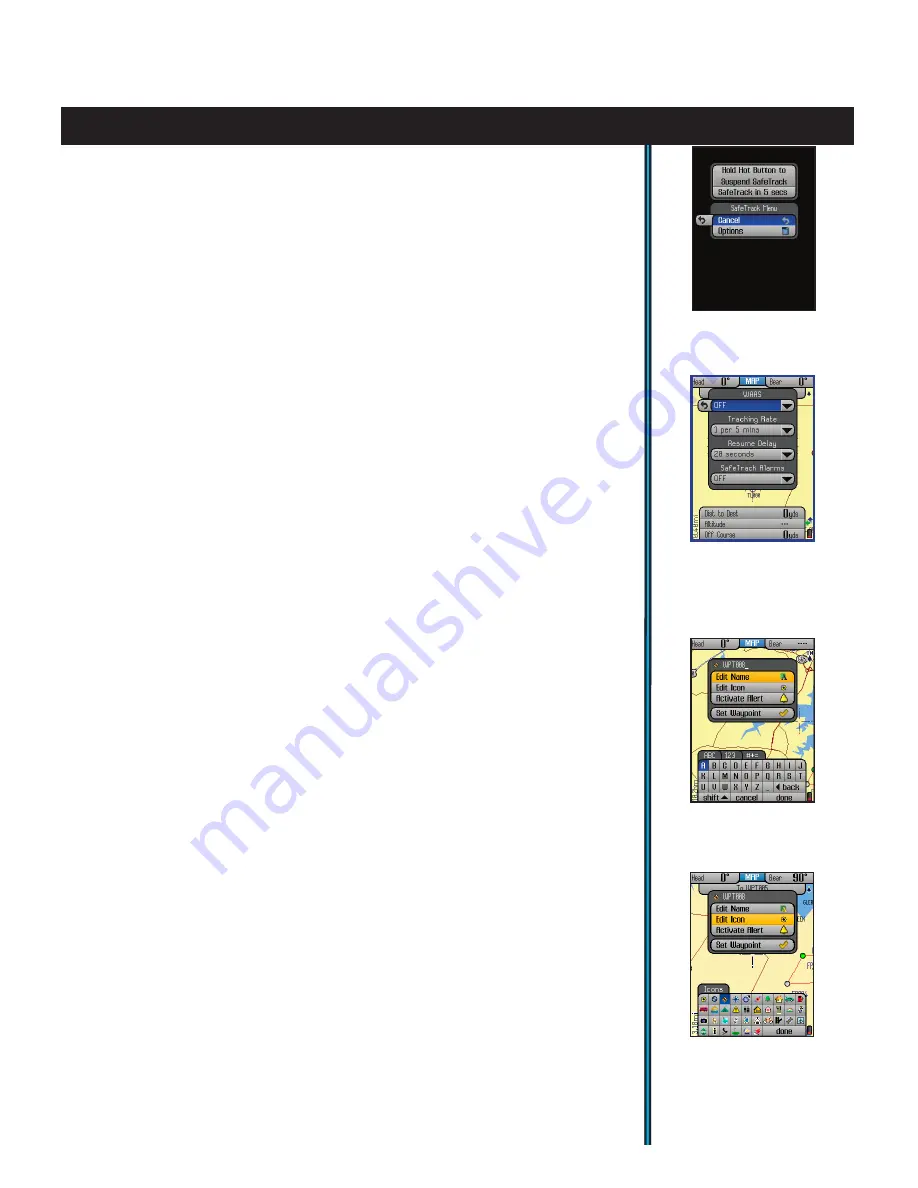
You will see the SafeTrack screen (

Fig

43

), with a count down delay (time can 

be adjusted in the Set Page Menu) before the unit enters SafeTrack mode. If you 

accidentally hold the HOT button down, select “Cancel” and press OK. If you 

do not cancel, at the end of the countdown, the unit will be in SafeTrack mode. 

The display will black out. The ONIX will automatically make GPS satellite 

contact every 5 minutes (default, can be changed in SafeTrack Options menu), 

which extends battery life significantly while still allowing you to instantly get a 

fix on your location and resume navigation when you exit SafeTrack mode. 

As long as you are actively using the GPS and pressing buttons (within time 

limit set in SafeTrack options (

Fig

44

), the screen display will stay active-but 

the unit is still in SafeTrack mode.

After a period of inactivity (length of time selectable in SafeTrack options menu), 

the Start SafeTrack screen (

Fig

43

) will appear. 

If you do not want to return to SafeTrack, press OK or LEFT with “Cancel” 

selected.

How to Create/Edit Names for Waypoints, Trails, Map Areas, etc.

(Using the Type Tool)

With  “Edit  Name”  selected,  click  OK  to  bring  up  the Type Tool,  a  “virtual 

keyboard” (

Fig

45

). This is a multi-function tool that is controlled by the 5-way 

button. Your currently selected character is highlighted. Move LEFT/RIGHT 

or UP/DOWN to select letters, then press OK to enter your selected character-

you’ll  see  it  appear  in  the  name  near  the  top  of  the  display.  Use  the  LEFT/

RIGHT keys to move around in a row (it “wraps around” when you go past 

the 1st or last character in a row), and use UP/DOWN to move through the 

columns.  The Text Tool  automatically  switches  to  lower  case  after  starting  a 

word with upper case, but you may use “SHIFT”(select, press OK) to change it 

anytime. Use “back” to backspace if you make a mistake, or to delete the default 

“WPT 000” assigned to a new waypoint before starting to “type” your preferred 

name for it. To switch from letter characters to numbers or symbols, press the 

“+” or “-“ buttons (you will see the tabs at the top of the Text Tool change). 

Once you are finished creating or editing the name for your waypoint, trail, etc, 

be sure to select “done” and press OK to actually confirm and enter the name in 

the memory of the ONIX350.  

How to Set or Edit Icons 

With “Edit Icon” selected, click OK and the display will show a menu of icons 

(

Fig

46

), or common symbols, that you may choose to represent your waypoint 

on the map. If you have previously set up a user profile for a particular type 

of activity (for example, camping), the group of icons that appears in the icon 

selection menu will be the ones most relevant to that activity. Simply use the 

LEFT/RIGHT and UP/DOWN keys to move around the available icons, press 

OK  to  select  one  (you  will  see  it  appear  next  to  the  name  at  the  top  of  the 

display), then select “done” and press OK again to confirm and enter the icon, 

so it appears on the map along with the name. 

Fig 43. 

SafeTrack 

Screen

Fig 44.


SafeTrack 

Options

(select “Options” 

from SafeTrack 

Screen)

Fig 46.

 Waypoint

 “Edit Icon”

Fig 45.

 Type Tool-

Editing a 

Waypoint Name

Summary of Contents for 363500

Page 1: ...GPS RECEIVER Quick Start Guide Model 363500 Lit 98 1246 08 08 English ...

Page 2: ...ors Do not use this product while driving An accident can result in property damage injury or death if the operator fails to practice prudent driving practices It is the sole responsibility of the driver of any vehicle to operate the motor vehicle in a safe manner Information from the GPS unit can distract the operator of a motor vehicle It is unsafe to operate the controls of the GPS unit while o...

Page 3: ...ons affecting wildlife behavior have been integrated in a mathematical algorithm to determine optimal animal and fish activity times The factors and relationships used in the instrument were obtained through an extensive study of the scientific literature and use of well documented wildlife behavior studies This information combined with discussions with wildlife biologists and experienced outdoor...

Page 4: ...ad the instructions contained in this manual and take time to familiarize yourself with the unit s operation and many great features You may want to start near your home by turning on the ONIX then pressing the MENU button to run through the different display pages MAP NAV SAT SET etc while reading the manual section for each After that practice using the HOT button and 5 way button to see and sel...

Page 5: ... opens and checks the battery compartment following any submersion or prolonged exposure to rain snow etc Any moisture observed inside the battery compartment or on the exterior of the battery pack or MicroSD card should be dried off immediately and completely Prolonged submersion over 30 minutes and or to water depths greater than 1 meter can cause damage to the unit If the ONIX exterior becomes ...

Page 6: ...ontrols all actions Navigation SafeTrack USB Port connect to PC with supplied cable Accessory Port used for AC charging cord Battery Pack Module houses Lith Ion battery pack Also covers MicroSD card slot Status LED Red charging Green battery charging complete Blinking Red during use SafeTrack mode controls and ports identification Zoom Buttons Zoom the view closer in or further out on maps and pho...

Page 7: ...the level of mammal and fish activity 4 ELEVATION your current altitude as well as a graph of changes in altitude over time as you travel on a trail 5 MAP you will likely spend the most time on the MAP page since it shows your current location relative to other objects and places You can layer a compass photos and other navigation related items alone or in combinations over the top of the base map...

Page 8: ...ight in low light or dark conditions or when indoors Brightness Select and press OK to use the Brightness slider Fig B Increasing brightness increases power consumption Select a brightness level based on your viewing requirements GPS Turn GPS Off when not using the GPS navigation functions or when indoors where GPS signals are not accessible 2 SafeTrack Battery Conservation Mode SafeTrack Mode cre...

Page 9: ...ee multiple icons on the circular radar screen representing the closest satellites to you in the global GPS system These icons will turn green as the ONIX locks on to each satellite and the satellite ID will be shown The bar graph below the radar screen indicates the relative signal strength of each satellite Once you have a lock on at least 3 or 4 satellites you are ready to navigate Note that th...

Page 10: ...e You will likely spend more time on the MAP page than any of the others while using the ONIX350 Using Bushnell s exclusive TruView Navigation screen layering feature this page can display multiple location and navigation related information in a single view The following items are always displayed on this page Base Map Fig 2 primary streets and location similar to a basic road map Cursor shows yo...

Page 11: ...that while both types of images can be stored at the same time on your ONIX only one of them photo or topo map can be displayed over the base map at a time Topo the topographic map you choose from files you download and store in the ONIX will be layered over the base map North UP when checked the top of the screen is oriented due north If unchecked the top of the screen is oriented to your current...

Page 12: ...them as selecting No Information will actually clear and remove that Info Box slot from the lower set of boxes You can reduce the stack of three boxes you start with to just two one or even zero You can also press DOWN to step below the third box where you will find that a fourth box is hidden because No Information is selected for display there Simply select something else and you can have up to ...

Page 13: ...e or Magnetic North but not both together they are mutually exclusive Bearing Arrow Fig 10 only appears during active navigation see pg 10 Fig 3 This will be seen as a long black line with an arrow head It indicates where you should go to get to your navigation destination and is only valid while navigating Upper and Lower Info Boxes are visible while on the NAV Page these operate the same way as ...

Page 14: ... ONIX Compass options to select your preferred navigation units Degrees Cardinal Letter or Mils and North Reference True or Magnetic Display allows adjustment of display Brightness and Breadcrumbs Color Sounds options to mute all sounds set volume and mute or select different tones for key beep destination arrival and warning sound Time sets time format 24 hr or AM PM North American time zone UTC ...

Page 15: ...ry drain No HOT button menu is available for the Weather page The ALMANAC Page The Almanac page Fig 16 primarily is used to view the information stored in internal Solunar Edge data tables which includes times for sunrise sunset and times when the moon s position is overhead or underfoot along with a graphic showing the current moon phase This solunar chart data can be displayed for your current p...

Page 16: ...f time Note The green area that will appear shows the correction to the activity graph based on SoLunar EdgeTechnology This technology incorporates local pressure and temperature variations that affect animal fish behavior during that part of the day A red line indicates the selected day One Month mode or current time One Day mode For more information on patented Solunar Edge technology and Speedt...

Page 17: ...changes in barometric pressure press OK to use the onscreen keyboard to manually enter the true altitude for your position Calibrating Altitude is a recommended step to ensure the best possible accuracy of all data shown on the Elevation page After one or both Markers have been set you can freely modify them First press the UP or DOWN key to highlight the Marker dot labeled with A or B on the elev...

Page 18: ...t any time in the future Press the HOT button then to view the My Stuff menu Select My Waypoints press OK then select the previously set waypoint you want to work with from the list Press OK and you will see the Waypoint Options menu Fig 27 Along with the same options you saw when you originally created the waypoint Edit Name Edit Icon Fig 28 Activate Alert you can navigate to the waypoint or dele...

Page 19: ...e the same Fence Post as the starting point of a new adjacent Map Area Delete erase the Fence Post Keep using Insert After to add Fence Posts until you have placed at least three or four to define the boundaries of the Map Area you are creating Press EXIT or the LEFT key to see the Map Areas List with your new Map Area added With the name of the Map Area selected press the RIGHT key to view the Ar...

Page 20: ...on and pressing OK the title of the destination will show in a yellow box at the top of the screen and the bearing arrow will point in the correct direction to take you to it To stop this navigation activity press the HOT button again you will see the option to stop Press OK to confirm you want to stop navigating and you will be returned back to the MAP page screen but without the bearing arrow po...

Page 21: ... either press OK and move the cursor to any point on the map or press the RIGHT key and chose an existing location from the To From list Fig 35 Once a location has been selected press OK and choose Measure To Fig 36 This will create a fence post at that location The info boxes will show the distance from your current location to that point fence post Fig 37 To measure the distance between any two ...

Page 22: ...l has been started select this when you reach the end of a new trail saving it in memory for later recall You will have the option of naming the trail so it is easy to find in your My Trails list Note this option will only be seen if you are already actively navigating a trail you started My Routes same 5 options as listed above for My Trails a Route is the most direct or shortest path between two...

Page 23: ...appear in the name near the top of the display Use the LEFT RIGHT keys to move around in a row it wraps around when you go past the 1st or last character in a row and use UP DOWN to move through the columns The Text Tool automatically switches to lower case after starting a word with upper case but you may use SHIFT select press OK to change it anytime Use back to backspace if you make a mistake o...

Page 24: ...olders on our safe and secure server so that you can access them at any time After you complete an outdoor excursion BushnellGPS com also enables you to upload all of your trip s navigation information into your account folders to review and analyze and save for the next return trip BushnellGPS com also provides detailed GPS product features and specifications Software Update Downloads Troubleshoo...

Page 25: ...nd in the Unit Info on SET page Downloaded photos or maps are not found or cannot be used 1 USB cable was disconnected or power was shut off before download was completed 2 Unit was used immediately after download without restarting power off then on again 1 When downloading information from the PC program or Web please wait until the download has been completed Disconnecting the unit prior to com...

Page 26: ...sion reception which can be determined by turning the equipment off and on the user is encouraged to try to correct the interference by one or more of the following measures Reorient or relocate the receiving antenna Increase the separation between the equipment and receiver Connect the equipment into an outlet on a circuit different from that to which the receiver is connected Consult the dealer ...

Page 27: ... 00 to the address listed below IN U S A Send To IN CANADA Send To Bushnell Outdoor Products Bushnell Outdoor Products Attn Repairs Attn Repairs 8500 Marshall Drive 25A East Pearce Street Unit 1 Lenexa Kansas 66214 Richmond Hill Ontario L4B 2M9 For products purchased outside the United States or Canada please contact your local dealer for applicable warranty information In Europe you may also cont...

Page 28: ...2008 Bushnell Outdoor Products For further questions or additional information please contact Bushnell Outdoor Products 9200 Cody Overland Park Kansas 66214 Customer Service 800 423 3537 www bushnell com ...

Reviews: