Bush LE-58GCL-B Installation & Operating Instructions Manual Download Page 21

19

For any help concerning set up and use of your TV please call the 

Customer Helpline: 0345 604 0105

How to use your TV

USING THE TIME  SHIFT 
FUNCTION

Digital (DTV) channels only

This function lets you quickly record the 
TV programme you are watching if you 
have to leave the room.

IMPORTANT: 

You must have a USB 

storage device attached to your TV to 
use the Time Shift function.

IMPORTANT:

 If the transfer rate of the 

attached USB storage device is too slow 
for the Time Shift function, a warning 
statement will be shown on the TV's 
screen. If this happens, please upgrade 
your USB storage device.

IMPORTANT:

 Time Shift mode may not 

work if the stations signal strength is 
too weak.

NOTE:

 Always stop the Time Shift 

function by pressing the 

 button 

before switching to another input 
source.

Using the Time Shift function

1.

  To start Time Shift, press the 

TIMESHIFT

 button on the remote 

control to pause the programme you 
are watching. The Time Shift symbol   
will be displayed in the top left of 
the TV screen showing that Time 
Shift is working.

2.

  When you wish to resume watching 

the programme, press the 

X

II


button on the remote control to 
show the PVR Time Shift progress 
bar.

3.

 Use 

the 

WX

 buttons to select 

the  button on the progress bar 
then press the 

OK

 button to start 

watching the programme. 

X

 will be 

displayed in the top left of the TV 
screen showing you are watching a 
programme in Time Shift.

4.

 Press 

the 

 button to stop the Time 

Shift recording and return to the live 
TV broadcast.

Alternatively:

 You can press the 

 (

red 

dot

) button on the remote control to 

display the PVR Time Shift progress bar 
and then use the 

WX

 buttons to select 

X

II

 on the bar then press the 

OK

 button 

to start playback.

Note: 

There may be a slight delay with 

the video and the sound may be slightly 
out of sync for a few seconds when you 
start watching the recorded programme. 
This will soon stop and the programme 
will play correctly.

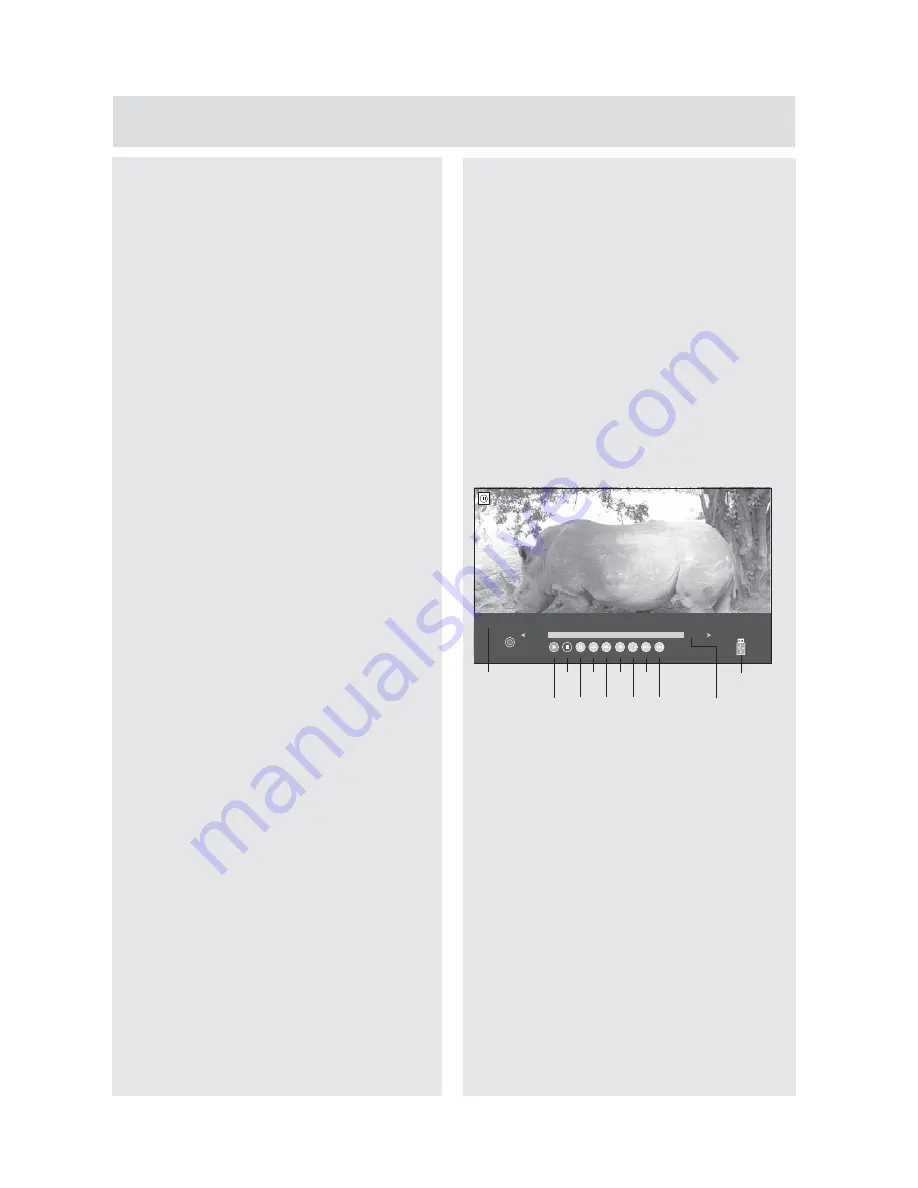
The Time Shift progress bar

Use the 

WX

 buttons to navigate 

through the progress bar. Once you 
have selected the feature you wish to 
use press the 

OK

 button.

1.

  Shows the channel and name of the 

recorded programme.

2.


PLAY:

 Select to play your recording.

3.


STOP:

 Select to stop play back.

4.


PAUSE:

 Select to pause the 

recording.

5.


FB:

 Select to rewind your recording 

at x2 / x4 / x8 / x16 / x32 speed.

6.


FF:

 Select to fast forward the 

recording at x2 / x4 / x8 / x16 / x32 
speed.

12

1

2

3

4

5

6

7

8

9

10

11

Wildlife on One

CH 1 BBC ONE Yorks

00:00

Play

Stop

Pause

FB

FF

Slow TimePlay Backward Forward

00:00

00:14

Used space: 4%

Recorder

Summary of Contents for LE-58GCL-B

Page 1: ...evision and ensure safe and correct installation and operation For any help concerning set up and use of your TV please call the Customer Helpline 0345 604 0105 Lines open 9am 8pm Monday to Saturday a...

Page 2: ...LE 28GBR A HD SY13096 _IM V01 indd 2 2013 5 3 11 25 43...

Page 3: ...HDMI Connections 14 SCART Connections 14 Connections 12 14 First time setup 15 Selecting Input Source 1 Picture Menu 25 Sound Menu 26 27 Channel Menu 27 31 Lock Menu 31 32 6 Viewing Teletext Using Th...

Page 4: ...V do not place any objects on top of the TV Only use the TV in moderate climates 10cm 10cm 10cm Power cord and plug The power cord plug should be easily accessible In case of storms and lightning when...

Page 5: ...installation of batteries may cause battery leakage and corrosion resulting in damage to the remote control Do not mix old and new batteries or batteries of different types Do not Do not dispose of ba...

Page 6: ...st remote control Any other technical issues you may need assistance with Call us today 0345 604 0105 Local call rates applies Lines open 9am 8pm Monday to Saturday and 10am 4pm Sunday Calls to Argos...

Page 7: ...enu system Scart socket for external devices such as video video games audio set etc Stereo sound system Teletext fastext TOP text Headphone connection Automatic programming system Forward or backward...

Page 8: ...screen can cause eyestrain Soft and indirect lighting is recommended for comfortable viewing Allow enough space between the TV and the wall to permit ventilation Avoid excessively warm locations to pr...

Page 9: ...nrecording function press to record current program DTV mode 15 Startorpauseplayback USB DTV modes TIMESHIFT Press to turn the timeshift function on and off DTV mode 16 Press to skip to the beginning...

Page 10: ...ed Viewing remote control TV LE 28GBR A HD SY13096 _IM V01 indd 8 2013 5 3 11 26 00 24 SIZE Press to enlarge the picture on the TV Teletext DTV AV SCART modes 25 LANG Select the DTV audio language DTV...

Page 11: ...ains power socket Power connection Connect the aerial or cable TV plug to AERIAL INPUT ANT socket located on the back of the TV 3 4 5 6 7 1 2 7 POWER button Turns the TV on when in standby mode or tur...

Page 12: ...batteries should be removed Otherwise the remote control may be damaged caused by battery leakage and corrosion Getting Started Switching the TV On Switch on the POWER ON OFF switch which is located...

Page 13: ...t the next or previous programme Getting Started The remote control is designed to control all the functions of the model you selected Volume Setting Press VOL button to increase the volume Press VOL...

Page 14: ...ed for an HDMI to HDMI connection 7 HDMI Input Connects a device that has an HDMI socket The TV can display High Definition pictures from devices such as a High Definition Satellite Receiver or DVD Pl...

Page 15: ...Player These devices must be connected via the HDMI sockets or Component Socket No sound connection is needed for an HDMI to HDMI connection 11 SCART socket Inputs or outputs for external devices Conn...

Page 16: ...e information refer to your device s own instruction book When connecting switch Source to HDMI See Input Selection section Note HDMI cable is not supplied Most devices support SCART connection You ca...

Page 17: ...to select Country Use the WX buttons on the remote control to select the country you are tuning the TV in 8 Now press the button on the remote control to select Tuning mode Use the WX buttons on the...

Page 18: ...vary depending on the particular broadcast This function can only be used when the information is broadcast by the broadcasting companies The EPG displays the programme details for the next 7 days 1 P...

Page 19: ...hrough the previous 7 days of programmes Note This only works if the broadcaster supports this function YELLOW button Next Press the yellow button to scroll through the next 7 days of programmes Note...

Page 20: ...shown on the TV screen 4 Press the TEXT button again to close the Teletext menu How to select a page of text 1 Find the number of the page you wish to view and enter it in the search panel using the 0...

Page 21: ...ogress bar 3 Use the WX buttons to select the button on the progress bar then press the OK button to start watching the programme X will be displayed in the top left of the TV screen showing you are w...

Page 22: ...s to jump forwards approximately 30s of the recording time Press to stop the Time Shift recording RECORDING DTV PROGRAMMES Digital DTV channels only You can record digital TV programs onto a USB drive...

Page 23: ...30Min PROGRAMME GUIDE 2 6 Houses and Palaces Steeplejack Fred Dibnah tours Britain s engineering marvels Here he visits Hampton Court Palace and oneof the rst homes to have electric lighting Cragside...

Page 24: ...and delete items in the schedule list Press the EXIT button to close the menus Note When the preset time is reached the TV will start recording automatically If the recording starts when the TV is in...

Page 25: ...e movie menu 3 Use the WX buttons to select _MSTPVR OK button to open 4 Use the WX buttons to select the recorded programme you wish to watch Note When y watch after a few seconds a thumbnail movie wi...

Page 26: ...nction you want Choose form NONE ONE ALL RANDOM TimePlay Allows you to select a time to start watching the programme from Enlarge Allows you to enlarge the screen image programme Use the WX buttons to...

Page 27: ...the EXIT button on the remote control to close the PICTURE menu What the sub menus do Picture Mode Choose between Dynamic Standard Mild Personal modes Contrast Adjusts the difference between light an...

Page 28: ...se to adjust the relative volume of the speakers in a multiple speaker system Auto Volume Level Turn on to automatically adjust volume levels e g volume levels in adverts are generally louder than pro...

Page 29: ...ng type using the WX buttons you can choose between DTV ATV DTV Analogue TV AD Volume Use the to set the volume of the audio description Note If you want to change the sound mode repeatedly press S MO...

Page 30: ...etween I DK L M BG 5 Press the T button to select SEARCH then press the X button to search through the different frequencies until you nd the program you want 6 After the search press the T button to...

Page 31: ...buttons then press the FAV button on Signal Information Allows you to view the signal strength of the selected channel TV signals Use the button to select Signal Information from the menu then press t...

Page 32: ...re is no USB storage device tted to the TV a warning message No USB Detected will be show press the EXIT button on the remote control to close the Recorded List menu Scheduled List Use the button to s...

Page 33: ...MENU button on the remote control 2 Press the WX buttons to select the LOCK menu 3 Use the buttons to navigate through the menu and press the OK button to select the item you wish to change 4 The mai...

Page 34: ...t enter the password before the remote control will function Turn key lock on and off by pressing the OK button TIME MENU 1 Press the MENU button on the remote control 2 Press the X button to select t...

Page 35: ...and select the input source using the WX buttons Choose between DTV Analogue TV Radio Data SCART Component YPbPr HDMI 1 HDMI 2 HDMI 3 HDMI4 Composite AV Press the button and select a channel for TV or...

Page 36: ...nfo Press either the X button or the OK button to view all the relevant information concerning your network setup Network test Press either the X button or the OK button to open the submenu Once the m...

Page 37: ...U button to return to the SETTING menu Subtitle Language Subtitle Language is the language certain items are played in depending on availability Press the T button to select the Audio Language Use the...

Page 38: ...d 18 for more information Software Update USB Insert the USB drive with the update on it into one of the USB ports on your TV then turn your TV on by pressing the power button Follow the on screen inf...

Page 39: ...e hard disk If you are using a USB Hub please ensure its mains adapter is connected to the mains supply as the total current consumption may exceed 500mA the maximum the TV can supply The maximum supp...

Page 40: ...the programme Previous Press to watch the previous programme in the playlist Next Press to watch the next programme in the play list Pause Press to pause the programme Stop Press to play back of the...

Page 41: ...the WX buttons to select the different functions available on the function bar press the OK button to select the function List of functions Play Press to play the track Previous Press to skip to prev...

Page 42: ...view the image Previous Press to view the previous photo Next Press to view the next photo Pause Press to pause the photo Stop Press to go back to the menu Rotate Press to rotate clockwise Rotate Pres...

Page 43: ...press the OK button to open the folder When y you want to see and press the OK button You will now be taken automatically to the photo or music browser See the instructions for using the music and ph...

Page 44: ...Energy Consumption Data EEI A On Mode Power Consumption W 120W Standby Mode W 0 5W Maximum Power W 230W Standby Mode After 4 Hours Other Information Digital reception MHEG 5 ENGINE compliant with ISO...

Page 45: ...is marked with the letter L If the power lead is damaged it must be replaced by Plug replacement UK and Ireland only Connect blue lead to N Neutral Connect brown lead to L Live N L 5 This is called t...

Page 46: ...in still picture mode for extended periods No power If your TV has no power please check the power cord plug is connect to the mains power socket No picture 1 No Picture means that your TV is not rec...

Page 47: ...s indicate that equipment with these symbols should not be disposed of as general household waste If you want to dispose of the product or battery please consider the collection systems or facilities...

Page 48: ...PRODUCT GUARANTEE LE 28GBR A HD SY13096 _IM V01 indd 40 2013 5 3 11 26 36...

Page 49: ...LE 28GBR A HD SY13096 _IM V01 indd 41 2013 5 3 11 26 36...

Page 50: ...LE 28GBR A HD SY13096 _IM V01 indd 42 2013 5 3 11 26 36...

Reviews: