background image

Page 5

General operation

Volume controls

1:

 Rotate the 

VOLUME 

control 

(9)

 clockwise or press the 

 button 

(25)

 on the remote to increase the 

volume level .

2:

 Rotate the 

VOLUME 

control 

(9)

 anti-clockwise or 

press the 

VOLUME-

 button 

(25)

 on the remote to 

decrease the volume level .

Mute function

1:

 Press the 

MUTE 

button 

(18)

 at any time to silence the 

output . 

2:

 Press again to resume audio output .

Tone controls

Adjust the Bass & Treble tone controls if required.

1:

 Press the 

TONE 

button 

(26)

  repeatedly on the remote 

control to cycle the tone options .

2:

 The first press is Volume . Use the 

VOL+

/- buttons or 

the 

VOLUME 

control 

(9)

 to adjust .

3:

 The second press is Treble . Use the 

VOL+

/- buttons or 

the 

VOLUME 

control 

(9)

 to adjust .

4:

 Press the 

TONE 

button again a third time to edit the 

Bass . Use the 

VOL+

/- buttons or the 

VOLUME 

control 

(9)

 to adjust .

DSP effects

1:

 Pressing the 

DSP 

button  

(29)

 on the remote 

repeatedly cycles through a set of 

EQ 

presets to alter 

the sound field . Choose from: Jazz, Rock, Pop, Classic 
& Off .

Loudness function

This function adds a rounder bass sound at low levels .

1:

 Press the 

LOUD 

button 

(28)

 on the remote to enable .

2:

 Press again to disable the effect .

Switching modes

To switch between the available modes : CD, FM, LINE 
INPUT & BLUETOOTH.

1:

 Press the 

SOURCE 

button 

(8

,

 35)

 to cycle through the 

options .

2:

 To select 

USB 

input mode . You must first select 

CD 

by 

following 

(step 1)

 . Then press the 

CD/USB 

button 

(37)


on the remote control to switch to the 

USB 

mode .

Loading a USB device

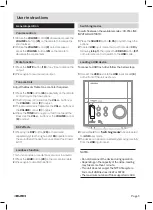
To connect a USB flash drive follow the below steps.

1:

 Connect the 

USB 

device to the 

USB 

input socket 

(6)


on the front of the unit as shown .

2:

 Follow step 

2

 from 

‘Switching modes’

 above to select 

the 

USB 

input mode .

3:

 The device can be disconnected by removing carefully 

from the 

USB 

input socket .

NOTES: 
 
• Do not disconnect the device during operation 
• Depending on the capacity of the dvice, reading   
   may take more than 1 minute. 
• This unit does not supprt the NTFS file system.  
   Format all USB devices in FAT or FAT32. 
• The maximum number of files supported is 999.

User instructions

Summary of Contents for 360/8911

Page 1: ...installing or using 360 8911 D BUSH CD Micro System With Bluetooth These instructions contain important information which will help you get the best from your appliance and ensure safe and correct installation use and maintenance If you need help or have damaged or missing parts call the Customer Helpline 0870 600 3030 ...

Page 2: ...CD MP3operation 6 Playback 6 SkippingTracks 6 FastSearchingTracks 6 RepeatOperation 6 Numericbuttons 6 Programmeplayback 6 RandomCDOperation 6 FM Radio operation 6 Scanningforstations 6 Storingastationpreset 7 Recallingastationpreset 7 Bluetoothoperation 7 Connectinganexternalaudiodevice 7 Connectinganexternalaudiodevice cont 8 Connectingtoanexternalamplifier 8 Earphoneconnection 8 UKMainspluginfo...

Page 3: ...ctionsorasmarkedontheproduct Themainsplugisusedasthedisconnectdevice the disconnectdeviceshallremainreadilyaccessible Thissymbolmeansthatthisunitisdouble insulated Anearthconnectionisnotrequired CAUTION CLASS1LASERPRODUCT ThisproductutilizesaClass1laser ThislaserDVD Playerisequippedwithsafetyswitchestoavoid exposurewhenthedoorisopenandthesafety interlocksaredefeated Invisiblelaserradiationis prese...

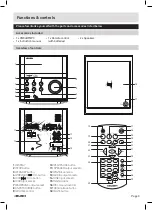
Page 4: ...6 USBinputsocket 7 EARPHONEoutputsocket 8 INPUTSOURCEbutton 9 VOLUMEcontrol 10 PLAY PAUSEbutton 11 SPEAKERoutputsockets 12 PIGTAILantenna 13 AUDIOoutputsockets 14 LINEinputsockets 15 MAINScable 16 CDcompartmentlid 17 CDlidreleasebutton 18 MUTEbutton 110 240V 50 60Hz 20W 1 11 12 13 14 15 16 3 4 6 7 2 5 8 9 10 110 240V 50 60Hz 20W 11 12 13 14 15 16 17 110 240V 50 60Hz 20W 1 11 12 13 14 15 16 17 3 4 ...

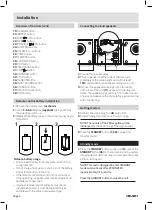
Page 5: ...roperreplacementofbatteriesmayresult inexplosivehazard Itmustbereplacedonlyby batterieswiththesameorequivalenttype Connecting the loud speakers 110 240V 50 60Hz 20W 1 Unwrapthespeakerwires 2 Placeaspeakeroneithersideofthemainunit preferablyatthesameheight andwithatleast 150mmbetweeneachspeakerandthemainunit 3 Connectthespeakerwireplugstotheterminals ontherearoftheunit 11 asshowninthediagram above ...

Page 6: ...clesthroughasetofEQpresetstoalter thesoundfield Choosefrom Jazz Rock Pop Classic Off Loudness function Thisfunctionaddsarounderbasssoundatlowlevels 1 PresstheLOUDbutton 28 ontheremotetoenable 2 Pressagaintodisabletheeffect Switching modes To switchbetweentheavailablemodes CD FM LINE INPUT BLUETOOTH 1 PresstheSOURCEbutton 8 35 tocyclethroughthe options 2 ToselectUSBinputmode YoumustfirstselectCDby ...

Page 7: ...cific track numbercanbeplayedbypressing the relative digit onthenumber buttons EGtrack6 would be 6 To play track12youwouldpressthe 10 button then2 Programme playback ShouldyouwishtocreateaplaylistfromaCDorMP3 tracks Followthebelowstepstoprogramtheplaylist 1 EnsureanyloadeddiscisinSTOPmode Pressthe PROGbutton 32 toentertheprogrammesetup function 2 YouwillseeP01appearonthedisplaytoindicate programtr...

Page 8: ...ss will need to be repeated whenpoweredONagain 4 OncepairedtheBLUEledindicatorwillflashslowly andabeepwillbeheard 5 WhenplaybackfromthedeviceisinitiatedtheRED BLUEledindicatorswillflashsimultaneously 6 Ifusingamobilephoneasanaudiosource when receivingacallaudioplaybackstopswhileyoureceive thecall Whenyouhanguptheaudioisrestored 7 Todisconnect un pair aconnectedbluetoothdevice pressthePAIRbutton 38...

Page 9: ...o thelowestsafelevelbefore playing and turn up to thedesiredlevelwhenplaybackhas started UK Mains plug information For yourconvenienceamainsplugwithafuse 3 Amp hasbeenfittedtothisappliance Foryoursafety pleaseobservethefollowinginformation TheunitisdesignedtooperateonACmainssupply230 volts 50Hz Thewiresinthemainsleadarecolouredinaccordance withthefollowingcode BLUE NEUTRAL BROWN LIVE Undernocircum...

Page 10: ...acesubjecttomoistureand dustsuchasabathroomornearahumidifier Storediscsverticallyinacase stackingorplacing objectondiscsoutsideortheircasemaycause warping Disposal information WEEEmarking Informationfortheconsumer Disposalofyourold productYourproductis designedandmanufacturedwithhighquality materialsandcomponents whichcanbe recycledandreused Whenthiscrossedoutwheeled binsymbolisattachedtoaproducti...

Page 11: ...lumeistoolow Increasethevolume Increasetheoutputvolumeofthe LINEINsource Soundisdistorted SoundisdistortedfromAUX input Volumeistoohigh LINEINsourcevolumeistoohigh Reducethevolume ReducetheoutputvolumeoftheLINE INsource UnabletoPlay Nodiscinthetray Discnotloadedproperly Discisdirty Insertacompatibledisc Checkthediscloaded Cleanthedisc StaticSound Poorreception Re locatetheantenna FM Bluetoothconne...

Page 12: ...guarantee does not cover accidental damage misuse cabinet parts knobs or consumable items The product must be correctly installed and operated in accordance with the instructions contained in this manual It must be used solely for domestic purpose The guarantee will be rendered invalided if the product is re sold or has been damaged by inexpert repair Specifications are subject to change without n...

Reviews: