background image

4-4 BLADE HOLDER REMOVAL 

(Fig. 4-3)

THE  CUTTER  CAN  FALL  FROM  HYDRAULIC 
SYSTEM  FAILURE.    TO  AVOID  SERIOUS 
INJURY  OR  DEATH,  SECURELY  SUPPORT 
CUTTER BEFORE WORKING UNDERNEATH.

NOTE

The  spindle  is  a  straight  splined  shaft,  not  a 
tapered shaft.  Do not hit on end of spindle shaft 
as this will damage spindle assembly.

A. Remove cotter pin and castle nut.
B. Pull blade holder off shaft.  It may be necessary

to remove blades and pan, then remove blade hold-
er with gear puller.

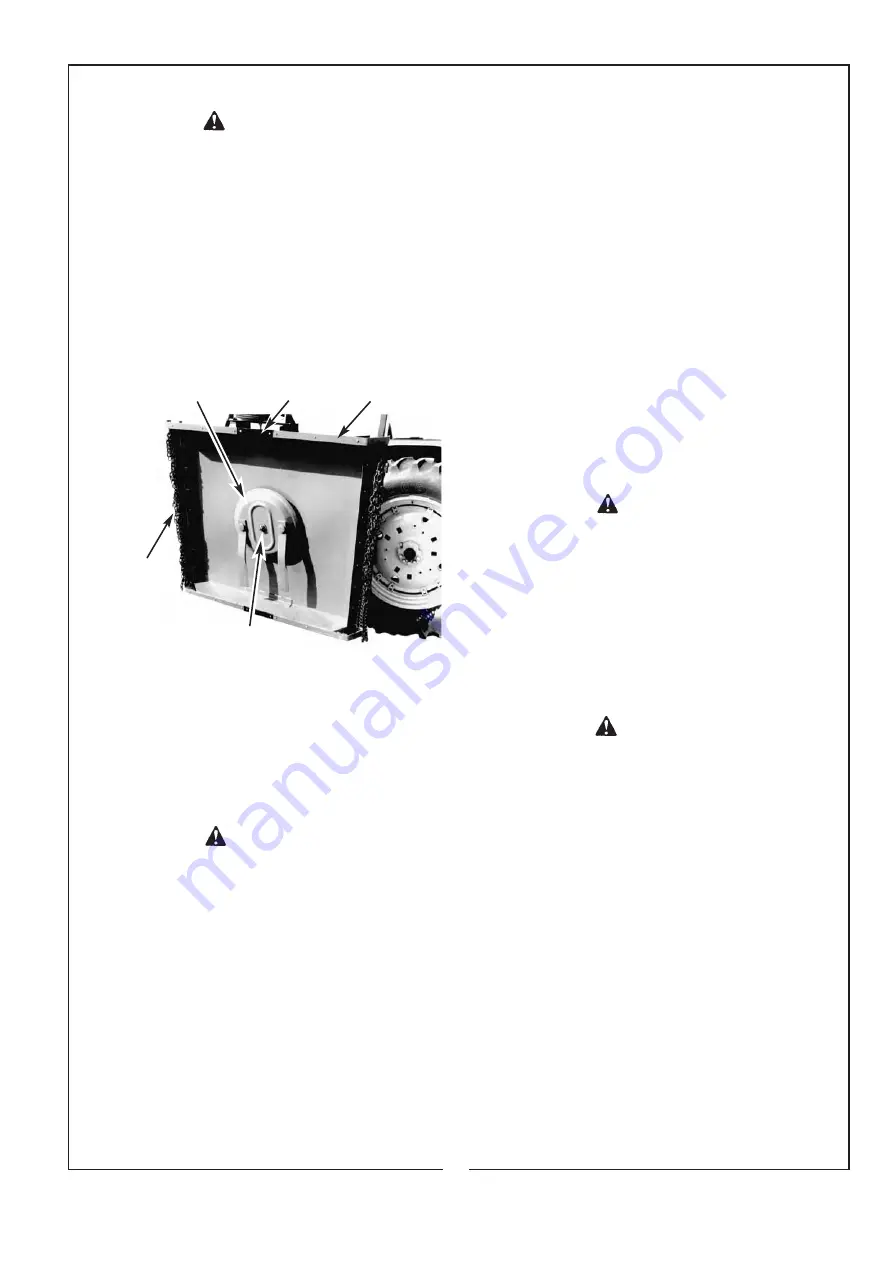
Figure 4-3   Blade Holder    Skid Filler    Skid Shoe

4-5 BLADE HOLDER INSTALLATION

A.  If  blades  were  removed,  perform  steps  “C” 

and “D” in paragraph 4-6 to reinstall blades and pan.

B.  Assemble  blade  holder  and  castle  nut  onto

spindle shaft.  Tighten nut to 300 ft./lbs.  (406 Nm).

C. Insert cotter pin.

4-6 BLADE REPLACEMENT

THE  CUTTER  CAN  FALL  FROM  HYDRAULIC
SYSTEM  FAILURE.  TO  AVOID  SERIOUS 
INJURY  OR  DEATH,  SECURELY  SUPPORT 
CUTTER BEFORE WORKING UNDERNEATH.

It  is  not  necessary  to  remove  the  complete  blade
holder assembly to replace the blades.  Blade bolts
are accessible through a hole in the top of the cutter
deck.    Blades  should  only  be  replaced  in  matched
pairs.    Use  only  genuine  Bush  Hog  replacements
parts.

A. Remove nuts from blade bolts.
B. Inspect blade bolt shoulder for wear.  Replace if

necessary.

C. Assemble new blades and pan to blade holder

using  blade  bolts,  nuts  and  lockwashers.    Tighten
nuts to 450 ft./lbs. (610 Nm).

D.  Check  to  be  sure  that  blades  will  swing  freely.

If  blades  will  not  swing  freely,  remove,  locate  prob-
lem,  and  repair.    Operating  cutter  when  blades  will
not  swing  freely  will  cause  excessive  stress  and
vibration causing damage to implement.

4-7 CABLE ADJUSTMENT

A.  Extend  slide  cylinder  completely.    Assure  full

extension by measuring from center of mounting pin
to  center  of  opposite  mounting  pin.    Measurement
should be 72-3/4 in. (1847.8 mm).

B. Put slack into cables by loosening eye bolts (if

necessary).

C.  Position  counterweight  box  1  inch  (25.4  mm)

from hydraulic tank.

D.  Tighten  eye  bolts  until  slack  is  taken  out  of

cables.

4-8 ADJUSTING HYDRAULIC PRESSURE

The  hydraulic  pressure  for  the  cast  iron  system
is  preset  from  the  factory  at  3200  psi. 
If  a
hydraulic pressure adjustment is necessary, contact
your authorized Bush Hog dealer.

DO  NOT  ATTEMPT  TO  ADJUST  HYDRAULIC 
SYSTEM  PRESSURE.    AN  INCORRECT 
ADJUSTMENT COULD CREATE EXTREMELY 
HIGH  PRESSURES  RESULTING  IN  PERSON-
AL INJURY AND EQUIPMENT DAMAGE.

4-9 CHANGING BLADE ROTATION

(Fig. 4-4)

To change the direction of blade rotation perform the
following procedures:

DO  NOT  OPERATE  CUTTER  WITH 
COUNTERCLOCKWISE  BLADE  ROTATION 
UNLESS  CUTTER  DECK  IS  EQUIPPED  WITH 
SAFETY  CHAINS  AND  THE  OPERATOR 
WEARS  SAFETY  GLASSES  AND  SAFETY 
(HARD)  HAT.    SAFETY  CHAINS  WILL 
REDUCE  AMOUNT  OF  DEBRIS  THROWN 
TOWARD  OPERATOR.    IT  IS  HIGHLY 
RECOMMENDED THAT OPERATOR BE PRO-
TECTED  WITH  ROLLOVER  PROTECTIVE 
SYSTEM (ROPS) ENCLOSED CAB AND THAT 
SEAT  BELT  BE  USED  FOR  ALL  MOWING 
OPERATIONS.

A.  Remove  hydraulic  pressure  and  return  lines

from connections on motor.

B.  Remove  hydraulic  fittings  from  both  sides  of

motor.

C.  Remove  bolts  retaining  motor  to  spindle  hous-

ing.

Chain
Guard
Assembly

Lower Shaft Nut

13

WARNING

WARNING

WARNING

WARNING

All manuals and user guides at all-guides.com

all-guides.com

Summary of Contents for SM 60

Page 1: ...OPERATION l l MAINTENANCE 1007 4 00 97701 Model SM 60 Side Mount Rotary Cutter Operator s Manual BUSH HOG All manuals and user guides at all guides com a l l g u i d e s c o m ...

Page 2: ...ush Hog parts which are manufactured with the same precision and skill as our original equipment Our trained service personnel are well informed on methods required to service Bush Hog equipment and are ready and able to help you Should you require additional information or assistance please contact us YOUR AUTHORIZED BUSH HOG DEALER BECAUSE BUSH HOG MAINTAINS AN ONGOING PROGRAM OF PRODUCT IMPROVE...

Page 3: ... warranty obligation or inspection Side Mount Rotary Cutter Models SM60R SM160R Operator s Manual 1 TABLE OF CONTENTS SECTION PARA PAGE Warranty 2 Dealer Preparation Check List 3 Safety Precautions 4 Federal Laws and Regulations 5 I INTRODUCTION DESCRIPTION 6 1 1 Introduction 6 1 2 Description 6 II PREPARATION FOR USE 7 2 1 Mounting Cutter On Tractor 7 2 2 Driveline Modification 8 III OPERATING PR...

Page 4: ...s for normal service or adjustment loss of crops or any other loss of income rental of substitute equipment expenses due to loss damage detention or delay in the delivery of equipment or parts resulting from acts beyond the control of Bush Hog THIS LIMITED WARRANTY SHALL NOT APPLY 1 To vendor items which carry their own warranties such as engines tires and tubes 2 If the unit has been subjected to...

Page 5: ...structed on the safe and proper use of the cutter r 10 Purchaser or dealer elects to delete deflectors front belting rear bands front and rear chains WARNING For Non Agricultural use OSHA ASAE SAE and ANSI standards require the use of Chain Guards or other protective guards at all times Bush Hog strongly recommends the use of such guards for Agricultural uses as well to reduce the risk of property...

Page 6: ...the operating area 7 Clear the work area of objects which might be picked up and thrown 8 Wear eye protection and use a piece of cardboard or wood rather than hands to search for hydraulic leaks Escaping hydraulic oil under pressure can penetrate skin If fluid is injected into the skin it must be surgically removed within a few hours by a doctor familiar with this form of injury or gangrene may re...

Page 7: ...comes within the operating area 7 Clear the work area of objects which might be picked up and thrown 8 Wear eye protection and use a piece of cardboard or wood rather than hands to search for hydraulic leaks Escaping hydraulic oil under pressure can penetrate skin If fluid is injected into the skin it must be surgically removed within a few hours by a doctor familiar with this form of injury or ga...

Page 8: ...tions to Keep all guards in place when the machine is in operation Permit no riders on equipment Stop engine disconnect the power source and wait for all machine movement to stop before servicing adjusting cleaning or unclogging the equipment except where the machine must be running to be properly serviced or maintained in which case the employer shall instruct employees as to all steps and proced...

Page 9: ...nks It is to be used on tractors weighing a minimum of 6000 lbs 2722 kg not including ballast and having a minimum of 50 PTO horse power Two models are available the model SM60R requiring 540 rpm PTO speed and the model SM160R requiring a 1000 rpm PTO speed Front and rear discharge shields are standard on each The cutter is all hydraulically powered as shown in Fig 1 2 A hydraulic gear pump is dri...

Page 10: ...UAL B Connect cutter to tractor 3 point hitch Adjust stabilizer bars sway blocks or chains Refer to tractor operator s manual USE OF THIS MACHINE ON TOO SMALL A TRACTOR CAN CAUSE TRACTOR UPSET DO NOT USE THIS MACHINE ON A TRAC TOR WEIGHING LESS THAN 6000 LBS 2722 KG NOT INCLUDING BALLAST IT IS RECOMMENDED THAT FRONT BALLAST BE USED FOR ADDED STEERING STABILI TY THIS MACHINE REQUIRES 50 PTO HORSEPO...

Page 11: ...t to desired working position R Raise cutter deck and install transport lock pin before traveling Fig 2 3 NOTE It is recommended that front end ballast weights be added to tractor for stabilization In some uses added stabilization may be gained by weighting left rear wheel heavier than right rear wheel Do not exceed tractor ballast rating Consult your tractor dealer 2 2 DRIVELINE MODIFICATION IMPO...

Page 12: ...2 Recommendations Tractor should have front end ballast weights to help prevent front end skidding Tractor should be equipped with Rollover Protective System ROPS and a seat belt used Check chains for 3 point hitch are recommended on tractors without position con trol stop adjustment to prevent accidental dragging of slide assembly on ground WHEN CUTTING WITH ANY SIDE MOUNT ROTARY CUTTER IT IS LIK...

Page 13: ...e aware that cutter deck and counter weight box may extend beyond tractor This is especially important when working along roads and traveling through gates and around buildings A slow moving vehicle SMV sign and tractor warning lights are recommended for working along highways A bracket is provided on weight box for SMV sign 10 ALL ROTARY CUTTERS HAVE THE ABILITY TO DISCHARGE OBJECTS AT HIGH SPEED...

Page 14: ...spindle to be sure that no foreign objects such as wire or steel strapping bands are wrapped around them 5 Check blade bolts for tightness Tighten to 450 ft lbs 609 7 Nm 6 Clean all debris from machine especially under side of deck 7 Check that cables are tight Tighten per para graph 4 7 8 Inspect blades for wear Replace if necessary per paragraph 4 6 Always replace both blades with a match pair U...

Page 15: ...s required for reassembly 2 Spindle Assembly Drain spindle housing Refill with EP80W 90 gear oil Capacity is 26 fl oz 4 3 RECOMMENDED HYDRAULIC OILS Recommended hydraulic oils are listed in Table 4 3 page 13 Other brands may be used provided they are equivalent Approved hydraulic oils may be mixed provided that anti wear oils are mixed with anti wear oils All hydraulic oils listed in Table 4 3 are...

Page 16: ...g cutter when blades will not swing freely will cause excessive stress and vibration causing damage to implement 4 7 CABLE ADJUSTMENT A Extend slide cylinder completely Assure full extension by measuring from center of mounting pin to center of opposite mounting pin Measurement should be 72 3 4 in 1847 8 mm B Put slack into cables by loosening eye bolts if necessary C Position counterweight box 1 ...

Page 17: ...aco Rando HD46 Exxon Magnas A15 Citgo AW46 Exxon Nutoh 46 Shell Tellus 46 HY Oil 46 Standard EP Hyd Oil 1 14 contamination such as pump failure This requires removal and individual flushing and cleaning of all components and lines that were exposed to the contaminated oil flow Flushing of the system components should be done with a suitable sol vent or diesel fuel Clean the suction strainer replac...

Page 18: ... dealer overheated Fluid dirty or fluid level low Clean or replace filter and strainer Add fluid above 200º F 93ºC bring up to bottom of filler strainer Hydraulic fluid incorrect Check fluid Should a change of hydraulic viscosity fluid be required flush entire system and change filters before adding new fluid Continuously stalling cutter See Item 3 Hydraulic fluid bypassing Overhaul or replace fau...

Page 19: ...ssembly to be blocked Also insure that the blocking material is on a clean dry surface 8 Never put hands or any other part of body under blocked up assemblies if at all possible 9 Always wear goggles or safety glasses when hammering grinding or drilling metal parts 10 If the assembly calls for welding or cutting be sure that there are no flammable materials close at hand and that bystanders have t...

Page 20: ...ndle housing using O ring gasket to seal Fasten with nuts bolts and lockwashers removed from cover plate H Assemble hydraulic valve kit Fig 5 1 or tractor kit Fig 5 2 Use pipe joint compound on pipe fit tings only Do not use thread tape Do not over tighten fittings I Check hydraulic oil level Fill as needed to bring oil level to bottom of filler strainer See paragraph 4 3 for compatible hydraulic ...

Page 21: ...nt and rear skid shoes Fig 4 3 5 3 BELTING INSTALLATION A Align belting with holes in lip of cutter deck B Fasten with 3 8 x 1 1 4 bolts flatwashers and locknuts Fig 5 4 5 4 OPTIONAL SIDEWHEEL INSTALLATION A Position sidewheel on cutter deck as shown Fig 5 5 B Fasten sidewheel assembly to cutter deck using 3 8 x 3 bolts and locknuts through deck braces and 3 8 x 1 1 4 bolts and locknuts through si...

Page 22: ...ng a ditch or bank sidewheel and tailwheel can be adjusted inde pendently as needed 5 6 OPTIONAL VALVE MOUNTING BRACKET INSTALLATION Fig 5 7 A Place bottom bracket at desired mounting loca tion Mark 2 4 holes as needed for drilling using bracket as pattern Drill holes using 13 32 drill bit B Mount lower bracket using four 3 8 x 1 1 2 bolts nuts flatwashers and lockwashers C Attach valve to top bra...

Page 23: ...can occur to safety decals either through shipment use or reconditioning Bush Hog will upon request provide safety decals for any of our products in the field at no charge Contact your authorized Bush Hog dealer for more information 20 50029419 50029419 78786 78608 82683 All manuals and user guides at all guides com ...

Page 24: ...SAFETY DECALS CONTINUED 21 83373 83375 82617 83374 83377 All manuals and user guides at all guides com ...

Page 25: ...82 2013 2728 2 1 16 1 3 8 6 UNC 655 887 1470 1992 2382 3228 2 1 16 1 3 8 12 UNF 746 1011 1672 2266 2712 3675 2 1 4 1 1 2 6 UNC 870 1179 1950 2642 3161 4283 2 1 4 1 1 2 12 UNF 979 1327 2194 2973 3557 4820 TORQUE SPECIFICATIONS Proper toque for American fasteners used on Bush Hog equipment Recommended Torque in Foot Pounds Newton Meters Proper torque for metric fasteners used on Bush Hog equipment R...

Page 26: ...P O Box 1039 l l Selma AL 36702 1039 Telephone 334 874 2700 l l www bushhog com All manuals and user guides at all guides com a l l g u i d e s c o m ...

Reviews: