background image


50 


Part 1 is “Low Warning Alarm” or “Low Critical Alarm” or “High Warning Alarm” or “High Critical 
Alarm”. 


Part 2 is the value of the channel that is in alarm, for example “150”. 


Part 3 is the units of the value, for example “kW”. 


Part 4 is the label assigned to the channel, for example “Chan 1”. 

So an example of a complete ASCII string might be “Low Critical Alarm 150kW Chan 1”. For the fourth trap 
listed above, the associated ASCII string contains the same text that is placed in the event log. Preconfigured 
ARC Plus Trap Messages are sent using the SNMP v2C message format.  
 

SENDING CUSTOM TRAPS 

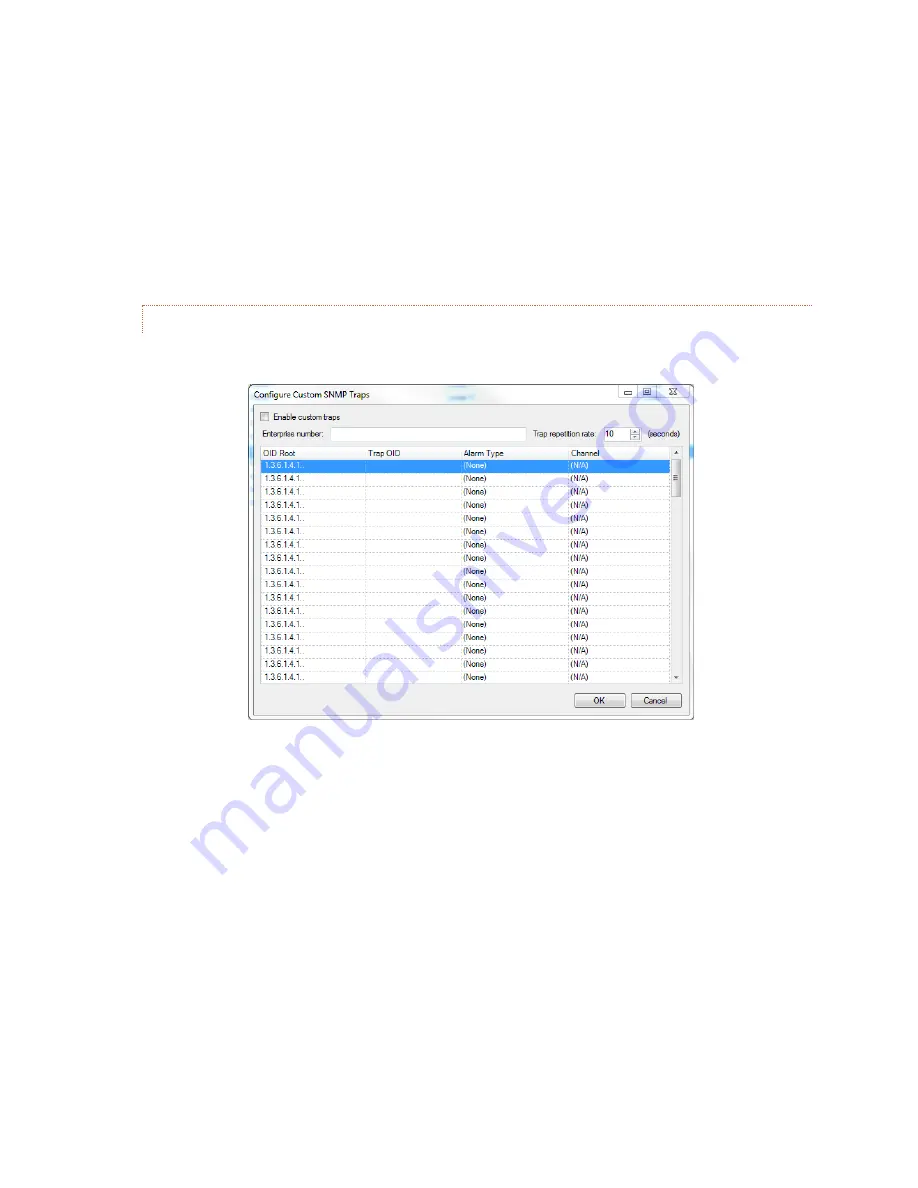
When “Configure custom SNMP Traps (advanced)” is selected, the following screen is displayed. 


Edit>Settings>SNMP Agent Settings>Configure custom SNMP Traps (advanced) 

Using this screen, the user can specify up to 64 custom trap OIDs, each one to be triggered by the 
occurrence of a user-selected alarm type on a user-specified meter channel or status channel. Custom Trap 
Messages will be sent only if the “Enable custom traps” box is checked. Custom traps are sent using the 
SNMP v1 message format. 

The custom SNMP traps specified on this page can be sent repetitively during the time their associated 
alarms are active. A value between 0 and 65535 must be entered to specify the desired repetition interval in 
seconds. An entry of 0 turns the trap repetition feature off. 

Each Trap is defined by a sequence of dot-separated numbers know as an OID (Object Identifier). This page 
allows construction of an OID for each desired trap. The Enterprise number entered at the top of the screen 
will become part of the Trap OID for each of the traps configured on the page. The Enterprise number is 
typically 1 to 5 digits with no internal dot separators.  

Summary of Contents for ARC Plus Touch

Page 1: ...1 Instruction Manual ARC Plus firmware version 5 0 Manual rev 8 ARC Plus Touch ...

Page 2: ...ce and reliability that will provide years of satisfaction We ve observed that installations go smoothly when the engineer plans the project and allows time for familiarization before jumping in We recommend setting up new units in a comfortable work environment before installing at the transmitter site In addition to hardware familiarization it will also be possible to do much of the configuratio...

Page 3: ... like this USING THIS MANUAL Click on the link to go directly to the named section For starters here is a quick set of links to the major sections of the manual USING THIS MANUAL This section ABOUT THE ARC PLUS SYSTEM Information about the models and components of the ARC Plus line Fully expanded table of contents useable in pdf or printed form INTRODUCTION Brief overview of the ARC Plus Touch Ver...

Page 4: ... in a separate manual The comparison chart below will help you determine which model you have ARC Plus Model Comparison Model ARC Plus SL ARC Plus1 ARC Plus Touch Version 2 3 5 2 3 4 5 Front Panel Display None VFD Color Touch Screen Rack Height 1RU 2RU 2RU Telephone Speech Option None ESI2 ESI2 RSI3 ESI RSI Connections None SET LINE SET LINE LINE ESI RSI Audio Jacks None 1 1 2 DB9 Serial Connector...

Page 5: ...ere will be an RJ 11 on the rear panel marked LINE Interface to analog and status inputs and command outputs is done through Plus X units while direct transmitter interface can be done through PlusConnect units available for select transmitters Data connections are typically IP based although modem options are available All I O units are described in separate documentation ...

Page 6: ...rsion 4 firmware is the initial release of firmware built for the ARC Plus Touch All of the features introduced in Version 3 are retained however there are considerations for using some older devices I O units with the Plus X branding are all 100 compatible If it is desired to use older I O units that have a PlusBus connection contact support for guidance NEW IN FIRMWARE VERSION 3 Version 3 introd...

Page 7: ...CORDABLE SPEECH INTERFACE RSI 14 AutoPilot Software 15 Web based monitoring and control 15 Software and Firmware Updates 15 System Security 15 Operation 16 Touch Screen 16 Header 16 Footer 16 Scrollbars 17 Keypad 17 Command Buttons 17 Help 17 Main Menu 18 Select Site 18 Channel Display 18 Status Display 18 Macros 19 Alarms 19 Events 19 Phone 19 Maintenance 20 Configuration Menu 20 Meter Mutes 20 S...

Page 8: ...utoLoad Plus Software 39 Connecting to the ARC PLUS TOUCH 39 Saving and Archiving ARC Plus Touch Configurations 40 Saving Configuration Changes to the ARC Plus Touch 40 Archiving ARC Plus Touch Settings to the PC 40 UpLoading Archived Settings 40 Uploading Firmware 40 Connecting Plus X I O units 41 Changing the Site Name 41 Managing Users 42 Time Settings 43 Network Settings 44 SNMP Settings 45 AR...

Page 9: ...r Type 74 Voltage Range 74 Sample Type and Time 74 Decimal Places 74 Meter Channel Source 75 Meter Graph 76 Meter Alarms 77 Delayed Alarm Reporting 77 Rearm Delay 77 Enabling Disabling Alarms 78 Setting Limits 78 Meter Actions 79 Meter Notifications 80 Meter Display 82 Meter Speech Labels 83 Calibrating Meter Inputs 84 Status 85 Status Channels 85 Inverting a Status Channel 85 Status Channel Sourc...

Page 10: ...ranching 99 Actions 99 IF statements 99 Examples 101 Macro expressions 105 General 105 ARC Plus 105 Date and Time 105 Memory 106 Macros 106 Misc 106 Starting and stopping Macros 107 Touch Screen 107 Autopilot 107 WEB Page 107 RSI 107 Raise and Lower buttons 108 Status Actions 108 From a Macro 109 Macro Schedule 110 Configuration 111 Calendar 111 Email Templates 112 Creating Macros 113 Macro Editor...

Page 11: ...rver for access via web browser PC or mobile device Connection to the plant equipment is by means of one or more Plus X I O units FRONT PANEL TOUCH SCREEN LCD The Touch screen display shows all status and metering values and offers command and macro activation Navigation through the menu system is by touch as are command activation and data entry A popup keyboard is available as appropriate The LC...

Page 12: ...uch to the LAN WAN for communications with the user as well as with Plus X I O devices ALARM The Form C alarm relay can be used to operate external equipment when an alarm condition exists The relay may be configured to latch closed when there is an alarm at the local site or when there is an alarm at any site in the ARC Plus network A 3 pin connector block is included with the ARC Plus Touch FAIL...

Page 13: ...ducts ArcPlusLine aspx Plus X devices include Plus X Integrated Input Unit Plus X Integrated Command Relay Unit Plus X 300 Plus X 600 Plus X EM Series Environmental Monitors Plus X AC 8 Plus X IP 8 Adapter Plus X GSC Adapter Plus X RP 8 Adapter For specific information on installing and configuring your Plus X accessories refer to the manual for your product Manuals are available online at www bur...

Page 14: ...ERFACE RSI The optional RSI Recordable Speech Interface provides dial in monitoring control and dial out alarm notifications via a standard telephone line connection for operation Click or turn to RECORDABLE SPEECH INTERFACE for operation The standard RSI vocabulary features pre recorded speech tailored to the broadcast environment Custom words or phrases may be recorded by the user on a PC and ad...

Page 15: ...of the ARC Plus Touch in your web browser For more on this feature click or turn to WEB PAGE The web server also provides connectivity to compatible mobile devices To access the mobile web display from your mobile device enter the IP address or host name followed by mobile Click or turn to SMARTPHONE WEB PAGE SOFTWARE AND FIRMWARE UPDATES Periodic updates to ARC Plus software and firmware along wi...

Page 16: ...ance mode can only be changed on the local site TOUCH SCREEN For ease of use the touch screen is designed to be as consistent as possible from one function to the next HEADER The top of the screen will always show the name of the selected site on the left the time in the center and site status on the right FOOTER Always returns to the next highest level in the menu tree If the next highest level i...

Page 17: ...acro start and stop commands and various enable disable functions Pushing a command button executes the raise or lower command For momentary commands the duration is set in AutoLoad Holding the command button does not extend the duration but pressing again during the command immediately restarts the duration It is possible to override a command button to execute a macro instead of a raise or lower...

Page 18: ...es Press the desired site name then press the SELECT button CHANNEL DISPLAY Channels are selected by scrolling with the up and down arrow keys or by selecting the keypad for direct entry The metering value for each channel is displayed in the central window along with the label and units entered in AutoLoad Below this is the status associated with this channel The two large buttons on the right sh...

Page 19: ...alarm to read the details and clear individually The CLEAR ALL button is a shortcut to clear all alarms at once Cleared alarms are moved to the bottom of the list and marked CLEARED EVENTS Press EVENTS on the main menu to review a list of system events Use the scroll bars to move through the list PHONE Press PHONE on the main menu to set the dial in and dial out modes for the optional telephone in...

Page 20: ...rom the main menu to select the CONFIGURATION sub menu for the following functions METER MUTES Alarm muting permits testing or abnormal operation without triggering alarms From the main menu press CONFIG then METER MUTES Find the desired channel using the scroll buttons as needed press the channel then press ENABLE or MUTE as appropriate Meter mutes may be set on any connected site Be sure to rest...

Page 21: ... show below the meter window Calibration can only be performed on the local site SYSTEM MENU Press CONFIG from the main menu to select the CONFIGURATION sub menu then press SYSTEM CLOCK Press CLOCK to display the time and date settings Press DATE TIME or TIME ZONE to change the value shown Press the field to be changed then use the keypad to enter the correct value Repeat until all fields are corr...

Page 22: ...esired parameter to select the appropriate edit screen Press the field to be changed then use the keypad to enter the correct value Repeat until all fields are correct then press ENTER INFORMATION Press INFO to display the firmware version serial number and MAC address ...

Page 23: ...is designed to work well on a PC tablet or smartphone The web page does not require Java SECURITY The web interface never transmits your password unencrypted When you log in client side code creates a one way hash of your password to send to the ARC Plus ...

Page 24: ...tus Use the Run and Stop buttons to run stop a macro ALARMS The Alarm page displays the alarms on this ARC Plus with the following fields Use the Clear link to clear an alarm or Clear all alarms to clear all Use the Show more or Show all links at the bottom of the page to display more alarms When all alarms are displayed All alarms shown will appear at the bottom of the page Date Time The date tim...

Page 25: ...ers on the ARC Plus Use the onscreen help text for more information REBOOTING The Reboot link will reboot the ARC Plus You will see a confirmation prompt before the system reboots RESETTING TO FACTORY DEFAULTS The Reset to Factory Defaults link will reset the ARC Plus to its factory default settings except for your network settings The page will show a confirmation Warning Resetting the ARC Plus T...

Page 26: ...nnel Bank Editor always shows all 16 banks To name a bank first select it and then click on its label in the list and type in a new name Each channel bank can contain any number of meter status and command channels To add channels to a bank 1 Select the channel bank 2 Select the Meter Status or Commands tab 3 Select the channel s you want to add from the left hand list and click the Add button You...

Page 27: ... log on client side code creates a one way hash of your password to send to the ARC Plus NAVIGATING When you log on to the smartphone interface you will see the Channels page This page displays your meter status and command channels in a vertical list If you have more channels than fit on one screen scroll down to see more channels As with the web interface use the Group list to select a channel b...

Page 28: ...g call the amount of time the RSI waits between phone numbers on the dial out list etc All of these may be edited via AutoLoad Plus and are described fully in RSI SETTINGS CALLING THE RSI Calling in to the RSI allows you to monitor and control any remote site linked to the called site To place a call to the RSI 1 Dial the phone number for the line connected to RSI After the specified number of rin...

Page 29: ...ach number on the alarm channel s selective dial out list again pausing after each attempt 5 If the alarm remains active after the selective dial out list is exhausted the RSI restarts from the master dial out list and continues the process until the alarm is cleared 6 Once a user answers a call and enters a password the RSI announces the name of the site where the alarm is located the number of a...

Page 30: ...nel s status input as follows Status Input Condition Spoken Report Status input is not configured No report Status input is ON Previously configured ON phrase Status input is OFF Previously configured OFF phrase Status input is OFFLINE has not yet been assigned a value or is associated with a Plus X device which is not responding STATUS OFFLINE See section STATUS SPEECH LABELS to configure ON and ...

Page 31: ... number of hours 1 9 For example press 4 to put alarm notification on hold for four hours After four hours if the alarm is still active the RSI will begin dialing out for this alarm once again This method allows operators to ignore an alarm for a period of time without clearing it The RSI will tell you when it has reached the end of the alarm report You can then enter any command RUNNING MACROS Yo...

Page 32: ...ent you enter your query Macros that stop during the macro report will be reported as running AUDIO INPUT MONITORING Line level audio applied to the rear panel RCA jack labelled AUDIO IN may be monitored over the phone This is commonly used for monitoring program audio or room noise You may begin monitoring by following these steps 1 Log in to the RSI 2 Dial 994 to begin monitoring the audio input...

Page 33: ...st be enabled The master dial out list also makes it possible for users to skip setting up selective dial out lists if all operators wish to be notified of all alarms in the system To edit the master dial out list during an RSI session 1 Log in to the RSI with system level privileges 2 Enter 801 809 to select a master dial out entry 1 to 9 The RSI will respond by speaking the phone number stored i...

Page 34: ...any RSI command To enable or disable alarm monitoring for a single status channel 1 Log in to the RSI with system level privileges 2 Enter the channel number for the desired status channel The RSI will read the meter value and label for the channel However the status channel with the same channel number is still selected 3 Dial 510 The RSI will report whether alarm monitoring is enabled or disable...

Page 35: ...tion to the context sensitive prompts in verbose mode any user can summon a complete list of available commands by entering 998 The RSI will read a list of commands You can interrupt the list with a new command at any time The RSI will finish reading the current phrase before executing the new command COMMAND TIMEOUTS When the RSI expects input from the user it will wait for a user specified amoun...

Page 36: ...m monitoring for selected site Report status alarm monitoring for selected channel Report metering alarm monitoring for selected channel Enable alarm monitoring after selecting 500 510 or 520 Disable alarm monitoring after selecting 500 510 or 520 Macros 600 601 698 699 Report currently running macros Select macro by preset number Select macro by using voice menu Run selected macro Stop selected m...

Page 37: ...Touch and peripherals RECOMMENDED SEQUENCE The following sequence assumes the unit is unpacked and powered up at the bench First read the Introduction section of this manual As you read descriptions in the manual it will be useful to follow along on the actual unit Step Reference or Hyperlink 1 Perform the network setup using the touch screen NETWORKS 2 3 4 5 6 7 8 9 10 Perform network setup on pe...

Page 38: ...address and set the time NETWORK SETTINGS Click or turn to NETWORK for help editing the network information Enter the PRIVATE IP ADDRESS PUBLIC IP ADDRESS and PORT values that will identify the ARC Plus Touch as a unique device on the network The private IP is the address you will use to access the ARC Plus Touch on your company LAN WAN The public IP is the address this ARC Plus Touch will use to ...

Page 39: ...lus CONNECTING TO THE ARC PLUS TOUCH To modify ARC Plus Touch settings using AutoLoad Plus start by launching AutoLoad Plus AutoLoad Plus will prompt for connection settings Enter the IP address and your user name and password for the ARC Plus Touch site you are connecting to Then click Connect The default user name is admin and the default password is password The Connect dialog automatically app...

Page 40: ...ress Save UPLOADING ARCHIVED SETTINGS To upload archived settings to an ARC Plus Touch connect to the desired ARC Plus Touch site and click the Open from File toolbar icon Select the desired file click Open and the settings will populate in AutoLoad Plus Press the Save toolbar icon to save the configuration to the ARC Plus Touch UPLOADING FIRMWARE Programs Burk Technology AutoLoad Plus 1 Enter the...

Page 41: ...anually or automatically Automatic assignment is recommended in most cases Select the channel number where you want to start assigning channels For your first Plus X device starting at channel 1 is typical Leave the Map the default set of channels checkbox checked and press OK If installing additional Plus X devices assign them to start after the last used channel For example if you are installing...

Page 42: ...r a name and password Once the new user appears on the user list assign privileges by selecting an option from the Level column System Full access to the ARC Plus Touch system This level is required to make configuration changes using AutoLoad Plus Operators Can issue commands run and stop macros clear alarms and calibrate channels Observers Read only access You can rename an existing user by simp...

Page 43: ...the ARC Plus Touch site to the time shown on your Windows clock adjusting for any time zone difference To configure the ARC Plus Touch to synchronize with an SNTP time server use the SNTP tab Enter the time server IP address port and rate in minutes at which the ARC Plus Touch should synchronize Note Using an SNTP server is recommended to ensure accurate timestamps and scheduled operations The Adv...

Page 44: ...work administrator Note In order to reference a mail server by host name instead of IP address a DNS Server is required If your firewall is configured to block access to port 80 the HTTP Port setting can be used to change the port on which the embedded web server communicates If for security reasons you wish to turn off the embedded web server uncheck the box marked Enable web server You will not ...

Page 45: ...e transmitter site or other locations SNMP Plus must be enabled on each ARC Plus Touch unit by entering an authorization code in the AUTOPILOT AND SNMP PLUS AUTHORIZATION CODES tab in the site settings dialog box Acting as an SNMP manager the ARC Plus Touch can monitor and control any IP connected device that has SNMP agent capabilities SNMP features were originally found only in networking device...

Page 46: ...device and the ARC Plus channel assignments for those OIDs An example OID list is shown below Assignment of OIDs to ARC Plus channels is discussed in subsequent sections Edit SNMP Devices Show OIDs SNMP MIB BROWSER Each SNMP managed device has one or more associated MIB Management Information Base files MIB files describe each parameter that can be retrieved from a managed device and each paramete...

Page 47: ...MIB files Often a manufacturer will supply a directory or zip file containing several MIB files related to a particular piece of equipment To add these files to the AutoLoad Plus MIB Browser click the Add button next to the MIB file list Then browse to and select one of the MIB files supplied by your equipment manufacturer When you select the file AutoLoad Plus will import it into the MIB browser ...

Page 48: ...t parameter to an ARC Plus meter status or command channel DISPLAY THE CURRENT VALUE OF A MIB PARAMETER The final function of the MIB Browser is to allow retrieval of a test value for the selected MIB parameter Clicking the Get button will cause an SNMP Get command to be sent to the device requesting the current value of the highlighted parameter In the example shown above the retrieved value for ...

Page 49: ...is set to mute while an alarm condition is active SNMP trap generation for that channel will stop If a channel is taken out of mute while an alarm condition is active SNMP trap generation for that channel will begin SENDING PRECONFIGURED TRAPS When the Send traps on alarm box is checked the following four preconfigured ARC Plus Trap Messages are enabled Trap OID Trap meaning 1 3 6 1 4 1 26079 2000...

Page 50: ...een the user can specify up to 64 custom trap OIDs each one to be triggered by the occurrence of a user selected alarm type on a user specified meter channel or status channel Custom Trap Messages will be sent only if the Enable custom traps box is checked Custom traps are sent using the SNMP v1 message format The custom SNMP traps specified on this page can be sent repetitively during the time th...

Page 51: ...must start with a digit and be followed by a set of dotted numbers with no concluding dot Each complete custom OID is made up of the OID Root followed by the Enterprise number and ending with the number entered in the Trap OID field This complete OID will be sent when the selected alarm type occurs on the identified channel ...

Page 52: ...cations is a two step process first the notification lists must be created in the Alarm Notifications window then the alarm conditions must be configured to use the appropriate lists This is accomplished in the Status Notifications and Meter Notifications tabs of the channel configuration area after you have configured status and metering channels CONFIGURING EMAIL ALARM NOTIFICATIONS To set up em...

Page 53: ...with your ARC Plus Touch system to originate encrypted emails using the STARTTLS protocol extension If your current email server does not support STARTTLS you can open a free email account with an Internet email service provider The Burk email cloud service is compatible with email services from a wide range of providers including Gmail mail com GMX and Zoho It is suggested that you create an emai...

Page 54: ...ted list Now that you have created at least one email list this list will be available for selection in the Meter Notifications and Status Notifications tabs when you configure ARC Plus Touch channels CONFIGURING DIAL OUT ALARM NOTIFICATIONS If an RSI is installed in any ARC Plus Touch in the network metering and status alarms can trigger dial out notifications to telephone numbers on your dial ou...

Page 55: ...lumn and enter the name of your first list where prompted Then click the Add button plus sign icon to the right of the Phone Numbers column and assign telephone numbers to this list If you wish for an alarm notification to dial a modem equipped PC running AutoPilot precede the telephone number with D for data This is a useful way to log an alarm to the PC if there is no IP connectivity to the remo...

Page 56: ...s box to suppress all alarm notifications for a specified duration after startup This provides an opportunity for equipment to recover from a power loss after startup without causing out of tolerance conditions Check the Delay macros box to prevent any macros from running during the specified duration after startup This feature can be used to prevent macros from using readings from equipment that ...

Page 57: ...if you want the relays to remain open when power is restored TIMEOUT SETTINGS Edit Settings Site Settings Timeouts After certain connection errors AutoLoad Plus AutoPilot and the ARC Plus will log events and or display error messages The Web interface will log off after the specified inactivity period Timeout durations are user configurable in the Timeouts tab Note For Plus X IIU and ICRU systems ...

Page 58: ...us on messages for every channel check the box marked Show all status conditions Otherwise the front panel status report will only include status on messages The Front Panel Passcode feature available in firmware version 5 0 1 1 or higher adds enhanced security to your ARC Plus The passcode entered in the field shown above can consist of up to 8 numeric digits After the passcode has been set on th...

Page 59: ...nel controls have been inactive for a specified duration This feature is designed to prevent screen burn in over the service life of the ARC Plus Touch If the ARC Plus Touch LCD is already in screen saver mode when you make a change to these settings the screen saver will not update until the next time the front panel enters screen saver mode ...

Page 60: ...notifications of system alarms email server settings and at least one email notification list must be configured Click or turn to CONFIGURING EMAIL ALARM NOTIFICATIONS In order to select a dial out list an RSI must be installed and there must be at least one dial out notification list created Click or turn to CONFIGURING DIAL OUT ALARM NOTIFICATIONS The Alarm on Lost Plus X Device box is checked a...

Page 61: ... systems the ESI tab allows you to configure primary and backup sites When an alarm occurs on the local ARC Plus Touch and dial out notification is enabled for that alarm the ARC Plus Touch will initiate dial out using the RSI installed at the site designated as Primary ESI site The ESI site timeout setting determines how long the ARC Plus Touch will wait for a response from the primary RSI or ESI...

Page 62: ...Site Settings Modem If you are connecting a dial up modem to the ARC Plus enter the modem s initialization string and connection speed where prompted The Inactivity timeout determines how long the ARC Plus will wait after the last data exchange before disconnecting a modem connection To allow the modem to be used for dial out notifications and incoming calls leave the Dial out on alarm and Answer ...

Page 63: ...ase a license for AutoPilot or SNMP Plus an authorization code is provided for one ARC Plus unit Enter the authorization code where prompted in order to begin using AutoPilot or SNMP Plus with this ARC Plus Touch Note The ARC Plus will retain the authorization codes after upgrading firmware resetting factory settings or cycling power However keeping a record of your authorization codes is strongly...

Page 64: ...al If fewer channels are used you can remove unused channels from display by clicking the Hidden Channels tab and checking off boxes under the Hide heading This will remove the metering status and command channels from view If you have a block of channels to hide or unhide choose Hide Unhide Channels from the Tools menu to select channels in blocks ...

Page 65: ...twork can make it easier to navigate between sites To add a category name choose Add Base Category from the Edit Site List menu and add as many root level categories as desired You can then create subcategories by choosing Add Category from the Edit Site List menu SETTING THE NETWORK PASSWORD Tools Set Network Password Each ARC Plus site has a network password that is used when connecting to other...

Page 66: ...choosing Speech Settings from the Edit Settings menu GENERAL Edit Settings ESI Settings General In order to enable dial out notifications check the box marked Dial out on alarm The RSI will dial out when there is an alarm condition under the following circumstances The alarm condition is configured to dial out to a notification list The site with the alarm has designated this RSI as a primary or b...

Page 67: ...s disabling alarm reporting and muting channels while the operator PIN allows readings commands and macros PINs may contain up to eight digits RSI PHRASES The ESI Phrases tab allows configuration of the phrases used to greet the caller say goodbye and accept or reject passwords Edit Settings ESI Settings Phrases Greeting Spoken as soon as the RSI Plus picks up the line The word Hello is always spo...

Page 68: ...te site response The amount of time the RSI allows for another ARC Plus site to supply data that this RSI requested After this duration has elapsed the RSI will speak Error and you may enter more commands or disconnect Command input The amount of time the RSI allows after the last DTMF tone before accepting the DTMF sequence as a single command Context help The amount of time the RSI allows after ...

Page 69: ...Settings ESI Settings Site Presets MACRO PRESETS To set up the preset numbers used to identify macros during an RSI session open the ESI Macro Presets dialog from Edit Settings ESI Macro Presets and select macro names to be associated with as many presets as desired SITE SPEECH LABEL To assign the ARC Plus a speech label for site identification during an RSI session choose Set Site Name Speech Lab...

Page 70: ... Plus will update the internal ARC Plus Touch speech files as needed To prevent problems we strongly recommend only editing the speech system with this editor There may be a file named Firmware hex on the SD card It can be safely removed if desired RECORDING ADDITIONAL VOCABULARY Use your DAW to record each word or phrase as desired You must set the editor to produce 16 bit mono wave files at an 8...

Page 71: ... Tools Speech Editor The speech editor when connected to a site will display both system phrases and any existing custom speech phrases You can limit the display of phrases by using the two buttons at the top and can further restrict the list using the Search box To add a recorded phrase press the Add button The Select a mono 16 bit 8kHz WAV file to import dialog box will open Select the desired f...

Page 72: ...se files on your PC you can use the speech editor off line not connected to your ARC Plus Touch and continue to add to or edit this copy of the vocabulary files which can then be uploaded into your unit when a connection is active Save to Unit This saves your updated vocabulary file system directly onto the connected ARC Plus Touch Save to All Units This saves your updated vocabulary file system d...

Page 73: ... on each tab to set up your analog metering inputs METER CHANNELS The Meter Channels tab permits entry of the channel label units label sample type decimal place and source CHANNEL AND UNITS LABELS Under the Label and Units Label headings enter names for the metering channel and the unit of measurement These labels appear on the front panel web page and in AutoPilot ...

Page 74: ...which provides a 10mV degree output The decimal setting for channels configured for degree is locked at 1 000 0 Indirect Multiplies the raw input voltage by the scaled value of the previous channel and multiples the product by a calibration constant Power Squares the raw input voltage and then multiples the product by a calibration constant VOLTAGE RANGE The voltage range is always 10 to 10 on Plu...

Page 75: ...ou to map a Plus X channel This is the most common selection Virtual Channel Calculates a value for this channel Click or turn to VIRTUAL CHANNELS for instructions Set by a macro This option allows a macro to set this channel s value To assign the value use the Set command in a macro Click or turn to MACRO EXPRESSIONS or in Jet Active Flowcharts in AutoPilot Set by SNMP This option instructs the A...

Page 76: ...late Value button If desired the scale factor used in the calculation can be manually adjusted by changing the value in the Multiply by box In certain cases a manufacturer may specify a MIB parameter with an integer data type when it is actually a floating point number This is to overcome an inherent limitation in the SNMP data formats Usually in these cases the text description field will include...

Page 77: ...EARM DELAY The ARC Plus has a built in mechanism to reduce multiple alarm reports due to a single alarm event An out of tolerance metering channel that returns to tolerance must remain within normal limits for a period of time before a new alarm is issued on that channel Use the Rearm Delay column to specify this period For example a channel configured to cause a high temperature alarm immediately...

Page 78: ...n the web page If email alarm reporting and or dial out notifications are enabled dial out requires optional RSI outbound notifications will also be sent When entering your limits keep in mind the lowest limit value should be the critical low and the highest should be the critical high AutoLoad Plus will automatically adjust limits if they are entered in an order other than least to greatest Becau...

Page 79: ...r channel crosses a limit Each limit is individually configurable Meter Actions Tab To configure an action navigate to the Meter Actions tab Hover over the cell and click the button for the channel and limit that you want to set Select the type of action raise lower run macro or stop macro and the target channel macro ...

Page 80: ...to send email and or dial out notifications when an alarm condition exists and the channel s alarm is enabled and not muted The critical thresholds and warning thresholds can each initiate phone calls and emails to separate lists To set up notification list assignments navigate to the Meter Notifications tab and use the drop down lists to select the email lists and dial out lists each alarm will u...

Page 81: ... channel can be configured with critical alarms and warning alarms low and high thresholds for each and notifications for critical alarms may be directed to different lists from the notifications for warning alarms ...

Page 82: ...the unit so channels will appear the same on every PC used to access the site Under the Min Value and Max Value headings choose the lower and upper bounds for the meter display in AutoPilot and the web page Then click the icon to modify the color selections for each segment of the meter By default meters show red for the ranges outside of critical limits yellow for the ranges that encompass warnin...

Page 83: ...ocabulary to each channel and unit label This vocabulary is used when an RSI is reporting conditions via a telephone connection Click the icons to assign RSI vocabulary Additional words or phrases may be added to the RSI vocabulary using the speech editor Click or turn to CUSTOM RECORDING ...

Page 84: ...n process sets that calibration constant To calibrate a metering channel 1 Choose the channel you want to calibrate by selecting the corresponding row in the Meter Channels tab 2 Click the wrench icon on the far right side of the grid 3 The calibration window will display the current channel scaled value and resolution 4 To change the value of the metering channel enter the actual channel reading ...

Page 85: ... status inputs STATUS CHANNELS Under the On Label and Off Label headings enter names for the status on and status off conditions respectively Labels can be up to twenty 20 characters INVERTING A STATUS CHANNEL Normally a status high input results in the ARC Plus showing a status on condition If you want a status low input to result in the on condition check the box under the Invert heading ...

Page 86: ...ctive Flowcharts in AutoPilot Set by SNMP This option instructs the ARC Plus to populate the status channel based on data retrieved from an SNMP enabled device USING AN SNMP PARAMETER AS A STATUS CHANNEL SOURCE Set by SNMP has been selected in the Source dialog shown above Clicking the Browse button invokes the AutoLoad Plus SNMP MIB BROWSER to identify the desired source parameter for the selecte...

Page 87: ...uld be entered in the corresponding box STATUS ALARMS Set up alarm characteristics for each status channel on the Status Alarms tab ENABLING DISABLING ALARMS To configure status alarms select the desired alarm behavior under the Alarm Behavior heading A status channel can cause an alarm when the status channel is on or when it is off If you do not want status alarms for a particular channel choose...

Page 88: ...o a single alarm event A status channel in alarm must remain in its normal state for a period of time before a new alarm is issued on that channel Use the Rearm Delay column to specify this period ALARM SEVERITY Status alarms may be configured as warning alarms or critical alarms Both types of alarms are reported in the same ways front panel email notifications dial out behavior etc The designatio...

Page 89: ...tatus channel changes state On and off states are individually configurable To configure an action navigate to the Status Actions tab and click the button in the appropriate field for the channel and state that you want to set Select the type of action raise lower run macro or stop macro and the target channel macro ...

Page 90: ...t must be created using the Alarm Notifications dialog Click or turn to CONFIGURING DIAL OUT ALARM NOTIFICATIONS STATUS DISPLAY AutoPilot software and the web page both show on and off indicators for the status channels To change which colors are used navigate to the Status Display tab and click the icon next to each status on or status off message The process is the same as for metering channels ...

Page 91: ...Status Speech Labels tab assign pre recorded vocabulary to each status channel The process for configuring status ON and OFF speech labels is the same as for metering click the icon at the right side of the On Message or Off Message field to assign prerecorded vocabulary ...

Page 92: ...ND DURATION The command duration setting determines the pulse duration for a momentary command COMMAND LABELS Command labels appear on the touch screen on the web page and in AutoPilot software The touch screen raise and lower buttons provide 12 characters for the command label 2 rows of 6 characters each In AutoLoad Plus hover inside Raise label or Lower label field and then click next to the lab...

Page 93: ...tes that a command channel is not in use PlusBus Not used in version 5 Plus X This option allows you to map a Plus X channel This is the most common selection Macro This option allows you to run a macro by issuing a raise or lower command to the channel Two different macros may be assigned to a channel s respective raise and lower commands Note You can always run stop macros from the macro list SN...

Page 94: ...lick on the corresponding dot box The SNMP Command Binder window will be displayed Clicking on the Browse button in the SNMP Command Binder invokes the SNMP MIB BROWSER to identify the desired SNMP parameter OID for the raise or lower function The Command Binder also lets you specify the data type and data value to be sent to the SNMP device along with the selected OID Inclusion of Meter Channel v...

Page 95: ...expression field that channel would always read 100 Typing 50 50 would do the same thing The terms and operators in the expressions can be any of the types listed on the source page M1 for instance represents the current value of the first meter channel You could if you like display the sum of meter 1 and meter 2 on another channel by this expression If Meter 1 is ambient temperature and Meter 2 i...

Page 96: ...s on MIN MAX AVERAGE The ARC Plus Touch allows for setting metering channels to normal minimum maximum or average Typically the real time value is also to be displayed so put any desired calculated values on virtual channels In fact you could devote 4 channels to one input using separate virtual channels for min max and average One channel would be the actual input say Meter 1 and the other three ...

Page 97: ...nd do the same thing but alarms on efficiency work just as well STATUS BASED ON ANALOG LIMITS You can also set a channel based on analog limits While you would normally alarm on limits there may be situations where you would prefer to log values as a status rather than an alarm Here is an example assuming Meter 1 is Power Out A status channel is set to be virtual and the following expression is en...

Page 98: ...g that it is actually on XOR is the exclusive OR operator meaning that either one or the other condition is true but not both The truth table looks like this R1 S1 Result Condition 0 0 OK TX off 0 1 Fault TX on with no command 1 0 Fault TX command on but no response 1 1 OK TX on If no status signal is available there may be a metering value you can use like this R1 XOR M1 90 To prevent false alarm...

Page 99: ...ed To perform a loop put a goto on the line following the steps to be looped followed by the line number of the first action If there are no if statements branching out of the loop it is an infinite loop If the action needs to end when a value is reached include an If statement in the loop which includes a goto to a line outside the loop such as an end statement at the end of the program ACTIONS A...

Page 100: ...F statement The comparison we are evaluating is a status input being compared to a literal value The status input is labeled LOAD OFF LOAD ON and the literal we are comparing with is LOAD ON If the expression evaluates to true we are branching to line 4 In plain English If the load is on then skip to line 4 else continue on line 2 Line 2 doesn t get executed unless the branch from line 1 is not ta...

Page 101: ... maintenance day Check out MACRO SCHEDULE to see how to set the time 1 If day Tuesday goto line 3 2 Raise Start Coffee on site BURK FM for default 3 End macro MUTE METERS In this example all we want to do is grey out the meters on the A transmitter This macro could be called from another macro that put the B transmitter on the air You would also need unmute macros for each transmitter 1 Set meter ...

Page 102: ...to line 1 2 Send email message more than 10 alarms to email list Chief 3 Wait for 01 00 00 4 Goto line 1 TRANSMITTER START SEQUENCE Here is a tube transmitter startup that skips the filament turn on and delay if filaments are already on 1 If status of TX A FIL ON TX A TX A FIL OFF on site BURK FM TX A FIL ON goto line 4 2 Raise TX A FIL ON on site BURK FM for default 3 Wait for 00 05 00 4 Raise TX...

Page 103: ...IR on site BURK FM for default 6 Wait for 00 00 01 7 Turn macro AUTO ON on 8 End macro 9 Message ATTEMPT XFER TO A 10 If status of TX A FAULT TX A OK on site BURK FM TX A FAULT goto line 13 11 Raise TX A TO AIR on site BURK FM for default 12 Goto line 6 13 Message FAIL TX FAULT 14 Goto line 6 ANTENNA MONITOR An older antenna monitor that has to be scanned for the phase and ratio readings can be re...

Page 104: ...K FM 4 Set 1 Ratio on BURK FM MON RATIO on BURK FM 5 Lower TWR1 OFF on site BURK FM for default 6 Raise TWR2 ON on site BURK FM for default 7 Wait for 00 00 05 8 Set 2 Phase on BURK FM MON PHASE on BURK FM 9 Set 2 Ratio on BURK FM MON RATIO on BURK FM 10 Lower TWR1 OFF on site BURK FM for default 11 End macro ...

Page 105: ...nction to test the result of a raise lower command If Relay State Tests if the state of a relay is latched or unlatched If Alarm Tests the expression against the alarm count at the specified site Can be used with an inequality to trigger an action if the alarm count is greater than 0 If Maint Mode Tests the expression against the maintenance mode on off state at the specified site Raise Lower Issu...

Page 106: ...off A macro that is scheduled to run but is not currently executing instructions is considered to be stopped Set Macro Runs or stops the specified macro MISC Wait Programs the macro to pause for the specified duration before executing the next line of code Message Generates a new entry in the ARC Plus event log with the specified message text Note that messages do not initiate any email notificati...

Page 107: ...s View Macros or as keyboard shortcut F6 See AutoPilot documentation for more details To start or stop a macro select the desired macro and press the Run or Stop buttons above the macro list The current status of each macro will show to the left of the macro name WEB PAGE From the web page of the ARC Plus Touch press the Macros tab All macros are available here and can be started and stopped by pr...

Page 108: ...rt Macro or Stop Macro from the dropdown then select the macro you wish to start or stop Often you will use a start macro for both raise and lower as shown here STATUS ACTIONS A change in any status channel can be used to start or stop a macro From the AutoLoad Plus Status Actions tab hover over On Action or Off Action of the appropriate channel and press the button to open the Action dialog Selec...

Page 109: ...ons for details FROM A MACRO A macro that is running can include an instruction to start or stop another macro This is useful for chaining complicated sequences and for reusing common sequences in different scenarios ...

Page 110: ...the dialog box ON DEMAND This is the default and is the correct setting for all of the above methods AT STARTUP When the ARC Plus Touch first powers on a macro can be set to run When the macro ends it will not run again until the next power on unless it is started manually This is useful for automatically initializing a system after a power failure If the macro loops infinitely it will always run ...

Page 111: ...emplates must be configured before use CALENDAR Macros scheduled to run according to a calendar time reference the ARC Plus calendar which is configured by selecting Calendar from the Tools menu in the Macro Editor The Calendar allows six preset times of day per month Pre Sunrise Sunrise Sunset Post Sunset User 1 and User 2 Set up the schedule by clicking under the appropriate heading and using th...

Page 112: ...displayed on the right of the screen Type in the appropriate token for the piece of information you wish to include All characters that are not part of a token are treated literally For example to send an email stating the value of channel 1 and the site name use the following syntax mLabel1 on site m1 mUnits1 at date time Assuming channel 1 is Forward Pwr the email message will be similar to the ...

Page 113: ...d Plus by selecting Macros from the Edit Settings menu This opens the Macro Editor 2 Select an empty macro from the navigation pane on the left 3 Click on the first line in the editor to select it for editing A dropdown box will appear right below the editor pane 4 Click on the arrow in the drop down box to see a list of commands 5 Select the command for this line 6 Make additional selections to c...

Page 114: ...an be programmed to display specific run and stop labels By default these labels are Run Macro and Stop Macro If desired you can change these labels by entering text in the Run Label and Stop Label fields in the macro properties list SPEECH LABEL In order for an RSI speech interface to report the name of the macro a label must be assigned in the Speech Label field SCHEDULE This field tells the mac...

Page 115: ...12 48 26 cm x 8 89 cm x 30 48cm Memory Nonvolatile FLASH memory and battery backed real time clock store data for 20 years without power Front Panel Interface Bright full color LCD Touch Screen Two color alarm LED Communication Ports RJ 45 Ethernet port for 10 100BaseT network connection DB9 RS 232 port for optional serial or dial up modem connection ...

Page 116: ...E DEGREE DEGREES DEICER DELAY DELTA DENON DENVER DETECTOR DETROIT DIAL DIELECTRIC DIGITAL DIGITAL AUDIO LABS DOLBY DOOR DOWN DOWNLINK DRIVE DTV DUMMY E EAS EAST EIGHT EIGHTEEN EIGHTY ELECTRIC ELEVEN EMERGENCY ENCO ENERGY ONIX ENTER EQUALS EQUIPMENT ERI ERROR EVENTIDE EXCITER EXIT EXTERNAL EXTREME F FADE FAHRENHEIT FAIL FAN FAULT FIBER FIFTEEN FIFTY FILAMENT FINAL FIRE FIVE FLASHER FLOOR FLOW FM FM...

Page 117: ... READY RECEIVER RECORD RECOVERY REFLECTED REJECT RELATIVE RELAY REMOTE REPEATER RESET RETURN REVERSE RF RHODE AND SCHWARTZ RIGHT ROLAND ROOM RPU RUN RUNNING S SACRAMENTO SAFE SAN DIEGO SAN FRANCISCO SATELLITE SBS SCREEN SEATTLE SECURITY SEE SENSOR SET SEVEN SEVENTEEN SEVENTY SHACK SHUT SHUTDOWN SIDE SIDELIGHTS SIGHT SIGNAL SILENCE SITE SIX SIXTEEN SIXTY SMOKE SOUTH SPEED ST LOUIS STACK STANDBY STA...

Reviews: