background image


Operation 


At least 250mV of sample 

voltage is required in order to 

calibrate channels. Note that 

channels configured for 

millivolt, degree or virtual 

input types cannot be 

calibrated. 

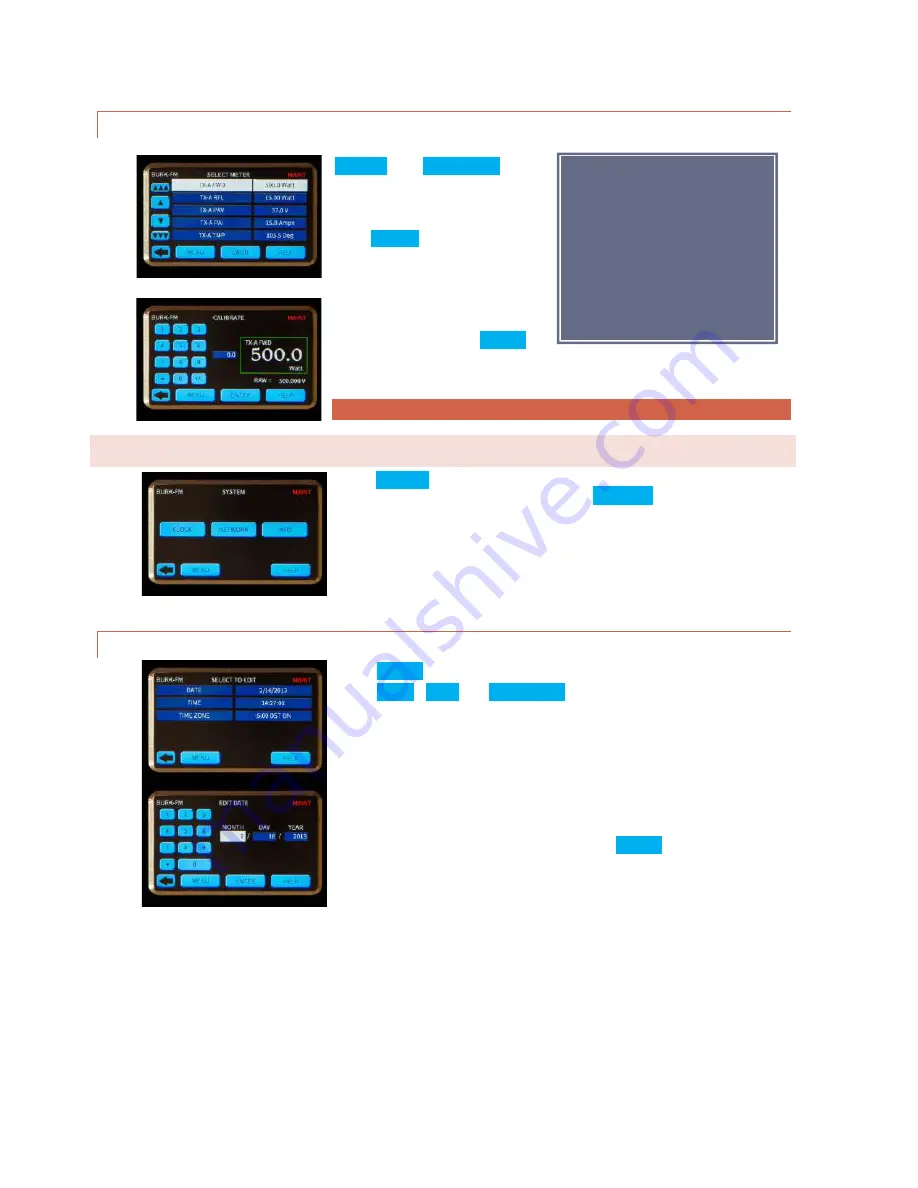
CALIBRATION 

From the main menu, press 

CONFIG

 then 

CALIBRATE

.  

Find the desired channel using 

the scroll buttons as needed then 

press the channel to select it. 
Press CALIB to show the 

calibration screen for the 

selected channel.  
 
Use the keypad to enter the 

actual value as read from the 

local meter, then press 

ENTER

For diagnostic purposes, the raw sample voltage (or 

virtual channel value) will show below the meter window. 

Calibration can only be performed on the local site. 

SYSTEM MENU 

Press

 CONFIG


from the main menu to select the


CONFIGURATION 

sub-menu then press 

SYSTEM 


CLOCK 

Press 

CLOCK

 to display the time and date settings. 

Press 

DATE

 , 

TIME

 , or 

TIME ZONE

 to change the value 

shown.  


Press the field to be changed then  use the keypad to 

enter the correct value.  
Repeat until all fields are correct then press 

ENTER


19 


Summary of Contents for ARC Plus Touch

Page 1: ...Instruction Manual ARC Plus firmware version 4 0 ARC Plus Touch ...

Page 2: ...lans the project and allows time for familiarization before jumping in We recommend setting up new units in a comfortable work environment before installing at the transmitter site In addition to hardware familiarization it will also be possible to do much of the configuration before going to the site Copyright 2008 2013 Burk Technology Inc All rights reserved Information in this manual is subject...

Page 3: ...al A model ESI Plus Telephone Speech Unit can be added to the ARC Plus Touch If your unit has this option there will be a pair of RJ 11s on the rear panel The ESI Plus operation is described in the ARC Plus Version 3 manual The older term ARC Plus SA referred to an ARC Plus unit with an added ESI Plus Interface to analog and status inputs and command outputs is done through Plus X units while dire...

Page 4: ...n ARC Plus environment contact support for guidance NEW IN FIRMWARE VERSION 3 Version 3 introduced a number of significant new features as described in the ARC Plus Version 3 manual on the pages noted here All new web interface offering platform independence better speed and more flexible navigation 83 Redesigned smartphone interface to carry over the updated look and new features of the web inter...

Page 5: ... Front Panel 8 Rear Panel 9 Inputs and Outputs 10 Plus X Ethernet I O 10 PlusConnect Direct Transmitter Interfaces 10 Communications 11 AutoLoad Plus Software 11 Enhanced Speech Interface ESI Plus 11 AutoPilot 2010 Software 12 Web based monitoring and control 13 Software and Firmware Updates 13 System Security 13 Operation 14 Touch Screen 14 Header 14 Footer 14 5 ...

Page 6: ...Select Site 16 Channel Display 16 Status Display 16 Macros 17 Alarms 17 Events 17 Phone 17 Maintenance 18 Configuration Menu 18 Meter Mutes 18 Status Mutes 18 Calibration 19 System Menu 19 Clock 19 Network 20 Information 20 Installation 21 Needed Items 21 Recommended Sequence 21 6 ...

Page 7: ...Contents Rear Panel Connections 22 Connecting to the Ethernet 22 Initial Front Panel Settings 22 Network settings 22 Time Settings 22 Configuration Using AutoLoad Plus Software 23 7 ...

Page 8: ...erver for access via web browser PC or mobile device Connection to the plant equipment is by means of one or more Plus X I O units FRONT PANEL TOUCH SCREEN LCD The Touch screen display shows all status and metering values and offers command and macro activation Navigation through the menu system is by touch as are command activation and data entry A popup keyboard is available as appropriate The L...

Page 9: ...ED DB 9M Service only Not used in normal operation ETHERNET RJ 45 The Ethernet jack connects the ARC Plus Touch to the LAN WAN ALARM The Form C alarm relay can be used to operate external equipment when an alarm condition exists The relay may be configured to latch closed when there is an alarm at the local site or when there is an alarm at any site in the ARC Plus network A 3 pin connector block ...

Page 10: ... www burk com Plus X devices include PLUS X INTEGRATED INPUT UNIT PLUS X INTEGRATED COMMAND RELAY UNIT PLUS X 300 PLUS X 600 PLUS X EM SERIES ENVIRONMENTAL MONITORS PLUS X AC 8 PLUS X IP 8 ADAPTER PLUS X GSC ADAPTER PLUS X RP 8 ADAPTER For specific information on installing and configuring your Plus X accessories refer to the manual for your product Manuals are available online at www burk com PLU...

Page 11: ...ished via AutoLoad Plus locally or remotely An IP connection is required See the ARC Plus Version 3 manual for full details ENHANCED SPEECH INTERFACE ESI PLUS The Enhanced Speech Interface ESI Plus is optional The ESI Plus provides dial in monitoring control and dialout alarm notifications via a standard phone line connection All site channel and macro labels spoken by the ESI Plus are user specif...

Page 12: ...IP connectivity allows simultaneous control of multiple sites while optional dial up modem connectivity provides a means to access single sites from outside the LAN AutoPilot 2010 provides a customizable GUI logging and automatic report generation network and SNMP monitoring and integration of remote security cameras 12 ...

Page 13: ...re on the web interface see the ARC Plus Version 3 manual SOFTWARE AND FIRMWARE UPDATES Periodic updates to ARC Plus software and firmware along with release notes are made available on the Burk Technology website To be notified when new versions are available sign up for email updates on the Burk Technology web site SYSTEM SECURITY The ARC Plus protocol contains an encrypted digital signature pre...

Page 14: ...ntenance mode can only be changed on the local site TOUCH SCREEN For ease of use the touch screen is designed to be as consistent as possible from one function to the next HEADER The top of the screen will always show the name of the selected site on the left the time in the center and site status on the right FOOTER Always returns to the next highest level in the menu tree If the next highest lev...

Page 15: ...AD button appears on the left side of the display COMMAND BUTTONS The right side of the display is generally reserved for actions such as channel raise and lower commands macro start and stop commands and various enable disable functions Pushing a command button executes the raise or lower command For momentary commands the duration is set in AutoLoad Holding the command button does not extend the...

Page 16: ...e sites Press the desired site name then press the SELECT button CHANNEL DISPLAY Channels are selected by scrolling with the up and down arrow keys or by selecting the keypad for direct entry The metering value for each channel is displayed in the central window along with the label and units entered in Autoload Below this is the status associated with this channel The two large buttons on the rig...

Page 17: ...lect ALARMS An exclamation point indicates a critical alarm Highlight the desired alarm to read the details and clear individually The CLEAR ALL button is a shortcut to clear all alarms at once Cleared alarms are moved to the bottom of the list and marked CLEARED EVENTS Press EVENTS on the main menu to review a list of system events Use the scroll bars to move through the list PHONE Press PHONE on...

Page 18: ...larm reporting during maintenance This setting can also be changed remotely CONFIGURATION MENU Press CONFIG from the main menu to select the CONFIGURATION sub menu for the following functions METER MUTES Alarm muting permits testing or abnormal operation without triggering alarms From the main menu press CONFIG then METER MUTES Find the desired channel using the scroll buttons as needed press the ...

Page 19: ...d channel Use the keypad to enter the actual value as read from the local meter then press ENTER For diagnostic purposes the raw sample voltage or virtual channel value will show below the meter window Calibration can only be performed on the local site SYSTEM MENU Press CONFIG from the main menu to select the CONFIGURATION sub menu then press SYSTEM CLOCK Press CLOCK to display the time and date ...

Page 20: ...the desired parameter to select the appropriate edit screen Press the field to be changed then use the keypad to enter the correct value Repeat until all fields are correct then press ENTER INFORMATION Press INFO to display the firware version serial number and MAC address 20 ...

Page 21: ... for your Ethernet connections to the ARC Plus Touch and peripherals RECOMMENDED SEQUENCE The following sequence assumes the unit is unpacked and powered up at the bench First read the Introduction section of this manual As you read descriptions in the manual it will be useful to follow along on the actual unit Step Reference 1 Perform the network setup using the touch screen Pages 20 22 2 3 4 5 6...

Page 22: ... in the AutoLoad software program which may be downloaded from www burk com downloads You will first need to use the front panel configuration pages to give the ARC Plus Touch an IP address and set the time NETWORK SETTINGS See page 20 for help editing the network information Enter the PRIVATE IP ADDRESS PUBLIC IP ADDRESS and PORT values that will identify the ARC Plus Touch as a unique device on ...

Page 23: ...ides access to every system parameter such as metering status and command channel settings calibration user security front panel display options time and date settings alarm notifications ESI Plus settings macros and more AutoLoad Plus Modems and the ESI are covered in depth in the ARC Plus Version 3 manual which should be downloaded from www burk com downloads With the exception of changes in the...

Reviews: