


SecuTronic
English I
2
Operating instructions
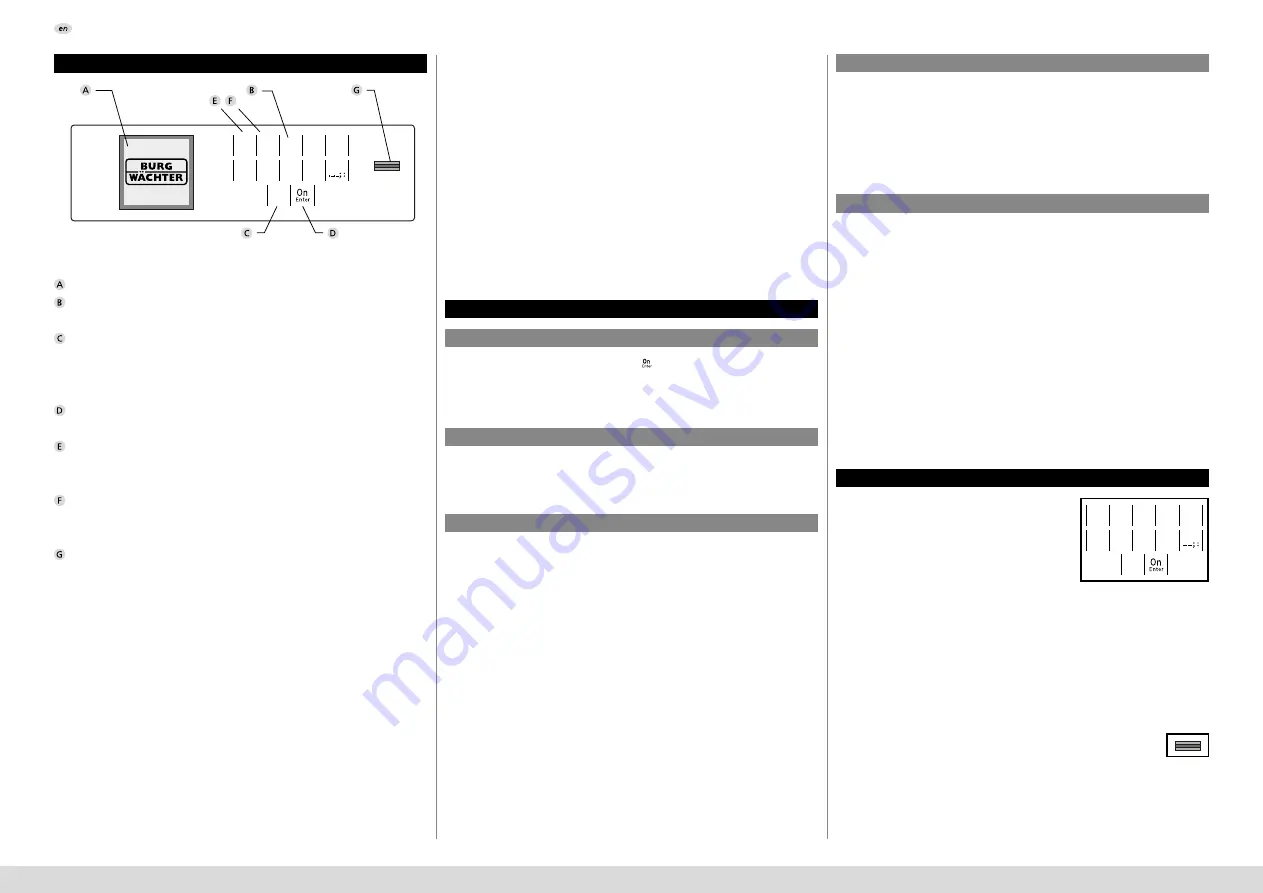
Display
Number keys
The numbers “1“ - “0“ are used for input e.g. when entering the code.
“
Func“ key
Multifunction key which adapts to perform several functions, including; Go
back one menu level, delete a entered character, show the main menu. The
display shows the current function of the key (see section 3).
“
On/Enter“ key
The “On/Enter“ key starts the system or selects the current menu item.
“1“ key
The key can be used to scroll up if there are several menu options.
If this is possible, the display shows this (see section 3).
“2“ key
The key can be used to scroll down if there are several menu options.
If this is possible, the display shows this (see section 3).
Fingerprint sensor
Fingerprints can be stored via the fingerprint sensor and used to open the safe.
Design
Dear customer,
Thank you for choosing a safe with a BURG-WÄCHTER SecuTronic lock. This
electronic lock is certified according to ECB•S Class B.
You have purchased a product that meets extremely high security requirements
and was developed and produced according to current technical standards.
This lock is certified according to EN 1300: 2018. (Classification of high-security
locks according to their resistance to unauthorised opening).
Important: Please read the entire instruction manual before programming
and keep this manual safe so that you can revisit it at a later date.
We hope you enjoy your new BURG-WÄCHTER safe.
Your Burg-Wächter KG
Activation
Languages
The electronics are switched on using the
key on the keyboard. This then
lights up. At the same time, the display shows the BURG-WÄCHTER logo for a
moment before the input graphic for the pin code or fingerprint appears.
The menu navigation in the display is available in twelve languages and can be
set via the “Languages” menu. Please refer to chapter “Menu Language“ for a
detailed explanation.
General information
Blocking times
Increasing burglary protection
To protect against tampering, the lock electronics block access to the safe for
five minutes if an incorrect pin code has been entered three times in succession.
Then, for every further incorrect entry, ten minutes. During this blocking time,
the remaining time on the display runs countsdown. It is not possible to open
the safe during this period, even with a valid user or administrator code.
Please take care to ensure codes do not fall into the wrong hands. Therefore,
store the codes in a safe location so that they can only be accessed by author-
ised persons. In the event you lose a code, the lock must be set to a new code.
• The factory code must be changed as soon as the lock is commissioned
• Codes that are easy to guess (e.g. 1, -2, -3, -4, -5, -6) must not be used
• Personal data (e.g. birthdays) or other data that may be guessed with
knowledge of the code owner must not be used as a code
• After changing the code, the lock must be checked several times with the
safety door opened
Attention:
All changes to the administrator code, the factory code and the
user code must be carried out with the safe door open! After changing a code,
the lock must be operated several times with the new code with the safe door
open.
A valid pin code must also be entered to open the door with a fingerprint.
Background:
Fingerprints do not receive full access rights in the current software version.
Full access rights are required to authorise the opening and unlock the safe.
Consequently, a valid pin code of a second user is required. During the process
of creating a user pin code, a prompt asks whether the access right should
also require a fingerprint. If the user selects yes, the pin code is automatically
downgraded to a half-access right. This pin code now requires a pin code or
fingerprint from a different authorised user. A pin code and fingerprint from
the same user will not be accepted. If you choose not to require a fingerprint
when creating a pin code, it will keep full access rights and a second user is not
required to open the safe.
Authorisation request
Input options
Number keys:
The numbers “1“ - “0“ are used for input e.g. when
entering the code.
“Func“ key:
Multifunction key which adapts to perform several
functions, including; Go back one menu level,
delete a entered character, show the main menu. The display shows the current
function of the key.
“On/Enter“ key:
The “On/Enter“ button starts the system or selects the current menu item.
Keys “1“ and “2“:
In menus, you can scroll up and down using these keys.
If this is possible, the display shows this with the corresponding arrows.
Fingerprint sensor:
Fingerprints can be stored via the fingerprint sensor or used to open
the safe


