Bullard PA1 User Manual Download Page 6

PA20 Series Powered Air-Purifying Respirator

PA1/PA2 Blower Assembly User Manual

6

Donning the Blower and Respirator

Prepare to don the blower and hood in a safe, hazard- free
area and do the following:

Check that the blower unit is securely clamped closed. 

Prior to assembling the system, fit the blower and belt
around the user’s waist. With the blower at the rear of the
user, adjust the belt for a comfortable fit.

Remove the belt and blower.

Ensure that the filter is an approved filter suitable for the
challenge being applied and is compatible with the PAPR. 

The use of any filter not approved with the PA1BU and
PA2BU units may put the user at risk and could result in
death or serious injury.

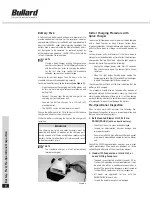
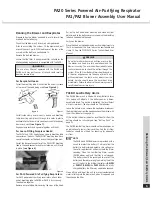
For Respirator Hoods:

Insert the breathing tube 5 inches into the air entry sleeve
at the rear of the hood being used 

(see Figure 6)

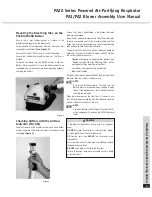
Install nylon clamp over air entry sleeve and breathing
tube, inserting clamp locks through two holes in plastic
anchorplate that is sewn into hood. Locks should face away
from user’s neck 

(see Figure 7)

.

Engage clamp locks and squeeze together until tight.

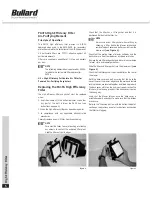
For Loose-Fitting Facepiece Hoods:

The 20LFM and 20LFL hoods have a sewn-in breathing tube
connector on the back. The PA20LFBT breathing tube has a
special connector on the hood end with bayonet type pins.

Insert the bayonet connector of the PA20LFBT breathing
tube in the hood connector and turn clockwise until it locks
in place 

(see Figure 8)

.

For PA20 Powered Air-Purifying Respirators:

For PA20 powered air-purifying respirators, attach other
end of breathing tube to PA1BU or PA2BU  by screwing
the adapters together.
Remove any protective film covering the visor of the hood.

Put on the belt and blower assembly and make any final
adjustments to the belt as necessary, keeping the breathing
tube and hood behind the head.

Switch on the blower.

Place the hood on the head making any final adjustments to
the fit as required at this time to ensure a comfortable and
stable fit. See the CC20/PA20 Series Tychem Hood User
Manual.

PA1BU Low Battery Alarm

The PA1BU Blower unit is fitted with a Low Battery Alarm.
This device will activate if the battery power is below
acceptable levels. The device is indicating that insufficient
airflow is imminent. The user should  do the following:

Leave the hazard area, remove the headpiece, disconnect
the breathing tube from the hood and check the airflow with
the airflow indicator (see page 5). 

If the airflow indicator indicates insufficient airflow, the
battery should be fully charged (see “Battery Pack” on
page 4).

The PA1BU Low Battery Alarm should not be relied upon as
an indication of a low air flow condition. Only the Air Flow
Indicator should be utilized for checking for adequate 
air flow.

NOTE

The PA1BU and PA2BU blowers are provided with a
circuit to protect the battery. It will not allow the
battery to be discharged below a safe voltage for
the cells, regardless of airflow, without the Alarm
sounding. When the Low Battery Alarm sounds
(PA1BU blower only) and the filter is not clogged,
the battery should be recharged to protect the
battery and thereby prolong the working life of the
unit. If the ball in the Airflow Indicator is 

BELOW

or 

PARTLY BELOW

the 

PASS LINE

with a fully

charged battery, the filter may need to be changed.

Clean off the outside of the unit to prevent contaminated
material falling into the blower unit when it is opened and
then change the filter.

WARNING

Donning the Blo

w

er/Lo

w Battery Alarm

WARNING

Do not enter a hazardous area until you are sure that
the blower and hood are fully operational and the
blower is running. The user should periodically leave
the hazardous area to check the airflow through the
system. If the PA1 Low Battery Alarm should sound, or
if the user experiences any laboring of breath, any
grittiness between the teeth or any odors from the
hazard, he/she should leave the hazardous area
immediately. Failure to observe these warnings could
result in death or serious injury. 

Figure 6

Figure 7

Figure 8

Summary of Contents for PA1

Page 1: ... Use strictly in accordance with instructions labels and limitations pertaining to the PA20 respirator 1 The PA20 respirator does not supply oxygen Use only in adequately ventilated areas containing at least 19 5 oxygen 2 Do not use when concentrations of contaminants are immediately dangerous to life or health 3 Do not use these respirators for respiratory protection during abrasive blasting 4 Do...

Page 2: ...4 The Battery Charger Both standard and quick chargers are available The high efficiency air purifying element must be mounted inside the blower body The blower unit draws in contaminated air through the filter The filtered air is blown into the wearer s hood through the breathing tube A flow indicator is provided to check that there is an adequate volume of air available to the wearer prior to us...

Page 3: ...arger follow these important guidelines These guidelines also apply to blower units that have been in storage for extended periods of time For new blower units or blower units that have been in storage for extended periods of time follow the directions above under Battery Pack and when the light begins to flash on the Quick Charger do the following Unplug the charger power cord Wait 15 seconds Plu...

Page 4: ...ball in the Airflow Indicator should be observed If any part of the ball is below the PASS LINE on the Airflow Indicator check for Clogged or damaged air purifying filter element See Replacing the PA1FG High Efficiency Filter on the next page for filter mounting instructions Low battery charge or battery malfunction Blower malfunction If the ball is completely above the PASS LINE on the Airflow In...

Page 5: ...the exposed filter pleat Hold the filter only by its edges Check that the filter has a filter gasket and that it is positioned flat behind the filter lip NOTE Always use a new filter gasket when refitting or changing a filter Unclip the blower latches and remove the back cover and belt assembly from the blower unit see Figure 4 Check that the mating faces of blower unit body and the back cover are...

Page 6: ...e fit as required at this time to ensure a comfortable and stable fit See the CC20 PA20 Series Tychem Hood User Manual PA1BU Low Battery Alarm The PA1BU Blower unit is fitted with a Low Battery Alarm This device will activate if the battery power is below acceptable levels The device is indicating that insufficient airflow is imminent The user should do the following Leave the hazard area remove t...

Page 7: ...ection and could result in death or serious injury Consult your local safety professional if you suspect that contaminant has entered the breathing tube When cleaning the equipment do the following Ensure water does not enter filter Replace wet filter DO NOT use gasoline organic based solvents or chlorinated degreasing fluids such as trichloroethylene as they will cause damage DO NOT immerse the e...

Page 8: ...charger for PA2BU Replacement Filter Gasket PA1FG3 Filter gasket assembly 3 per box PA1FGBP Filter gasket assembly 36 per box Replacement Parts and Accessories PA1SB Standard belt PA1DB Decon belt PA1EB Extension belt kit PA1DEB Extension decon belt kit PA1LSK Blower latch and screw kit 4 latches 16 screws PA1AFI Air Flow Indicator PA1BU PA1 Blower housing unit motor and impeller PA2BU PA2 Blower ...

Page 9: ...cturer s instructions for changing cartridges and or filters M All approved respirators shall be selected fitted used and maintained in accordance with MSHA OSHA and other applicable regulations N Never substitute modify add or omit parts Use only exact replacement parts in the configuration as specified by the manufacturer O Refer to users instructions and or maintenance manuals for information o...

Page 10: ...285 5273 Tel 859 234 6616 Fax 859 234 8987 www bullard com Bullard GmbH Hochkreuzallee 36 53175 Bonn Bad Godesberg Germany Tel 49 228 931933 0 Fax 49 228 931933 50 2003 Bullard All rights reserved It s Your Life and You re Worth It is a trademark of Bullard Tychem is a registered trademark of E I DuPont de Nemours Company ISO 9001 certified Cert i f i e d I S O 9001 ...

Reviews: