background image

TM

Battery P

a

ck/Pr

e

-Oper

ational Inspection

3

The charging port plug and cover assembly must be
mounted and locked in position on the charging port
during use and at all times except when recharging the
battery. Failure to follow these instructions could result
in death or serious injury.

WARNING

Battery Pack

A fully charged battery pack will power a blower unit to
provide adequate air volume for the respirator hood for
approximately 10 hours for the PA1BU, and approximately 6
hours for the PA2BU, under normal working conditions. The
battery pack is mounted inside the blower unit body and is
not designed to be removed or replaced except by
authorized service personnel. The ON/OFF switch must be
in the OFF position for re-charging.

NOTE

If using a Quick Charger or Gang Charger, please
see the instructions in “Initial Charging Procedure
with Quick Charger” prior to charging the battery
for the first time. Also, follow this procedure
following  periods of extended storage. 

Charging for periods longer than 16 hours with the
standard charger will reduce battery capacity.

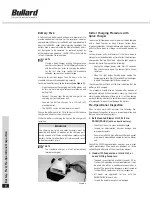
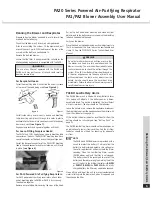
To charge the battery pack, do the following 

(see Figure 1)

:

• Open the cover on the charging port of the blower unit

by turning the retaining collar counter-clockwise and
pulling it off.

• Connect the lead from the battery charger to the

charging port on the blower unit.

• Connect the battery charger to a 120-volt (AC)

electrical outlet.

• The ON/OFF switch on the blower must be off.

Charge the battery pack for 14 to 16 hours with standard
charger and 8 hours with quick charger.

While the battery is charging the light on the charger will
remain on. 

NOTE

The standard charger will not automatically
terminate charging!

Initial Charging Procedure with
Quick Charger

To ensure a full charge on a new blower unit being charged
with a Quick Charger or Gang Charger, follow these
important guidelines. These guidelines also apply to blower
units that have been in storage for extended periods of
time.

For new blower units or blower units that have been in
storage for extended periods of time, follow the directions
above under “Battery Pack”, and  when the light begins to
flash on the Quick Charger do the following: 

• Unplug the charger power cord. Wait 15 seconds.

Plug the charger in again. The charger light will now
remain on.

• When the light begins flashing again, unplug the

charger power cord. Wait 15 seconds. Plug the charger
in again. The charger light will now remain on.

The charger light will flash a third time, indicating that the
battery is fully charged.

This procedure should also be followed after periods of
prolonged storage. Without periodic charging, the nickel
metal hydride batteries will lose up to 1% of their charge
per day. Allowing a battery to self-discharge during periods
of prolonged storage will not damage the battery. 

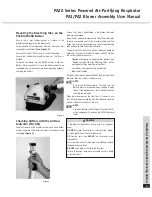
Pre-Operational Inspection

Prior to each work shift, perform the following Pre-
Operational Inspection to ensure proper operation and
that you have the following items.

1. Belt Mounted Blower Unit, Part No.

PA1BU/PA2BU 

(with on board battery) 

• Check that the unit is clean and undamaged.

• Inspect for deterioration, physical damage, and

improper assembly.

• Ensure that a PA1FG high efficiency filter and gasket

are properly mounted and seated inside the blower
unit.

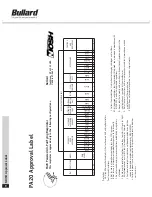
Consult the NIOSH approval label and your own in-plant
safety professional if you have any questions as to the
suitability and efficiency of the air-purifying element.

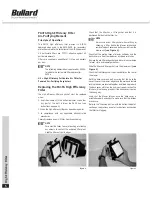
2. Hood with Suspension or Hard Hat, or

Loose Fitting Facepiece

• The hood is constructed of either Tychem® QC or

Tychem SL. Depending on the model ordered, it may
be used with either a headband suspension or a
hard hat. The loose fitting facepiece is constructed of
Tychem QC and features an internal suspension

• 

All hoods are approved for use with the
PA1BU/PA2BU Blower Units.

• Inspect the hood for any physical damage.

Figure 1 

Summary of Contents for PA1

Page 1: ... Use strictly in accordance with instructions labels and limitations pertaining to the PA20 respirator 1 The PA20 respirator does not supply oxygen Use only in adequately ventilated areas containing at least 19 5 oxygen 2 Do not use when concentrations of contaminants are immediately dangerous to life or health 3 Do not use these respirators for respiratory protection during abrasive blasting 4 Do...

Page 2: ...4 The Battery Charger Both standard and quick chargers are available The high efficiency air purifying element must be mounted inside the blower body The blower unit draws in contaminated air through the filter The filtered air is blown into the wearer s hood through the breathing tube A flow indicator is provided to check that there is an adequate volume of air available to the wearer prior to us...

Page 3: ...arger follow these important guidelines These guidelines also apply to blower units that have been in storage for extended periods of time For new blower units or blower units that have been in storage for extended periods of time follow the directions above under Battery Pack and when the light begins to flash on the Quick Charger do the following Unplug the charger power cord Wait 15 seconds Plu...

Page 4: ...ball in the Airflow Indicator should be observed If any part of the ball is below the PASS LINE on the Airflow Indicator check for Clogged or damaged air purifying filter element See Replacing the PA1FG High Efficiency Filter on the next page for filter mounting instructions Low battery charge or battery malfunction Blower malfunction If the ball is completely above the PASS LINE on the Airflow In...

Page 5: ...the exposed filter pleat Hold the filter only by its edges Check that the filter has a filter gasket and that it is positioned flat behind the filter lip NOTE Always use a new filter gasket when refitting or changing a filter Unclip the blower latches and remove the back cover and belt assembly from the blower unit see Figure 4 Check that the mating faces of blower unit body and the back cover are...

Page 6: ...e fit as required at this time to ensure a comfortable and stable fit See the CC20 PA20 Series Tychem Hood User Manual PA1BU Low Battery Alarm The PA1BU Blower unit is fitted with a Low Battery Alarm This device will activate if the battery power is below acceptable levels The device is indicating that insufficient airflow is imminent The user should do the following Leave the hazard area remove t...

Page 7: ...ection and could result in death or serious injury Consult your local safety professional if you suspect that contaminant has entered the breathing tube When cleaning the equipment do the following Ensure water does not enter filter Replace wet filter DO NOT use gasoline organic based solvents or chlorinated degreasing fluids such as trichloroethylene as they will cause damage DO NOT immerse the e...

Page 8: ...charger for PA2BU Replacement Filter Gasket PA1FG3 Filter gasket assembly 3 per box PA1FGBP Filter gasket assembly 36 per box Replacement Parts and Accessories PA1SB Standard belt PA1DB Decon belt PA1EB Extension belt kit PA1DEB Extension decon belt kit PA1LSK Blower latch and screw kit 4 latches 16 screws PA1AFI Air Flow Indicator PA1BU PA1 Blower housing unit motor and impeller PA2BU PA2 Blower ...

Page 9: ...cturer s instructions for changing cartridges and or filters M All approved respirators shall be selected fitted used and maintained in accordance with MSHA OSHA and other applicable regulations N Never substitute modify add or omit parts Use only exact replacement parts in the configuration as specified by the manufacturer O Refer to users instructions and or maintenance manuals for information o...

Page 10: ...285 5273 Tel 859 234 6616 Fax 859 234 8987 www bullard com Bullard GmbH Hochkreuzallee 36 53175 Bonn Bad Godesberg Germany Tel 49 228 931933 0 Fax 49 228 931933 50 2003 Bullard All rights reserved It s Your Life and You re Worth It is a trademark of Bullard Tychem is a registered trademark of E I DuPont de Nemours Company ISO 9001 certified Cert i f i e d I S O 9001 ...

Reviews: