background image

2-4

Setting Up the System

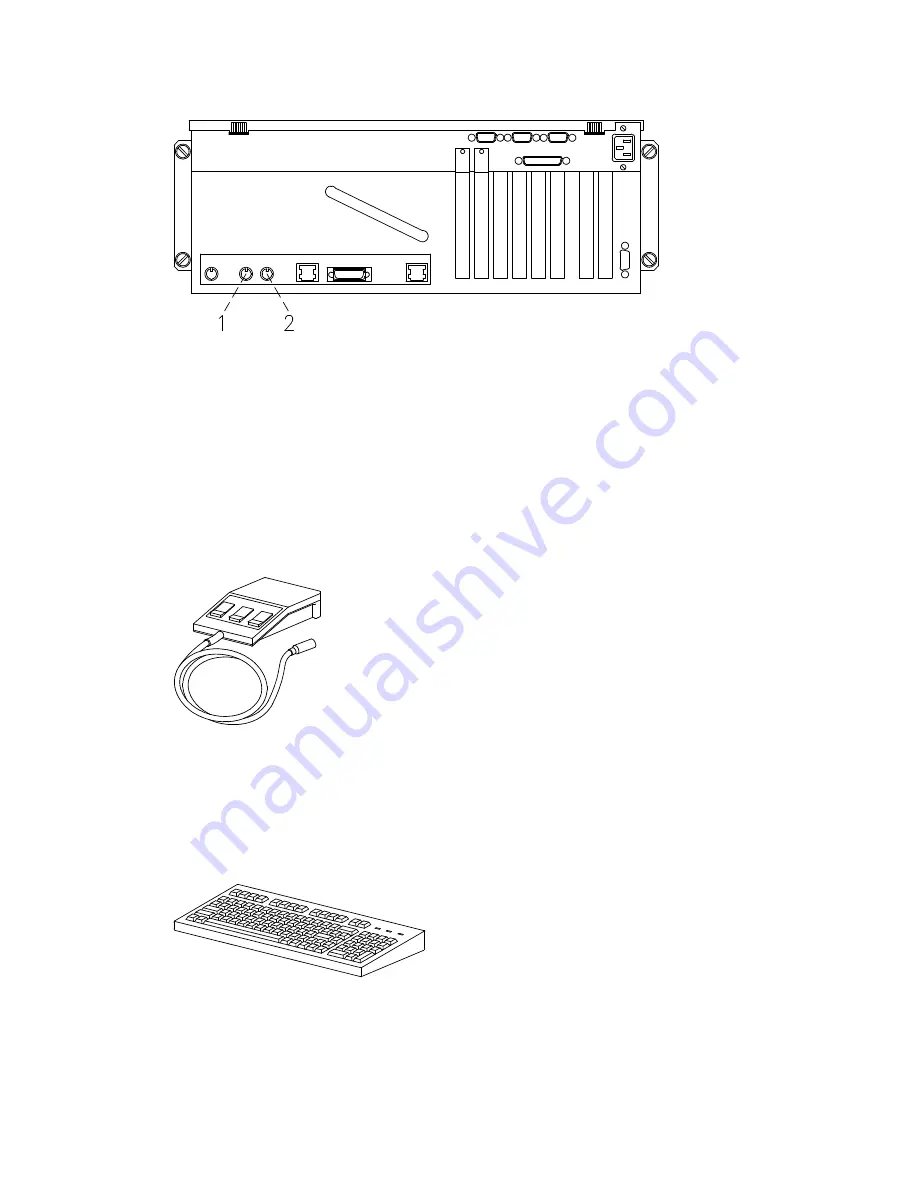
Connecting Keyboard and Mouse

CPU Drawer Rear Side

Mouse

Keyboard

Note:

Keyboard and mouse are for use with graphic monitors only. You do not need to
connect them, if you are not going to connect any graphic monitor.

Connect the mouse to the dedicated connector at the rear of the CPU drawer. Do not force
the cable plug into the socket.

Note:

An extender cable for the mouse is supplied with the system. Use it in case the
distance between the CPU drawer and the mouse requires it.

Connect the keyboard to the dedicated connector at the rear of the CPU drawer. Do not
force the cable plug into the socket.

Note:

An extender cable for the keyboard is supplied with the system. Use it in case the
distance between the CPU drawer and the keyboard requires it.

Summary of Contents for Escala EPC400

Page 1: ...Bull ESCALA EPC400 Setting Up the System 86 A1 18PX 02 ORDER REFERENCE...

Page 2: ......

Page 3: ...Bull ESCALA EPC400 Setting Up the System Hardware July 1998 BULL ELECTRONICS Angers CEDOC 34 Rue du Nid de Pie BP 428 49004 ANGERS CEDEX 01 FRANCE 86 A1 18PX 02 ORDER REFERENCE...

Page 4: ...k or other Bull Technical Publications you are invited to use the Ordering Form also provided at the end of this book Trademarks and Acknowledgements We acknowledge the right of proprietors of tradema...

Page 5: ...Preface iii...

Page 6: ...formation Connecting Devices on page 2 1 ASCII terminal Parallel printer RS 485 RS 232 LAN 10 Mb s LAN 100 Mb s LAN AUI Serial printer Keyboard Mouse Reference information Inserting the Key on page 2...

Page 7: ...software status for your system pre installed not installed If the Preload Report sheet has been supplied with the system the software is pre installed Skip to step 5 If the Preload Report sheet is no...

Page 8: ...Setting Up the System vi...

Page 9: ...1 7 Chapter 2 CPU Drawer Setup Procedure 2 1 Connecting Devices 2 1 Connecting Terminals 2 2 Connecting Keyboard and Mouse 2 4 Connecting Printers 2 5 Inserting the Key 2 6 Connecting the Power Cords...

Page 10: ...viii Setting Up the System...

Page 11: ...ubject to the following two conditions 1 this device may not cause harmful interference and 2 this device must accept any interference received including interference that may cause undesired operatio...

Page 12: ...VDE standard 0837 1986 and the CENELEC European Committee for Electrotechnical Standardization Harmonization Document HD 482 S1 1988 The German testing institute VDE assigned a certificate of conform...

Page 13: ...rked in order to correctly address the recycling operations The unit is designed taking into account the requirements for disassembly largest parts are made of homogeneous material to facilitate recyc...

Page 14: ...xii Setting Up the System...

Page 15: ...ding in terms of memory CPU s controllers and devices is described Configuring the System provides information about the CPU drawer the PCI expansion drawer and the rack configuration rules Examples o...

Page 16: ...lation Guide provides detailed instructions for the AIX installation Disks and Tapes Configuration Information describes the setting of addresses and switches for both disk and tape drives It also inc...

Page 17: ...vironmental and technical characteristics Note It is assumed that the site has already been properly prepared as described in the Site Preparation for Rack Systems manual If it is not so check the ins...

Page 18: ...ding a specific set of paper documentation is available at any authorized supplier It is addressed to both service people and trained customers who are in charge of the system maintenance For a detail...

Page 19: ...cation lines One parallel port One mouse port One keyboard port One EIA 485 communication line for drawer interconnection Support for an integrated modem using one ISA port Disk Devices Up to 6 x 1 in...

Page 20: ...CPU Drawer Front View From the front of the CPU drawer you have access to the following features and components Media Devices Area Hard Disk Devices Area Key Mode Switch Operator Panel Power Supply Fa...

Page 21: ...tors Three serial ports RS 232 9 pin male from right to left COM1 COM2 and COM3 Parallel port 25 pin female Power cord receptacle Video graphics SVGA 15 pin female LAN 100M bit RJ 45 LAN AUI 15 pin fe...

Page 22: ...the System PCI Expansion Drawer Front View From the front of the PCI expansion drawer you can access to the following features and components Media Devices Area Hard Disk Devices Area Operator Panel P...

Page 23: ...CI expansion drawer you can identify the following connectors and slots Power Cord Receptacle PCI Controller Slots First KPE Planar KXB Card Slot First KPE Planar PCI Controller Slots Second KPE Plana...

Page 24: ...1 8 Setting Up the System...

Page 25: ...ase refer to the PCI Expansion Drawer Quick Set Up leaflet For other drawers please refer to the documentation delivered with those drawers and to the Rack Service Guide manual Connecting Devices The...

Page 26: ...to connect an external UPS device Uninterruptible Power Supply The UPS if present provides continuous power to the system and sustains it in case of outages for a given amount of time SVGA port Used t...

Page 27: ...as specified below Communication Options Line Speed baud rate 9600 Word Length bits per character 8 Parity no none Number of Stop Bits 2 Interface RS 232C or RS 422A Line Control IPRTS Keyboard and Di...

Page 28: ...t the rear of the CPU drawer Do not force the cable plug into the socket Note An extender cable for the mouse is supplied with the system Use it in case the distance between the CPU drawer and the mou...

Page 29: ...rial connectors RS 232 ports CPU Drawer Rear Side Serial Ports Parallel Port You can also connect printers to a SCSI port if PCI controllers housing SCSI ports are installed inside the CPU drawer and...

Page 30: ...s supplied with the system The key is used to activate the key controlled switch which is named Key Mode Switch This switch enables the power on off functions Keys Insert one of the two keys in the CP...

Page 31: ...g steps must be performed to give it AC power Note Make sure that the CPU drawer Key Mode Switch is set to the Power Off position and all external devices connected to it are powered off 1 Identify th...

Page 32: ...DU outlet is set to OFF b Plug the power cord of the drawer into the chosen PDU outlet and into the dedicated receptacle on the drawer itself c Set the circuit breaker related to the chosen PDU outlet...

Page 33: ...the PDU power cord to the proper wall outlet DANGER An electrical outlet that is not correctly wired could place hazardous voltage on metal parts of the system or the devices that attach to the syste...

Page 34: ...when you receive it This makes your first startup of the system easier and faster Make sure your system software is pre installed by checking that the Preload Report sheet has been supplied with the s...

Page 35: ...en asking you to identify your system console A specific key is indicated for each terminal Press the specified key on the terminal you want to use as the system console Press a key on only one termin...

Page 36: ...2 12 Setting Up the System...

Page 37: ...Chapter 3 Starting and Stopping the System This chapter describes the steps for the power on and power off procedures for daily operation of your system Starting the System Logging into the System Sto...

Page 38: ...e that all the rack drawers are connected to the PDU outlets Warning Do not connect the CPU drawer and the PCI expansion drawer to a power source other than the PDU 3 Switch on the external devices if...

Page 39: ...on the display 1 Type your login name and press the Enter key or click on the OK button 2 If a password is required the related prompt appears type your password and press the Enter key or click on t...

Page 40: ...al minutes allowing the user to properly finish the update of a database In the case of a user updating a database if the system is shutdown before the user has properly finished his update session th...

Page 41: ...system is not running which test the system hardware and perform the fault isolation If you are maintaining the system on your own you can find the description of these tools in the Maintenance Guide...

Page 42: ...t the contrast and or brightness knobs until you can see the display the screen see note below The computer system is not powered on Power on the system The monitor video cable is not properly connect...

Page 43: ...he key contacts with a component cleaning spray allow the keyboard to dry thoroughly before powering up the system Printer The printer does not power on The printer power switch is not set to the ON p...

Page 44: ...4 4 Setting Up the System...

Page 45: ...tem Running System On Standby Dry Bulb Temperature from 10 C to 32 C from 5 C to 55 C from 50 F to 89 6 F from 41 F to 131 F Gradient 10 C h 50 F h 25 C h 77 F h Barometric Pressure Min 747 hPa altitu...

Page 46: ...d 4 memory risers 3 PCI ISA cards 3 hard disk drives 2 media drives System Running System Idle Acoustic Power Lw A 63 dB Lw A 61 dB Standards The system complies with the following standards Hardware...

Page 47: ...rt PCI host bridge DRAM Dynamic Random Access Memory drawer Each system or subsystem installed in a rack is a drawer There are several types of drawers such as CPU drawers expansion drawers DAS drawer...

Page 48: ...n optional card to be installed in presence of a RAID configuration It interfaces the RAID controller card KP2 The back plane of a disk cage that connects two hard disk drives with 1 6 inch form facto...

Page 49: ...power riser SRC A card which can host up to six memory DIMM s It is used to expand the system memory capacity RMS Recovery Management Support ROM Read Only Memory RS 232 An EIA interface standard tha...

Page 50: ...G 4 Setting Up the System V V Volt VCC Voltage Continuous Current VCCI Voluntary Control Council for Interference VGA Video Graphics Array W No entries X No entries Y No entries Z No entries...

Page 51: ...ntenance kit 1 2 of the system 1 2 online 1 2 drawers connecting 2 1 F first startup not installed system 2 10 pre installed system 2 11 front view CPU drawer 1 4 PCI expansion drawer 1 6 K key insert...

Page 52: ...10 pre installed system 2 11 stopping system 3 1 3 4 SVGA connector 1 5 system daily startup 3 1 3 2 first startup 2 10 logging into 3 3 rebooting 3 4 stopping 3 1 3 4 system features CPU drawer fron...

Page 53: ...ne r ponse crite veuillez indiquer ci apr s votre adresse postale compl te Your comments will be promptly investigated by qualified technical personnel and action will be taken as required If you requ...

Page 54: ..._ _ _ _ _ _ _ _ _ _ _ _ _ _ _ _ _ _ _ _ _ _ _ _ _ _ _ _ _ _ _ _ _ _ _ _ _ _ _ _ _ _ _ _ _ _ _ _ _ _ _ _ _ _ _ _ _ _ _ _ _ _ _ _ _ _ _ _ _ _ _ _ _ _ _ _ _ _ _ _ _ _ _ _ _ _ _ _ _ _ _ _ _ _ _ _ _ _ _ _...

Page 55: ......

Page 56: ...BULL ELECTRONICS Angers CEDOC 34 Rue du Nid de Pie BP 428 49004 ANGERS CEDEX 01 FRANCE 86 A1 18PX 02 ORDER REFERENCE PLACE BAR CODE IN LOWER LEFT CORNER...

Page 57: ...e pour obtenir les tiquettes Use the cut marks to get the labels 86 A1 18PX 02 Setting Up the System Bull ESCALA EPC400 86 A1 18PX 02 Setting Up the System Bull ESCALA EPC400 86 A1 18PX 02 Setting Up...

Reviews: