background image

Chapter 3  Connect to a Wireless Network 

WLI-UC-GNHP User Manual

21

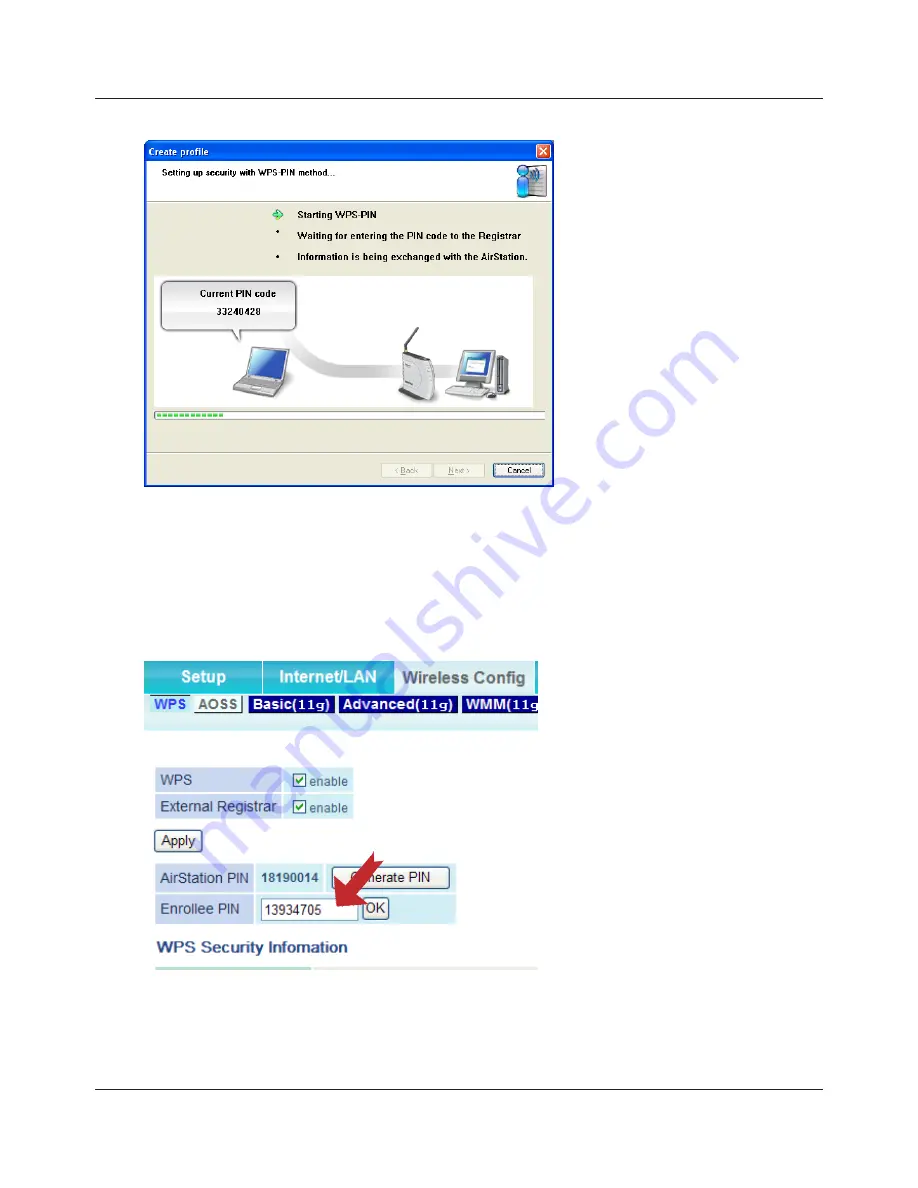
This screen will be displayed.

4

Connect your computer to the wireless router with a wired Ethernet cable.  Log in to the 

wireless router’s configuration utility and navigate to its WPS page.  If your router is a Buffalo 

AirStation, then the WPS page will be under the Wireless Config tab.

5

Enter the PIN code you wrote 
down in step 6.

When the message "

Connection has been Completed

” is displayed in Client Manager 3, you may 

disconnect the Ethernet cable. Your computer is now connected to the network wirelessly.

Example:  If the access point you are 
trying to connect is a Buffalo AirStation, 

enter the PIN code in “

Enrollee PIN

” and 

click “

OK

”.

Summary of Contents for WLI-UC-GNHP

Page 1: ...User Manual Wireless N High Power USB 2 0 Adapter WLI UC GNHP www buffalotech com 35010984 ver 02...

Page 2: ...y 10 Chapter 3 Connect to a Wireless Network 13 Automatic Secure Setup AOSS WPS 13 Windows Vista Client Manager V 14 Windows XP Client Manager 3 15 Automatic Secure Setup WPS PIN 16 Windows Vista Clie...

Page 3: ...ation 35 WPS PBC AOSS selection 36 Wireless Status 37 Wireless LAN Diagnostics 39 Profile List 40 Extended Properties Wireless 41 Extended Properties Network 42 Extended Properties Browser 43 Extended...

Page 4: ...t SSID Encryption KEY or Password 59 Other Tips 60 Appendix 63 150 Mbps Mode settings 63 Specifications 64 Removing the device from the computer 65 Uninstalling the Software 65 Uninstalling the Driver...

Page 5: ...Secure System and WPS Wi Fi Protected Setup making connection with wireless devices easier The AirStation supports the following wireless encryption modes WPA PSK TKIP AES WPA2 PSK TKIP AES WEP 128 6...

Page 6: ...bit versions of Windows Vista or Windows XP A USB 2 0 port is required Either a CD ROM drive or an internet connection is recommended This product does not support computers equipped with dual proces...

Page 7: ...nnect the AirStation to your computer yet 1 2 Boot your computer and insert the AirNavigator CD The AirNavigator Setup Wizard will launch automatically Note If the AirNavigator Setup Wizard doesn t op...

Page 8: ...4 Disable the firewall if it is enabled and click Next 5 Click Install 6 Click Next Note If you check the box to Install Wireless Client Manager Client Manager software will also be installed You may...

Page 9: ...ation 7 Read the license agreement and select Agree Then click Next 8 Check Always trust software from BUFFALO INC and click Install 9 When this screen is displayed attach the AirStation to your compu...

Page 10: ...11 Click Finish Note If you checked Install Wireless Client Manager the Client Manager installation wizard will run after this screen Follow the instructions on the screen to install Client Manager Yo...

Page 11: ...r software with the drivers you can install it later 1 Boot your computer and insert the AirNavigator CD The AirNavigator Setup Wizard will launch automatically Note If the AirNavigator Setup Wizard d...

Page 12: ...NHP User Manual 11 4 Check the box for Install Wireless Client Manager then click Install Note Select Client Manager V for Windows Vista or Client Manager 3 for Windows XP 5 Click Next 6 Read the lice...

Page 13: ...WLI UC GNHP User Manual 12 Chapter 2 Installation 7 8 9 Click Next Click OK Click Back 10 Click X at the top right corner of the window to close it Client Manager installation is complete...

Page 14: ...ces and complete security settings Utilize this system to connect to wireless devices computers or game machines which support AOSS or WPS AOSS was developed by Buffalo Technology WPS was created by t...

Page 15: ...system tray to open Client Manager Windows Vista Client Manager V If you are using Windows Vista use the Client Manager V software to connect wirelessly with AOSS or WPS Click Create Profile 3 When th...

Page 16: ...ion depending on where the AirStation will be used 2 Windows XP Client Manager 3 If you are using Windows XP use the included Client Manager 3 software to connect wirelessly with AOSS or WPS 1 Right c...

Page 17: ...to a network Use this feature if your wireless router supports WPS PIN Note Install Client Manager software from the AirNavigator CD before using WPS PIN Windows Vista Client Manager V If you are usin...

Page 18: ...Chapter 3 Connect to a Wireless Network WLI UC GNHP User Manual 17 4 Click the Advanced Setup button 5 Click the WPS PIN button...

Page 19: ...HP User Manual 18 Chapter 3 Connect to a Wireless Network 6 This is the PIN code write it down Then click Next 7 Select the access point you are going to connect to and click Next This screen will be...

Page 20: ...Wireless Config tab 9 Enter the PIN code you wrote down in step 6 If the Set Network Location screen is displayed select Home Work or Public location depending on where the AirStation will be used Wh...

Page 21: ...If you are using Windows XP use Client Manager 3 to connect wirelessly with a WPS PIN 1 Right click on the icon displayed in the system tray and select Easy Connection WPS PIN Code type 2 Write down t...

Page 22: ...S page If your router is a Buffalo AirStation then the WPS page will be under the Wireless Config tab 5 Enter the PIN code you wrote down in step 6 When the message Connection has been Completed is di...

Page 23: ...ly The procedure is slightly different if you have Windows XP or Vista These directions assume that you have already installed Client Manager software page 10 Windows Vista Client Manager V With Windo...

Page 24: ...Chapter 3 Connect to a Wireless Network WLI UC GNHP User Manual 23 4 Click the Advanced Setup button 5 Click the Connect Manually button...

Page 25: ...Network Name SSID and SecurityType Enter an EncryptionKey pass phrase and click Connect If the Set Network Location screen is displayed select Home Work or Public location depending on where the AirS...

Page 26: ...ndows XP use Client Manager 3 to connect wirelessly 2 1 Right click on the icon in the system tray and select Scan Select the access point to connect to and click Connect 3 Choose the type of encrypti...

Page 27: ...Manager 3 by using the wireless utility built in to Windows The procedure varies depending on the version of Windows used 1 Right click on the wireless network icon in the system tray 2 Click Connect...

Page 28: ...Chapter 3 Connect to a Wireless Network WLI UC GNHP User Manual 27 If the screen below is displayed click I want to enter the network key or pass phrase instead...

Page 29: ...Chapter 3 Connect to a Wireless Network Enter the encryption key passphrase and click Connect 4 If the Set Network Location screen is displayed select Home Work or Public location depending on where t...

Page 30: ...o Configuration is disabled Uninstall Client Man ager 3 to use Wireless Zero Configuration or just use Client Manager 3 to connect to the AirStation 1 Right click on the wireless network icon in the s...

Page 31: ...orts Windows XP Using Client Manager V with Windows Vista Opening and Closing Client Manager After installation Client Manager automatically launches when Windows boots To load Client Manager manually...

Page 32: ...itch among them Transmission Speed Displays the current connection speed Signal Strength Displays the signal strength of the current connection Create Profile Click this to display the Automatic Secur...

Page 33: ...connection and security settings by just following instructions on the screen Advanced Setup Configure the settings for an access point manually Click this to display the SSID WPS PIN selection scree...

Page 34: ...gure connection settings Click here to display the Searching Wireless Access Points screen Connect with WPS PIN Click this to connect to a WPS compatible access point using a PIN SSID WPS PIN selectio...

Page 35: ...ss point Strength Displays the signal strength for each available access point Enter the Network Name SSID manually Click this to entering an SSID manually This displays the Wireless Network Informati...

Page 36: ...elect the security type Encryption Method Select the encryption method Encryption Key or Passphrase Enter an encryption key pass phrase Connect to a network which does not broadcast the SSID Check to...

Page 37: ...on the access point or in its software You will be connected to the network automatically Automatic Secure Setup AOSS method Click this to connect to an AOSS compatible access point then push the AOSS...

Page 38: ...Wireless LAN Diagnostic screen Profile Name Displays the current profile name Status Displays the current transmission status Network Mode Displays the current network mode Transmission Speed Displays...

Page 39: ...urrently used Signal Strength Displays the current signal strength IP Address Displays the IP address assigned to this unit Subnet Mask Displays the subnet mask assigned to this unit Default Gateway D...

Page 40: ...l order in 1 minute intervals Note the following Some wireless devices may not be displayed Signal strength and quality may vary among different devices So comparisons between readings for different w...

Page 41: ...s the name of the current wireless client such as the WLI UC GNHP AirStation in use on your computer New Click to create a new profile Edit Edit the selected profile Click this to display the Extended...

Page 42: ...of the currently connected access point Security Type Displays the current connection s security type Encryption Type Displays the current connection s encryption type Security key or Pass phrase Dis...

Page 43: ...wirelessly with this profile Parameter Meaning Do not change IP Address settings of this Profile Keeps current TCP IP network settings Use the following settings Select this option to configure differ...

Page 44: ...r settings when connected wirelessly with this profile Parameter Meaning Do not change the browser settings of this Profile Keeps current Internet Explorer settings Use the following settings Select t...

Page 45: ...Manager to use different printer settings when connected wirelessly with this profile Parameter Meaning Do not change the printer settings of this Profile Keeps current printer settings Use the follo...

Page 46: ...ientManager3 Right click on the Client Manager icon in the system tray and click Exit to close Client Manager The appearance of the Client Manager icon in the systray will change according to its conn...

Page 47: ...ently in use SSID Displays the currently connected access point s SSID Adapter Name Displays the name of the current wireless client Network Type Displays the current network mode Transmission Speed D...

Page 48: ...User Manual 47 Parameter Meaning MAC Address Displays the MAC address of this unit Duration Displays the duration of this connection Signal Strength Displays the current signal strength Reconnect Clic...

Page 49: ...available access point Wireless mode Displays the type of wireless network 11a or 11g for each access point Channel Displays the wireless channel used by each access point Strength Displays the signa...

Page 50: ...figures settings to connect to an access point Parameter Meaning Encryption Method Select the encryption type used by the access point Encryption Key Enter at least one encryption key pass phrase for...

Page 51: ...ick to add a new profile Displays the Profiles Information screen Edit Click to edit or delete a profile WPS AOSS Click to have connect automatically with AOSS or WPS After connection a profile for th...

Page 52: ...rStation wireless client choose wireless Profile Name Choose a name for this profile Network Type For use with an access point choose Infrastructure Mode To connect to another wireless client chose Ad...

Page 53: ...r the number of encryption keys allowed If using WEP for Encryption you may enter up to four encryption keys Only a single key is necessary Encryption Key Enter an encryption key or keys AP is set to...

Page 54: ...g Do not change IP Address settings of this Profile Keeps current TCP IP network settings Automatically acquire the IP Address Check to automatically acquire an IP address from a DHCP server when conn...

Page 55: ...file Check to keep current Internet Explorer settings Uncheck to use special settings below Address to use as Home Page Configure a special home page address to display when connected wirelessly with...

Page 56: ...nfigure Client Manager to print to a different printer when connected wirelessly with this profile Parameter Meaning Do not change the printer settings of this Profile Check to use your current printe...

Page 57: ...us Click to display the Status screen Scan Click to display the Scan screen Profile Click to display the Profiles screen Easy Connection Select an automatic configuration method Supported automatic co...

Page 58: ...tication from the Profiles screen Lock If you click this you will not be able to add edit or delete profiles A password is required to lock or unlock this The password may have 8 63 characters Export...

Page 59: ...Use the following network adapter Select a network adaptor to use with Client Manager Wireless Adapter Auto select is recommended for most users Automatically connect to the profile with highest prio...

Page 60: ...er 3 to connect the AirStation to an access point wirelessly Configure the same SSID encryption method and encryption key for both your access point and your wireless client Temporarily move your wire...

Page 61: ...be installed on your computer that is taking control of the wireless client adapter away from the Windows connection manager Either switch to the other software or use Add Remove Programs to remove th...

Page 62: ...e Internet with my web browser Answer First power off the Cable or DSL modem the wireless router and then your computer Pressing a power button or simply unplugging the devices can power off the modem...

Page 63: ...Trouble Shooting Issue Where can I download the latest drivers firmware and instructions for my Buffalo wireless products Answer The latest drivers and firmware with installation instructions are ava...

Page 64: ...launch the utility software If you are using Windows Vista and the message A program needs your permission to continue is displayed click Continue 2 When the message Now start the step wizard of Bandw...

Page 65: ...gGI 65 58 5 52 39 26 19 5 13 6 5Mbps 1stream ShortGI 72 2 65 57 8 43 3 28 9 21 7 14 4 7 2Mbps 1stream 40MHz BW LongGI 135 121 5 108 81 54 40 5 27 13 5Mbps 1stream ShortGI 150 135 120 90 60 45 30 15Mbp...

Page 66: ...lick My Computer icon CD ROM drive icon AirNavi exe icon in this order 2 Click Options 3 Click Uninstall software 4 Follow the instructions on the screen to delete the Utility software Uninstalling th...

Page 67: ...Connection then click Properties 5 When the message Windows needs your permission to continue appears click Continue 6 Select Internet Protocol Version 4 TCP IPv4 then click Properties 7 Select Obtai...

Page 68: ...ght click on Local Area Connection then click Properties 4 Select Internet Protocol TCP IP then click Properties 5 Select Obtain an IP address automatically and Obtain DNS server address automatically...

Page 69: ...et on a circuit different from that to which the receiver is connected Consult the dealer or an experienced radio TV technician for help FCC Caution Any changes or modifications not expressly approved...

Page 70: ...as been designed to operate with an antenna having a maximum gain of 3 0 dBi Antenna having a higher gain is strictly prohibited per regulations of Industry Canada The required antenna impedance is 50...

Page 71: ...um Matters ERM ElectroMagnetic Compatibility EMC standard for radio equipment Part 17 Specific conditions for 2 4 GHz wideband transmission systems 5 GHz high performance RLAN equipment and 5 8 GHz Br...

Page 72: ...Hereby Buffalo Technology Inc declares that this AirStation WLI UC GNHP is in compliance with the essential requirements and other relevant provisions of Directive 1999 5 EC Espa ol Spanish Por medio...

Page 73: ...nc deklaruj e AirStation WLI UC GNHP spe nia wymagania zasadnicze oraz stosowne postanowienia zawarte Dyrektywie 1999 5 EC Portugu s Portuguese Buffalo Technology Inc declara que este AirStation WLI U...

Page 74: ...erse a consideraci n de la Comisi n para que sta determine si procede el otorgamiento de una ampliaci n del Certificado de Homologaci n o si requiere de un nuevo Certificado SEXTA El equipo que ampara...

Page 75: ...A Standards DA103412 China CMIIT ID 2009DJ3691 Taiwan CCAH09LP0900T6 India 194 2009 WRLO United States Tested to comply With FCC Standards FCC ID FDI 09102082 0 Korea BUF WLIUCGNHP01 B UAE TRA REGISTE...

Page 76: ...to avoid the dissemination of those substances in our environment and to diminish the pressure on the natural resources we encourage you to use the appropriate take back systems The take back systems...

Page 77: ...l expressed and implied warranties for the Buffalo Technology Buffalo Inc product line including but not limited to the warranties of merchantability and fitness of a particular purpose are limited in...

Page 78: ...ustin TX 78758 4018 GENERAL INQUIRIES Monday through Friday 8 30am 5 30pm CST Direct 512 794 8533 Toll free 800 456 9799 Fax 512 794 8520 Email sales buffalotech com TECHNICAL SUPPORT North American T...

Page 79: ...UK only 08712 50 12 60 Phone 353 61 70 80 50 Email sales buffalo technology com Calls cost 8 5p per minute Technical Support Operating Hours Monday Friday GMT 9 00 AM 6 00 PM Monday Thursday 9 00 AM...

Reviews: