background image

Press the Down Arrow key and select the SD card beginning from "UEFI:", then press the Enter key.

The recovery process proceeds automatically.

When the recovery process finishes, the TeraStation shuts down automatically.

10 

Turn on the TeraStation. If it boots up properly, recovery is completed.

Errors on the LCD Panel

The unit indicates errors on the LCD panel. The LCD panel can help you troubleshoot problems. Refer to the 
"Diagrams" section in chapter 1 to locate where the LCD panel is.
If an error occurs, the unit will beep. You can stop the beeping by pressing the mode button.

Error Messages

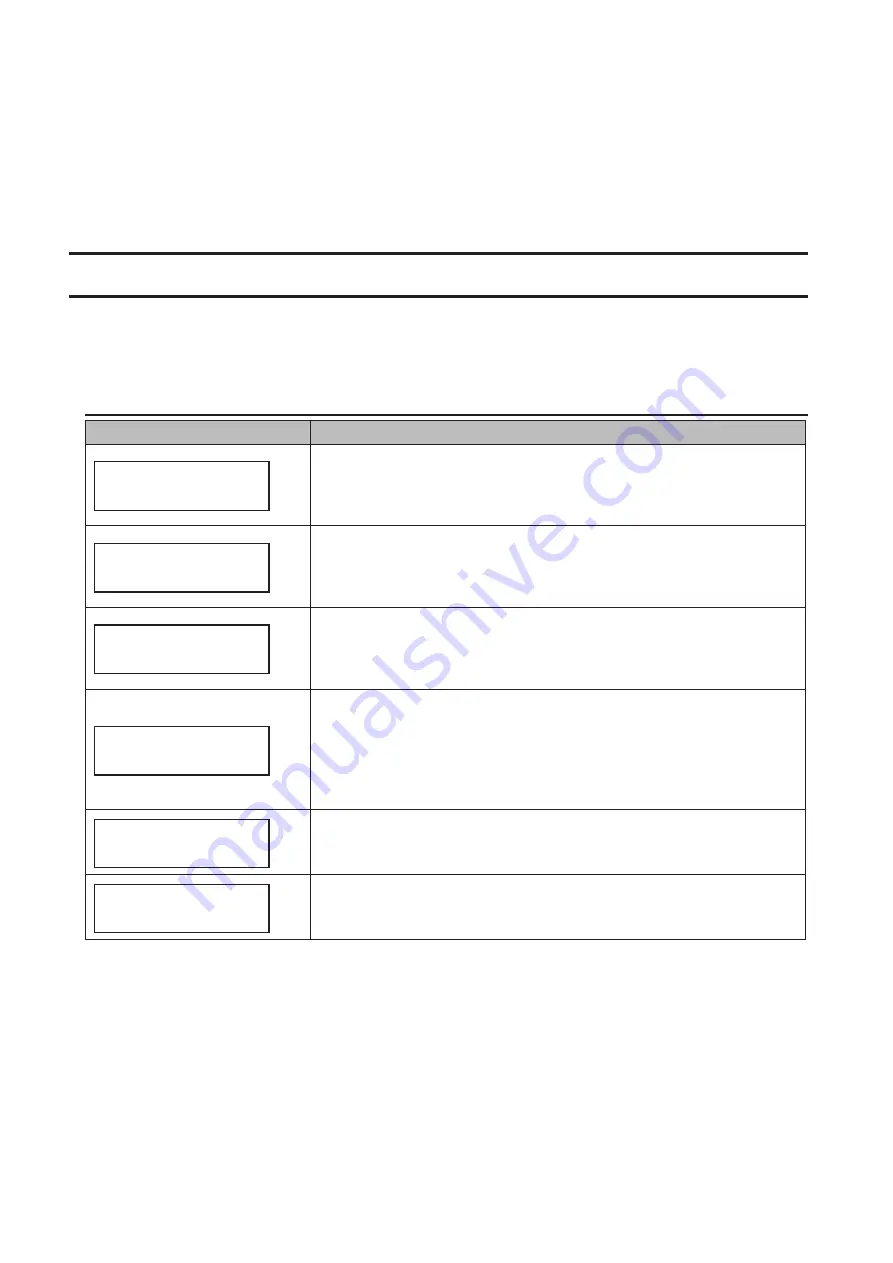
LCD Panel

Corrective Action

RAID-6

ONE DRIVE DOWN

One hard drive failed. Check the LED in front for the defective drive. Refer to 
the "Hard Drive Replacement Procedure" section in chapter 6 and replace 
the failed drive with a new drive.
You can stop the beeping by pressing the mode button.

RAID-6

TWO DRIVE DOWN

Two hard drives failed. Check the LED in front for the defective drive. Refer 
to the "Hard Drive Replacement Procedure" section in chapter 6 and replace 
the failed drive with a new drive.
You can stop the beeping by pressing the mode button.

SYSTEM

DOWN

Three or more hard drives failed. Check the LED in front for the defective 
drive. Refer to the "Hard Drive Replacement Procedure" section in chapter 6 
and replace the failed drive with a new drive.
You can stop the beeping by pressing the mode button.

FAN STOP

NORMAL

The fan is stopped. If you continue to use the unit while the fan is stopped, 
the temperature of the drive will increase and a malfunction may occur. 
Turn off the unit and check if dust has accumulated on the fan. If removing 
dust does not solve the problem, the fan may be broken. Contact Buffalo 
technical support.
You can stop the beeping by pressing the mode button.

Code ROM Error

System Halted

Program ROM cannot be read. Shut off the unit, wait 10 seconds, then turn it 
back on. If the error still remains, contact Buffalo technical support.

Work RAM Error

System Halted

A work memory error occurred on the array controller. Shut off the unit, wait 
10 seconds, then turn it back on. If the error still remains, contact Buffalo 
technical support.

102

Summary of Contents for TeraStation WSH5610

Page 1: ...Europe www buffalo technology com Please make sure to read this manual before using and follow the procedures If you have any inquiries about the product contact the number on the warranty statement o...

Page 2: ...g Antivirus Software 13 Chapter 2 Preinstalled Software 14 RAID Builder 14 Buffalo Dashboard 15 Errors and Statuses on Buffalo Dashboard 16 Email Notification 17 Buffalo Replication 18 TeraStation Bac...

Page 3: ...Changing Administrator s Password 61 Changing Other Users Password 62 Adding a User 64 Connecting to Windows Storage Server with Standard Accounts 66 Adding a Group 69 Email Notification 73 Specifyin...

Page 4: ...Shared Folders Cannot Be Accessed or System Is Unstable 100 Hard Drive Status Cannot Be Found 101 LCD Panel Displays a Different IP Address 101 Resynchronization Regressed When TeraStation Was Restar...

Page 5: ...Chapter 10 Regulatory Compliance Information 107 For Customers in the United States 107 For Customers in Europe 107 4...

Page 6: ...er is on 3 Access LED Shows network activity This LED blinks green when hard drives are being accessed 4 Fail LED If there is an error on the drives this LED glows amber Open Buffalo Dashboard to see...

Page 7: ...nly supported for monitoring the progress of Windows Update 15eSATA Port eSATA compatible hard drives are available with this port Turn the TeraStation off before connecting the drives 16UPS Port Conn...

Page 8: ...Right click on your TeraStation s icon and choose Open Remote Desktop For macOS click the TeraStation s icon while holding down the control key then click Open Remote Desktop If the message The identi...

Page 9: ...tically Creating a Shared Folder No shared folders are configured by default Before using the TeraStation follow the procedure below to create one or more shared folders This is an example to create a...

Page 10: ...t Notes Enter D Share into the folder path to create the shared folder for the first time If the message The system cannot find the specified path Do you want to create it is displayed click Yes 6 Ent...

Page 11: ...7 Click Customize permissions then Custom 8 Choose Everyone and select the Allow checkbox for Change 10...

Page 12: ...9 In the Security tab click Edit Add 10Enter Everyone under Enter the object names to select then click OK 11...

Page 13: ...ers and Groups 3 Double click Users Guest 4 In the General tab clear the Account is disabled checkbox then click OK Enable access permissions 1 From the Windows Storage Server Start menu open Administ...

Page 14: ...eason why you want to shut down then click Continue When all the LEDs on the front of the TeraStation turn off the shutdown process is complete Note Always shut down the TeraStation before unplugging...

Page 15: ...older Settings RAID Builder RAID Builder is used to create RAID arrays See the Managing Storage section in chapter 3 for more details To launch RAID Builder you must be logged in as a member of the Ad...

Page 16: ...n Computer Name Displays the hostname of the TeraStation Domain Name Displays the type of domain that the TeraStation is a member of OS Displays the type of Windows installed on the TeraStation OS Ver...

Page 17: ...cool location Make sure that the TeraStation s fan is working normally HDx Error E16 HDx Not Found Unable to find hard drive X Hard drive may be disconnected or may have failed HDx Broken E30 Replace...

Page 18: ...heck the backup log to see if any errors were recorded Email Notification Your TeraStation can send you email reports when settings are changed or an error occurs See the Email Notification section in...

Page 19: ...e time Before launching it make sure that it is not being used by another user TeraStation Backup Replication Folder Settings Before using it as a backup device on the network configure your TeraStati...

Page 20: ...er should not be a symbol You may leave this field blank if you do not want a backup device access key but for security reasons we highly recommend entering one for the shared folder If a backup devic...

Page 21: ...ing data The usable space is equal to the sum of the capacity of five drives If one drive in a RAID 5 array fails data on the array can be recovered after the failed drive is replaced However if two o...

Page 22: ...utton on the TeraStation to turn it on 6 Connect the Windows Storage Server via the remote desktop 7 From the Windows Storage Server Start menu click RAID Builder 8 Click Format RAID and OK When forma...

Page 23: ...wrong operation To avoid losing data accidentally back up your data regularly You can back up data using the following functions Windows Server Backup Buffalo Replication DFS Replication Back Up in Wi...

Page 24: ...In Server Manager click Tools Windows Server Backup The Windows Server Backup wizard will start 2 Click Local Backup If Reading data please wait is displayed please wait until any messages disappear 2...

Page 25: ...3 Right click on Local Backup and select Backup Schedule The Backup Schedule Wizard will start 4 Click Next 5 Select Custom and click Next 24...

Page 26: ...6 Click Add Items 7 Select the backup source folders or drives and click OK 25...

Page 27: ...8 Click Next 26...

Page 28: ...9 Specify the schedule to run the backup and click Next 27...

Page 29: ...ep through the wizard to finish Recovering Backup Data Follow the procedure below to recover the backup data to the TeraStation Note Bare metal recovery is not supported for the backup data stored usi...

Page 30: ...In Server Manager click Tools Windows Server Backup The Windows Server Backup wizard will start 2 Click Local Backup If Reading data please wait is displayed please wait until any messages disappear 2...

Page 31: ...Backup and click Recover The recovery wizard will start 4 Select where the backup data is saved and click Next When A backup stored on another location is selected specify the folder of the backup da...

Page 32: ...5 Select the date when a data backup occurred and click Next 31...

Page 33: ...fferences Between Buffalo Replication and DFS Replication To use DFS Replication your TeraStation needs to be joined to an Active Directory while Buffalo Replication does not require joining an AD dom...

Page 34: ...fer to that TeraStation s user manual to configure it as a replication destination After you finish configuring on the TeraStation s Settings go to step 3 1 Click TeraStation Backup Replication Folder...

Page 35: ...tion Source click and select a folder from the list as the replication source folder then click OK 5 Click Set Backup Device Access Key 6 Enter the configured backup device access key of the replicati...

Page 36: ...s appears select the folder and click Select If no shared folders appear click Refresh and try again 8 When finished configuring click Apply 9 Click OK then the task will start a differential overwrit...

Page 37: ...another LAN port or changing the IP address of the replication source or target TeraStation If the network settings are changed refresh the list of TeraStations and LinkStations as follows 1 Click Buf...

Page 38: ...2 Click Change 3 Select Domain enter a domain name and click OK 37...

Page 39: ...4 Enter a administrator username and password for the Active Directory domain controller 5 Click OK when the following message is displayed 6 Click OK again 38...

Page 40: ...7 Click Close 8 Click Restart Now and restart your computer to apply settings 39...

Page 41: ...Installing DFS 1 In Server Manager click Dashboard Add roles and features 2 Click Next 40...

Page 42: ...3 Select Role based or feature based installation and click Next 4 Click Next 41...

Page 43: ...5 Select DFS Namespaces and DFS Replication in File and Storage Services File and iSCSI Services 6 Select Include management tools if applicable and click Add Features 42...

Page 44: ...7 Click Next 8 Click Install 43...

Page 45: ...9 Click Close to finish Creating Namespaces 1 In Server Manager click Tools DFS Management 44...

Page 46: ...2 Click Namespaces New Namespace 3 Enter a hostname for the namespace server and click Next 45...

Page 47: ...4 Enter a name for the namespace and click Next 46...

Page 48: ...omain based namespace and click Next 6 Click Create 7 Click Close when the New Namespace Wizard finishes 8 In DFS Management click Namespaces and the name you created through the wizard Then click New...

Page 49: ...9 Enter a folder name and click OK 10Enter a path to the folder or select from the list by clicking Browse Click OK 11Click OK again 48...

Page 50: ...Configuring DFS Replication 1 In Server Manager click Tools DFS Management 2 Click Replication 3 Click New Replication Group 49...

Page 51: ...4 Select the type of replication group and click Next 50...

Page 52: ...5 Enter a name for the replication group and click Next 51...

Page 53: ...6 Enter the hostname of the file server for the replication source and click Next 52...

Page 54: ...7 Click Add 53...

Page 55: ...8 Enter the path of the replication source and click OK 54...

Page 56: ...9 Click Next 55...

Page 57: ...10Enter the hostname of the file server for the replication target and click Next 56...

Page 58: ...11Enter the path of the replication target Alternatively click Browse and select the folder from the list Click Next 57...

Page 59: ...To configure bandwidth select Replicate continuously using the specified bandwidth and the bit rate from the drop down list To configure the schedule time select Replicate during the specified days an...

Page 60: ...13Click Create 14Click Close when finished DFS Replication is now configured Note It may take some time before actual replication is caught up 59...

Page 61: ...Server Name Workgroups and Domains 1 From the Windows Storage Server Start menu right click This PC and choose Properties 2 Click Change settings under Computer name domain and workgroup settings 3 In...

Page 62: ...rs from the 17th character on are ignored Changing the Password The default password for the TeraStation s administrator account is password This is public knowledge so for security you should change...

Page 63: ...s password and a new password twice then press the Enter key Changing Other Users Password 1 From the Windows Storage Server Start menu open Administrative Tools then double click Computer Management...

Page 64: ...3 Right click the user whose password will be changed and click Set Password 4 Click Proceed 63...

Page 65: ...5 Enter a new password twice Adding a User 1 From the Windows Storage Server Start menu open Administrative Tools then double click Computer Management 2 Click Local Users and Groups 64...

Page 66: ...3 Right click Users and click New User 65...

Page 67: ...s group cannot connect to Windows Storage Server through the remote desktop Those accounts must be added to the Remote Desktop Users group Follow the procedure below to add accounts to the group 1 Fro...

Page 68: ...3 Double click Remote Desktop Users 4 Click Add 67...

Page 69: ...5 Click Advanced 6 Click Find Now 68...

Page 70: ...to be joined as a group member and click OK 8 Click OK twice Adding a Group 1 From the Windows Storage Server Start menu open Administrative Tools then double click Computer Management 2 Click Local U...

Page 71: ...3 Right click Groups and choose New Group 4 Enter a group name and click Add 70...

Page 72: ...5 Click Advanced 6 Click Find Now 71...

Page 73: ...7 Select the users to be registered to the group then click OK 8 Click OK 72...

Page 74: ...eraStation can send you email reports daily or when settings are changed or an error occurs Notification emails may be triggered by any of TeraStation reports or Windows event logs 1 From the Windows...

Page 75: ...Test Message 5 Enter the password of the user you re logged in as and click OK Items Descriptions Enable email notification If enabled email reports will be sent during specific events Send to Adds a...

Page 76: ...d port number 110 is used Username and Password Enter the username and password of your mail server SSL TLS If LOGIN SMTP AUTH LOGIN or CRAM MD5 SMTP AUTH CRAM MD5 is selected select whether to use SS...

Page 77: ...he line will be selected at once 5 Click OK when finished 6 Click OK 7 Enter the password of the user you re logged in as and click OK The notification emails will be categorized into the following im...

Page 78: ...il if an error occurs Error reports will describe any critical failures that prevented a function or unit from operating It is recommended to do the corrective action for the error immediately Specify...

Page 79: ...ct Application from the Log Type list 7 Enter Replication into the Source box 8 Enter an event ID referring to the table below Event IDs Event ID Type Description 1001 Warning Files in the replication...

Page 80: ...list 13Select Application from the Log Type list 14Enter TeraSync into the Source box 15Enter an event ID referring to the table below Event IDs Event ID Type Description 1001 Warning Files in the re...

Page 81: ...ick Save All Events As 6 Specify the desired location and enter a filename then click Save Note Do not change the file type 7 When the Display Information screen appears click OK The operation to acqu...

Page 82: ...be the same size as the replacement drive The TeraStation is fragile Handle it with care Do not drop or bump the TeraStation Use caution when handling the unit in order to avoid personal injury Never...

Page 83: ...included key 2 Verify the status LEDs The LED for the failed drive glows amber 3 Push the unlock button of the drive whose status LED is glowing amber and swing the locking mechanism out Do not unplug...

Page 84: ...4 Pull out the drive cartridge and remove it from the unit 5 Remove the drive from the cartridge 6 Install a new drive into the cartridge 7 Replace the four screws 83...

Page 85: ...1 2 9 Close the front cover with the key 10The RAID x RECOVERING 0 message will be displayed on the LCD panel after 3 minutes RAID 6 RECOVERING 0 11When RAID x NORMAL is displayed hard drive replacem...

Page 86: ...for the failed drive glows amber 3 Push the unlock button of the drive whose status LED is glowing amber and swing the locking mechanism out Do not unplug and remove the hard drives with the status LE...

Page 87: ...4 Pull out the drive cartridge and remove it from the unit 5 Remove the drive from the cartridge 6 Install a new drive into the cartridge 7 Replace the four screws 86...

Page 88: ...after 3 minutes RAID 6 RECOVERING 0 10When RAID 6 ONE DRIVE DOWN is displayed replacement for a defective drive is finished RAID 6 ONE DRIVE DOWN 11Push the rest of the failed drive s unlock button an...

Page 89: ...he TeraStation back up data before replacing drives For Striped Volume 1 Turn off the unit 2 Turn the unit on while holding down the mode button 3 When RAID 0 NORMAL is displayed you can proceed If SY...

Page 90: ...remove the hard drives with the status LED lit green If you do it may cause data loss or the unit to malfunction 2 1 7 Pull out the drive cartridge and remove it from the unit 8 Remove the drive from...

Page 91: ...w drive into the cartridge 10Replace the four screws 11Insert the new drive into the empty slots slide the drive in with the locking mechanism open and swing the lock back down until it clicks into th...

Page 92: ...dges whose status LED glow amber from the unit Leave the hard drives that the status LEDs blink amber in the unit 4 Turn off the TeraStation 5 Turn on the unit while holding down the mode button with...

Page 93: ...wn the mode button with the hard drives left removed 6 When RAID x ONE DRIVE DOWN is displayed replace the defective drive referring to the ONE DRIVE DOWN Is Displayed on the LCD Panel section above I...

Page 94: ...deleted after replacing the drive You will not be able to use the TeraStation until the hard drive has been replaced Refer to the SYSTEM DOWN Is Displayed on the LCD Panel section above for the proce...

Page 95: ...drive in remote desktop If you installed the TeraStation with the TeraNavigator NAS Navigator2 was installed automatically Double click the icon to start NAS Navigator2 Click on a TeraStation s icon t...

Page 96: ...et mask and default gateway Sort by If you have multiple LinkStations and TeraStations on the network you may choose to display them in order of hostname product name workgroup IP address subnet mask...

Page 97: ...Exits NAS Navigator2 The following tasks may be performed from the LinkStation s or TeraStation s properties page Name Description Remote Desktop Click Open Remote Desktop to open Windows Storage Serv...

Page 98: ...u installed the TeraStation with the TeraNavigator NAS Navigator2 was installed automatically To launch it click the icon in the Dock Click on a TeraStation s icon to display Total capacity Used capac...

Page 99: ...ote Desktop Opens Windows Storage Server in remote desktop Configure Opens a window that lets you configure the NAS s IP address or open the remote desktop screen Label Color Selects the color of the...

Page 100: ...click Apply NovaBACKUP NovaBACKUP is a Windows utility that lets you back up the data on your computer The NovaBACKUP installer is available from http d buffalo jp WSH5000N2 Select the region and mod...

Page 101: ...oards or hubs may be unable to connect the network correctly when the transmission mode is set to Auto Negotiation Cause 7 A network bridge is installed If the network has a network bridge that is not...

Page 102: ...perform recovery using the supplied SD card Notice When Recovering This recovery procedure erases the data on the drive C Backing up regularly is highly recommended to avoid losing your important dat...

Page 103: ...to the Hard Drive Replacement Procedure section in chapter 6 and replace the failed drive with a new drive You can stop the beeping by pressing the mode button SYSTEM DOWN Three or more hard drives f...

Page 104: ...e Error Cache Buffer Error 0x Buffer Size Error Buffer Manager Link Error Internal error The unit cannot be accessed Contact Buffalo technical support Characters Added When ONE DOWN or SYSTEM DOWN Occ...

Page 105: ...M N O p R S T Y Z z L W X Drive disconnected Reconnect the drive Note If S Z or z is displayed the hard drives may be malfunctioning Contact Buffalo technical support while keeping the TeraStation pow...

Page 106: ...has the following functions and roles Features WoW64 Support Graphical Management Tools and Infrastructure Server Graphical Shell User Interfaces and Infrastructure NET Framework 4 5 Windows Communica...

Page 107: ...sted above are available from the Buffalo website Other Power Supply AC 100 240 V 50 60 Hz Dimensions W x H x D excluding protruding parts 170 x 260 x 230 mm 6 7 x 10 2 x 9 1 in Weight 9 0 kg 19 8 lb...

Page 108: ...not cause harmful interference and 2 this device must accept any interference received including interference that may cause undesired operation Only use the cables and accessories that are included...

Page 109: ...the documentation Do not use USB cables that are 3 meters or longer to connect USB devices to this TeraStation series Espa ol Este es un producto de Clase A En una situaci n domestica este producto p...

Page 110: ...mr der Slik bruk m unng s med mindre brukeren tar spesielle tiltak for redusere elektromagnetisk str ling for unng interferens med mottak av radio og TV sendinger Bruk kun kabler og tilbeh r som er in...

Page 111: ...Kullan c radyo ve televizyon yay nlar nda paraziti nlemek zere elektromanyetik sal n mlar azaltacak zel nlemler almad k a bu ekilde kullan mdan ka n lmal d r Yaln zca pakette bulunan kablo ve aksesua...

Reviews: