Care and Maintenance
8-3
1 —
2 —
3 —
4 —
5 —
6 —
7 —
8 —
?
!
9 —
CONTENTS
Index
5
1
2
1
2
1
▼
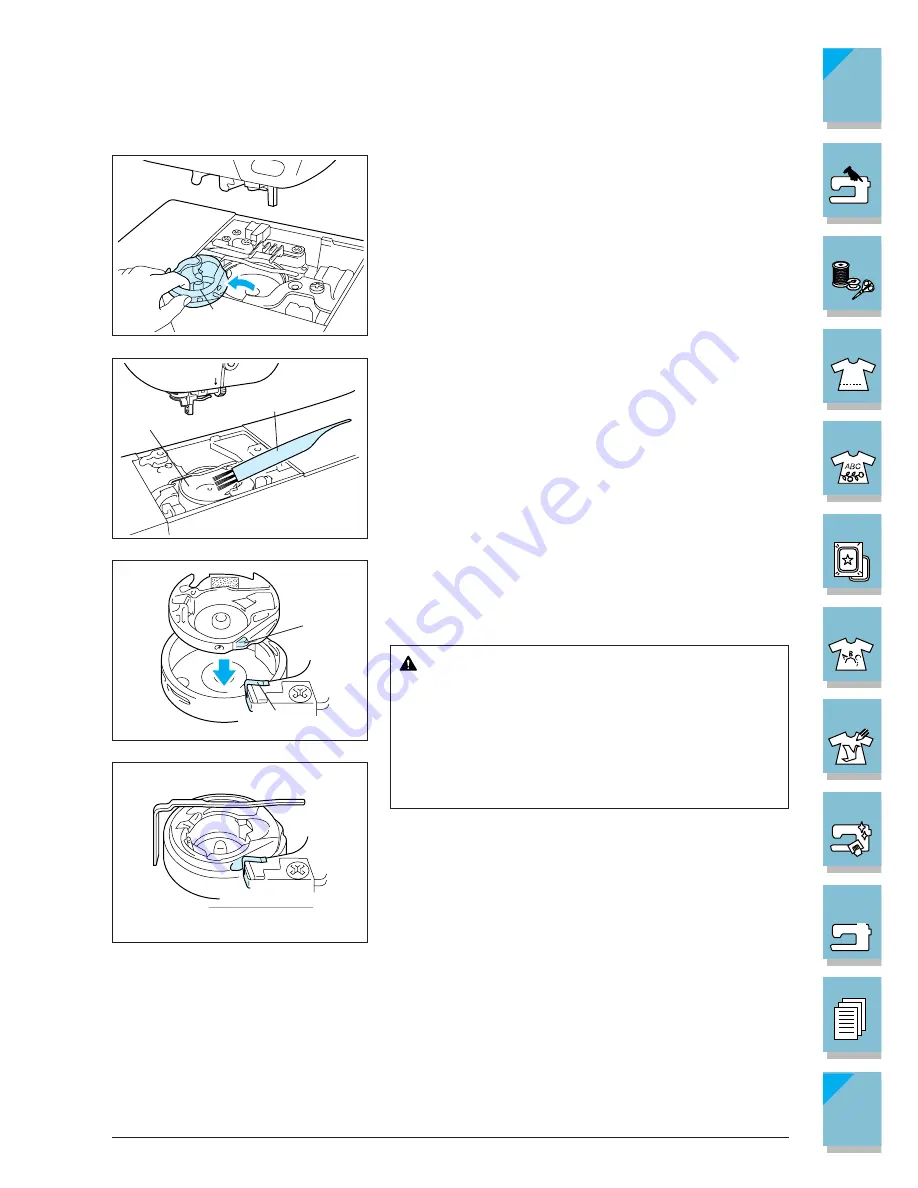
4. Remove the race.
* While pushing the race towards the back of the ma-
chine, lift the edge nearest you and remove the race.
1
Race
5. Remove accumulated lint and thread from the inner
shuttle and race with a brush or vacuum cleaner.
* Do not oil the shuttle or the race.
1
Shuttle
2
Brush
6. Check that the notch on the shuttle is in the same posi-
tion as when you removed the race. Position the race
so that the shelf and spring are aligned, and insert the
race.
CAUTION
• Do not use a damaged race or shuttle. Other-
wise, the thread may tangle and cause a poor
finish, or the needle may break. You can get
the proper parts from your authorized dealer.
• Be sure to insert the race in the correct posi-
tion. Otherwise, the needle may break.
1
Shelf
2
Spring
7. Reattach the needle plate.
Summary of Contents for ULT-2003D
Page 1: ......
Page 34: ...Setting Up 1 23 1 2 3 4 5 6 7 8 9 CONTENTS Index Contents of Other Categories ...
Page 57: ...1 46 Setting Up 1 2 3 4 5 6 7 8 9 CONTENTS Index ...
Page 168: ...Sewing Character Decorative Stitches 4 25 1 2 3 4 5 6 7 8 9 CONTENTS Index More Examples ...
Page 293: ...7 16 My Custom Stitch 1 2 3 4 5 6 7 8 9 CONTENTS Index ...
Page 313: ...9 16 Troubleshooting 1 2 3 4 5 6 7 8 9 CONTENTS Index ...
Page 315: ...A 2 Appendix 1 2 3 4 5 6 7 8 9 CONTENTS Index ...
Page 321: ...ENGLISH 114 230 XC3200 001 0205 Printed in Japan ...


