background image

Printer Set up

Open the app if it wasn't already open. 

If it was open you should have seen the app update after we made the changes in the dashboard. 

Complete a test sign in to see if the badge prints successfully. 


On the iPad 

On the Printer


(Optional but recommended) 

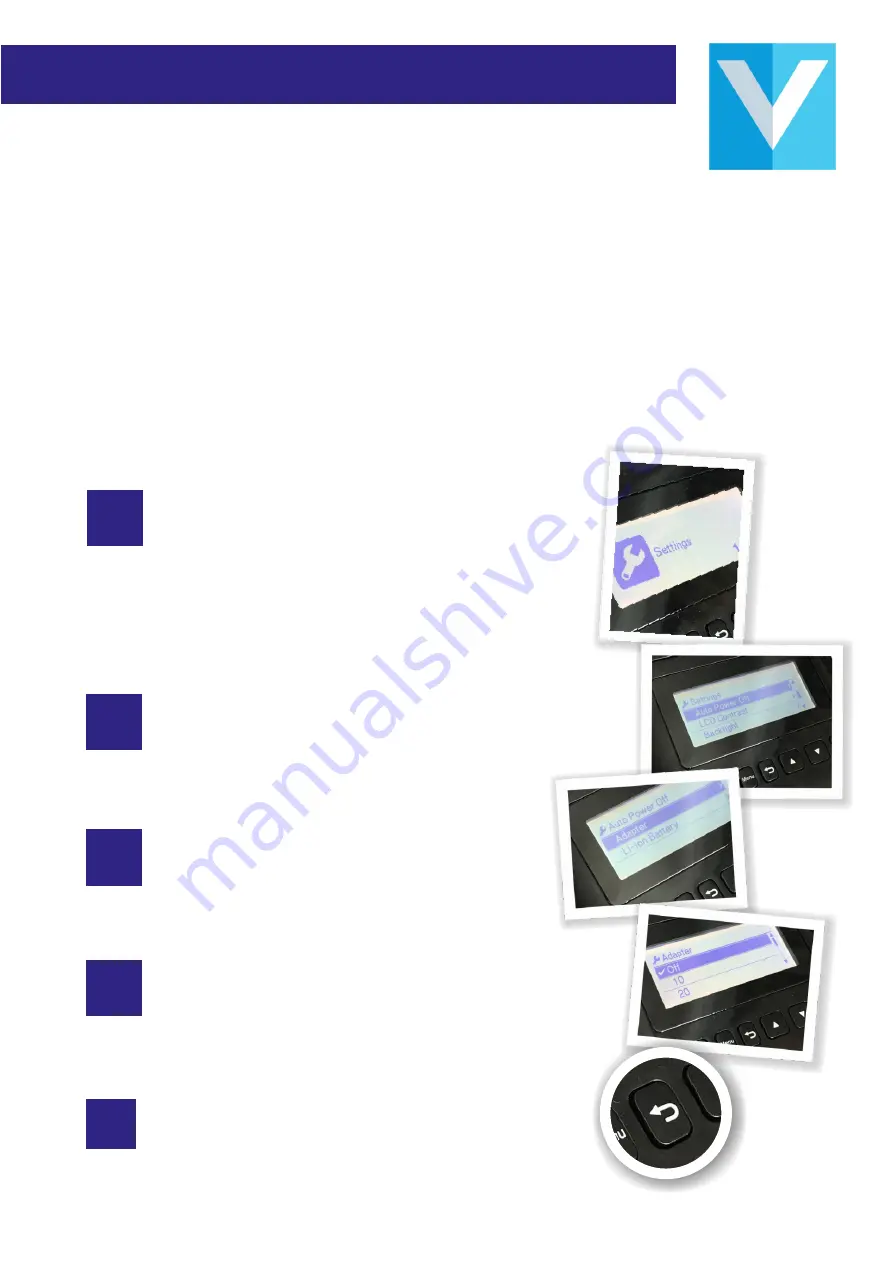
To ensure that the printer does not lose it's Wi-Fi connection and change 

its IP address we will disable the Auto Power Off feature. 

Press the 

“Menu”

 button. Use the arrow keys to select the 

“Settingsʼʼ

 option. Press the 

“OK”

 button. 

1

2

3

Use the arrow keys to select the 

“Auto Power Off” 

option. 

Press the 

“OK” 

button 

Ensure that the 

“Adapter” 

option is selected 

then press the 

“OK” 

button. 

Use the arrow keys to select the 

“Off”

 option then 

press the 

“OK” 

button. 

4

5

Finally press the

 “Back arrow”

 button to return to 

the 

‘main menuʼ

 of the printer. 


© www.visit-us.com 

Summary of Contents for QL-820NWB

Page 1: ...VisitUs Reception Welcome to Brother QL 820NWB Printer Set up guide www visit us com ...

Page 2: ...ettingsʼ app on the front screen of your iPad Grey icon with a cog This should show an option showing for Wi Fiʼ Click here for Settingsʼ 4 Check to confirm your iPad is connected to your network Wi Fi as it is necessary to be linked function We will need your network Wi Fi password to connect to shortly 5 Click hold Click www visit us com Your iPad is now ready to be linked to your printer ...

Page 3: ...rrow keys to enter the correct date and press the OK button to proceed to the Month Day then confirm 3 4 Press the downʼ arrow key until you find the Reset option Press the OK button Make sure the Factory Reset option is selected Press the OK button Make sure the Reset option is selected Press the OK button The printer will now reset all settings and restart After restarting the printer will ask you...

Page 4: ...button The Wi Fi will now be enabled on the printer After a couple of seconds the printers screen will go back to the main menu Press the Menu button and then use the arrow keys to go to the WLAN 5 7 option and press the OK button Press the down arrow key to select the Network Mode option and press the OK button 6 5 Make sure that Infrastructure Mode is selected and press the OK button The printer...

Page 5: ...en the different options Use the arrow keys to select the Wi Fi network that you iPad is connected too which we checked earlier then press the OK button When you have entered the password press the OK button twice to confirm The printer will now try to connect to your WIFI network If the printer hangs on the connecting screen press the OK button which will return you to the main menu If you do not ...

Page 6: ... 7 option and press the OK button Use the arrow keys to select the WLAN status option and press the OK button Make sure that the Infrastructure Mode option is selected and press the OK button Make a note of the IP Add number Example 172 20 10 3 IP Address is here To exit out of this screen press the Back arrow button 4 times until you get to the main menu 5 X 4 On the Printer 3 www visit us com ...

Page 7: ...er the IP address of the printer that we noted earlier and enter it under the IP address section 3 4 Enter IP Address Finally click on the green Update Changes button in the top right corner of the dashboard www visit us com The Badge Creatorʼ section is located by clicking on configure systemʼ then sign In Typesʼ followed by Print Badgesʼ Customise how your badge looks here Click Click ...

Page 8: ...se it s Wi Fi connection and change its IP address we will disable the Auto Power Off feature Press the Menu button Use the arrow keys to select the Settingsʼʼ option Press the OK button 1 2 3 Use the arrow keys to select the Auto Power Off option Press the OK button Ensure that the Adapter option is selected then press the OK button Use the arrow keys to select the Off option then press the OK bu...

Reviews: