1
2
3
4
5
6
7
8
9
37
z
E
D
IT
ING
A LABE
L
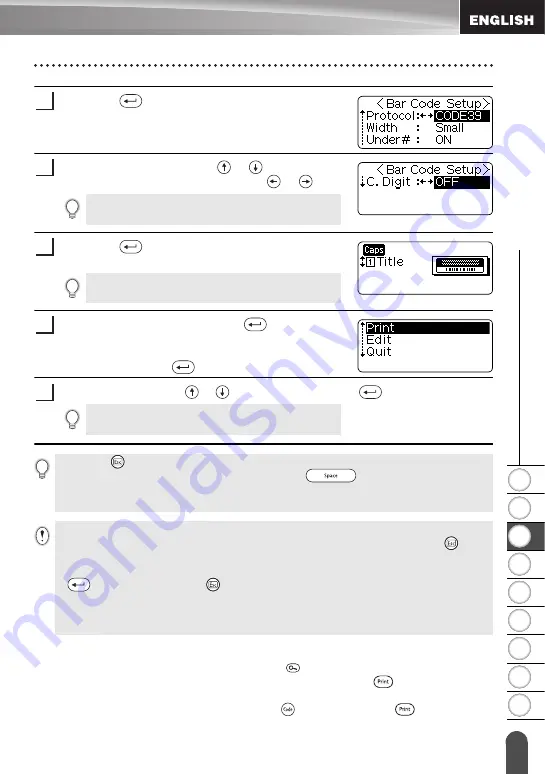
Using Auto-Format Layouts
Press the
key.
The Bar Code Setup screen is displayed.
Select an attribute using the
or
keys, and then
set a value for that attribute using the
or
keys.
Press the
key.
The template text entry screen is displayed.
Enter the text and then press the
key.
Repeat this for each text field.
After all text fields are entered, the print menu is
displayed when the
key is pressed.
Select "Print" using the
or
keys and then press the
key to print the label.
Preview and print options for templates
• When the print menu is displayed, press the
key to preview the label layout.
• To print the label directly from the Preview screen, press the
key.
• To print multiple copies, sequentially numbered copies, or a mirror image of the label,
with the print menu displayed hold down the
key and press the
key to display
the Print Options menu.
6
The "C-Digit" attribute is only available for the
CODE39, I-2/5 and CODABAR protocols.
7
Caps mode can be used when entering text.
8
• Select "Edit" to change the text data or style settings.
• Select "Quit" to exit the Auto-Format function.
9
10
• Press the
key to return to the previous step.
• On the Style and Bar Code Setup screens, press the
key to change the selected
attribute to the default value.
• Refer to the Templates table for a list of available templates.
• If the width of the current tape cassette does not match the set width for the selected layout,
an error message is displayed when you try to print or preview the label. Press the
key or
any other key to clear the error message, and insert a tape cassette of the correct width.
• If the number of characters entered exceeds the limit, an error message is displayed when the
key is pressed. Press the
key or any other key to clear the error message, and edit the
text using fewer characters.
• When using the Auto-Format function the label is cut with a margin on the left and right ends
regardless of the current Tape Cutting Option setting (refer to page 47).
Summary of Contents for P-Touch PT-18RKT
Page 8: ......
Page 22: ...GETTING STARTED 14 LCD Display Keyboard Key Names and Functions ...
Page 72: ......
Page 73: ...Guía del usuario Sistema de Rotulador Electrónico PT 18RKT ...
Page 92: ...PARA EMPEZAR 14 Teclado y pantalla LCD Funciones y nombre de las teclas ...
Page 145: ......
Page 146: ......


