background image

63

Ch. 4 Using Labels and Stamps

U

si

n

g L

abe

ls

 a

n

d

 S

ta

m

ps

4

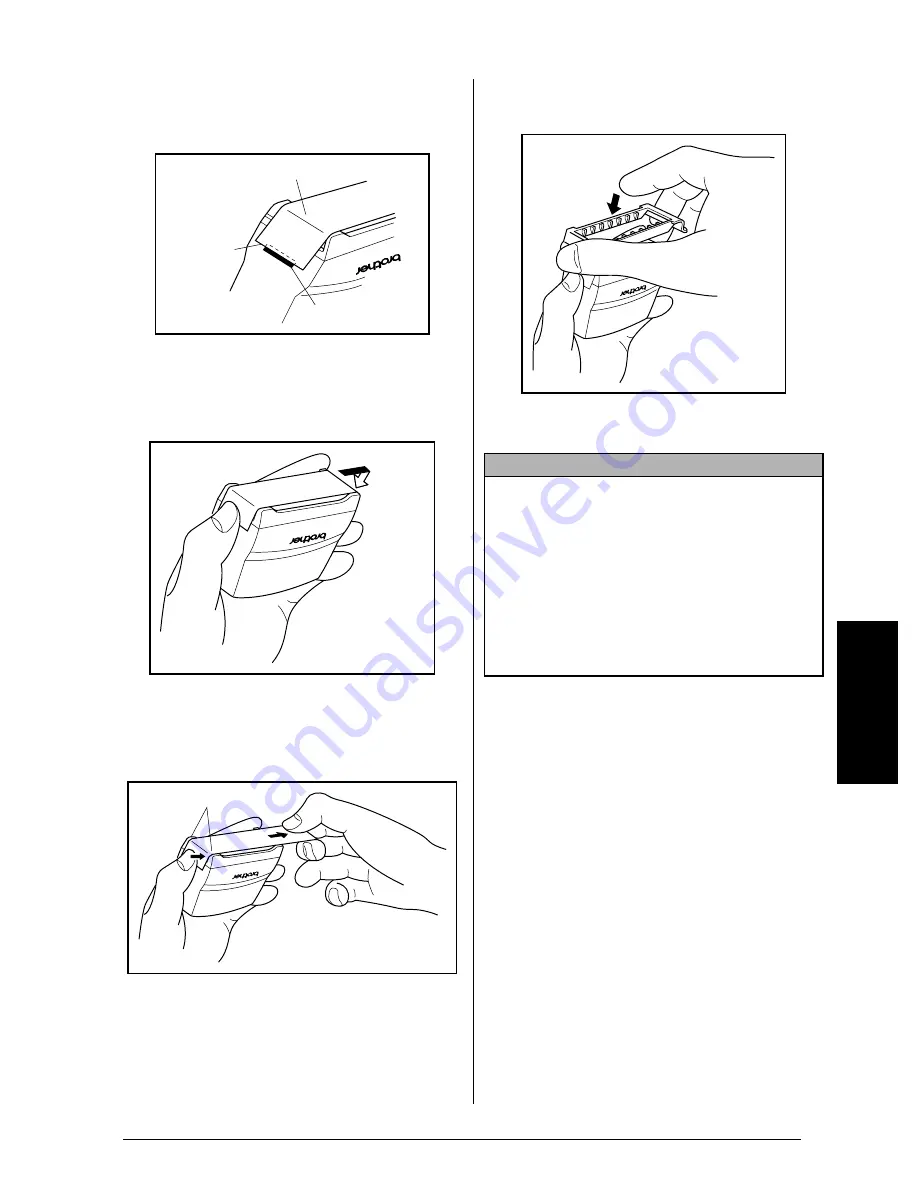
With the glossy side of the stamp film facing
up, align one end of the stamp film with the
slit in the side of the stamp holder.

5

Hold the end of the stamp film in place with
your thumb, then pass the stamp film
through the guides while pulling it tight.

6

Fold the other end of the stamp film over
the other side of the stamp holder and hold
it in place with your finger.

7

Fit the frame over the stamp film, and then
push the frame into place.

8

Insert the stamp holder straight into the cap.

Tape end

Glossy side

Slit

Fold over

Guides

NOTE

Be sure that the cap correctly covers the stamp
in order to prevent ink spills.

When the stamp is not being used, firmly cover
it with the cap and always store it standing up
with the stamp facing downward. Do not leave
the stamp laying on its side or leaning.

Store stamp film holders and stamp film cas-
settes in a location where they are not exposed
to high temperatures, high humidity or direct
sunlight.

Summary of Contents for P-touch PRO PT-9400

Page 1: ... Read this User s Guide before you start using your P Touch Keep this User s Guide in a handy place for future reference USER S GUIDE MODEL PT 9400 ...

Page 2: ... 5 Menus 5 Keyboard 6 Chapter 2 Getting Started 7 PRECAUTIONS 8 Connecting the power supply cord 9 Installing a TZ tape cassette 10 Turning on off the P touch 11 Chapter 3 Functions 13 Performing basic operations 14 Entering text 15 Editing text 21 Formatting 24 Storing and recalling files 46 Printing 49 Setting display features 57 CONTENTS ...

Page 3: ... TROUBLESHOOTING 70 MACHINE SPECIFICATIONS 73 Appendix 75 Symbols 76 Special barcode characters 80 Fonts 80 Sizes and widths 81 Type styles 82 Framing and shading patterns 83 Background designs 84 Pre set templates 85 Template text styles 89 Text transformation styles 90 INDEX 91 ACCESSORIES 93 ...

Page 4: ...ameter or to select parameter or to select setting Editing text Zooming in and out Deleting text Clearing all of the text and formats or to select TEXT FORMATS Clearing only the text or to select TEXT ONLY Selecting an area of the text or to select text Selecting all of the text Copying text or to select text Pasting text Copy text or to position cursor or to select OK Shift Caps Alt New Block Sym...

Page 5: ...ng a template Creating a label or stamp from a template a or to select TEMPLATE NO or to select or type template number Type line of text and Continue with 1 2 3 4 or 5 b or to select template category or to select template number Type line of text and Continue with 1 2 3 4 or 5 1 Changing the style of the template or to select CHANGE STYLE or to select setting 2 Editing the template text or to se...

Page 6: ...ly saved file a or to select OPEN or to select file number b or to select OPEN Type file name or to select file Deleting a previously saved file a or to select DELETE or to select file number or to select OK b or to select DELETE Type file name or to select file Printing text Previewing the label appearance Feeding and cutting 1 25 mm of tape Printing using the cur rent print options or to select ...

Page 7: ...elect MIRROR or to select ON 9 Inverting the printed and unprinted areas or to select INVERT or to select ON 0 Changing the shape of the text or to select TRANSFORM or to select setting A Changing how labels are cut or to select CUT or to select setting B Enlarging text and printing it on 2 3 or 4 labels or to select SPLIT or to select setting New Block New Block New Block New Block New Block New ...

Page 8: ...1 Ch 1 Before You Start Before You Start Chapter 1 Before You Start ...

Page 9: ...ch label You can also invert the printing to make the light parts dark and the dark parts light p 53 With the New Block function p 16 your labels can contain sections with dif ferent numbers of lines In this label part of the text was formatted using a different font p 25 and a different style p 28 In addition the Barcode function makes creating and printing barcodes easy Decorate your text using ...

Page 10: ... can be read from the adhesive side In this example a warning symbol was added Symbol function p 17 and the entire text was framed using the Frame Shading function p 32 In addition the label was printed vertically using the Vertical function p 31 Create a table using the Frame Shading function p 32 to put a box around each line of each block in the text Then use the Area func tion p 22 to format t...

Page 11: ...4 Ch 1 Before You Start Before You Start GENERAL DESCRIPTION Features Cover release button Tape compartment cover LCD display Keyboard Tape exit slot Handle Lettering stick Power supply connector ...

Page 12: ... Zoom Back ground Half Cutter 36mm 24mm 18mm 12mm 9mm 6mm 1 1 2 1 3 4 1 2 3 8 1 4 A BACKGROUND OFF SMALL LARGE FLOORING PLATE TILE The color of the arrows on the ends of the scroll bar shows whether or not more settings are available When the arrows are light and no more settings are available When the arrows are dark and more settings can be seen by pressing or to move 9 or Î up or down In menus ...

Page 13: ...n p 16 9 Font key p 24 L Cursor keys p 14 0 Size key p 25 M Symbol key p 17 A Width key p 27 N Space bar p 15 B Style key p 28 O Code key p 14 C Italic key p 29 P Cancel key p 14 D line effects key p 30 Q Shift key p 15 E Vert vertical key p 31 R Caps key p 15 F Back Space key p 21 S Alt key p 15 Clear function p 21 Print Clear C Shift 1 2 3 4 56 7 8 9 0 A B CD E F G H I J L K M N O P Q R S Feed C...

Page 14: ...7 Ch 2 Getting Started Chapter 2 Getting Started ...

Page 15: ...for an extended period of time Doing so may cause staining Do not clean the machine with alcohol or other organic solvents Only use a soft dry cloth Do not put any foreign objects into or heavy objects on the machine To avoid injuries do not touch the cutter s edge Use only the power supply cord designed exclusively for this machine Use of any other cord will void the warranty When the machine is ...

Page 16: ...tandard electrical outlet is available 1 Insert the plug on the end of the power supply cord into the power supply connector on the back of the P touch 2 Insert the pronged plug on the other end of the power supply cord into an AC outlet NOTE Only use the power supply cord designed exclusively for this machine ...

Page 17: ...toothed wheel in the direction of the arrow on the cassette until there is no slack in the ribbon Also make sure that the end of the tape feeds under the tape guides 4 Insert the tape cassette firmly into the com partment making sure that the entire back of the cassette touches the bottom of the compartment 5 Close the compartment cover and press the power supply key to turn on the machine if it i...

Page 18: ... the top right corner of the machine s keyboard This P touch will automatically turn off if no key is pressed or no operation is performed for 30 minutes In addition if it has remained plugged in the previous session s text is displayed when you turn it on again Press to turn on or turn off the P touch ...

Page 19: ...12 Ch 2 Getting Started Getting Started ...

Page 20: ...13 Ch 3 Functions Chapter 3 Functions ...

Page 21: ...he next text block hold down and press To select the item on the right in a list press left To move the cursor one space or character to the left press once If the cursor is at the beginning of a line when this key is pressed the cursor moves to the end of the previous line To move the cursor to the beginning of the current line of text hold down and press To move the cursor to the beginning of th...

Page 22: ...off by pressing When Alt mode is on the Alt indicator lights up The following table shows the available charac ters To add an accented character or a special punctuation mark to the text 1 Press The Alt indicator lights up NOTE When a number key is pressed the number not the symbol above it is typed in unless is held down To type lowercase letters while the Caps mode is on hold down while pressing...

Page 23: ...ffl ë ëéèêee Style Italic Vertical Caps Alt Template Zoom Back ground Half Cutter 36mm 24mm 18mm 12mm 9mm 6mm 1 1 2 1 3 4 1 2 3 8 1 4 A uffl é ëéèêee Style Italic Vertical Caps Alt Template Zoom Back ground Half Cutter 36mm 24mm 18mm 12mm 9mm 6mm 1 1 2 1 3 4 1 2 3 8 1 4 A New Block Code New Block Code New Block New Block NOTE A single block of text can only contain the maxi mum number of lines sho...

Page 24: ...lay If a category was selected Press or until the desired row of symbols is selected and then press or until the desired symbol is highlighted An enlargement of the selected symbol is shown on the right half of the display For the numbers of symbols refer to the list of symbols in the Appendix NOTE To return to the previous screen without keep ing any changes press To return to the text without ad...

Page 25: ...n will explain how to enter a barcode into your text It is not intended as a compre hensive introduction to the concept of barcod ing For more detailed information please consult one of the many reference books avail able Since this machine is not specifically designed for special barcode label making some bar code readers may not be able to read the labels Barcodes should be printed on white labe...

Page 26: ...talic Vertical Caps Alt Template Zoom Back ground Half Cutter 36mm 24mm 18mm 12mm 9mm 6mm 1 1 2 1 3 4 1 2 3 8 1 4 A PARAMETER PROTO CODE39 WIDTH WIDE UNDER S ON CH DIG OFF CONFIRM Style Italic Vertical Caps Alt Template Zoom Back ground Half Cutter 36mm 24mm 18mm 12mm 9mm 6mm 1 1 2 1 3 4 1 2 3 8 1 4 A PROTOCOL CODE39 I 2 5 EAN13 EAN8 UPC A UPC E NOTE To select the default setting press space bar C...

Page 27: ...s Alt Template Zoom Back ground Half Cutter 36mm 24mm 18mm 12mm 9mm 6mm 1 1 2 1 3 4 1 2 3 8 1 4 A FORMAT PARAMETER SYMBOL SPECIAL CHARACTER Symbol CONFIRM Style Italic Vertical Caps Alt Template Zoom Back ground Half Cutter 36mm 24mm 18mm 12mm 9mm 6mm 1 1 2 1 3 4 1 2 3 8 1 4 A SPECIAL CHARA SYMBOL 1 SYMBOL 2 New Block NOTE To delete a barcode move the cursor to the center or the right of the barco...

Page 28: ...k is joined with the previous one Clear Once you have printed your text you will need to erase the display so that you can design a new one With the Clear function you can select whether all of the text and all of the for mat settings or just the text and its text format settings will be erased To erase all of the text and formats 1 Hold down and press NOTE Use the cursor keys to move around the t...

Page 29: ... using the New Block function The first block of this text contains a single line the second con tains four lines and the third two lines This is a single block single line label with dif ferent parts of the text formatted using the Area function After all of the text was typed in sec tion 123 456 7890 was selected and given a smaller character size NOTE To return to the text without erasing anyth...

Page 30: ... r T r a n s p o r t Style Italic Vertical Caps Alt Template Zoom Back ground Half Cutter 36mm 24mm 18mm 12mm 9mm 6mm 1 1 2 1 3 4 1 2 3 8 1 4 A Area All MARGIN WIDE AUTO 5 3 HELSI e r t B e c k e r T r a n s p o r t Style Italic Vertical Caps Alt Template Zoom Back ground Half Cutter 36mm 24mm 18mm 12mm 9mm 6mm 1 1 2 1 3 4 1 2 3 8 1 4 A MARGIN WIDE AUTO 5 3 HELSI e r t B e c k e r T r a n s p o r ...

Page 31: ... you have entered it The label formats listed in the FORMAT menu specify the general appearance of the label Font With the Font function you can change your text s font to one of the many that are available Refer to the font samples on page 80 The font of the text at the cursor s current position is shown at the right end of the top line in the top of the display Copy Paste Copy Paste Copy Paste O...

Page 32: ...econd line in the top of the display Font A BRUSSELS FONT Style Italic Vertical Caps Alt Template Zoom Back ground Half Cutter 36mm 24mm 18mm 12mm 9mm 6mm 1 1 2 1 3 4 1 2 3 8 1 4 A Code Area All Area All Font BRUSSELS FONT r t B e c k e r T r a n s p o r t Style Italic Vertical Caps Alt Template Zoom Back ground Half Cutter 36mm 24mm 18mm 12mm 9mm 6mm 1 1 2 1 3 4 1 2 3 8 1 4 A New Block NOTE With ...

Page 33: ...ZE at the top of the display 3 Press The selected text is displayed in the desired text size NOTE While selecting a Size setting the following opera tions may be used To display the previous setting hold down and press To select the default setting AUTO hold down and press To return all text formatting functions to their default settings hold down and press space bar To return to the text without ...

Page 34: ... until the text is displayed in the desired width The current setting is shown below WIDTH at the top of the display 3 Press The selected text is displayed in the desired text width NOTE While selecting a Width setting the following oper ations may be used To display the previous setting hold down and press To select the default setting MEDIUM hold down and press To return all text formatting func...

Page 35: ...d in the desired style The setting is shown below STYLE at the top of the display 3 Press The selected text is displayed in the desired text style NOTE While selecting a Style setting the following opera tions may be used To display the previous setting hold down and press To select the default setting NORMAL hold down and press To return all text formatting functions to their default settings hol...

Page 36: ...s until the text is displayed with the desired Italic setting The current setting is shown below ITALIC at the top of the dis play 3 Press The selected text is displayed with the desired Italic setting NOTE While selecting an Italic setting the following operations may be used To select the default setting OFF hold down and press To return all text formatting functions to their default settings ho...

Page 37: ... Line effects setting The current set ting is shown below LINE EFFECTS at the top of the display 3 Press The selected text is displayed with the desired Line effects setting NOTE While selecting a Line effects setting the following operations may be used To display the previous setting hold down and press To select the default setting OFF hold down and press To return all text formatting functions...

Page 38: ... the text is displayed with the desired Vertical setting The current setting is shown below VERTICAL at the top of the display 3 Press The selected text is displayed with the desired Vertical setting NOTE While selecting a Vertical setting the following operations may be used To select the default setting OFF hold down and press To return all text formatting functions to their default settings hol...

Page 39: ... or shading press at any time NOTE To select the first setting in a menu press space bar To return to the previous screen without keep ing any changes press Cancel CONFIRM Style Italic Vertical Caps Alt Template Zoom Back ground Half Cutter 36mm 24mm 18mm 12mm 9mm 6mm 1 1 2 1 3 4 1 2 3 8 1 4 A FRAME SHADING FRAME SHADING New Block CONFIRM Style Italic Vertical Caps Alt Template Zoom Back ground Ha...

Page 40: ...und Half Cutter 36mm 24mm 18mm 12mm 9mm 6mm 1 1 2 1 3 4 1 2 3 8 1 4 A SHADING ALL BLOCK LINE CHARACTER New Block Style Italic Vertical Caps Alt Template Zoom Back ground Half Cutter 36mm 24mm 18mm 12mm 9mm 6mm 1 1 2 1 3 4 1 2 3 8 1 4 A A B C T r 1 M a i n L o s A n s A1 SELECT START POINT New Block Style Italic Vertical Caps Alt Template Zoom Back ground Half Cutter 36mm 24mm 18mm 12mm 9mm 6mm 1 1...

Page 41: ... the text without adding a frame or shading press at any time NOTE To select the first setting in a menu press space bar To return to the previous screen without keep ing any changes press New Block Clear Back Space New Block Cancel New Block Cancel CONFIRM Style Italic Vertical Caps Alt Template Zoom Back ground Half Cutter 36mm 24mm 18mm 12mm 9mm 6mm 1 1 2 1 3 4 1 2 3 8 1 4 A FRAME SHADING FRAME...

Page 42: ...enu press space bar To return to the previous screen without keep ing any changes press New Block CONFIRM Style Italic Vertical Caps Alt Template Zoom Back ground Half Cutter 36mm 24mm 18mm 12mm 9mm 6mm 1 1 2 1 3 4 1 2 3 8 1 4 A SHADING OFF New Block Cancel CONFIRM Style Italic Vertical Caps Alt Template Zoom Back ground Half Cutter 36mm 24mm 18mm 12mm 9mm 6mm 1 1 2 1 3 4 1 2 3 8 1 4 A FRAME SHADI...

Page 43: ...value 1 Press New Block Style Italic Vertical Caps Alt Template Zoom Back ground Half Cutter 36mm 24mm 18mm 12mm 9mm 6mm 1 1 2 1 3 4 1 2 3 8 1 4 A SELECT END POINT R obe rt Be ck AB C Tra nsp New Block CONFIRM Style Italic Vertical Caps Alt Template Zoom Back ground Half Cutter 36mm 24mm 18mm 12mm 9mm 6mm 1 1 2 1 3 4 1 2 3 8 1 4 A SHADING OFF New Block NOTE To return to the text without making any...

Page 44: ...fault setting AUTO press space bar To return to the previous screen without keep ing any changes press To return to the previous screen with the new setting press or CONFIRM Style Italic Vertical Caps Alt Template Zoom Back ground Half Cutter 36mm 24mm 18mm 12mm 9mm 6mm 1 1 2 1 3 4 1 2 3 8 1 4 A LENGTH AUTO inch Cancel New Block New Block New Block NOTE To return to the text without making any cha...

Page 45: ...ical Caps Alt Template Zoom Back ground Half Cutter 36mm 24mm 18mm 12mm 9mm 6mm 1 1 2 1 3 4 1 2 3 8 1 4 A FORMAT LENGTH AUTO MARGIN WIDE H ALI LEFT PITCH NORMAL BACK OFF CONFIRM Style Italic Vertical Caps Alt Template Zoom Back ground Half Cutter 36mm 24mm 18mm 12mm 9mm 6mm 1 1 2 1 3 4 1 2 3 8 1 4 A MARGIN ABC ABC WIDE NONE ABC NARROW ABC Cancel New Block New Block New Block NOTE To return to the ...

Page 46: ...screen with the new setting press or CONFIRM Style Italic Vertical Caps Alt Template Zoom Back ground Half Cutter 36mm 24mm 18mm 12mm 9mm 6mm 1 1 2 1 3 4 1 2 3 8 1 4 A HORIZONTAL ALIGN ABC LEFT ABC CENTER ABC RIGHT ABC JUSTIFY ABC LEFT Cancel New Block New Block New Block NORMAL FIXED NOTE To return to the text without making any changes press at any time To return all functions in the FORMAT menu...

Page 47: ...ny time To return all functions in the FORMAT menu to their default settings hold down and press space bar CONFIRM Style Italic Vertical Caps Alt Template Zoom Back ground Half Cutter 36mm 24mm 18mm 12mm 9mm 6mm 1 1 2 1 3 4 1 2 3 8 1 4 A PITCH HIHIHI NORMAL HIHIHI FIXED HIHIHI Cancel New Block New Block New Block Format Format Code NOTE To select the default setting OFF press space bar To return t...

Page 48: ... 89 for samples of the style formats To create a label or stamp from a template 1 Press The Template indicator lights up NOTE Up to 20 characters can be entered Symbols see pages 17 and 18 and accented characters see page 15 can also be added To display an enlarged view of the character or symbol above the cursor press Press any key to continue editing the text To return to the previous screen wit...

Page 49: ...ode ADDRESS 1 SELECT NO 1 Style Italic Vertical Caps Alt Template Zoom Back ground Half Cutter 36mm 24mm 18mm 12mm 9mm 6mm 1 1 2 1 3 4 1 2 3 8 1 4 A W 1 3 1 1 ADDRESS 1 Style Italic Vertical Caps Alt Template Zoom Back ground Half Cutter 36mm 24mm 18mm 12mm 9mm 6mm 1 1 2 1 3 4 1 2 3 8 1 4 A NOTE Symbols can also be added Refer to pages 17 and 18 for details To display an enlarged view of the chara...

Page 50: ...again after the last line of text in the tem plate is edited and is pressed NOTE To quit Template mode press or until 9 moves beside DONE and then press When the message OK TO FINISH TEMPLATE appears press or until 9 moves beside OK and press To return to Template mode press or move 9 beside CANCEL and then press New Block New Block New Block Cancel New Block CONFIRM Style Italic Vertical Caps Alt...

Page 51: ... PRINT LABEL H Press To store the label or stamp created using a tem plate I Press or until 9 moves beside FILE J Press NOTE Be sure that the correct tape cassette is installed When printing a stamp install a stamp film cassette When printing a label install a label tape cas sette New Block OK TO PRINT Style Italic Vertical Caps Alt Template Zoom Back ground Half Cutter 36mm 24mm 18mm 12mm 9mm 6mm...

Page 52: ...haracters long New Block 0 INPUT FILE NAME Style Italic Vertical Caps Alt Template Zoom Back ground Half Cutter 36mm 24mm 18mm 12mm 9mm 6mm 1 1 2 1 3 4 1 2 3 8 1 4 A 0 Address INPUT FILE NAME Style Italic Vertical Caps Alt Template Zoom Back ground Half Cutter 36mm 24mm 18mm 12mm 9mm 6mm 1 1 2 1 3 4 1 2 3 8 1 4 A New Block NOTE To return to the FILE menu without erasing the edited template press o...

Page 53: ...ady beside SAVE AS press 3 Press or until the file number where you want to store the text is dis played 4 Type in the desired file name 5 Press The text is saved under the selected number with the entered file name To save a file that has been saved before 1 Press 2 Press or until 9 moves beside SAVE NOTE To return to the previous screen without making any changes press File CONFIRM Style Italic ...

Page 54: ... R o be rt Be ck AB C Tra nsp Style Italic Vertical Caps Alt Template Zoom Back ground Half Cutter 36mm 24mm 18mm 12mm 9mm 6mm 1 1 2 1 3 4 1 2 3 8 1 4 A Address INPUT FILE NAME New Block File CONFIRM Style Italic Vertical Caps Alt Template Zoom Back ground Half Cutter 36mm 24mm 18mm 12mm 9mm 6mm 1 1 2 1 3 4 1 2 3 8 1 4 A FILE NEW SAVE AS SAVE OPEN DELETE NOTE To return to the previous screen witho...

Page 55: ...en without making any changes press New Block File CONFIRM Style Italic Vertical Caps Alt Template Zoom Back ground Half Cutter 36mm 24mm 18mm 12mm 9mm 6mm 1 1 2 1 3 4 1 2 3 8 1 4 A FILE NEW SAVE AS SAVE OPEN DELETE Cancel New Block R obe rt Be ck AB C Tran sp Style Italic Vertical Caps Alt Template Zoom Back ground Half Cutter 36mm 24mm 18mm 12mm 9mm 6mm 1 1 2 1 3 4 1 2 3 8 1 4 A 0 Address SEARCH...

Page 56: ...NT appears 2 Since is already beside OK press The label is printed out To print multiple copies of a label 1 Press 2 Press or to move 9 beside OPTION 3 Press Code Zoom Image Code Zoom Image Cancel Feed Cut Feed Cut Cancel Print Print OK TO PRINT Style Italic Vertical Caps Alt Template Zoom Back ground Half Cutter 36mm 24mm 18mm 12mm 9mm 6mm 1 1 2 1 3 4 1 2 3 8 1 4 A OK OPTION CANCEL NOTE To quit p...

Page 57: ...he number of digits that are printed 1_9Î 2_0 Î 9_9 Î __0 Î _9 Î 10 Î 99 Î _0 Î _Z Î AA Î ZZ Î _A Î 1 Press NOTE To select the default setting 1 press space bar CHANGE SETTINGS Style Italic Vertical Caps Alt Template Zoom Back ground Half Cutter 36mm 24mm 18mm 12mm 9mm 6mm 1 1 2 1 3 4 1 2 3 8 1 4 A OPTION COPIES 1 NUMBER OFF MIRROR OFF INVERT OFF TRANS FORM ABC CONFIRM Style Italic Vertical Caps A...

Page 58: ...m Back ground Half Cutter 36mm 24mm 18mm 12mm 9mm 6mm 1 1 2 1 3 4 1 2 3 8 1 4 A OPTION COPIES 1 NUMBER OFF MIRROR OFF INVERT OFF TRANS FORM ABC SELECT START Style Italic Vertical Caps Alt Template Zoom Back ground Half Cutter 36mm 24mm 18mm 12mm 9mm 6mm 1 1 2 1 3 4 1 2 3 8 1 4 A POINT io 1A NOTE If a barcode was selected in step 6 this step is skipped A numbering field must be located entirely wit...

Page 59: ...t without making any changes press at any time New Block OFF ON Print OK TO PRINT Style Italic Vertical Caps Alt Template Zoom Back ground Half Cutter 36mm 24mm 18mm 12mm 9mm 6mm 1 1 2 1 3 4 1 2 3 8 1 4 A OK OPTION CANCEL Print NOTE To display the OPTION menu quickly hold down and press To return to the previous screen without keep ing any changes press To return all functions in the OPTION menu t...

Page 60: ...BC ON ABC Print OK TO PRINT Style Italic Vertical Caps Alt Template Zoom Back ground Half Cutter 36mm 24mm 18mm 12mm 9mm 6mm 1 1 2 1 3 4 1 2 3 8 1 4 A OK OPTION CANCEL Print NOTE To display the OPTION menu quickly hold down and press To return to the previous screen without keep ing any changes press To return all functions in the OPTION menu to their default settings hold down and press space bar...

Page 61: ...n and press To return to the previous screen without keep ing any changes press To return all functions in the OPTION menu to their default settings hold down and press space bar New Block Print OK TO PRINT Style Italic Vertical Caps Alt Template Zoom Back ground Half Cutter 36mm 24mm 18mm 12mm 9mm 6mm 1 1 2 1 3 4 1 2 3 8 1 4 A OK OPTION CANCEL Print New Block Code Print Cancel Code NOTE To select...

Page 62: ...9mm 6mm 1 1 2 1 3 4 1 2 3 8 1 4 A ABC ABC ABC ABC ABC ABC ABC ABC Print OK TO PRINT Style Italic Vertical Caps Alt Template Zoom Back ground Half Cutter 36mm 24mm 18mm 12mm 9mm 6mm 1 1 2 1 3 4 1 2 3 8 1 4 A OK OPTION CANCEL NOTE To return to the text without making any changes press at any time NOTE To display the OPTION menu quickly hold down and press To return to the previous screen without kee...

Page 63: ...To return to the text without making any changes press at any time ABC ABC New Block ABC1 ABC1 Print OK TO PRINT Style Italic Vertical Caps Alt Template Zoom Back ground Half Cutter 36mm 24mm 18mm 12mm 9mm 6mm 1 1 2 1 3 4 1 2 3 8 1 4 A OK OPTION CANCEL Print NOTE To display the OPTION menu quickly hold down and press To return to the previous screen without keep ing any changes press To return all...

Page 64: ...m mode The line numbers are not displayed in WYSIWYG mode 1 Press 2 Since Î is already beside LINE NO press New Block NOTE To return all functions in the SETUP menu to their default settings hold down and press space bar Setup Setup Setup Code CHANGE SETTINGS Style Italic Vertical Caps Alt Template Zoom Back ground Half Cutter 36mm 24mm 18mm 12mm 9mm 6mm 1 1 2 1 3 4 1 2 3 8 1 4 A SETUP LINE NO ON ...

Page 65: ... space bar NOTE To return all functions in the SETUP menu to their default settings hold down and press space bar New Block New Block Setup Code CHANGE SETTINGS Style Italic Vertical Caps Alt Template Zoom Back ground Half Cutter 36mm 24mm 18mm 12mm 9mm 6mm 1 1 2 1 3 4 1 2 3 8 1 4 A SETUP LINE NO ON CONTRAST 0 UNITS inch LANGUAGE ENGLISH NOTE To select the default setting press space bar NOTE To r...

Page 66: ...gain to apply the setting NOTE To select the default setting press space bar NOTE To return all functions in the SETUP menu to their default settings hold down and press space bar CONFIRM Style Italic Vertical Caps Alt Template Zoom Back ground Half Cutter 36mm 24mm 18mm 12mm 9mm 6mm 1 1 2 1 3 4 1 2 3 8 1 4 A UNITS inch cm New Block New Block Setup Code NOTE To select the default setting press spa...

Page 67: ...60 Ch 3 Functions Functions ...

Page 68: ...61 Ch 4 Using Labels and Stamps Chapter 4 Using Labels and Stamps ...

Page 69: ...mplates and then affixing the printed stamp stencil to a self inking stamp film holder 1 Install a stamp film cassette and enter text into a pre formatted stamp template Refer to pages 41 through 45 for more details on using templates 2 Print out the stamp stencil and remove its backing paper 3 Remove the frame from around the stamp holder ink pad one end at a time and then remove the protective s...

Page 70: ... it in place with your finger 7 Fit the frame over the stamp film and then push the frame into place 8 Insert the stamp holder straight into the cap Tape end Glossy side Slit Fold over Guides NOTE Be sure that the cap correctly covers the stamp in order to prevent ink spills When the stamp is not being used firmly cover it with the cap and always store it standing up with the stamp facing downward...

Page 71: ...the size and thickness of the char acters whether a shading pattern is used etc NOTE Use 1 2 12 mm wide tape to make an identifica tion label for an M size stamp and use 3 4 18 mm wide tape to make a label for an L size stamp OK TO PRINT Style Italic Vertical Caps Alt Template Zoom Back ground Half Cutter 36mm 24mm 18mm 12mm 9mm 6mm 1 1 2 1 3 4 1 2 3 8 1 4 A PRINT STAMP PRINT LABEL CANCEL NOTE Aft...

Page 72: ... character a space a new line a new block a symbol an accented character or a barcode This message appears if enough text has already been entered to fill the buffer and you press or Delete some of the text before trying to add any more Delete some of the text before trying to change the text format CAN T FIND FILE This message appears if a file with the entered file name cannot be found Search fo...

Page 73: ...talled when you try to print text Install a tape cassette and try again LENGTH LIMIT This message appears if you try to paste in text or add a character a space a new block a symbol an accented character a barcode or a frame shading causing the text to exceed the 4 1 2 meter limit This message appears if you press after changing a label for mat function on the FORMAT menu or press or causing the t...

Page 74: ...MAX 5 BARCODES This message appears if five bar codes already exist when you press Limit the number of bar codes in the text to five MAX 5 BLOCKS This message appears if five blocks already exist when you hold down and press Limit the number of blocks in the text to five MAX 10 LINES This message appears if ten lines have already been entered in a block of text when you press This message appears ...

Page 75: ...here is a problem with the machine s mem ory Contact your service rep resentative SET 3 8 TAPE This message appears if a 3 8 9 mm wide tape cassette is not installed when printing a label cre ated using a template for 3 8 9 mm wide tape Install a 3 8 9 mm wide tape cassette SET 1 2 TAPE his message appears if a 1 2 12 mm wide tape cassette is not installed when printing a label cre ated using a te...

Page 76: ...ed tape Reduce the number of lines in the text reduce the size of the characters or install a tape with a greater width TEXT TOO LONG This message appears if the length of the text is longer than the label length that has been set This message appears if the text typed into a line in a template TEMPLATE function exceeds the preset length Delete some of the text reduce the character width or increa...

Page 77: ...isplay and all text files stored in the memory are erased 2 The text shown in the display cannot be read Use the Zoom mode to zoom in on the text Refer to page 21 3 The machine does not print or the printed characters are blurred Check that the tape cassette has been inserted properly If the tape cassette is empty replace it with a new one Make sure that the tape compartment cover has been closed ...

Page 78: ...to gently wipe up and down along the print head Rollers Use a dry cotton swab to wipe up and down along each roller while rotating them with your finger 4 Install a tape cassette close the tape com partment cover and then try printing again 5 If a blank streak still appears in the printed label repeat steps 2 through 4 using a cotton swab dipped in isopropyl rubbing alcohol If none of the above wo...

Page 79: ...machine has locked up i e noth ing happens when a key is pressed Reset the machine by turning it off and while holding down and turn ing the machine back on All text and formats in the display and all text files stored in the memory will be erased 8 After turning on the P touch the message BACKUP MEMORY CLEARED appears and all of the files in the memory are lost The internal backup battery is low ...

Page 80: ...on Tape cutter Auto full cutter Auto half cutter Dimensions 13 19 12 28 3 98 335 312 101 mm Weight 5 51 lbs 2 5 kg Character fonts 10 built in fonts Helsinki Brussels US San Diego Florida Calgary Brunei Bold Los Angeles Bermuda Script and Istanbul Character sizes AUTO plus 9 point sizes 6 9 12 18 24 36 48 60 and 72 points Character styles 9 built in type styles Normal Bold Outline Solid Shadow Out...

Page 81: ...74 MACHINE SPECIFICATIONS ...

Page 82: ...75 Appendix Appendix ...

Page 83: ... 40 41 42 43 44 45 46 47 48 49 Symbol Number 50 51 52 53 54 55 56 57 58 59 60 61 SPECIAL LETTERS Symbol Number 62 63 64 65 66 67 68 69 70 71 NUMBERS Symbol 1 2 1 3 1 4 1 2 3 4 5 6 7 8 9 0 Number 72 73 74 75 76 77 78 79 80 81 82 83 84 85 Symbol 0 1 2 3 4 5 6 7 8 9 Number 86 87 88 89 90 91 92 93 94 95 96 97 98 99 Symbol 0 1 2 3 4 5 6 7 8 9 Number 100 101 102 103 104 105 106 107 108 109 110 GENERAL S...

Page 84: ...190 191 192 193 194 195 196 197 198 199 200 Symbol Number 201 202 203 204 205 WARNING 3 Symbol Number 206 207 208 209 210 211 212 213 214 215 216 217 218 219 Symbol Number 220 221 222 223 224 225 226 227 228 229 230 231 232 233 Symbol Number 234 235 236 237 238 239 240 241 242 243 244 245 246 GUIDANCE Symbol Number 247 248 249 250 251 252 253 254 255 256 257 258 259 260 Symbol Number 261 262 263 2...

Page 85: ...9 350 351 352 ANIMALS Symbol Number 353 354 355 356 357 358 359 360 361 362 363 364 PLANTS Symbol Number 365 366 367 368 FOOD DRINK Symbol Number 369 370 371 372 373 374 375 376 377 378 379 380 381 382 Symbol Number 383 384 385 386 OFFICE Symbol Number 387 388 389 390 391 392 393 394 395 396 397 398 399 400 Symbol Number 401 402 403 404 405 406 407 408 409 410 411 412 413 414 Symbol Number 415 416...

Page 86: ...umber 441 442 443 444 TOOL Symbol Number 445 446 447 448 ASTRONOMI CAL Symbol Number 449 450 451 452 POINTING Symbol Number 453 454 455 456 457 458 459 460 FISH Symbol Number 461 462 INSECTS Symbol Number 463 464 465 466 VIDEO Symbol Number 467 468 469 470 471 472 473 474 475 Category ...

Page 87: ...tocols CODE39 or CODABAR Fonts p 24 The following fonts are available Value Character Value Character Value Character 3 69 ENQ 87 ETB 4 70 ACK 88 CAN 11 71 BEL 89 EM 28 72 BS 90 SUB 29 73 HT 91 ESC 30 74 LF 91 32 75 VT 92 FS 59 76 FF 92 60 77 CR 93 GS 61 78 SO 93 62 79 SI 94 RS 63 _ 80 DLE 94 64 NUL 81 DC1 95 US 64 82 DC2 95 DEL 65 SOH 83 DC3 96 FNC3 66 STX 84 DC4 97 FNC2 67 ETX 85 NAK 100 FNC4 68...

Page 88: ...81 Appendix Appendix Sizes and widths pp 25 27 Samples of the available text sizes and widths are shown below Width Size Wide Medium Narrow 72pt 60pt 48pt 36pt 24pt 18pt 12pt 9pt 6pt ...

Page 89: ...82 Appendix Appendix Type styles p 28 Normal Bold Outline Solid Shadow Outline Shadow Stripe Helsinki Brussels US San Diego Florida Calgary Brunei Bold Los Angeles Bermuda Script Istanbul ...

Page 90: ...83 Appendix Appendix Framing and shading patterns p 32 The following frame and shading patterns are available Frame Shading ...

Page 91: ...ppendix Appendix Background designs p 40 Samples of the available background designs are shown below OFF ARABIC SMALL TARTAN LARGE ETHNIC FLOORING FLOWER PLATE GEOMETRI TILE GRADATION 1 MARBLES GRADATION 2 ...

Page 92: ...gth Sample 1 ADDRESS ADDRESS 1 1 24 mm 3 1 8 0 cm 2 ADDRESS 2 1 24 mm 3 1 7 8 cm 3 ADDRESS 3 1 24 mm 4 1 10 4 cm 4 ADDRESS 4 1 1 2 36 mm 3 4 8 6 cm 5 EQUIPMENT EQUIPMENT 1 24 mm 3 3 8 4 cm 6 PLATE PLATE 1 1 2 36 mm 7 3 18 6 cm 7 NAMEPLATE NAMEPLATE 1 3 4 18 mm 3 4 8 6 cm 8 NAMEPLATE 2 1 1 2 36 mm 3 9 9 8 cm 9 NAMEPLATE 3 3 4 18 mm 2 0 5 2 cm ...

Page 93: ... 11 PRICE 1 1 24 mm 2 2 5 7 cm 12 PRICE 2 1 24 mm 4 3 11 0 cm 13 SIGN SIGN 1 1 2 36 mm 4 5 11 4 cm 14 FLOPPY FLOPPY 1 1 24 mm 2 8 7 0 cm 15 FLOPPY 2 1 24 mm 2 8 7 0 cm 16 FLOPPY 3 1 1 2 36 mm 2 8 7 0 cm No Category Template name Tape width Label length Sample ...

Page 94: ...20 8mm 2 1 2 12 mm 3 6 9 2 cm 21 VHSC 3 4 18 mm 3 2 8 1 cm 22 AUDIO AUDIO 1 3 8 9 mm 3 5 8 9 cm 23 AUDIO 2 3 8 9 mm 3 5 8 9 cm 24 AUDIO 3 3 8 9 mm 3 5 8 9 cm 25 SLIDE SLIDE 1 2 12 mm 1 7 4 2 cm 26 FILE FILE 1 1 1 2 36 mm 7 9 20 0 cm 27 FILE 2 1 24 mm 7 5 19 0 cm No Category Template name Tape width Label length Sample ...

Page 95: ...AMP M 4 0 10 2 cm 30 FRAMED L STAMP L 4 4 11 2 cm 31 FRAMED M STAMP M 4 0 10 2 cm 32 2LINE L STAMP L 4 4 11 2 cm 33 2LINE FRAME L STAMP L 4 4 11 2 cm 34 VERTICAL L STAMP L 4 4 11 2 cm 35 VERTICAL M STAMP M 4 0 10 2 cm No Category Template name Tape width Label length Sample ...

Page 96: ...ext styles are shown below CHAR style Sample Font Style Italic ORIGINAL Template default ITALIC Template default ON DYNAMIC ISTANBUL SOLID OFF CUTE FLORIDA OUTLINE OFF FORMAL BRUSSELS NORMAL ON ELEGANT US NORMAL OFF FREE BERMUDA SCRIPT OUTLINE SHADOW OFF NATURAL SAN DIEGO NORMAL OFF ...

Page 97: ...90 Appendix Appendix Text transformation styles p 54 Samples of the text transformation shapes are shown below OFF ABC ABC ABC ABC ABC ABC ...

Page 98: ...unction 24 H ALI horizontal alignment function 39 Italic function 29 LENGTH function 37 Line effects function 30 MARGIN function 38 PITCH function 40 Size function 26 Style function 28 Vertical function 31 Width function 27 Deleting Display 21 Files 48 Text 21 Display settings 57 Displaying Areas of text 14 Enlargements 21 E EAN128 special characters 80 Enter key 14 16 Error messages 65 F Feed Cut...

Page 99: ...17 76 R Recalling Template text 48 Text 47 Reversing Print 53 Text 52 S Saving Template text 44 Text 46 Selecting Functions 14 Settings 14 Text 22 23 Setup key 57 SETUP menu 57 Shading 32 Shift key 15 Signs 17 76 Size function 25 Space bar 15 SPECIAL CHARA menu 20 SPLIT function 56 Stamp films 62 Storing Template text 44 Text 46 Strike out 30 Style function 28 STYLE menu 43 Styles Character 28 Tem...

Page 100: ... White characters on clear tape 1 20 99 TZ 241 Black characters on white tape 1 20 99 TZ 242 Red characters on white tape 1 20 99 TZ 243 Blue characters on white tape 1 20 99 TZ 344 Gold characters on black tape 1 24 99 TZ 345 White characters on black tape 1 23 99 TZ 441 Black characters on red tape 1 20 99 TZ 541 Black characters on blue tape 1 20 99 TZ 545 White characters on blue tape 1 23 99 ...

Page 101: ...k No Description QTY PACKAGE PRICE TZ SE4 Black characters on 3 4 18 mm wide security tape 1 29 99 TZ FA3 Blue characters on 1 2 12 mm wide fabric tape 1 24 99 Stock No Description QTY PACKAGE PRICE SK LB Stamp making kit for Large stamp with black ink 1 39 99 SK MB Stamp making kit for Medium stamp with black ink 1 37 99 SH LB Additional stamper for Large stamp with black ink 1 27 99 SH MB Additi...

Page 102: ...he desired items 2 Complete the order form indicating the quantity of each item for your records 3 Enter the total on the Supply Accessory Total line below for your records 4 Add appropriate sales tax and shipping handling costs for your records 5 Have your Visa or MasterCard number and expiration date available G S T R100663764 P S T 100100117TQ0001 Prices subject to change without notice Stock N...

Page 103: ......

Page 104: ...he desired items 2 Complete the order form indicating the quantity of each item for your records 3 Enter the total on the Supply Accessory Total line below for your records 4 Add appropriate sales tax and shipping handling costs for your records 5 Have your Visa or MasterCard number and expiration date available G S T R100663764 P S T 100100117TQ0001 Prices subject to change without notice Stock N...

Page 105: ......

Page 106: ...GUÍA DEL USUARIO ...

Page 107: ...nstalaciones residenciales Este equipo genera emplea y puede radiar energía de radiofrecuencia y si no se instala de acuerdo con las instrucciones puede causar interferencias perjudiciales en las radiocomunicaciones Sin embargo no se garantiza que no ocurrirán interferencias en una instalación en particular Si este equipo causa interferen cias perjudiciales en la recepción de radio o televisión lo...

Page 108: ...esconexión de la alimentación del P touch 2 Realización de las operaciones básicas 3 Introducción de texto 4 Edición de texto 8 Formateo 11 Almacenamiento e invocación de archivos 25 Impresión 27 Ajuste de las funciones de visualización 33 Solución de prodlemas 35 Especificaciones de la máquina 41 CONTENTS ...

Page 109: ...ii ...

Page 110: ...ortador Utilice solamente el cable de alimentación diseñado exclusivamente para esta máquina Si usase otro cable de alimentación la garantía se anularía Cuando no vaya a utilizar la máquina durante mucho tiempo desconéctele el cable de alimen tación Una línea negra horizontal que aparezca en una etiqueta impresa puede indica que hay polvo en la cabeza impresora Limpie la cabeza impresora frotándol...

Page 111: ...ete de cinta en el compartimiento cerciorándose de que toda la parte posterior del mismo toque la base del compartimiento 5 Cierre la cubierta del compartimiento y pre sione la tecla de alimentación para conectar la alimentación de la máquina si está encendida La anchura de la cinta actualmente instalada se mostrará en el indicador de anchura de cinta del borde derecho del visualizador 6 Presione ...

Page 112: ...l cursor hasta el final de la línea actual de texto mantenga pulsada y presione Para mover el cursor hasta el comienzo del bloque de texto siguiente mantenga pul sada y presione Para seleccionar el ítem situado a la dere cha en una lista presione izquierda Para mover el cursor un espacio o un carác ter hacia la izquierda presione una vez Si el cursor está al comienzo de una línea cuando presione e...

Page 113: ...Par añadir un espacio en blanco al texto pre sione barra espaciadora Shift Par escribir una letra mayúscula o el símbolo impreso en la mitad superior de ciertas teclas como en una máquina de escribir o un PC mantenga pulsada y presione la tecla correspondiente al carácter que desee introdu cir Caps Para escribir en serie mayúsculas sin mantener pulsada tendrá que activar el modo Caps El moco Caps ...

Page 114: ...er al texto presione o en cualquier momento NIOTA Para introducir una serie de caracteres en el modo Alt mantenga pulsada antes de presionar Después continúe añadiendo caracteres selec cionándolos como de explica en los pasos 2 y 3 y manteniendo pulsada mientras pre sione Después de haber seleccionado el último carácter de una serie presione simplemente Alt Alt Alt Shift Caps Cancel Alt New Block ...

Page 115: ... mostrará una ampliación del símbolo seleccionado Con respecto a los números de los sím bolos consulte la lista de símbolos de Appendix en inglés 5 Presione El símbolo seleccionado se añadirá al texto NOTA Para volver a la pantalla anterior sin realizar ningún cambio presione Para volver al texto sin añadir ningún símbolo presione en cualquier momento Symbol Symbol Cancel Symbol New Block NOTA Par...

Page 116: ...í no se pretende ofrecer una descripción detallada sobre el concepto de código de barras Para una información más detallada consulte uno de los muchos libros de referencia dispo nibles Como esta máquina no ha sido específicamente diseñada para la confección de etiquetas de códigos de barras especiales es posible que algunos lectores de códigos de barras no pue dan leer las etiquetas Los códigos de...

Page 117: ... texto en plantillas modo Template y fondos modo BACKGROUND del menú FORMAT se visualizará una ampliación del carácter situado sobre el cursor Esto le permitirá ver símbolos que aparezcan en el visualizador como Back Space Para borrar el carácter del texto que se encuen tre a la izquierda de la posición actual del cur sor presione Cada vez que presione se borrará un carácter Si el cursor está al c...

Page 118: ... función Area podrá seleccionarse el texto dentro de una línea o un grupo de líneas a fin de poder cam biar sus formatos de texto El texto seleccio nado también podrá borrar o copiar y pegarse en un lugar diferente del texto Las dos etiquetas siguientes muestran cómo pueden utilizarse estas funciones Los bloques múltiples de esta etiqueta fueron creados utilizando la función New Block El primer bl...

Page 119: ... Paste La función Copy Paste será muy útil para copiar caracteres ya introducidos y pegarlos en una sección diferente del texto Para copiar y pegar texto 1 Seleccione el texto que desee copiar y pegar utilizando la función AREA consulte la página 10 o la función ALL consulte la página 10 2 Presione Los caracteres seleccionados se copiarán pero no se eliminarán del texto 3 Presione o hasta que el c...

Page 120: ...zar una fuente diferente 2 Presione hasta seleccionar la fuente deseada El ajuste actual se mostrará debajo de FONT de la parte superior del visualiza dor y a la derecha del cursor podrá verse una muestra A 3 Escriba el nuevo texto Para cambiar la fuente del texto de un área seleccionada 1 Mantenga pulsada y presione para seleccionar todo el texto o presione y utilice o para seleccio nar solamente...

Page 121: ... 1 1 2 36 mm de anchura el tamaño del texto con una línea solamente y sin contener letras minúscu las o ciertos símbolos se imprimirá con un tamaño ligeramente mayor Si selecciona un tamaño muy pequeño el texto puede no leerse en el modo WYSIWYG Para editar tal texto de tamaño pequeño active el modo Zoom Para más detalles consulte la página 8 Los tamaños de texto que pueden imprimirse depende de l...

Page 122: ...jo de WIDTH de la parte superior del visualizador y a la derecha del cursor podrá verse una muestra A 3 Escriba el nuevo texto Para cambiar la anchura del texto de un área seleccionada 1 Mantenga pulsada y presione para seleccionar todo el texto o presione y utilice o para seleccionar solamente parte del mismo 2 Presione hasta que el texto se visualice en la anchura deseada El ajuste actual se mos...

Page 123: ...e El texto seleccionado se visualizará en el estilo de texto deseado Italic La función Italic podrá combinarse con cada uno de los otros ajustes de formato de texto para lograr mayor variedad de estilos de texto Cuando haya activado la función Italic para el texto de la posición actual del cursor aparecerá el indicador Italic en la parte inferior del visuali zador NOTA Cuando haya seleccionado el ...

Page 124: ...effects La función Line effects le permitirá subrayar o tachar ciertas partes de su texto Para cambiar el ajuste Line effects del texto antes de introducirlo 1 Presione o hasta que el cursor se mueva hasta el punto a partir del que desee comenzar a utilizar un ajuste Line effects diferente 2 Presione para seleccionar el ajuste deseado El ajuste actual se mostrará debajo de LINE EFFECTS de la parte...

Page 125: ...ferente 2 Presione para seleccionar ON o OFF El ajuste actual se mostrará debajo de VER TICAL de la parte superior del visualizador y a la derecha del cursor podrá verse una muestra A 3 Escriba el nuevo texto Para cambiar el ajuste Vertical del texto de un área seleccionada 1 Mantenga pulsada y presione para seleccionar todo el texto o presione y utilice o para seleccio nar solamente parte del mis...

Page 126: ...resione 6 Presione o hasta seleccionar el pri mer bloque que desee encuadrar o som brear 7 Presione 8 Presione or hasta seleccionar todos los bloques que desee encuadrar o sombrear 9 Presione 0 Presione o para mover 9 hasta el lado del cuadro o del patrón de sombreado deseado A Presione El cuadro o el sombreado deseado se aplicará a los bloques de texto seleccionados NOTA Para volver al texto sin ...

Page 127: ...ear 7 Presione 8 Presione o hasta selec cionar todos los caracteres que desee encuadrar o sombrear 9 Presione NOTA Para borrar el cuadro o el sombreado coloque el cursor a la izquierda del cuadro sombreado que desee borrar y después presione Cuando aparezca el mensaje OK TO CLEAR FRAME SHADING presione o para mover 9 hasta el lado de OK y presione Para conservar el marco sombreado presione o mueva...

Page 128: ...r el ajuste y volver al menú FORMAT presione una vez 5 Para aplicar el ajuste vuelva a presionar Para cambiar los ajustes de MARGIN Esta función le permitirá seleccionar el tamaño de los márgenes izquierdo y derecho de su texto Cuando seleccione NONE NARROW o MEDIUM se alimentará cierta cinta extra a fin de que los márgenes izquierdo y derecho sean iguales El ajuste de márgenes actual se mostrará ...

Page 129: ...ver todas las funciones del menú FORMAT a sus ajustes predeterminados man tenga pulsada y presione barra espaciadora NOTA Para seleccionar el ajuste predeterminado WIDE presione barra espaciadora Para volver a la pantalla anterior sin realizar ningún cambio presione Para volver a la pantalla anterior sin el nuevo ajuste presione o Format Format Code ABC Cancel New Block New Block New Block ABC LEF...

Page 130: ...lver al texto sin realizar ningún cambio presione en cualquier momento Para devolver todas las funciones del menú FORMAT a sus ajustes predeterminados man tenga pulsada y presione barra espaciadora NOTA Para seleccionar el ajuste predeterminado NORMAL presione barra espaciadora Para volver a la pantalla anterior sin realizar ningún cambio presione Para volver a la pantalla anterior sin el nuevo aj...

Page 131: ...la deseada Si seleccionó TEMPLATE NO Escriba un número de plantilla o pre sione o hasta que se visualice la plantilla deseada El nombre de la plantilla seleccionada se mostrará en la segunda línea de la parte superior del visualizador Si seleccionó una categoría Presione o hasta que se visua lice la plantilla deseada El número y el nombre de la placa actual se visualiza rán en la parte superior de...

Page 132: ...lva a presionar NOTA También podrá introducir símbolos Con respecto a los detalles consulte las páginas 6 y 6 de inglés Para hacer que se visualice una vista ampliada del carácter o del símbolo situado sobre el cur sor presione Para volver a la edición de texto presione cualquier tecla Para mover el cursor a través de la línea de texto presione y y para hacer que se visualice una línea diferente d...

Page 133: ...as páginas 28 a 33 Para un sello creado utilizando una planti lla de la categoría STAMP Para imprimir un clisé de sello selec cione PRINT STAMP Para imprimir una etiqueta de identifi cación seleccione PRINT LABEL H Presione Para almacenar la etiqueta o el sello creado uti lizando una plantilla I Presione o para mover 9 hasta el lado de FILE J Presione K Presione o para mover 9 hasta el lado del aj...

Page 134: ...ción OPEN el texto podrá editar o imprimirse sin cambiar el archivo originalmente almacenado Sin embargo la función SAVE podrá utilizarse para reemplazar el archivo previamente almacenado por el nuevamente editado Cuando ya no necesite un archivo o cuando necesite más espacio podrá utilizar la función DELETE para borrarlo Para almacenar un archivo que no haya sido almacenado antes 1 Presione 2 Com...

Page 135: ...ta que se visualice el que desee abrir 5 Presione El archivo seleccionado aparecerá en el visualizador Para borrar un archivo que haya almacenado 1 Presione 2 Presione o para mover 9 hasta el lado de DELETE NOTA Para volver a la pantalla anterior sin realizar ningún cambio presione NOTA Un nombre de archivo solamente podrá contener hasta 10 caracteres NOTA Para volver a la pantalla anterior sin re...

Page 136: ...ticamente presione Presione esta tecla para alimentar la cinta impresa que haya quedado después de haber presionado para abandonar la impresión Print Después de haber escrito su texto y haber ele gido todo el texto y el formato de la etiqueta que desee utilizar podrá imprimir Antes de imprimir su etiqueta podrá seleccionar algunos ajustes adicionales Para imprimir una etiqueta utilizando los ajus ...

Page 137: ...r el espacio entre caracteres o para controlar el número de dígitos a imprimirse 1_9Î 2_0 Î 9_9 Î __0 Î _9 Î 10 Î 99 Î _0 Î _Z Î AA Î ZZ Î _A Î 1 Presione 2 Presione o para mover 9 hasta el lado de OPTION NOTA Para volver al texto sin realizar ningún cambio pre sione en cualquier momento NOTA Para hacer que se visualice rápidamente el menú OPTION mantenga pulsada y pre sione Para volver a la panta...

Page 138: ...2 Presione o para mover 9 hasta el lado de OPTION 3 Presione NOTA Para hacer que se visualice rápidamente el menú OPTION mantenga pulsada y pre sione Para volver a la pantalla anterior sin realizar ningún cambio presione Para devolver todas las funciones del menú OPTION a los ajustes predeterminados man tenga pulsada y presione barra espaciadora NOTA Si seleccionó un código de barras en el paso 6 ...

Page 139: ...a 90 de inglés 1 Presione NOTA Para hacer que se visualice rápidamente el menú OPTION mantenga pulsada y pre sione Para volver a la pantalla anterior sin realizar ningúnn cambio presione Para devolver todas las funciones del menú OPTION a sus ajustes predeterminados man tenga pulsada y presione barra espaciadora NOTA Para seleccionar el ajuste predeterminado OFF presione barra espaciadora NOTA Cua...

Page 140: ...o sin realizar ningún cambio pre sione en cualquier momento NOTA Para hacer que se visualice rápidamente el menú OPTION mantenga pulsada y pre sione Para volver a la pantalla anterior sin realizar ningún cambio presione Para devolver todas las funciones del menú OPTION a los ajustes predeterminados man tenga pulsada y presione barra espaciadora NOTA Para seleccionar el ajuste predeterminado OFF pr...

Page 141: ...ione 6 Presione o para mover 9 hasta el lado del ajuste deseado 7 Presione para confirmar el ajuste y volver al menú OPTION NOTA Para seleccionar el ajuste predeterminado BOTH presione barra espaciadora NOTA Si imprime las etiquetas en cinta transparente podrá juntarlas sin cortarlas NOTA Para volver al texto sin realizar ningún cambio pre sione en cualquier momento ABC ABC New Block Print Print N...

Page 142: ...a el lado de CONTRAST 3 Presione 4 Presione o para mover Î hasta el lado del ajuste que desee seleccionar 5 Presione una vez para confirmar el ajuste y volver al menú SETUP 6 Vuelva a presionar para confirmar el ajuste Para cambiar el ajuste de UNITS Esta función le permitirá elegir las unidades uti lizadas para las medidas de visualización 1 Presione 2 Presione o para mover Î hasta el lado de UNI...

Page 143: ...e or para mover Î hasta el lado de LANGUAGE 3 Presione 4 Presione o para mover Î hasta el lado del ajuste que desee seleccionar 5 Presione una vez para confirmar el ajuste y volver al menú SETUP 6 Vuelva a presionar para confirmar el ajuste NOTA Para seleccionar el ajuste predeterminado presione barra espaciadora NOTA Para devolver todas las funciones del menú SETUP a sus ajustes predeterminados m...

Page 144: ...atos del visualizador y todos los archivos de texto almacenados en la memoria se borrarán 2 El texto mostrado en el visualizador no puede leerse Utilice el modo Zoom para ampliar el texto Consulte la página 8 3 La máquina no imprime o los caracteres impresos aparecen difuminados Compruebe si el casete está adecuada mente insertado Si el casete está vacío reemplácelo por otro nuevo Compruebe si la ...

Page 145: ...la cabeza impresora Rodillos Utilice un palillo de cabeza de algo dón seco para frotar hacia arriba y hacia abajo cada rodillo girándolos con los dedos 4 Instale un casete de cinta cierre la cubierta del compartimiento del mismo y después vuelva a intentar la impresión 5 Si sigue apareciendo una raya blanca en la etiqueta impresa repita los pasos 2 a 4 utilizando un palillo de cabeza de algodón hu...

Page 146: ... ranura de salida situada a la izquierda del cortador 7 La máquina se ha bloqueado es decir no sucede nada al presionar una tecla Reponga la máquina desconectando su alimentación manteniendo pulsadas y y volviendo a conectar su alimen tación El texto y los formatos del visuali zador y todos los archivos de texto almacenados en la memoria se borrarán El texto y los formatos del visualizador y todos...

Page 147: ...do la ali mentación del P touch aparecerá el mensaje BACKUP MEMORY CLEARED y se perderán todos los archivos de la memoria La batería de protección interna está débil Póngase en contacto con su pro veedor más cercano Problema Solución ...

Page 148: ... Cortador de cinta Automático completo Automático semicompleto Dimensiones 13 19 12 28 3 98 335 312 101 mm Peso 5 51 libras 2 5 kg Fuentes de carac teres fuentes incluidas Helsinki Brusels US San Diego Florida Calgary Brunei Bold Los Angeles Bermuda Script y Estambul Tamaños de cara cteres Tamaños AUTO más 9 puntos 6 9 12 18 24 36 48 60 y 72 puntos Estilos de carac teres 9 estilos incorporados nor...

Page 149: ...39 ...

Page 150: ...40 ...

Reviews: