Brother HS-5000 - Color Solid Ink Printer User Manual Download Page 48

USER’S GUIDE

5–4

English: HS3 User’s Guide, Chapter 5

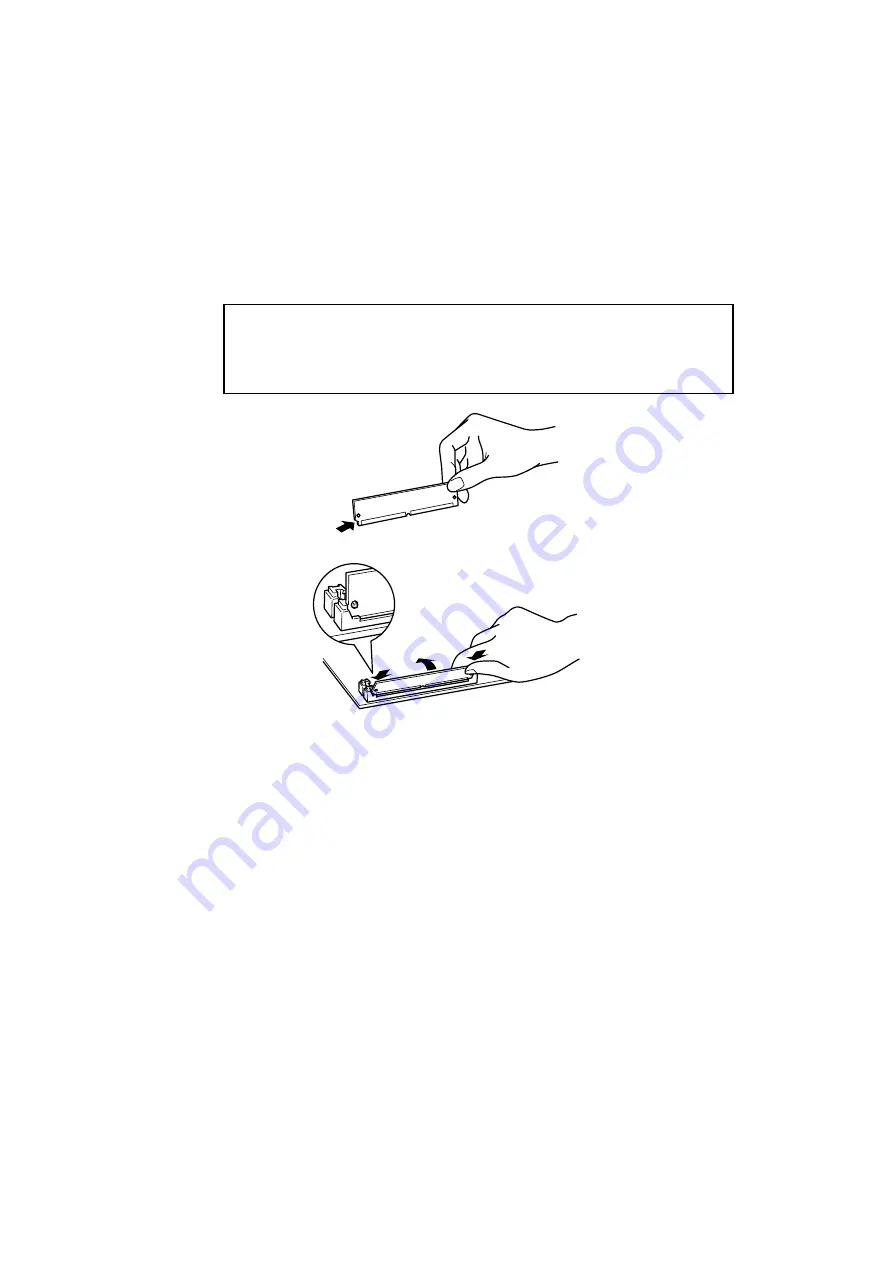
4. Install as many SIMMs as you need.

   • Set the SIMM into the slot at an angle.
   • Push the top of the SIMM gently towards the vertical until it clicks into

place.

  Notes

 When installing SIMMs, be sure to install them in the order slot 1 then slot 2.

 When you install different capacities of SIMMs, be sure to install the larger

capacity SIMM in slot 1 and the smaller capacity SIMM in slot 2.

Fig. 5-3  Installing the SIMMs

5. Refit  the main controller board and secure it with the 5 screws.

6. Plug in the power cord and turn on the printer.

If you have installed the SIMMs incorrectly, the printer prints a report to alert
you.

Summary of Contents for HS-5000 - Color Solid Ink Printer

Page 1: ...User s Guide Preliminary TOC Please read this manual thoroughly before using the printer Brother Color Printer HS 5000 5300 User s Guide Keep this manual in a convenient place for quick and easy reference at all times ...

Page 2: ... re pack it after waiting 30 minutes with the power off which will allow the printer to cool down and the ink to solidify Moving the printer with ink melted will cause severe damage to the Printer and will VOID THE WARRANTY REPACKING THE PRINTER 1 Turn the printer Off Wait 30 minutes until the printer cools down 2 Re pack the printer See REPACKING THE PRINTER in Chapter 6 Maintenance Cassette Manu...

Page 3: ... your password Our BBS supports modem speeds up to 14 400 8 bits no parity 1 stop bit Fax Back SM System For USA and Canada only Brother Customer Service has installed an easy to use Fax Back SM System so you can get instant answers to common technical questions and product information for all Brother products This is available 24 hours a day 7 days a week You can use the system to send the inform...

Page 4: ...USER S GUIDE English CS 5zxx User s Guide Preliminary TOC UD4653001 Printed in Japan ...

Page 5: ... a four digit number for your password Our BBS supports modem speeds up to 14 400 8 bits no parity 1 stop bit Fax BackSM System For USA and Canada only Brother Customer Service has installed an easy to use Fax BackSM System so you can get instant answers to common technical questions and product information for all Brother products This is available 24 hours a day 7 days a week You can use the sys...

Page 6: ...ompilation and Publication Notice Under the supervision of Brother Industries Ltd this manual has been compiled and published covering the latest product s descriptions and specifications The contents of this manual and the specifications of this product are subject to change without notice Brother reserves the right to make changes without notice in the specifications and materials contained here...

Page 7: ...in the following illustration High Temperature Inside the Printer Warning There are high voltages inside the printer Before cleaning the printer be sure to turn the power off and unplug the power cord from the power outlet 1 2 Turning off the Switch and Unplugging the Printer Warning Keep the ink cartridge away from children If ink is swallowed drink plenty of water The ink contains no harmful sub...

Page 8: ...BROTHER SPECIAL PAPERS 2 4 ABOUT BROTHER SPECIAL TRANSPARENCIES 2 4 SHEET FEEDER 2 5 ADJUST THE HEAD GAP BY PAPER THICKNESS 2 5 LOADING THE PAPER 2 6 MANUAL FEED SLOT 2 8 OUTPUT TRAY 2 9 CHAPTER 3 PRINTER DRIVER 3 1 PAPER 3 2 MEDIA SELECTION 3 2 PAPER SOURCE 3 3 COPY PAGE ORDER 3 3 SCALING 3 3 QUALITY AND COLOR 3 4 QUALITY 3 4 COLOR CONTROL 3 5 DOCUMENT TYPE 3 5 COLOR MONO 3 5 CONTROL AND MAINTENA...

Page 9: ...NTENANCE PAPER CASSETTE 6 1 ADDING INK 6 7 CLEANING THE PRINTER INTERIOR 6 9 RE PACKING THE PRINTER 6 13 CHAPTER 7 TROUBLESHOOTING 7 1 ALARM INDICATIONS AT A GLANCE 7 1 OPERATOR CALLS 7 1 SERVICE CALLS 7 2 PRINT QUALITY PROBLEMS 7 3 PAPER JAMS 7 4 Q A 7 8 SETTING UP THE PRINTER HARDWARE 7 8 SETTING UP THE PRINTER FOR WINDOWS 7 8 SETTING UP THE PRINTER FOR DOS 7 9 PAPER HANDLING 7 10 PRINTING 7 11 ...

Page 10: ... be determined by turning the equipment off and on the user is encouraged to try to correct the interference by one or more of the following measures Reorient or relocate the receiving antenna Increase the separation between the equipment and receiver Connect the equipment into an outlet on a circuit different from that to which the receiver is connected Consult the dealer or an experienced radio ...

Page 11: ...liant The cable must not exceed 1 8 metres in length IMPORTANT For Your Safety To ensure safe operation the three pin electrical plug supplied must be inserted only into a standard three pin power point which is properly grounded through normal household wiring Extension cords used with the equipment must be three pin plug type and corruptly wired to provide proper grounding Incorrectly wired exte...

Page 12: ...of this printer may not correspond with the markings which identify the terminals in your plug If you need to fit a different plug proceed as follows Remove a length of the cord outer sheath taking care not to damage the coloured insulation of the wires inside Cut each of the three wires to the appropriate length If the construction of the plug permits leave the green and yellow wire longer than t...

Page 13: ...nd connect it to your computer It also contains information on how to set up your computer for your printer by installing the printer driver and fonts 2 Read the User s Guide to get information about the following Features and operating environment requirements of the printer Chapter 1 Paper Handling Chapter 2 Printer Driver Chapter 3 Control Panel Chapter 4 Options Chapter 5 Maintenance Chapter 6...

Page 14: ...TER Printer Overview Fig 1 1 Front View Fig 1 2 Rear View Sheet Feeder Control Panel Output Tray Manual Feed Slot Top Cover Second Sheet Feeder HS 5300 only Power Inlet Parallel Interface Port MIO Slot Paper Guide Ink Reservoir Cover Head Gap Lever inside Power Button ...

Page 15: ...special coated paper Solid ink provides you with a professional print quality with sharp text and vivid color User Friendly Operation for Windows The dedicated printer driver and TrueType compatible fonts for Microsoft Windows 3 1 95 98 NT 4 0 are available on the floppy disk supplied with your printer You can easily install them into your Windows system using our installer program Color Matching ...

Page 16: ... Use a voltage regulator if the power source is not stable Environment The printer should be installed near a power outlet which is easily accessible Use the printer only within the following ranges of temperature and humidity Ambient temperature 10 C to 35 C 50 F to 95 F Ambient humidity 20 to 80 without condensation For optimum image quality it is recommended to use this printer within the range...

Page 17: ...is unavoidably set up near a window Do not place the printer near devices that contain magnets or generate magnetic fields Do not subject the printer to strong physical shocks or vibrations Do not expose the printer to open flames or salty or corrosive gasses Do not place objects on top of the printer Do not place the printer near an air conditioner Do not move the printer within 30 minutes of tur...

Page 18: ......

Page 19: ... 5 14 inches 60 157 g m 2 16 42 lbs 22 mm 0 87 inch A4 letter 200 sheets of 80g m 2 20 lb Legal 100 sheets Envelopes 10 Transparencies 50 Second sheet feeder HS 5300 only Paper ONLY A4 Letter Legal Custom size 70 229 x 250 356 mm 9 8 16 x 7 14 inches 60 135 g m 2 16 36 lbs 22 mm 0 87 inch A4 letter 200 sheets of 80g m 2 20 lb Legal 100 sheets Cut Sheet Envelope Caliper 0 03 0 08 in 0 09 0 2 mm 0 0...

Page 20: ...isfeeds Some paper may become curled by the printers heat during printing You can prevent the paper from curling by having a top margin of 12 7 mm or more Do not use paper pre printed by a laser or inkjet printer Do not print on both sides of the paper The printer heat will make pre printed laser toner ink melt again Prior to loading paper check the type of media and select the appropriate positio...

Page 21: ...sparencies and 25 4 mm for envelopes for optimum print quality However if a file you want to print does not match the printable area you might need to select Recommended Paper in the printer driver Refer to Chapter 3 and adjust the page margins in your software to match the printable area Unprintable area 4 mm 4 mm 12 7mm plain paper transparencies 25 4mm envelopes Top Margin Bottom Margin 6 5mm f...

Page 22: ...t on transparencies After finishing printing a page remove each transparency immediately and place it face up on a flat surface until it is completely dry Do not put anything on the printed side of the transparency When storing the transparencies keep them sealed in the original plastic bag to protect them from moisture Store the transparencies flat Keep the transparencies away from the direct ray...

Page 23: ...only Adjust the head gap for paper thickness There are 3 positions for the head gap lever a Regular position for plain paper a Thick Paper position for thick paper and an Envelope and Transparency position for envelopes and transparencies Prior to setting the media you want to use open the top cover and set the head gap lever to the appropriate position Envelope Transparency Thick paper Regular Fi...

Page 24: ...stacked below the mark If there is still some paper left in the feeder you must first remove it put it together with the new paper and then insert the stack into the feeder Note When you load envelopes in the feeder make sure they are inserted in the direction shown below The Stamp corner at the lower right hand corner of the envelope should face the front of the printer The first feeder can hold ...

Page 25: ... to load paper and push the FF Cont button to cancel the alarm and continue printing If paper jams in the printer the Alarm and Paper LEDs also blink In that case clear it referring to PAPER JAMS in Chapter 7 Note You have to select the proper paper source paper size and orientation in your application software If your application software does not support your custom paper size select the next la...

Page 26: ...ual feed slot and be sure to insert it fully Move the paper guide of the manual feed slot to the paper width you are using Figure 2 6 When you want to load more than one sheet of paper manually Choose Manual Feed in the Paper Source section of your printer driver or application Follow the instructions above to load the first page After the first page is printed the printer stops and alerts you to ...

Page 27: ...e bottom of the printer 2 Set the Output Tray wire referring to below figures Fig 2 7 Set the Output Tray You can stack up to 100 sheets of 80 g m2 20 lb paper in the output tray When you have loaded the paper you want to print on pull out the Output Tray and adjust the tray position for the loaded paper as follows otherwise paper jams might occur LGL Legal Paper A4 A4 size Paper LTR Letter Paper ...

Page 28: ...USER S GUIDE 2 10 English HS3 User s Guide Chapter 2 ...

Page 29: ...3 1 95 98 NT 4 0 applications Select Options in Print Setup available from the File menu The following list details the settings available in each tab Paper Paper Media Selection Orientation and Size Paper Source Scaling Copy Page Order Quality Color Quality Color Control Document Type Control Maintenance Showing Printer Status Power Save Printer Control Maintenance Color Adjustment The printer dr...

Page 30: ...es dots depending on the selected media type To get good print output make sure you select the correct media type Use only Brother original Transparencies to get good print quality Non Brother transparencies may have problems on printouts When the print image does not match the printing area you may need to select the Recommended Paper setting to get a wider printing area in Windows 3 1x 95 98 Als...

Page 31: ...prints Page1 Page1 Page 2 Page 2 Page 3 Page 3 in order When Collate is selected the printer starts printing after processing all the print data so that it takes a longer time for collated printing than uncollated copies Reverse Order When you want to get printouts in the correct order use this function The printer spools all the job in your computer and sends the data starting from the the last p...

Page 32: ...tting Fine 600 x 600 dpi The finest print mode Use this mode to print precise images such as photographs Since the print data is much larger than in normal mode processing time data transfer time and printing time will be longer Enhancement Use this mode for printing photographs or business graphics Enhancement mode optimizes color image printing as this mode reduces the horizontal lines or bandin...

Page 33: ...our document type Generally text and business graphics are printed vividly and photographic images are printed softly This is the recommended mode for each type of your file File Quality Enhancement Document Type Text only Normal OFF Auto Text with charts Normal ON Auto Business Graphics Normal ON Graph Text Presentation Sheet Computer Graphics Fine ON Graph Text Photo Images Fine ON Photo If you ...

Page 34: ...ould be shown in this mode when using the parallel port To see them you need to restart your PC after selecting this option Note For this mode to work correctly your PC must support be directional transfer and be using an IEEE 1284 compliant shielded parallel cable Printer Control The printer will print the related information by clicking each menu button Print Config Printer default settings are ...

Page 35: ...ts the Energy Star power conservation requirements Receiving a print file or document or pressing any button automatically wakes up the printer to start printing In this mode setting box you can set the time out value from 3 to 99 minutes Maintenance Enter this mode by clicking a menu button and the printer starts head cleaning or printng the test page Color Adjustment If you want to get the close...

Page 36: ......

Page 37: ...ates whether the printer is turned ON or OFF LED Printer status Off The printer is turned Off On The printer is turned On Ready LED The Ready LED indicates the current status of the printer LED Printer status Off The printer is off line The printer cannot receive any print data Blinking The printer is warming up or cleaning the print head On The printer is ready to print This LED blinks with the A...

Page 38: ...ent paper source LED Printer status Off Sheet Feeder mode Blinking The printer is waiting for paper to be loaded in the manual feed slot On Manual feed mode This LED blinks with the Alarm LED to indicate a Maintenance paper empty or no Maintenance cassette error See Maintenance paper in Chapter 6 and Operator Calls in Chapter 7 Alarm LED The Alarm LED blinks to indicate a printer error such as cov...

Page 39: ...n performing cleaning or resetting the printer must be set to off line first Reset Button The Reset button is valid only in the off line mode The printer is reset and restored to the user default settings Note Remember that the Reset button clears data from the printer memory FF Cont Button This button is valid only in the off line mode If the Data LED is on pressing the FF Cont button prints any ...

Page 40: ...ntly Do not press with too much force or hold the buttons down for a long time If you do the operation might now start Shift Clean Button Set the printer to off line by pushing the Online Button first Pressing the Clean button while holding down the Shift button starts head cleaning If you see any problems on printouts clean the print head and try again Release the two buttons immediately after pr...

Page 41: ...utton the blinking LED changes to select another choice See the table below 3 Press the FF Cont button to perform the selected choice LED Choice Function Alarm Print Config The printer prints the current printer settings Manual Print Fonts I The printer prints a list of the printer resident fonts Data Print Fonts P The printer prints a list of the permanent download fonts Ready Test Print The prin...

Page 42: ... press the button the blinking LED changes to indicate another choice See the table below 3 Press the FF Cont button to perform the selected choice LED Choice Function Alarm User Reset The printer is restored to the user default settings without clearing permanent fonts and macros Manual Factory Reset The printer is restored to the factory settings and permanent fonts and macros are cleared Data H...

Page 43: ...e the printer cools down and power consumption is almost at the same level as power off In this mode it requires up to 9 5 minutes to warm up The factory setting of the Power Save Mode is OFF but once you turn the Power Save Mode ON the default time out of each mode is set to one hour which meets the Energy Star power conservation requirements Receiving a print file or document or pressing any but...

Page 44: ......

Page 45: ... printer and unplug the power cord from the wall socket Note Be sure to turn off the power to the printer before installing or removing the MIO card 2 Remove the two screws and cover plate from the MIO interface slot 3 Unpack the MIO card and hold it by the edge of the card Note Do not touch the card surface If static electricity collects it can damage the card 4 Insert the card until it is secure...

Page 46: ...72 pin and 32 bit or 36 bit output Access Time 80 nsec or less Capacity 1 2 4 8 16 or 32 Mbyte Height 38 mm 1 5 inches or less The following capacity of a SIMM for installing is recommended 1 Mbyte HITACHI HB56D25632B 6A 7A MITSUBISHI MH25632BJ 7 2 Mbyte HITACHI HB56D51232B 6A 7A MITSUBISHI MH51232BJ 7 4 Mbyte HITACHI HB56A132BV 7A 7AL 7B 7BL MITSUBISHI MH1M32ADJ 7 8 Mbyte HITACHI HB56A232BT 7A 7A...

Page 47: ...er cord from the wall socket Note Be sure to turn the printer off before installing or removing the SIMMs 2 Remove the five marked screws holding the main controller board Fig 5 2 Remove the main controller board 3 Unpack a SIMM and hold it by its edge Note Do not touch the memory chips or the board surface If static electricity collects it can damage the memory ...

Page 48: ...SIMMs be sure to install them in the order slot 1 then slot 2 When you install different capacities of SIMMs be sure to install the larger capacity SIMM in slot 1 and the smaller capacity SIMM in slot 2 Fig 5 3 Installing the SIMMs 5 Refit the main controller board and secure it with the 5 screws 6 Plug in the power cord and turn on the printer If you have installed the SIMMs incorrectly the print...

Page 49: ...his ROM board in your printer allows your printer to print PostScript data With a BR Script 2 ROM board installed the automatic emulation switching function will work among PCL5c and BR Script 2 Caution Although Brother supplies two types of ROM boards BR 3000 and BR 3000C this printer supports only the BR 3000C option You cannot use the BR 3000 option with this printer ...

Page 50: ......

Page 51: ...You can replace the whole maintenance cassette including the paper roll or only replace the maintenance paper roll with a new one The following types of options are available for replacement MR5 1 maintenance cassette and 5 paper rolls MR1 1 maintenance cassette with 1 paper roll Note It is recommended that you always keep a new maintenance paper roll ready for replacement There is an indicator on...

Page 52: ...the maintenance paper cassette out of the printer If you replace the maintenance paper and cassette together skip steps 3 9 Fig 6 2 Remove the maintenance paper cassette Caution Do not put your hands inside the printer Some parts may be extremely hot and may cause burns 3 Open the maintenance paper cassette 2 1 Fig 6 3 Open the maintenance cassette ...

Page 53: ...wheel with the old maintenance paper roll from the cassette 2 1 Figure 6 4 Remove the geared wheel 5 Pull the wheel out from the old mainteance paper roll Figure 6 5 Pull the wheel out 6 Peel the seal from a new maintenance paper roll Fig 6 6Remove the tape by holding the paper roll ...

Page 54: ...ardboard core center ensuring that the cutouts in the cardboard core center locates onto the pegs on the geared wheel Fig 6 7 Insert geared wheel into the cardboard core 8 Set the new maintenance paper roll with the wheel into the cassette 2 1 Figure 6 8 Set the new maintenance paper roll ...

Page 55: ...e cassette Fig 6 9 Replace shaft into the maintenance cassette 10 Turn the paper roll shaft on the right hand side of the cassette and ensure that the maintenance paper inside the cassette correctly moves in the direction of the arrow as shown Fig 6 10 Turn the paper roll ...

Page 56: ...ssette into the printer and push it into the printer until it clicks into place and the Alarm and Filter LEDs turn off Figure 6 11 Insert the Maintenance cassette Note The life of a maintenance cassette is 5 paper rolls Replace the cassette with a new one after using 5 paper rolls ...

Page 57: ...ly Brother genuine inks The following options are avilable HS5K 5 holders of Black ink HS5C 5 holders of Cyan ink HS5M 5 holders of Magenta ink HS5Y 5 holders of Yellow ink HS5S 2 holders of Black ink and 1 holder each of Cyan Magenta and Yellow ink Note Do not touch the surface of the ink blocks Do not put ink blocks into your mouth If an Ink empty error occurs check the ink reservoir and add ink...

Page 58: ...e ink holder Note Add ink to the printer by using the ink holder Do not remove ink blocks from the holder 4 Push the center of the ink holder The ink blocks are dropped into the ink reservoir Fig 6 14 Adding the ink blocks Note When you want to add two or more holders of ink close the ink reservoir cover after adding each holder of ink 3 blocks Closing the cover pushes the added ink blocks down so...

Page 59: ...ior when the platen or rollers are stained by ink due to some problem such as a paper jam You will need to clean out the spilt ink and remove any small pieces of paper remaining inside the printer 1 Turn the printer power off 2 Wait around 30 minutes after power off to allow the printer to cool down 3 Open the top cover Then open the inside cover Fig 6 16 Open the inside cover 1 Clean Stick ...

Page 60: ... inside cover 2 4 Dampen the cleaning stick or wipers with the IPA Isopropyl Alcohol concentration is 90 or higher or Denatured Alcohol 5 Move the print head to the right by hand until you can see the part of the platen and rollers that you want to clean Figure 6 18 Move the print head to the right ...

Page 61: ...er 6 6 Wipe up the spilt ink in the printer interior with a cleaning stick or wiper in the shaded area in the figure below Fig 6 19 Wiping up the ink 7 Remove any small pieces of paper remaining in the printer interior Figure 6 20 Remove small pieces of paper ...

Page 62: ... can be freed from the printer for cleaning by pulling the holders toward you Figure 6 21 Cleaning the rollers Warning NEVER touch the interior of the printer without waiting 30 minutes after power off before commencing cleaning This is because some parts of the interior are extremely hot after you have used the printer ...

Page 63: ... below to re pack the printer or the printer may be damaged Before Re Packing the printer Before your starting to re pack the printer you need to support the print head and head gap lever with the Styrofoam block as shown below Figure 6 22 Insert the Styrofoam blocks Note You need to move the print head to the left by hand until it stops Do not insert the Styrofoam in the wrong direction as shown ...

Page 64: ...the printer Figure 6 23 Remove the maintenance cassette 2 Turn off the power button and unplug the printer from the AC outlet 3 Wait at least 30 minutes for the printer to cool down After that pack the printer as illustrated below Fig 6 24 Repacking the Printer Maintenance Cassette Printer Manuals Wires Ink Holders ...

Page 65: ... Cont button Ink Alarm Ink Empty Ink is empty Add ink blocks into the printer and press the FF Cont button Filter Alarm No Maintenance cassette or Maintenance paper empty Maintenance paper is empty or Maintenance cassette is not installed correctly Replace the maintenance cassette or re install the cassette If the following errors occur the printer indicates the error by blinking the Alarm LED and...

Page 66: ...error Refill CAM position error CR Position error PWM error CR Lock error CR Initialize error Thermistor error Heater overheat error Heater break error AC heater error Quench platen error Encode error LOIS error ON OFF If you see any of these service call indications reset the printer in either of the following ways Reset the printer using the control panel button and try to print again Turn off a...

Page 67: ... that A4 or Letter size paper is loaded in the feeder Print a test page by pushing the Test button while holding down the Shift button Shift Test Clean Fig 7 1 Test page Cleaning the print head If you see some horizontal lines as below perform head cleaning Set the printer to offline first by pushing the Online Button once Push the Clean button while holding down the Shift button The printer clean...

Page 68: ...position clear the jammed paper referring to the following descriptions If the jammed paper is removed completely the printer may resume printing If the printer does not resume printing press the FF Cont button Warning After you have used the printer some internal parts of the printer are extremely hot When you open the inside cover of the printer NEVER touch the shaded parts shown in the followin...

Page 69: ...ut of the feeder then close the sheet feeder Also open the top cover and check that a torn piece of paper is not left inside the printer refer to the next section Fig 7 5 Paper Jam in the Feeder If the jammed paper cannot be pulled up remove the sheet feeder from the printer Turn the paper release lever forward so that the jammed paper is released Fig 7 6 Turning the paper release lever forward ...

Page 70: ...ly Do not pull the paper hard to avoid tearing the jammed paper inside the printer Fig 7 7 Paper Jam at the Paper Output Tray If the jammed paper cannot be pulled out remove the output tray as in the following procedure to access the jammed paper 1 Extend the output tray 2 Lift it up so that the hooks are released 3 Remove the output tray Fig 7 8 Removing the output tray ...

Page 71: ...nside the printer first turn the printer off and unplug the power cord from the power outlet Wait for 30 minutes before attempting to remove the paper because some parts inside the printer are extremely hot immediately after printing Open the top cover and remove the piece of paper carefully Fig 7 9 Paper Jam inside the printer ...

Page 72: ...rk in ECP mode of your PC The mode in the Parallel Port setting of your PC might not be ECP mode You might need to change a setting in the BIOS of your PC to use ECP mode Please set up ECP mode in the Parallel Port setting of your PC For details refer to your PC manual Setting Up the Printer for Windows Question Recommendation I cannot print from my application software Make sure that no color ink...

Page 73: ...When you set the printer selection to HP LaserJet xxx it supports only monochrome printing To get color printing select the HP DeskJet 1600 series The printer does not print when I press the Print Screen Key Data LED On Turn the printer offline with the Online button and press the FF Cont button Data has been sent to the printer but the printer did not receive a Page Eject command print screens do...

Page 74: ...e cassette correctly Please remove the cassette and then replace it until it clickes fully into position Refer to the Quick Setup guide The printer does not load paper from the manual feed slot Re insert the paper firmly one sheet at a time How can I load envelopes You can load envelopes from either the sheet feeder or the manual feed slot Select the Envelope and Transparency position of the head ...

Page 75: ...lexity of your document and try again You want to print on both sides of the paper You should NEVER try to print on both sides of the paper If you did contact your dealer or our authorized service representative My headers or footers appear when I view my document on screen but do not show up when I print them Most inkjet printers have a restricted area that cannot be printed on Usually the first ...

Page 76: ...nvelope and Transparency position of the head gap lever The ink on printouts flakes off Some colors might be lighter than expected You may be using thick paper Check the type of media in the printer driver and select the Thick paper position of the head gap lever You may be using the printer out of the environment range shown in Chapter 1 Vertical lines are not straight Adjust the position of the ...

Page 77: ...rform interior cleaning WAIT 30 minutes after turning off the printer before starting the cleaning The printed color is different from the displayed color Make sure that your monitor supports and is set to full color mode 32 000 color or higher in Control Panel of your computer Set the Monitor Calibration in your printer driver referring to Control and Maintenance in Chapter 3 However the printer ...

Page 78: ...p Max 9 5 minutes at 25 C 73 4 F Ink Black Cyan Magenta Yellow Each 3 cc x 3 blocks 9cc 1 cartridge Life Expectancy 460 pages 9cc when printing letter size paper at 5 print coverage TrueType Fonts on disks TrueType compatible soft fonts for Windows on the supplied disk Functions Printer Driver Windows 3 1 95 98 NT 4 0 driver supporting Brother Native Compression mode and bi directional capability ...

Page 79: ...0W or less Noise Printing 55 dB A or less Stand by 40 dB A or less Temperature Operating 10 to 35 C 50 to 90 5 F Storage 0 to 35 C 32 to 104 F for optimum quality 15 to 30 C 59 to 86 F Humidity Operating 20 to 80 without condensation Storage 10 to 85 without condensation for optimum quality 30 to 60 Dimensions W x D x H HS 5000 490 x 410 x 310 mm 19 3 x 16 2 x 12 2 inches HS 5300 490 x 510 x 310 m...

Page 80: ...ATA 3 Input 22 0V S G 5 DATA 4 Input 23 0V S G 6 DATA 5 Input 24 0V S G 7 DATA 6 Input 25 0V S G 8 DATA 7 Input 26 0V S G 9 DATA 8 Input 27 0V S G 10 ACKNLG Output 28 0V S G 11 BUSY Output 29 0V S G 12 PE Output 30 0V S G 13 SLCT Output 31 INPUT PRIME Input 14 AUTO FEED Input 32 FAULT Output 15 N C 33 N C 16 0V S G 34 N C 17 0V S G 35 N C 18 5V 36 SLCT IN Input Note To use bi directional communica...

Page 81: ...an Italic Bold BoldItalic Utah Oblique Bold BoldOblique Utah Condensed Oblique Bold BoldOblique BR Symbol Helsinki Oblique Bold BoldOblique Tennessee Roman Italic Bold BoldItalic W Dingbats Type 1 Font Compatible Fonts Brother Original Fonts Atlanta Book BookOblique Demi DemiOblique Calgary MediumItalic Copenhagen Roman Italic Bold BoldItalic Portugal Roman Italic Bold BoldItalic Bermuda Script Ge...

Page 82: ...n 1 ECMA 94 ISO84 Portuguese ISO85 Spanish PC 8 PC 8 D N PC 8 Turkish PC 850 PC 852 ISO60 Norwegian 1 ISO61 Norwegian 2 ISO25 French ISO69 French HP German ISO21 German ISO15 Italian ISO6 ASCII Legal ISO2 IRV ISO4 UK Note If you want to know what characters are in each symbol character set print CHARSETS PRN file from Print form option in Direct Access Menu of the Remote Printer Console Program ...

Page 83: ...rable 7 2 F factory reset 4 6 FF Cont Button 4 3 Filter LED 6 1 FONTS 8 4 H Hardware 7 8 head cleaning 3 7 4 4 7 3 Head Gap Lever 1 2 2 5 hex dump print 4 6 I ICM 3 5 ink 6 7 8 1 empty 7 1 Ink Reservoir 6 6 Ink Reservoir cover 1 2 interface 8 1 error 7 1 J jammed paper 7 4 M maintenance paper 6 1 empty 7 1 Manual Feed slot 1 2 2 8 Manual LED 4 2 manual paper feed 2 8 3 3 Media Selection 2 4 3 2 me...

Page 84: ...4 Q questions and answers 7 8 Quick Setup Guide 1 1 R Ready LED 4 1 RE PACKING 6 13 reset and hex dump mode 4 6 Reset button 4 3 resolution 1 3 8 1 S Scaling 3 3 service call 7 2 Sheet Feeder 1 2 2 1 2 5 Show Printer Status 3 6 SIMM 5 2 specifications Electrical and Mechanical 8 2 Functions 8 1 interface cable 8 3 paper 2 1 Printing 8 1 symbol set 8 5 System Requirements 1 3 T Test button 4 4 test...

Reviews: