background image

6

Pacesetter  Embroidery Lettering Software
Instruction Manual

Parts of the Workspace

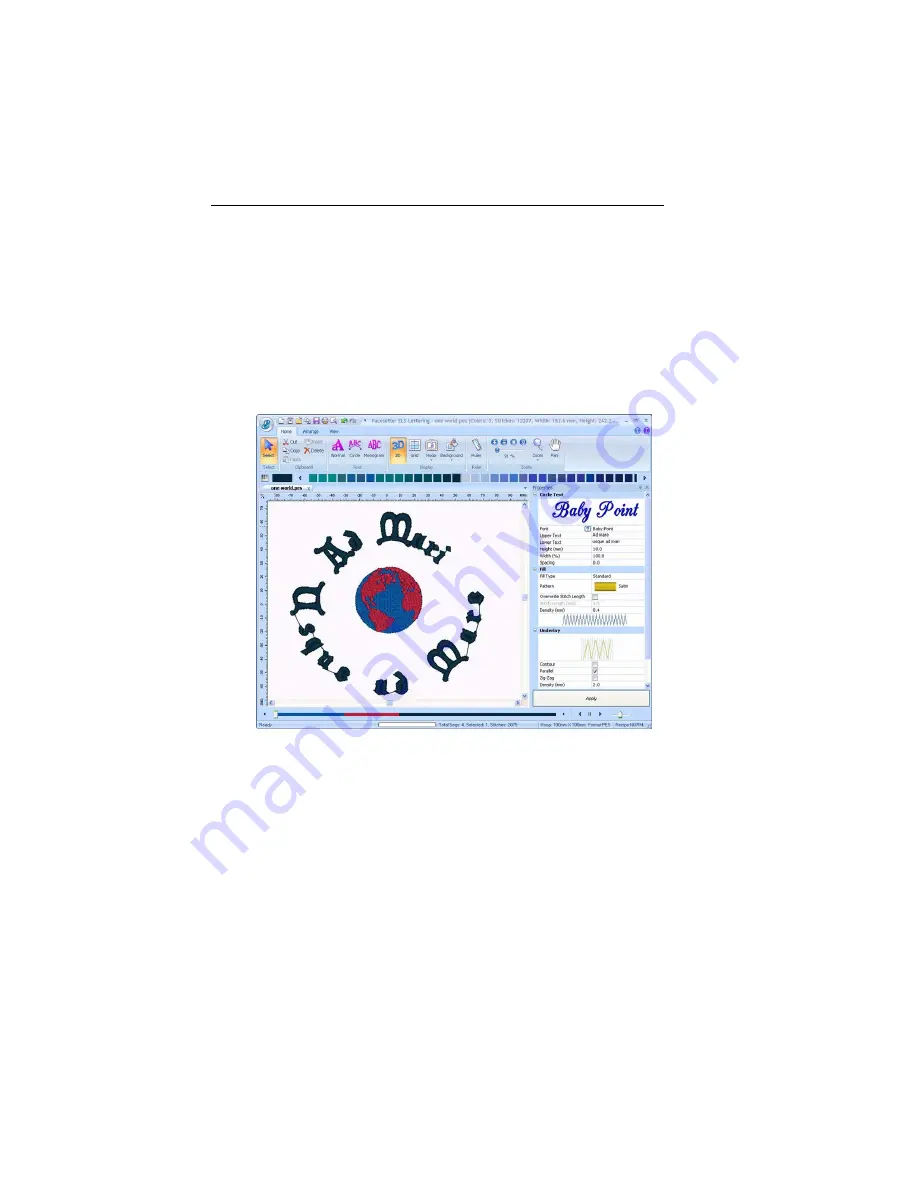
The Pacesetter Embroidery Lettering Software workspace 

contains a number of different areas which have distinct 

functions. The sections that follow give an overview of what 

each of these areas does, and the kinds of information about 

the design that they contain.

Title Bar

The Title Bar appears at the top of the Pacesetter Embroidery 

Lettering Software design window. The Title bar displays 

information about the design that is open in the workspace: its 

name, the number of stitches and colors in the design, and the 

overall width and height.

Summary of Contents for ELS Lettering

Page 1: ...Pacesetter Embroidery Lettering Software Instruction Manual ...

Page 2: ...copied only in accordance with the terms of those agreements No part of this publication and the software may be copied photocopied reproduced translated or reduced to any electronic medium or machine readable form without the manufacturer s written permission Commercial or industrial use of trademark and copyrighted works For example books paintings drawings photos fanciful characters and so fort...

Page 3: ...5 Setting up your Workspace Environment 16 Changing Machine Format Properties 17 Adjusting the View of the Workspace 18 Magnifying and Reducing the View 18 Hiding the Properties Panel Automatically 19 Viewing Different Parts of the Workspace Panning 20 Taking Measurements 21 Displaying the Hoop 21 Viewing and Hiding the Hoop 22 Selecting a Hoop 22 Available Hoops 23 Getting Help 24 Opening the Hel...

Page 4: ...tters 39 Adjusting the Space between Letters Kerning 40 Moving Individual Letters 40 Resizing Individual Letters 41 Rotating Individual Letters 41 Working with Color 42 Changing the Color of a Text Segment 42 Creating Multi color Text Segments 42 Text Properties 45 The Properties Panel 46 Adjusting Text Properties 46 Changing the Text 46 Changing the Font of Existing Text Segment 47 Displaying a F...

Page 5: ...Moving Parts of a Design 72 The Select Tool 72 Copying Cutting and Pasting Design Components 73 Aligning Items in the Design Horizontally and Vertically 74 Moving Parts of a Design Manually 75 Nudging Design Components 75 Deleting Design Components 76 Rotating Design Components 76 Working with the Color Palette 77 Selecting a Thread Chart 77 Changing a Thread Color 77 Merging Design Files 78 Print...

Page 6: ...4 Pacesetter Embroidery Lettering Software Instruction Manual ...

Page 7: ...workspace and learn a few of the basic components outlined in this section Topics covered in this chapter Setting up the design workspace environment Showing a hoop in the workspace and choosing the size of hoop to be displayed Using the Pacesetter Embroidery Lettering Software help CHAPTER 1 Learning about the Workspace ...

Page 8: ... sections that follow give an overview of what each of these areas does and the kinds of information about the design that they contain Title Bar The Title Bar appears at the top of the Pacesetter Embroidery Lettering Software design window The Title bar displays information about the design that is open in the workspace its name the number of stitches and colors in the design and the overall widt...

Page 9: ...ols in the next section When you open the Pacesetter Menu you will also see displayed a list of recent files that you have been using Just double click on the file name to open it Tools available on the Pacesetter Menu Note that only one embroidery file can be open at a time in Pacesetter Embroidery Lettering Software So if you have a file open in the Workspace already the program will have to clo...

Page 10: ... Button and the various toolbars The tables below show the buttons grouped by location i e whether they are on the Quick Access Bar or on one of the tabs on the ribbon A brief description of what the button does is also included Note that within each tab some buttons are grouped together by function Pacesetter Menu Tools Tool What it means New Creates a new untitled design New Recipe Opens a new p...

Page 11: ...rksheet bypassing the printer dialog Print Preview Opens the print preview window which in turn will let you print the current design Print Setup Opens the print preview window which in turn will let you print the current design Close Closes the file that you are currently working on Exit Closes all open files and shuts down Pacesetter Embroidery Lettering Software you will be prompted to save any...

Page 12: ... grid which helps with alignment This grid can be used for the alignment of items on the display Hoop Displays the hoop as it fits relative to the embroidery Clicking this button a second time will turn the view of the hoop off Select Hoop Accessed via the drop down menu from the Hoop tool Opens up the Select Hoop window in which you can choose a new hoop Background Two options are available from ...

Page 13: ...d objects and centers them in the selection box The objects are moved so that they are centered left to right with each other but they are not moved up or down Vertical Center Takes all selected objects and centers them in the selection box The objects are moved so that they are centered top to bottom with each other but they are not moved left or right Center Centers one or more selected objects ...

Page 14: ...status bar Program Preferences Click on the Program Preferences button to open a dialog in which you can set the default machine settings change the units of measure and choose settings for the workspace grid For more information on this dialog see Setting up your Workspace Environment Simulator The Simulator makes it easy to see on screen how your design will sew out You can use the Simulator to ...

Page 15: ... stitch basis simulating the sewing action of your machine The Simulator controls include pause stop sew forward and sew backwards You can push various control buttons and slide the speed control to vary the rate of sewing Using the Simulator The following table explains how to use the Simulator in more detail Tools What is does Previous Stitch Move backward in the design by one stitch Scrollbar s...

Page 16: ...the current design the number of stitches in the selected design components and the hoop being used Color Palette The thread colors for the design are shown in the Color Palette located along the top edge of the workspace To show the Color Palette if it is not already displayed go to the Windows area of the View tab and check the Palette box The color palette in Pacesetter Embroidery Lettering Sof...

Page 17: ...ws at each end of the scrollbar to move the design view incrementally Click in the track of the scrollbar to move the workspace view by one whole screen You can also right click the scrollbar to display a pop up menu of scroll actions The pop up menu gives you the following options Correcting Mistakes Undo and Redo are two significant features that allow you to correct mistakes If you make a mista...

Page 18: ...environment for all opened design files You can predetermine the units of measurement you want to use for your designs The following sections describe the units of measurement that can be used for designs opened in Pacesetter Embroidery Lettering Software Metric The dimensions in Pacesetter Embroidery Lettering Software can be displayed in metric values This is the default setting which will appea...

Page 19: ...setter Embroidery Lettering Software have a machine format Machine formats have their own profile settings that determine how embroidery information will be interpreted when you save design files When you create a new design file you can select the machine format for the specific design The selected machine format can change how the design file is read When you set machine format properties in the...

Page 20: ...sign With Zoom you can either left click to enlarge your design or right click to make your design smaller When you select Zoom the cursor changes to a small magnifying glass To use the Zoom tool do one of the following To zoom in on the spot where the mouse is currently pointing left click To zoom out again right click To zoom in on a particular area left click and drag the display will expand to...

Page 21: ...the Zoom Toolbar When you click on the down arrow underneath the Zoom Tool you will see an option menu You can choose from any of the following options on this menu Zoom In to make your design larger Zoom Out to make your design smaller To Fit to make the whole design the size of the design window To Selection to zoom to the size of the currently selected embroidery segment or set of embroidery se...

Page 22: ...e working on will not show up in the workspace You can move to parts of your design that go beyond the window s borders In these situations you can use keyboard arrows or the pan tool to change your view of the project Panning using the keyboard Use the key to move up Use the key to move down Use the key to move left Use the key to move right Using the Pan Tool Use the Pan tool to move the view of...

Page 23: ...the Design Workspace 3 Click and drag your mouse until you are finished measuring the item 4 Let go of your mouse when you are finished measuring 5 Look in the status line at the bottom of the workspace to see the measurement 6 Right click to set the end point of your measurement The measurement is now displayed in the status bar Displaying the Hoop Viewing the hoop or frame on the screen lets you...

Page 24: ...og This is useful when you want to make sure that your design will fit for more than one kind of embroidery machine To select a hoop using the Hoops dialog 1 On the Home Tab click the down arrow under the Hoop tool 2 From the menu that appears click on Select Hoop You see the Hoops dialog The hoop s dimensions are determined by your settings under the Hoops dialog in Pacesetter Embroidery Letterin...

Page 25: ...ery Lettering software comes with a number different sizes of hoops pre loaded The hoop sizes available for each file type are listed in the following table Important The maximum size of the design that you can save in any given file format is limited by the largest hoop available in that format For example if you are saving as VIP the largest design you will be able to save is 170mm 100mm If you ...

Page 26: ... visit most often Opening the Help To open the Help 1 Double click the Pacesetter Embroidery Lettering Software icon on your desktop You see the blank design workspace 2 Click the Help tool You see the Help Format Available Sizes mm DST 130 180 EXP 130 180 HUS 100 100 80 80 JEF 126 110 PCS 120 115 80 80 PES 130 180 100 180 100 100 60 40 60 20 SEW 122 88 80 70 50 50 SHV 100 100 40 40 VP3 VIP 170 10...

Page 27: ...s similar to the index in a book To use the Index 1 Click the Help tool You see the Help 2 In the box enter the word or words you want to search for In the list you see the topics that most closely match your query 3 Click the term you want to learn more about If there is more than one topic for the keyword you see a menu 4 Click the topic you want to see You see the topic in the right window pane...

Page 28: ...t to access quickly To save your favorite topics 1 Click the Help tool You see the Help 2 Double click the book you want to open 3 Click the topic you want to save as your favorite You see the topic in the right window pane 4 Click the Favorites tab You see the selected topic in the Current topic area 5 To add the selected topic to your favorites list click Add You see the selected topic appear in...

Page 29: ...lick the Help tool 2 Click the topic you want to print The topic will appear in the Help window 3 Click Print You see the Print Topics dialog box 4 Select one of the following print options Print the selected topic Print the selected heading and all subtopics 5 Click OK You see the Print dialog box 6 Change any of the print settings if necessary and click OK The topic will be sent to your printer ...

Page 30: ...28 Pacesetter Embroidery Lettering Software Instruction Manual ...

Page 31: ...ray of shapes and sizes using our powerful Text tools Topics covered in this chapter Creating lettering with the Normal and Circle text tools Using the Monogram Text tool to create monogram lettering How to modify blocks of text and individual letters within text segments Adjusting the spacing between individual letters CHAPTER 2 Creating Lettering ...

Page 32: ... and the mouse pointer changes to an arrow with the letter A next to it 4 Type the desired text string To create a multi line text segment press ENTER which will drop the cursor down one line and continue to enter your text 5 Right click to complete the text segment Your text appears in the design You can now make any other changes to the text segment in the Text Properties box 6 To choose a new f...

Page 33: ...in the Properties panel 5 Right click to complete the text segment Your text appears in the design You can now make any other changes to the text segment in the Text Properties box 6 To choose a new font i e other than the currently selected one for the text string at this point do the following In the Text area of Properties panel click in the Font field to select it Click the down arrow to the r...

Page 34: ... create standard Monogram text 1 On the Ribbon select the Home tab 2 On the Text bar click on the Monogram frame tool 3 Click once in the design window A monogram text frame appears in the workspace and the mouse pointer changes to an arrow with the letter A next to it 4 Type the three letters of your monogram into the frame 5 In the Monogram area of the Properties Panel select the font you wish t...

Page 35: ...rties Adjusting Size of a Text Segment To change the size of a text segment manually you can use the Proportional Sizing handle This is the green arrow located on the top left corner of the text frame Click and drag on the Proportional Sizing Handle to change the overall size of the text up to increase the size down to decrease the size Note that the size of the text changes proportionally that is...

Page 36: ...h and to the left to decrease the width Adjusting the Corners of Text Segments Use the Corner Handles to change the shape of a text segment The Corner Handles are at each corner of the text frame and are pink in color When you click and drag these handles up or down they change to position of the selected corner of the text frame when you release the mouse button the embroidery is regenerated to I...

Page 37: ...ers of the text frame Click and drag these handles to make the top and or bottom of the frame concave bowed in or convex bowed out Rotating Text Use the Rotation handle to change the angle of a text segment This is the orange circle at the top left corner of the text frame These handles are applicable only to Normal Text frames and Monogram Text frames You can also apply an envelope shape to a tex...

Page 38: ...t Release the mouse button to drop the segment and generate the stitches at the new angle Dragging this handle rotates the design to any angle You will see an outline of the design rotate onscreen as you are drag ging and the text will be regenerated when you release the mouse Adjusting the Slant of Text The angle of the letters in a text object can be adjusted with the Slant Handle The Slant Hand...

Page 39: ... Frame The size of text items can be adjusted using the Proportional Sizing Handle This handle is at the top of the lettering and appears as a blue circle Select the Circle Text tool and place your mouse pointer over this handle you will see that it changes to a small cross If after performing any of the adjustments above you wish to return the frame to its original size and shape right click on t...

Page 40: ... select the Circle Text tool and click on the text to select it When you place your pointer in the Width Handle you will see that it changes to a small cross By dragging this handle you will be able to adjust the width of the text segment Note that the spacing between the lettering changes proportionally as you increase and decrease the size of the segment To adjust the spacing between letters ind...

Page 41: ...our Circle Text segment Working with Individual Letters The text tools allow you to make changes to individual letters within the text segments in your designs You are able to select a letter and move it rotate it and resize it by using the handles that surround the letter when it is selected You can also change the spacing of letters within the word with the special kerning handles If after perfo...

Page 42: ...idual Letters Individual letters can be moved using the Letter Handles These appear as blue squares centered on each letter in the segment To select a letter click on its Letter Handle once the individual letter is selected you can adjust its position by dragging with the mouse When you move a kerning handle in a word you adjust the space between only the two letters on either side of the handle y...

Page 43: ... are green squares that are located in the corners of the letter frame When you hover over these handles a double ended arrow appears by dragging up or down on this handle you increase or decrease the size Rotating Individual Letters When you select an individual letter with its Letter Handle you can rotate it by clicking and dragging the Letter Rotation Handles The Letter rotation handles are the...

Page 44: ...nt The following procedure applies to situations where you want to simply change the thread color of an existing text segment to a new color To change a the thread color of a Text item 1 Select the text item in the workspace using either the Select tool or one of the text tools 2 In the Color Palette click the color box with the thread color you want to use Creating Multi color Text Segments When ...

Page 45: ...o insert thread color changes within a text segment 1 Select the text segment 2 In the Text field of the Text Properties panel type a tilde between letters in each position that you want a color change to occur 3 Click Apply You see the colors change for all text sub segments after the first one which retains the original color The text segment as it appears initially after being divided into sub ...

Page 46: ... example applying a red thread color to the first segment the word Multi 5 From the context menu click on the subsegment identifier to apply the chosen thread color to it The subsegment changes to the chosen color 6 Repeat step 5 for each subsegment in your list The text segment with new thread colors applied The example outlined above demonstrates two color changes being applied between words but...

Page 47: ...Topics covered in this chapter Editing text objects using Properties panel settings How to know what characters are available in each font Using the color palette CHAPTER 3 Text Properties ...

Page 48: ...acing of the letters The properties that you will see displayed will be slightly different depending on which type of text Normal Circle or Monogram is currently selected Changing the Text As well as being able to type directly on the screen see appropriate sections under Creating Text you can also input your text by typing in into the Text field on the Properties Panel Note however that there is ...

Page 49: ...perties panel click in the Text field to select it 3 Type the desired text into the Text field 4 Click Apply to save your changes Changing the Font of Existing Text Segment You can change the font type of text objects using the drop down list of fonts in the Properties Panel At the top of the area you see a preview image showing a sample of the selected font If the Properties panel is not already ...

Page 50: ...can be entered for available embroidery fonts For example some fonts only allow you to enter uppercase characters while other fonts allow you to enter both uppercase and lowercase characters The available characters box also tells you the minimum and maximum recommended heights for sewing out the font To display an embroidery font s available keystrokes 1 Display the Properties Panel if it is not ...

Page 51: ...change the height of any lettering Height refers to the tallest character in the desired lettering So when a text segment contains both uppercase and lowercase letters it is the size of largest uppercase letters usually that is set by this property To change the height of lettering 1 Select the text object you want to alter 2 In the Text area of the Properties panel select the Height field The pro...

Page 52: ... the text object you want to alter 2 In the Text area of the Properties panel click in the Spacing field to select it 3 Enter the font spacing value you want to use 4 Click Apply to save your changes You see your text s letter spacing altered accordingly Width Percentage The Width Percentage changes the overall width of a text segment You can adjust the Width percentage to alter the appearance of ...

Page 53: ...ext area of the Properties panel select the Slant field 3 Enter the slant value you want to use To slant your lettering to the left enter a negative value To slant your lettering to the right enter a positive value 4 Click Apply to save your changes You see your text altered accordingly Applying an Envelope One way to vary the shape of your text segment is to use the Envelope setting This allows y...

Page 54: ...he selected envelope shape will be applied to your lettering Properties Specific to Particular Text Frames Decor for Monograms Most of the properties of a Monogram are the same as the ones that appear for Normal text the exception is the Line Spacing property which does not apply There is an additional feature unique to the Monogram properties section called Decor Decor consists of pre designed em...

Page 55: ...y applies to the Normal text mode This property controls the spacing between lines in multi line text segments This quantity is expressed as percentage of the Letter Height value Align The Align setting is found only in Normal text mode and can be applied to lettering segments with more than one line This property is equivalent to the alignment of paragraphs in word processors you can align your t...

Page 56: ...sting text object in Pacesetter Embroidery Lettering Software You can change an existing text item to Normal Frame Circle Frame or Monogram Frame Right click the text object and select a text mode from the menu This feature is useful when the text is already in position but you want to change the frame that is applied to it For instance you may create a normal text object but then realize you want...

Page 57: ...is Text Direction Normal However if you want the text to start at the bottom and read counter clockwise instead you can change to this condition by right clicking the segment and choosing Text Direction Reverse from the menu that appears This command is available when you activate individual letter size handles and right click the individual letter with your cursor To get text that goes in both di...

Page 58: ...option to add a pattern type and change the text object s density settings Choosing a Fill Pattern When you install Pacesetter Embroidery Lettering Software a wide variety of Standard patterns are installed along with the software You can select which Standard or pattern to use in the Properties box To choose the fill pattern 1 Select the Lettering segment 2 Click on the down arrow on the right of...

Page 59: ...fabrics with a very loose weave are less able to hold a large density of stitches in cases such as this you can lower the density of the fill If you are unsure what setting to use try the standard setting of 0 4 This setting works well almost universally as long as you have not exceeded the font s size recommendations Note that the density setting is given in millimeters Therefore larger values co...

Page 60: ... the type you would normally find filling an area in an embroidery design With Fill stitches each line across is made up of two or more individual stitches Underlay Properties Underlay stitches are laid down before the visible or top stitches to help stabilize stretchy fabrics They can also help to tack down wales or naps on fabrics such as corduroy There are a variety of possible underlay types a...

Page 61: ...ed procedures for more information 5 Click Apply Specifying the Underlay Density You can specify the density for underlay stitches To set the underlay density 1 Select the segment 2 In the Properties Panel scroll down to the Underlay area 3 Select one or more of the following underlay types you want to use Contour Parallel or Zig Zag 4 In the Density box enter a density value 5 Adjust any of the o...

Page 62: ...ngth that you want for your underlay stitches 5 Adjust any of the other settings Refer to the related procedures for more information 6 Click Apply Changing the Inset Distance You can change the inset distance Pacesetter Embroidery Lettering Software calculates the inset distance the distance the underlay stitches are placed from the edge of the top stitching Inset distance changes the amount of u...

Page 63: ...or are symbols that exist in some fonts but are not type able on a standard US English keyboard Please note that not all fonts contain all of the special characters To see which characters are available in any given font check the font preview information for that font When you select underlay types you will be able to see what your underlay type will look like in the Preview area Due to Windows c...

Page 64: ... may be available in Pacesetter Embroidery Lettering Software Character Key Code Alt 0128 Alt 0145 Alt 0146 Alt 0147 Alt 0148 Alt 0149 Alt 0151 Alt 0153 Alt 0161 Alt 0162 Alt 0163 Alt 0164 Alt 0165 Alt 0166 Alt 0167 Alt 0168 Alt 0169 Alt 0173 Alt 0174 Alt 0175 Alt 0191 À Alt 0192 Á Alt 0193 Â Alt 0194 Ã Alt 0195 Ä Alt 0196 Å Alt 0197 ...

Page 65: ...Alt 0204 Í Alt 0205 Î Alt 0206 Ï Alt 0207 Ð Alt 0208 Ñ Alt 0209 Ò Alt 0210 Ó Alt 0211 Ô Alt 0212 Õ Alt 0213 Ö Alt 0214 Alt 0215 Ø Alt 0216 Ù Alt 0217 Ú Alt 0218 Û Alt 0219 Ü Alt 0220 Ý Alt 0221 Þ Alt 0222 ß Alt 0223 à Alt 0224 á Alt 0225 â Alt 0226 ã Alt 0027 ä Alt 0028 Character Key Code ...

Page 66: ...racter 2 Press and hold down the ALT key on your keyboard å Alt 0029 æ Alt 0230 ç Alt 0231 è Alt 0232 é Alt 0233 ê Alt 0234 ë Alt 0235 ì Alt 0236 í Alt 0237 î Alt 0238 ï Alt 0239 ð Alt 0240 ñ Alt 0241 ò Alt 0242 ó Alt 0243 ô Alt 0244 õ Alt 0245 ö Alt 0246 Alt 0247 ø Alt 0248 ù Alt 0249 ú Alt 0250 û Alt 0251 ü Alt 0252 ý Alt 0253 þ Alt 0254 ÿ Alt 0255 Character Key Code ...

Page 67: ...for the special character from the number pad located on the right side of the keyboard To view a list of special characters and their corresponding key codes see Special Characters List 4 Release the ALT key on your keyboard You see the special character ...

Page 68: ...66 Pacesetter Embroidery Lettering Software Instruction Manual ...

Page 69: ...ring For designs with multiple components that is more than one text segment or a text segment plus a merged design file you can select the text components and edit them individually Topics covered in this chapter Saving designs and the different stitch file types that are available Selecting copying and pasting components of the design Moving and aligning items in your workspace Combining letteri...

Page 70: ...will want to open using the New Recipe tool To create a new design using the recipe dialog 1 Click the Pacesetter Button and then click the New Recipe tool You see the New Page dialog 2 In the Recipe list select the recipe you want to use for your design 3 In the Machine format list select the machine format that you want applied to the design when created 4 Click OK You see a new design window If...

Page 71: ...ist browse to the location of the file you want to open 3 In the Files of type list select the format for the design you want to open 4 In the File name box enter the file name or select the file you want to open by clicking the file 5 Select Preview to view a thumbnail a small representation of the design 6 Click Open To close a design Click the Pacesetter Button and select Close from the menu To...

Page 72: ...ttering you create in that design Saving a Design The Save As command lets you save an alternative version of the design with a different name location or file format Save As is used when you want to keep your original design and create another design with slight modifications The Save command saves the changes you make to the current design To open the Preferences dialog box go to the View tab on...

Page 73: ...ne of the following Click the Pacesetter Button and choose Save from the menu On the Quick Access Toolbar click the Save button Selecting and Moving Parts of a Design The Select Tool The Select tool allows you to select and modify individual design components Design components that have been selected using the Select tool can be moved duplicated or deleted They can also be resized and rotated in e...

Page 74: ...corresponding sections for each tool under Creating Lettering To select one segment in the design 1 From the Home tab click the Select tool 2 Click the design component you want to select The active segment is enclosed in a selection box To select multiple components in the design 1 From the Home tab click the Select tool 2 Click a design component Press CTRL on your keyboard while you click each ...

Page 75: ...s Ctrl C The design components are copied to the clipboard 3 To paste design components from the clipboard do one of the following In the Clipboard area on the Home tab click on the Paste button In the design workspace right click anywhere and choose Paste from the menu Press Ctrl V To cut to the clipboard 1 Select one or more design components you want to cut 2 To cut design components to the cli...

Page 76: ...propriate button from the following Moving Parts of a Design Manually You can move the component parts of your design relative to each other by dragging them to another location Vertical Center Takes all selected objects and centers them in the selection box The objects are moved so that they are centered top to bottom with each other but they are not moved left or right Horizontal Center Takes al...

Page 77: ...tance that the design component moves is smaller To nudge up Use Ctrl To nudge down Use Ctrl To nudge left Use Ctrl To nudge right Use Ctrl Deleting Design Components Deleting a design component removes it from the design The only way to retrieve a design component you delete is to use the Undo tool from the Quick Access tool bar immediately after you delete it To delete a design component 1 From ...

Page 78: ...nts manually 1 Select one or more segments you want to rotate The active segment s is enclosed in a selection box with handles 2 Move your mouse over the blue rotation bead beside the top right or the bottom left design handle You see the cursor change to a circular arrow 3 Click and drag the rotation bead to adjust the box to the angle you want You cannot use the Text tool to rotate merged segmen...

Page 79: ...ist Click on the one that you want and those thread colors will be loaded into the color palette Changing a Thread Color Pacesetter Embroidery Lettering Software allows you to adjust the colors of the lettering you create by using the Color Palette you do this by choosing thread objects in the Color palette To change the thread color of a Text item 1 Select the text item in the workspace using eit...

Page 80: ...le you want to merge 4 In the Files of type list select a design file type for the design you want to merge 5 In the File Name box select the design file that you want to merge onto the current open design workspace 6 To view a preview of the selected design select Preview if not already selected A preview image of the selected design appears in the small window on the right hand side of the dialo...

Page 81: ...Editing Designs 79 7 Click Open The merged design file appears in the design workspace You can now select and move the stitch file to place it in the desired position relative to your lettering ...

Page 82: ...e Printing You can preview a worksheet on the screen before sending it to the printer To preview a design 1 From the Quick Access Toolbar click on the Print Preview button 2 To zoom in and out of the previewed worksheet do the following To zoom in on the worksheet click Zoom In and scroll to view specific parts of the design To zoom out on the worksheet click Zoom Out and scroll to view specific p...

Page 83: ...Do one of the following Click the Print Setup button Press Ctrl P on the keyboard You see the Print dialog 2 Make any required changes to the print settings 3 Click OK to send the file to the printer Changing the Print Settings You can customize print settings for your embroidery designs Pacesetter Embroidery Lettering Software allows you to adjust the image and worksheet information displayed in ...

Page 84: ...or your design worksheet 4 Select Print Actual Size to have your design print in its actual size 5 Select Print Color Analysis to print an expanded thread sequence view that includes a view of the colors used the color sequence and the thread consumption for each color 6 Select Print In One Page to print the design on a single worksheet page If Print Color Analysis is selected along with Print In ...

Page 85: ...y Name to have the name of your company name printed on your design worksheet Enter your company name in the box below 8 To prevent jump stitches from showing on your print preview check the Remove Jump Stitches box 9 Click OK 10 Click Close ...

Page 86: ...84 Pacesetter Embroidery Lettering Software Instruction Manual ...

Page 87: ...85 Glossary ...

Page 88: ...machine to stop sewing a design in order to change its thread colors Also known as Color Change Column Stitch Formed by closely arranged zig zag stitches Often used to form borders See also Satin Stitch Density Density is the number of stitches covering a given area Large letters large fill areas and textured fabrics generally need higher densities The reverse can be true as well There are two mea...

Page 89: ...ltering the angle length and repeat sequence of the stitches Handles Handles are the small boxes at each corner of the selection box you see around active segments If you point to a handle the pointer becomes a double sided arrow You can click and drag the handle to resize the selected segment or segments proportionally Clicking and dragging the control points on the left and right side of a handl...

Page 90: ... you save design files as a machine readable format When you use machine formats your design information displays accurately on the screen and designs are sewn correctly on each embroidery machine You can select a specific machine format for a design when opening or saving designs Monogram Embroidered design composed of one or more letters usually the initials in a name Outline file File format fo...

Page 91: ...h as its size color sequence in designs stitch type and values including stitching instructions Select tool The Select tool allows you to select and modify individual or groups of outline segments You can select outline segments by clicking on a single segment or by clicking and dragging to draw a box around parts of the design Once you select outline segments you can edit the segments ...

Page 92: ...90 Pacesetter Embroidery Lettering Software Instruction Manual ...

Page 93: ...gns 68 Creating Normal Text 30 D Deleting segments 76 Density 59 Density settings 57 Design components duplicating 72 Design size 18 Design Window 6 68 87 Design workspace 6 16 20 87 Display Hoop command 21 Dragging segments 75 Draw Bar 12 13 Drawing speed settings 14 Duplicating a design component 72 E Edit Tools 8 Editing Text Properties box 46 English units 17 F File Tools 9 Fill density 57 Fil...

Page 94: ... New Design tool 8 New designs 68 New tool 8 Normal Frame 54 Normal Text 30 Nudging segments 75 O Open Design tool 8 Options 17 Outline file 88 P Pan tool 20 Panning 20 Pasting design components 74 Patterns 56 choosing 56 Previewing designs 80 Print Preview 9 80 82 Print settings 82 Printing 81 Printing Help topics 27 Properties box 46 Properties text 42 R Recipe 88 Redo tool 9 15 Reducing views 1...

Page 95: ...Status Line 14 T Text Modes 54 Text Properties 42 Text properties 42 54 Text tool 10 Thread Colors 77 Thread colors 14 Title Bar 6 Tools Edit 8 File 9 Modify 11 Tools Draw Bar 12 13 U Underlay stitch length 60 Underlay types 59 Undo tool 9 15 V Vertical Center tool Align 11 75 Viewing designs 20 75 Views tools 18 Zoom 18 19 W Width compensation 50 Worksheet Setting 81 Print Setting 81 Workspace 6 ...

Reviews: