background image

*


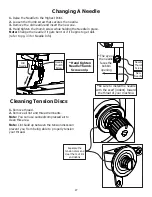
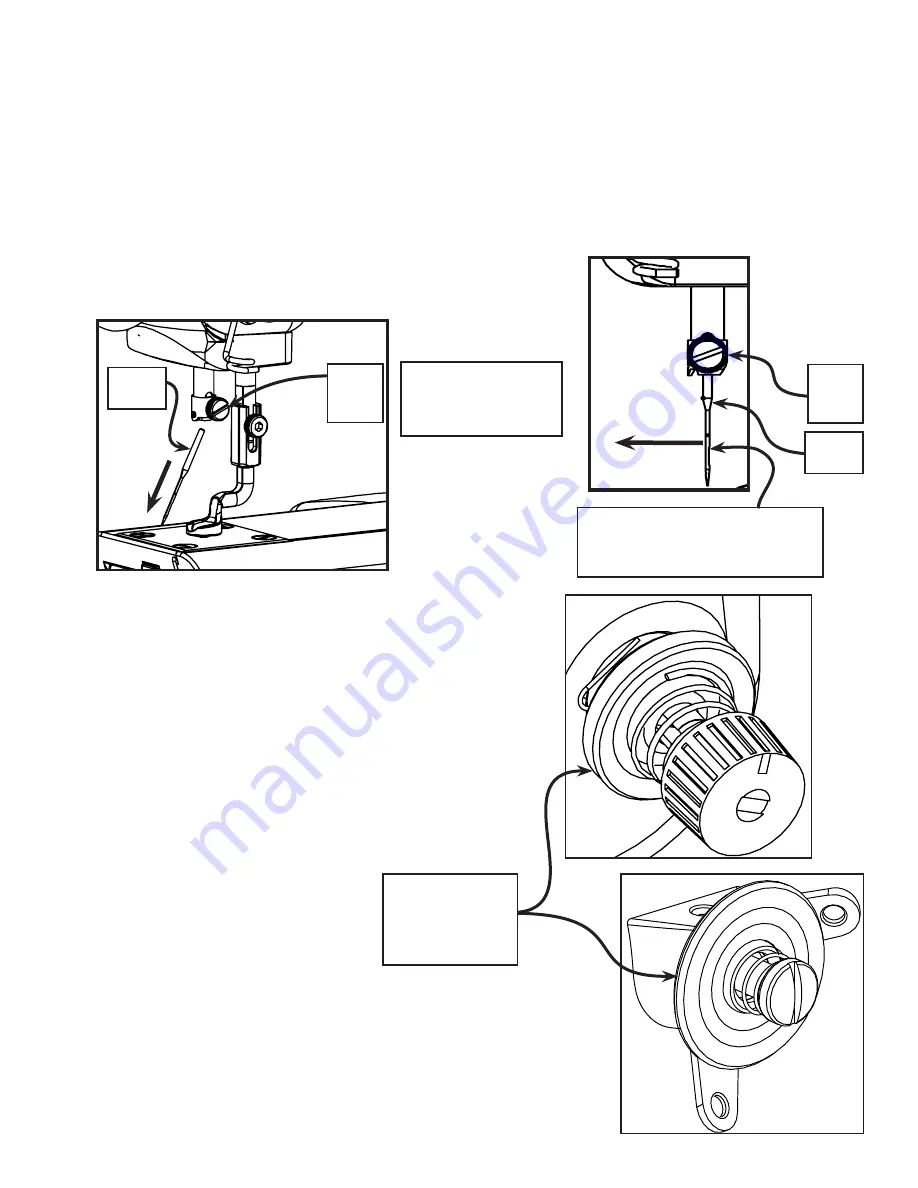
Hand tighten 

Needle Thumb 

Screw only.

*

Be sure to install the needle 

with the scarf (indent) toward 

the throat of your machine.

*The eye of 

the needle 

faces the 

bobbin 

opening

New 

Needle

Needle 

Thumb 

Screw

Changing A Needle

Cleaning Tension Discs

1. 

Remove thread.

2.

 Remove all lint and thread remnants.

Note:

 You can use canned/compressed air to 

clean this area.

Note:

 Lint build up between the tension discs can 

prevent you from being able to properly tension 

your thread.

1. 

Raise the Needle to the Highest Point.

2. 

Loosen the thumb screw that secures the needle.

3. 

Remove the old needle and insert the new one.

4. 

Hand tighten the thumb screw while holding the Needle in place. 

Note:

 Change the needle if it gets bent or if it begins to get dull. 

(refer to pg. 33 for Needle Info)

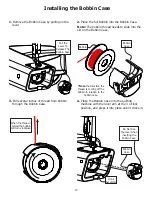
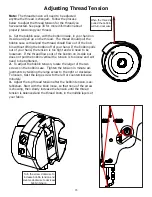
Separate the 

tension discs and 

clear them of lint 

and debris

Old 

Needle

Needle 

Thumb 

Screw

27

Summary of Contents for Dream Quilter 15

Page 1: ...Sit Down Instruction Manual Copyright Jan 01 2017 Jim M Bagley GraceWood Inc Reproduction Prohibited Version 1 0 ...

Page 2: ...1 Winding Bobbins 12 Installing the Bobbin Case 13 Thread Tension 14 Adjusting Thread Tension 15 Foot Pedal 16 Final Checklist 17 Main Screen Options 18 Sewing Modes 19 Settings 20 System Info 21 Repair Kit 22 The Needle Plate 23 The Hook Holder 24 Hopping Foot 25 Timing The Machine 26 Changing A Needle 27 Cleaning Tension Discs 27 Cleaning Bobbin Area 28 Cleaning Bobbin Case 28 Oiling the Machine...
Page 3: ...y air openings blocked Keep ventilation openings of the sewing machine free from the accumulation of lint dust and loose cloth 5 Never drop or insert any object into any opening 6 Do not use outdoors 7 Do not operate where aerosol spray products are being used or where oxygen is being administered 8 To disconnect turn all controls to the off position then remove the plug from the outlet 9 Do not u...

Page 4: ...o not modify the plug provided with the product if it will not fit the outlet have a proper outlet installed by a qualified electrician This product is for use on a nominal 120 V circuit and has a grounding plug that looks like the plug illustrated in sketch A in Figure 61 1 A temporary adaptor which looks like the adaptor illustrated in sketches B and C may be used to connect this plug to a 2 pol...

Page 5: ...uilting Arm Length 15 W 8 5 H Maximum SPM 1800 Minimum SPM 90 Input Voltage 110 220 VAC Input Frequency 47 63 Hz Peak Power Consumption 300 W Timing Belt System Bobbin Type Large M Class 5in Touch Screen Built in Bobbin Winder Dual Thread Tension Guides for precise tension 5 Front Right Left Rear ...

Page 6: ... Cutter 5 Bobbin Wind Stand 6 Bobbin Sensor 7 Dual Thread Tension Guide 8 Small Thread Tensioner 9 Large Thread Tensioner 10 Thread Guides 11 Take Up Lever 12 Lamp 13 Needle Bar 14 Needle 15 Hopping Foot 16 Thread Stand 17 Carriage Feet 18 Handwheel 19 Bobbin Case 6 1 2 3 4 5 6 7 8 9 10 11 12 13 14 15 16 17 18 ...

Page 7: ... Head Screwdriver 1 Bobbin Case 1 Pre installed Bobbin 3 2 Pre installed Needle 11 1 Pre installed Oil Bottle 1 5in Screen with Cable and Stylus 1 2 5mm T Handle Allen Wrench 1 Foot Pedal 1 3mm T Handle Allen Wrench 1 Thread Mast 1 4mm T Handle Allen Wrench 1 M3 Thumb Screw 2 1 pre installed M5 x 6mm SBHCS 2 7 Screen Mount Cap 1 ...

Page 8: ...kely to get snagged or looped around any object Thread Mast Parts Needed 1 Display Screen 1 with cable and clip Step 2a Connecting the Front Display 2 1a Connect the Display Ribbon Cable from the Display Screen to the Display Hub 2 2a Attach Display Screen into the Display Hub Display Ribbon Cable Display Screen Display Clip Display Clip Display Hub 8 Display Hub Display Screen ...

Page 9: ...play 2 1b Connect the Side Mount Bracket using the 2 M5 x 6mm SBHCS Side Mount Bracket M5 x 6mm SBHCS 2 2b Connect the Display Ribbon Cable from the Display Screen to the Display Hub and connect the Display Screen to the Side Mount Bracket Install the Screen Mount Cap into the Display Hub 9 Display Screen Display Clip Screen Mount Cap Display Hub ...

Page 10: ...outlet Programming only For sit down system Step 3 Plugging in the Cables 3 3 When you are ready to begin sewing turn on the machine using the power switch located on the back of the machine Note Below is a reference of how the machine should be configured Foot Pedal USB Connector Port Off On Power Adapter Power Cord Parts Needed 1 Power Cable 1 2 Foot Pedal 1 10 Foot Pedal Cable ...

Page 11: ...er 8 Feed the thread through the right thread guide up to the take up lever 9 Pull the thread through the hole in the take up lever 10 Feed thread into the left thread guide below 11 Pull the thread down towards the needle and through the bottom thread guide 12 Feed the thread through the eyelet in the front of the needle arm 13 Feed the thread through the eye of the needle Threading the Quilting ...

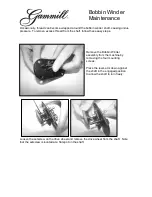
Page 12: ...is full it will automatically stop Winding Bobbins When the bobbin is full you can cut the thread with the thread cutter found next to the bobbin stand The bobbin winder runs on a separate motor from the quilting machine This al lows you to wind bobbins with the quilting machine running or stopped as long as the power is on 1 2 3 4 5 6 The bobbin winds in a clockwise direction Bobbin Winder Cam Ma...

Page 13: ...bin Case Do Not Use the lever when inserting the Bobbin Case 2 Place the full Bobbin into the Bobbin Case Note The bobbin thread needs to slide into the slit on the Bobbin Case When the thread is pulled the bobbin will turn clockwise 3 Pull several inches of thread from Bobbin through the Bobbin Case 4 Place the Bobbin Case into the quilting machine with the lever arm at the 3 o clock position and...

Page 14: ...on the top thread by turning the top tension knob counter clockwise If the top thread is being pulled through the bottom layer of fabric you need to increase the tension on the top thread by turning the top tension knob clockwise If the thread is properly tensioned the top thread and the bobbin thread will knot in the middle of the fabric layers Thread Knot Bobbin Thread Top Thread Proper Tension ...

Page 15: ...ws out of the bobbin on its side but does not pull the bobbin vertical the tension is too loose and will need to be tightened 2 To adjust the bobbin tension locate the larger of the two screws on the bobbin case Tighten the tension in minute ad justments by twisting the large screw to the right or clockwise To loosen twist the large screw to the left or counterclockwise minutely 3 Adjust the top t...

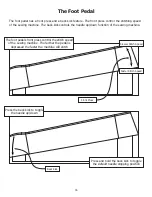
Page 16: ...n of the sewing machine Press the back kick to toggle the needle up down Press and hold the back kick to toggle the default needle stopping position The foot pedals front press control the stitch speed of the sewing machine The farther the pedal is depressed the faster the machine will stitch Slower Stitch Speed Faster Stitch Speed Front Press Back Kick The Foot Pedal 16 ...

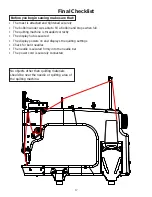
Page 17: ...ed correctly The display hub is secured The display powers on and displays the quilting settings Check for bent needles The needle is secured firmly into the needle bar The power cord is securely connected No objects other than quilting materials should be near the needle or quilting area of the quilting machine Before you begin sewing make sure that 17 ...

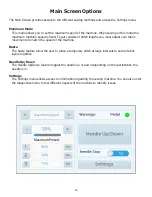
Page 18: ...bric movements to match the speed of the machine Baste The baste feature allow the user to place a temporary stitch at large intervals to secure fabric layers together Needle Up Down The Needle Up Down feature toggles the needle up or down depending on the last location the needle is in Settings The Settings menu allows access to information regarding the sewing machine You can also enter the diag...

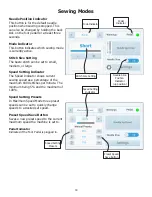
Page 19: ...rent sewing speed as a percentage of the maximum 1800 stitches per minute The minimum being 5 and the maximum of 100 Speed Setting Presets In Maximum Speed Mode three preset speeds can be set to quickly change speeds to a desired set speed Preset Speed Save Button Saves a new preset speed to the current maximum speed the machine is set to Pedal Indicator Indicated if the Foot Pedal is plugged in M...

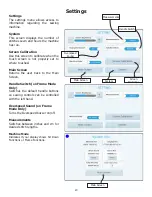
Page 20: ... Screen Returns the user back to the Main Screen Handle Switch on Frame Mode Only Switches the default handle buttons so sewing controls can be controlled with the left hand Overspeed Sound on Frame Mode Only Turns the Overspeed buzzer on off Measurements Switches between inches and cm for desired stitch lengths Machine Mode Indicates if your display shows Sit Down Functions or Frame Functions Mai...

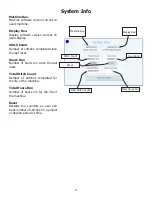
Page 21: ... reset Hours Run Number of hours run since the last reset Total Stitch Count Number of stitches completed for the life of the machine Total Hours Run Number of hours run for the life of the machine Reset Restarts the counters so user can track number of stitches for a project or desired period of time Reset Total Hours Run Display Rev Machine Rev Total Stitch Count Stitch Count Hours Run 21 ...

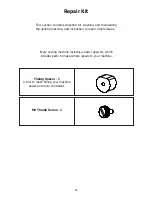
Page 22: ...air kit which includes parts to make simple repairs to your machine Timing Spacer 1 A tool to make timing your machine easier and more consistent This section contains direction for cleaning and maintaining the quilting machine and instruction to repair simple issues 22 ...

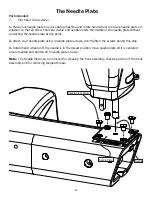
Page 23: ...ttach your needle plate using 4 needle plate screws don t tighten the screws during this step 3 Rotate hand wheel until the needle is in the lowest position move needle plate till it is centered around needle and tighten all 4 needle plate screws Note The Needle Plate can be removed for cleaning the hook assembly checking timing of the Hook Assembly and for removing tangled thread Parts Needed 1 F...

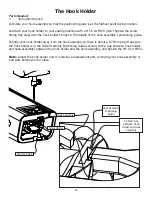
Page 24: ... assembly so there is about a 0 75mm gap Make sure the hook holder is in the Hook Assembly Positioning Guide securely with a gap between hook holder and hook assembly between the hook holder and the hook assembly and tighten the M5 X 10 FHCS Note Adjust the hook holder only if receiving a replacement part removing your hook assembly or part gets bumped out of place The Hook Holder Parts Needed 1 3...

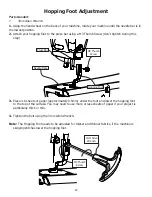
Page 25: ...pping foot to the press bar using a M3 Thumb Screw don t tighten during this step 3 Place 4 8 sheets of paper approximately 0 5mm under the foot and lower the hopping foot to the top of the surface You may need to use more or less sheets of paper if your project is particularly thick or thin 4 Tighten the bolt using the 3mm Allen Wrench Note The Hopping Foot needs to be adjusted for thicker and th...

Page 26: ...sembly without touching roughly between 0 02mm and 0 075mm 4 Tighten set screw make sure needle doesn t hit hook by watching to see if the needle bends during rotation and there is no clicking noise Rotate machine using the handwheel a full rotation to ensure the needle doesn t hit anywhere during rotation If needle hits the hook assembly anywhere during rotation adjust needle height up or down of...

Page 27: ...sed air to clean this area Note Lint build up between the tension discs can prevent you from being able to properly tension your thread 1 Raise the Needle to the Highest Point 2 Loosen the thumb screw that secures the needle 3 Remove the old needle and insert the new one 4 Hand tighten the thumb screw while holding the Needle in place Note Change the needle if it gets bent or if it begins to get d...

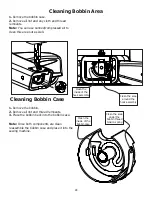
Page 28: ...lint and thread remnants 3 Place the bobbin back into the bobbin case Cleaning Bobbin Area Cleaning Bobbin Case Note Once both components are clean reassemble the bobbin case and place it into the sewing machine Clean the inside of the hook assembly Clean the area around the hook assembly Clean the inside of the bobbin case Clean the area under the bobbin thread tension spring 28 ...

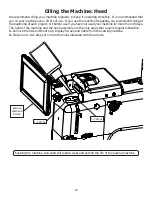
Page 29: ...before use if you have not used your machine for more than 30 days The head of the machine and the hook assembly are the only areas that require regular lubrication 1 Remove the Screen Mount Cap Display Screen and Cable from the sewing machine 2 Place one to two drops of oil into the holes indicated with the arrows Keeping the machine well oiled will reduce wear and extend the life of the sewing m...

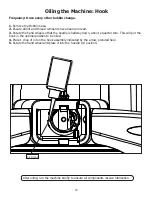
Page 30: ...dle is halfway down about a quarter turn This will put the hook in the optimal position to be oiled 4 Place 1 drop of oil on the hook assembly indicated by the arrow pictured here 5 Rotate the hand wheel and place it into the needle Up position After oiling run the machine briefly to ensure all components receive lubrication Oiling the Machine Hook 1 2 Drops 30 ...

Page 31: ...needle and replace it if necessary page 26 Bobbin may be wound or threaded improperly Check the bobbin to ensure that it is properly wound and that it is properly inserted into the bobbin case page 12 13 Thread may have too much or too little tension Check and re adjust your tension page 25 Thread Bunches Up Or Is Getting Wrapped Around Hook Holder Hook holder pressing against hook assembly Loosen...

Page 32: ... adjusted correctly page 12 13 Debris on tension discs Clean between and around the tensioner discs page 26 Hook holder pressing against hook assembly or doesn t have enough space Re adjust the hook holder page 22 Bobbin is not correctly wound Check the bobbin to ensure that it is properly wound and that it is properly inserted into the bobbin case page 12 13 Timing needs to be adjusted If needle ...

Page 33: ...t is held in the needle bar Shaft The long narrow part of the needle The diameter measurement is based on the shaft Groove Allows the thread to pass through the fabric more easily Eye The hole near the tip of the needle for the thread to pass through Point The sharp end of the needle There are different types of points for different applications It s important that you change you needle when the p...

Page 34: ...een exposed to a high temperature gas flame very rapidly This process removes fuzz and lint giving the thread a smoother appearance Bonded The thread is treated with a resin to increase its strength Usually used for heavy duty applications such as upholstery Length of Fibers Also know as the staple This is the length of the cotton fibers Extra long staple cotton thread is better because it has bet...

Page 35: ...ive the thread a tryout Remember to adjust the machines thread tension settings based on the type of thread you are using Needles The size of the needle shows on the front of the package with 2 sizes the larger number of the two is a metric designation and the smaller is the American standard equivalent The larger the number the larger the diameter of the shaft of the needle As a general rule the ...

Page 36: ...84119 Phone 1 800 264 0644 Fax 801 908 8888 www graceframe com Model GC140 115 230 V 50 60 Hz 400 W HOUSEHOLD USE ONLY USAGE MENAGER SEULEMENT CONFORMS TO UL STD 1594 CERTIFIED TO CSA STD C22 2 No 68 Date Code 1511 5000843 1 800 264 0644 www graceframe com 36 ...

Reviews: