background image

7

2

2

Loading documents

2

You can make copies and scan from the 
scanner glass.

Using the scanner glass

2

You can use the scanner glass to copy or 
scan pages of a book or one page at a time.

Document Sizes Supported

2

Size: Up to A4 size [215.9 to 297 mm]

Weight: Up to 2 kg

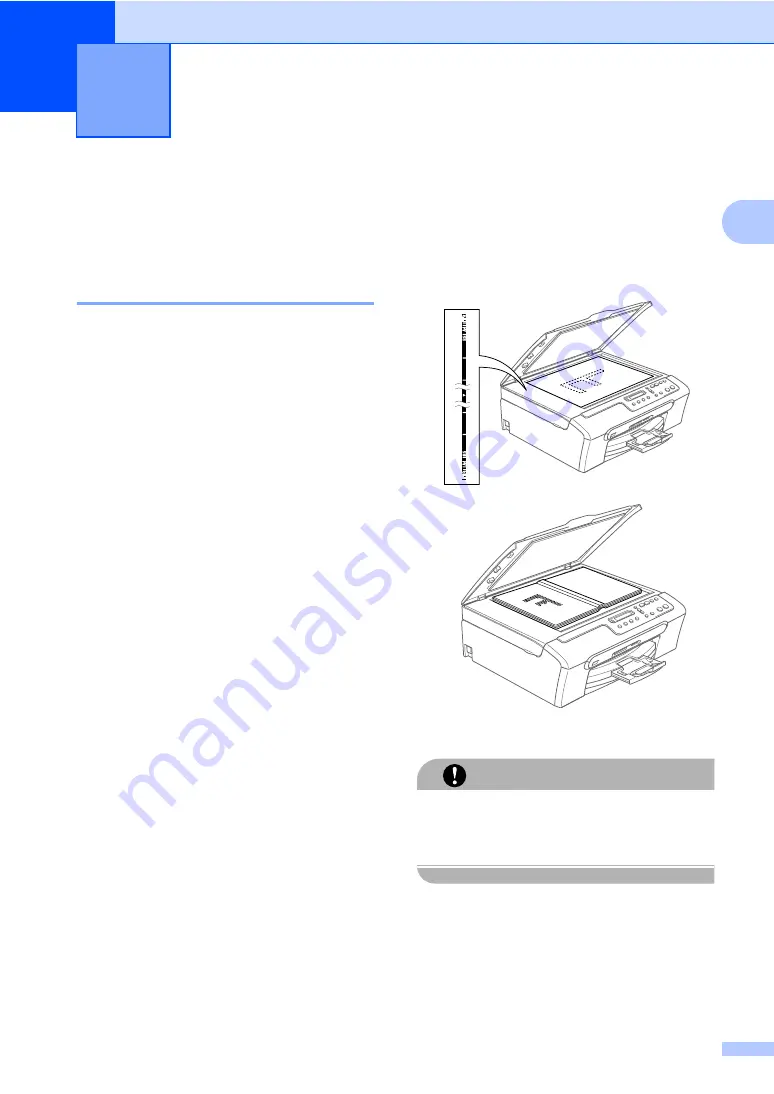
How to load documents

2

a

Lift the document cover.

b

Using the document guidelines on the 
left, center the document face down on 
the scanner glass.


c

Close the document cover.

CAUTION


If you are scanning a book or thick 
document, DO NOT slam the cover or 
press on it.


Loading documents and paper

2

Summary of Contents for DCP-155C

Page 1: ...USER S GUIDE DCP 155C ...

Page 2: ... Use only GENUINE brother supplies Brother multifunction machines are designed to work ink of a particular specification and work to a level of optimum performance when used with genuine Brother ink cartridges Brother cannot guarantee this optimum performance if ink or ink cartridges of other specifications are used Brother does not therefore recommend the use of cartridges other than genuine Brot...

Page 3: ...paper and other media 8 Recommended media 9 Handling and using media 9 Choosing the right media 10 Loading paper envelopes and other media 12 Loading paper and other media 12 Loading envelopes and post cards 14 Removing small printouts from the machine 15 Printable area 16 Section II Copy 3 Making copies 18 How to copy 18 Making a single copy 18 Making multiple copies 18 Stop copying 18 Copy optio...

Page 4: ... Print Index Thumbnails 29 Printing Images 30 DPOF printing 31 PhotoCapture Center print settings 32 Print quality 32 Paper Options 32 Adjusting Brightness Contrast and Colour 33 Cropping 34 Borderless printing 34 Scan to a memory card or USB Flash memory drive 35 Changing the image quality 35 Changing the monochrome file format 36 Changing the colour file format 36 Understanding the Error Message...

Page 5: ...ages 55 Changing LCD language 57 Improving the LCD viewing 57 Printer jam or paper jam 58 Routine maintenance 60 Replacing the ink cartridges 60 Cleaning the outside of the machine 62 Cleaning the scanner 62 Cleaning the machine printer platen 63 Cleaning the Paper Pick up Roller 63 Cleaning the print head 64 Checking the print quality 65 Checking the print alignment 66 Checking the ink volume 66 ...

Page 6: ...iv D Specifications 75 General 75 Print media 76 Copy 77 PhotoCapture Center 78 PictBridge 79 Scanner 80 Printer 81 Interfaces 81 Computer requirements 82 Consumable items 83 E Glossary 84 F Index 85 ...

Page 7: ...Section I General I General Information 2 Loading documents and paper 7 ...

Page 8: ...n important point or refers you to a related topic Courier New Text in the Courier New font identifies messages on the LCD of the machine Warnings tell you what to do to prevent possible personal injury Electrical Hazard icons alert you to possible electrical shock Cautions specify procedures you must follow or avoid to prevent possible damage to the machine or other objects Notes tell you how you...

Page 9: ...rn on your PC Insert the Brother CD ROM into your CD ROM drive b If the model name screen appears click your model name c If the language screen appears click your language The CD ROM main menu will appear Note If this window does not appear use Windows Explorer to run the start exe program from the root directory of the Brother CD ROM d Click Documentation to view the Software User s Guide in HTM...

Page 10: ...ation icon c Double click your language folder d Double click the top page file to view the Software User s Guide in HTML format e Click the documentation you want to read Software User s Guide Software User s Guide in HTML format How to find Scanning instructions 1 There are several ways you can scan documents You can find the instructions as follows Software User s Guide Scanning For Mac OS X 10...

Page 11: ...nochrome Also lets you start a scanning operation in colour or mono depending on the scanning setting in the ControlCenter software Colour Start Lets you start making copies in full colour Also lets you start a scanning operation in colour or mono depending on the scanning setting in the ControlCenter software 5 On Off You can turn the machine on and off If you turn the machine off it will periodi...

Page 12: ... choose 3 Print Reports Press OK c Press a or b to choose the report you want Press OK d Press Mono Start e Press Stop Exit LED DCP status Description Off Ready The DCP is ready for use Red Cover open The cover is open Close the cover See Error messages on page 55 Ink empty Replace the Ink cartridge with a new one See Replacing the ink cartridges on page 60 Paper error Put paper in the tray or cle...

Page 13: ...t a time Document Sizes Supported 2 Size Up to A4 size 215 9 to 297 mm Weight Up to 2 kg How to load documents 2 a Lift the document cover b Using the document guidelines on the left center the document face down on the scanner glass c Close the document cover CAUTION If you are scanning a book or thick document DO NOT slam the cover or press on it Loading documents and paper 2 ...

Page 14: ...tities For best results use the Brother paper When you print on inkjet paper coated paper transparencies and photo paper be sure to choose the correct media in the Basic tab of the printer driver or in the Paper Type setting of the menu When you print on Brother photo paper load the instruction sheet included with the photo paper in the paper tray first and then put the photo paper on the instruct...

Page 15: ...s because they absorb water and perspiration easily and this may cause decreased output quality Transparencies designed for laser printers copiers may stain your next document Use only transparencies recommended for inkjet printing Improper Setup DO NOT use the following kinds of paper Damaged curled wrinkled or irregularly shaped paper 1 2 mm or longer Extremely shiny or highly textured paper Pap...

Page 16: ...es A5 148 210 mm 5 8 8 3 in Yes Yes A6 105 148 mm 4 1 5 8 in Yes Cards Photo 10 15 cm 4 6 in Yes Yes Yes Photo 2L 13 18 cm 5 7 in Yes Yes Index Card 127 203 mm 5 8 in Yes Post Card 1 100 148 mm 3 9 5 8 in Yes Post Card 2 Double 148 200 mm 5 8 7 9 in Yes Envelopes C5 Envelope 162 229 mm 6 4 9 in Yes DL Envelope 110 220 mm 4 3 8 7 in Yes COM 10 105 241 mm 4 1 8 9 1 2 in Yes Monarch 98 191 mm 3 7 8 7...

Page 17: ...m 0 003 to 0 006 in 100 1 Inkjet Paper 64 to 200 g m2 17 to 53 lb 0 08 to 0 25 mm 0 003 to 0 01 in 20 Glossy Paper Up to 220 g m2 Up to 58 lb Up to 0 25 mm Up to 0 01 in 20 Cards Photo Card Up to 240 g m2 Up to 64 lb Up to 0 28 mm Up to 0 01 in 20 Index Card Up to 120 g m2 Up to 32 lb Up to 0 15 mm Up to 0 006 in 30 Post Card Up to 200 g m2 Up to 53 lb Up to 0 23 mm Up to 0 01 in 30 Envelopes 75 t...

Page 18: ...tput paper tray cover 1 b Press and slide the paper side guides 1 and paper length guide 2 to fit the paper size c Fan the stack of paper well to avoid paper jams and misfeeds Note Always make sure that the paper is not curled d Gently put the paper into the paper tray print side down and top edge first Check that the paper is flat in the tray 1 1 2 ...

Page 19: ...ful that you do not push the paper in too far it may lift at the back of the tray and cause feed problems f Close the output paper tray cover g Slowly push the paper tray completely into the machine h While holding the paper tray in place pull out the paper support 1 until it clicks and unfold the paper support flap 2 Note Do not use the paper support flap for Legal paper ...

Page 20: ... the inside Occasionally you may experience paper feed problems caused by the thickness size and flap shape of the envelopes you are using How to load envelopes and post cards 2 a Before loading press the corners and sides of the envelopes or post cards to make them as flat as possible Note If the envelopes or post cards are double feeding put one envelope in the paper tray at a time b Put the env...

Page 21: ...ap is either to the side of the envelope or to the back edge of the envelope when printing c Adjust the size and margin in your application Removing small printouts from the machine 2 When the machine ejects small paper onto the output paper tray you may not be able to reach it Make sure printing has finished and then pull the tray completely out of the machine ...

Page 22: ...ble areas on cut sheet paper and envelopes The machine can only print in the shaded areas when the Borderless print feature is available and turned on Note The Borderless feature is not available for envelopes Cut Sheet Paper Envelopes Top 1 Bottom 2 Left 3 Right 4 Cut Sheet 3 mm 3 mm 3 mm 3 mm Envelopes 12 mm 24 mm 3 mm 3 mm 3 4 1 2 3 4 1 2 ...

Page 23: ...Section II Copy II Making copies 18 ...

Page 24: ...press a or b to change the number of copies c Press Mono Start or Colour Start Stop copying 3 To stop copying press Stop Exit Copy options 3 When you want to quickly change the copy settings temporarily for the next copy use the temporary Copy keys You can use different combinations The machine returns to its default settings 1 minute after it finishes copying Note You can save the copy settings y...

Page 25: ...ose Fast Normal or Best Press OK e Press Stop Exit Enlarging or reducing the image copied 3 You can select the following enlargement or reduction ratios Custom 25 400 allows you to enter a ratio from 25 to 400 Press Normal Normal is the recommended mode for ordinary print outs This produces good copy quality with good copy speed Fast Fast copy speed and lowest ink consumption Use to save time prin...

Page 26: ... produce a poster When you use the poster feature your machine divides your document into sections then enlarges the sections so you can assemble them into a poster Important 3 Please make sure paper size is set to Letter Legal or A4 You cannot use the Enlarge Reduce setting with the N in 1 and Poster features N in 1 colour copies are not available P means Portrait and L means Landscape You can on...

Page 27: ... 3 3 You can make a poster size copy of a photograph Adjusting Brightness Contrast and Colour 3 Brightness 3 To temporarily change the brightness setting follow the instruction below a Load your document b Press Copy Options and a or b to choose Brightness Press OK nnonn e c Press a or b to make a lighter or darker copy Press OK d Press Mono Start or Colour Start To change the default setting foll...

Page 28: ...he next colour Press Stop Exit Paper options 3 Paper type 3 If you are copying on special paper be sure to select the type of paper you are using so you will get the best print quality a Load your document b Press Copy Options and a or b to choose Paper Type Press OK c Press a or b to choose the type of paper you are using Press OK d Press Mono Start or Colour Start To change the default setting f...

Page 29: ...Press OK c Press a or b to choose the size of paper you are using Press OK d Press Mono Start or Colour Start To change the default setting follow the instruction below a Press Menu b Press a or b to choose 1 Copy Press OK c Press a or b to choose 2 Paper Size Press OK d Press a or b to choose the paper size you are using Letter Legal A4 A5 or 10x15cm Press OK e Press Stop Exit Press and then a or...

Page 30: ...Chapter 3 24 ...

Page 31: ...Section III Direct Photo PrintingIII Printing photos from a memory card or USB Flash memory drive 26 Printing photos from a camera 37 ...

Page 32: ...pture Center for Macintosh in the Software User s Guide on the CD ROM Using memory card or USB Flash memory drive 4 Your Brother machine has media drives slots for use with popular digital camera media CompactFlash Memory Stick Memory Stick Pro SecureDigital MultiMediaCard and xD Picture Card and USB Flash memory drives miniSD can be used with a miniSD adapter Memory Stick Duo can be used with a M...

Page 33: ...n a valid format See DPOF printing on page 31 Please be aware of the following When printing the INDEX or IMAGE the PhotoCapture Center will print all the valid images even if one or more images have been corrupted A portion of the corrupted image may be printed The corrupted image will not be deleted Memory card users Your machine is designed to read memory cards that have been formatted by a dig...

Page 34: ...light is on the memory card or USB Flash memory drive is properly inserted PhotoCapture light is off the memory card or USB Flash memory drive is not properly inserted PhotoCapture light is blinking the memory card or USB Flash memory drive is being read or written to CAUTION DO NOT unplug the power cord or remove the memory card or USB Flash memory drive from the media drive slot or USB direct in...

Page 35: ...ss a or b to choose Print Images in c and then press OK See Printing Images on page 30 f Enter the image number and press OK g Press Colour Start to start printing Print Index Thumbnails 4 The PhotoCapture Center assigns numbers for images such as No 1 No 2 No 3 and so on The PhotoCapture Center does not recognise any other numbers or file names that your digital camera or PC has used to identify ...

Page 36: ...sing the Copy Options key for hyphen For example enter 1 Copy Options 5 to print images No 1 to No 5 You can enter up to 12 characters including commas for the image numbers you want to print e After you have selected the images you want to print press OK to select your settings If you have already chosen your settings press Colour Start f Press a or b to choose the type of paper you are using Pla...

Page 37: ... print the chosen image easily To print directly from a memory card or USB Flash memory drive containing DPOF information on it follow the instructions below a Firmly insert the memory card into the correct slot C Flash Active Press PhotoCapture b Press a or b to choose Print Images Press OK c If there is a DPOF file on the card the LCD will show DPOF Print Yes e d Press a or b to choose DPOF Prin...

Page 38: ...e Plain Paper Inkjet Paper Brother Photo or Other Photo Press OK e Press Stop Exit Paper Size 4 a Press Menu b Press a or b to choose 2 PhotoCapture Press OK c Press a or b to choose 3 Paper Size Press OK d Press a or b to choose the paper size you are using Letter A4 10x15cm or 13x18cm Press OK e Press Stop Exit Print Size 4 This setting is available only when you select Letter or A4 in the paper...

Page 39: ...s a or b to choose 7 Color Enhance Press OK d Press a or b to choose On or Off Press OK If selecting Off then go to g e Press a or b to choose 1 White Balance 2 Sharpness or 3 Color Density Press OK f Press a or b to adjust the degree of the setting Press OK g Press Stop Exit Note White Balance This setting adjusts the hue of the white areas of an image Lighting camera settings and other influence...

Page 40: ... b to choose 2 PhotoCapture Press OK c Press a or b to choose 8 Cropping Press OK d Press a or b to choose Off or On Press OK e Press Stop Exit Cropping On 4 Cropping Off 4 Borderless printing 4 This feature expands the printable area to the edges of the paper Printing time will be slightly slower a Press Menu b Press a or b to choose 2 PhotoCapture Press OK c Press a or b to choose 9 Borderless P...

Page 41: ... the memory card while PhotoCapture is blinking to avoid damaging the card or data stored on the card b Load your document c Press Scan d Press a or b to choose Scan to Media do one of the following To change the quality press OK and go to step e To start scanning press Mono Start or Colour Start e Press a or b to choose the quality and then press OK Do one of the following To change the file type...

Page 42: ...irect interface Media Error This message will appear if you put in a memory card that is either bad or not formatted or when there is a problem with the media drive To clear this error take out the memory card No File This message will appear if you try to access a memory card or USB Flash memory drive in the drive slot that does not contain a JPG file Out of Memory This message will appear if you...

Page 43: ...ridge compatible digital camera Depending on your camera some of these settings may not be available 1 See DPOF printing on page 38 for more details 2 If your camera is set to use the Printer Settings Default setting the machine will print your photo using the following settings When your camera does not have any menu selections this setting is also used The names and availability of each setting ...

Page 44: ...from your camera When the machine starts printing a photo the LCD will show Printing WARNING To prevent damage to your machine do not connect any device other than a digital camera or USB Flash memory drive to the USB direct interface DPOF printing 5 DPOF stands for Digital Print Order Format Major digital camera manufacturers Canon Inc Eastman Kodak Company Fuji Photo Film Co Ltd Matsushita Elect...

Page 45: ...fer among digital cameras Please refer to the documentation supplied with your camera for detailed information such as how to switch from PictBridge mode to USB mass storage mode Printing Images 5 Note Remove any memory cards or USB Flash memory drive from the machine before connecting the digital camera a Connect your camera to the USB direct interface 1 on the machine using the USB cable 1 USB d...

Page 46: ...Out of Memory This message will appear if you are working with images that are too large for the machine s memory Unusable Device This message will appear if you connect a camera which is not in PictBridge mode nor using the USB Mass storage standard This message can also appear if you connect a broken device to the USB direct interface For more detailed solutions see Error messages on page 55 ...

Page 47: ...Section IV Software IV Software features 42 ...

Page 48: ...led the software see Viewing Documentation on page 3 a From the Start menu point to Brother DCP XXXX where XXXX is your model number from the programs group then click User s Guides in HTML format b Click SOFTWARE USER S GUIDE from the top menu c Click the heading you would like to read from the list at the left of the window For Macintosh a Make sure your Macintosh is turned on Insert the Brother...

Page 49: ...Section V Appendixes V Safety and Legal 44 Troubleshooting and Routine Maintenance 52 Menu and Features 69 Specifications 75 Glossary 84 ...

Page 50: ...heaters air conditioners refrigerators medical equipment chemicals or water DO NOT expose the machine to direct sunlight excessive heat moisture or dust DO NOT connect your machine to electrical sockets controlled by wall switches or automatic timers Disruption of power can wipe out information in the machine s memory Do not connect your machine to electrical sockets on the same circuit as large a...

Page 51: ...high voltage electrodes inside the machine Before you clean the inside of the machine make sure you have unplugged the power cord from the electrical socket Doing this will prevent an electrical shock DO NOT handle the plug with wet hands Doing this might cause an electrical shock DO NOT pull in the middle of the power cord Doing this might cause an electrical shock ...

Page 52: ... the machine under the scanner cover Doing this may cause injury DO NOT put your hands on the edge of the paper tray under the output paper tray cover Doing this may cause injury DO NOT touch the paper feed roller Doing this may cause injury ...

Page 53: ...pe of spray to clean the inside or outside of the machine Doing this may cause a fire or electrical shock If the machine becomes hot releases smoke or generates any strong smells immediately turn off the power switch and unplug the machine from the electrical socket Call your Brother dealer or Brother Customer Service If metal objects water or other liquids get inside the machine immediately turn ...

Page 54: ...placed near or over a radiator or heater This product should never be placed in a built in installation unless adequate ventilation is provided 8 This product should be operated from the type of power source indicated on the label If you are not sure of the type of power available call your dealer or local power company 9 Use only the power cord supplied with this machine 10 This product is equipp...

Page 55: ...e Protector 16 To reduce the risk of fire electric shock and injury to people note the following DO NOT use this product near appliances that use water a swimming pool or in a wet basement DO NOT use the machine during an electrical storm there is the remote possibility of an electrical shock or to report a gas leak in the vicinity of the leak IMPORTANT For your safety A To ensure safe operation t...

Page 56: ...ess Certificates of Deposit Armed Forces Service or Draft papers Passports Postage Stamps cancelled or uncancelled Immigration Papers Welfare documents Cheques or Drafts drawn by Governmental Agencies Identification Documents badges or insignias Licences and Certificates of Title to motor vehicles Copyrighted works cannot be copied Sections of a copyrighted work can be copied for fair dealing Mult...

Page 57: ...demark of International Business Machine Corporation CompactFlash is a registered trademark of SanDisk Corporation Memory Stick is a registered trademark of Sony Corporation SanDisk is a licensee of the SD and miniSD trademarks MultiMediaCard is a trademark of Infineon Technologies and licensed to the MultiMediaCard Association xD Picture Card is a trademark of Fujifilm Co Ltd Toshiba Corporation ...

Page 58: ...cked Poor print quality Check the print quality See Checking the print quality on page 65 Make sure that the Printer Driver or Paper Type setting in the menu matches the type of paper you are using See Printing for Windows or Printing and Faxing for Macintosh in the Software User s Guide on the CD ROM Make sure that your ink cartridges are fresh The following may cause ink to clog The expiration d...

Page 59: ...ck the Settings tab and make sure you uncheck Colour Enhancement Set the borderless feature off Borderless printing is slower than normal printing See Printing for Windows or Printing and Faxing for Macintosh in the Software User s Guide on the CD ROM Colour Enhancement is not working properly If the image data is not full colour in your application such as 256 colour Colour Enhancement will not w...

Page 60: ...me you must make sure your Brother machine is turned On and connected to your computer This will allow you to access all the functions of FaceFilter Studio PhotoCapture Center Difficulties Difficulty Suggestions Removable Disk does not work properly 1 Have you installed the Windows 2000 update If not do the following 1 Unplug the USB cable 2 Install the Windows 2000 update using one of the followi...

Page 61: ...terface Init Unable XX The machine has a mechanical problem OR A foreign object such as a clip or ripped paper is in the machine Open the scanner cover and remove any foreign objects inside the machine If the error message continues disconnect the machine from the power source for several minutes then reconnect it Ink Empty Black The indicated ink cartridge is empty The machine will stop all print...

Page 62: ...OM The memory card or USB Flash memory drive you are using does not have enough free space to scan the document Delete unused files from your memory card or USB Flash memory drive to make some free space and then try again Paper Jam Paper is jammed in the machine Remove the Jam Clear Cover at the back of the machine and pull out the jammed paper See Printer jam or paper jam on page 58 Print Unable...

Page 63: ...ore vivid display If you are having difficulty reading the LCD try changing the contrast setting a Press Menu b Press a or b to choose 0 Initial Setup Press OK c Press a or b to choose 2 LCD Contrast Press OK d Press a or b to choose Light or Dark Press OK e Press Stop Exit Unusable Device Please Disconnect USB Device A USB device or USB Flash memory drive that is not supported has been connected ...

Page 64: ...t the jammed paper 1 and press Stop Exit If you cannot remove the jammed paper from the front side or the error message still appears on the LCD after you remove the jammed paper please go to the next step c Remove the Jam Clear Cover 1 Pull the jammed paper out of the machine CAUTION DO NOT place the jam clear cover face down as shown in the illustration You may damage the cover and cause paper j...

Page 65: ...d paper left inside the machine Check both ends of the print carriage Note If the paper is jammed under the print head unplug the machine from the power source and then move the print head to take out the paper f Lift the scanner cover to release the lock 1 Gently push the scanner cover support down 2 and close the scanner cover 3 g Slowly push the paper tray completely into the machine Note Make ...

Page 66: ...idge It is necessary to keep some ink in the ink cartridge to prevent air from drying out and damaging the print head assembly a Open the ink cartridge cover If one or more ink cartridges are empty for example Black the LCD shows Ink Empty Black and Replace Ink b Pull the lock release lever and take out the ink cartridge for the colour shown on the LCD c Open the new ink cartridge bag for the colo...

Page 67: ... slots If you do so the ink may stain your skin If ink stains your skin or clothing wash with soap or detergent at once If you mix the colours by installing an ink cartridge in the wrong position clean the print head several times after correcting the cartridge installation Once you open an ink cartridge install it in the machine and use it up within six months of installation Use unopened ink car...

Page 68: ...B a Pull the paper tray completely out of the machine b Wipe the outside of the machine with a soft cloth to remove dust c Lift the output paper tray cover and remove anything that is stuck inside the paper tray d Wipe the inside and outside of the paper tray with a soft cloth to remove dust e Close the output paper tray cover and slowly push the paper tray completely into the machine Cleaning the...

Page 69: ...printer platen 1 and the area around it wiping off any scattered ink with a soft dry lint free cloth Cleaning the Paper Pick up Roller B a Pull the paper tray completely out of the machine b Unplug the machine from the electrical socket and remove the Jam Clear Cover CAUTION DO NOT place the jam clear cover face down as shown in the illustration You may damage the cover and cause paper jams 1 ...

Page 70: ...n the text or graphics on your printed pages You can clean Black only three colours at a time Cyan Yellow Magenta or all four colours at once Cleaning the print head consumes ink Cleaning too often uses ink unnecessarily CAUTION DO NOT touch the print head Touching the print head may cause permanent damage and may void the print head s warranty a Press Ink Management b Press a or b to choose Clean...

Page 71: ...three colours Black OK a Yes b No Press a Yes or b No h The LCD asks you if you want to start cleaning Start Cleaning a Yes b No Press a Yes The machine starts cleaning the print head i After cleaning is finished press Colour Start The machine starts printing the Print Quality Check Sheet again and then return to step e j Press Stop Exit If you repeat this procedure at least five times and the pri...

Page 72: ... go to step h If another test print number is a better match for either 600 dpi or 1200 dpi press b No to choose it f For 600 dpi press a or b to select the number of the test print that most closely matches the number 0 sample 1 8 600dpi Adjust Select Best 5 Press OK g For 1200 dpi press a or b to select the number of the test print that most closely matches the number 0 sample 1 8 1200dpi Adjust...

Page 73: ...ne properly you could void your warranty CAUTION It is important to allow the machine to park the print head after a print job Listen carefully to the machine before unplugging it to make sure that all mechanical noise has stopped Not allowing the machine to finish this parking process may lead to print problems and possible damage to the print head a Open the ink cartridge cover b Pull the lock r...

Page 74: ...both hands use the plastic tabs on both sides of the machine to lift the scanner cover until it locks securely into the open position Then unplug the interface cable from the machine if it is connected f Lift the scanner cover 1 to release the lock Gently push the scanner cover support down 2 and close the scanner cover 3 g Wrap the machine in the bag and put it in the original carton with the ori...

Page 75: ... have created step by step on screen instructions to help you program your machine All you need to do is follow the instructions as they guide you through the menu selections and programming options Menu table C You can program your machine by using the menu table that begins on page 71 These pages list the menu selections and options Menu keys C Menu and Features C Access the menu Scroll through ...

Page 76: ...ssing a or b for the direction you want 1 Copy 2 PhotoCapture 3 Print Reports 4 Machine Info 0 Initial Setup c Press OK when that option appears on the LCD The LCD will then show the next menu level d Press a or b to scroll to your next menu selection e Press OK When you finish setting an option the LCD shows Accepted ...

Page 77: ...opy 1 Paper Type Plain Paper Inkjet Paper Brother Photo Other Photo Transparency Sets the type of paper in the paper tray 22 2 Paper Size Letter Legal A4 A5 10x15cm Sets the size of the paper in the paper tray 23 3 Quality Fast Normal Best Chooses the copy resolution for your type of document 19 4 Brightness nnnno nnnon nnonn nonnn onnnn Adjusts the brightness for copies 21 5 Contrast nnnno nnnon ...

Page 78: ...nnno B nnnon B nnonn B nonnn B onnnn Adjusts the amount of Blue in copies 2 PhotoCapture 1 Print Quality Normal Photo Selects the print quality 32 2 Paper Type Plain Paper Inkjet Paper Brother Photo Other Photo Selects the paper type 32 3 Paper Size Letter A4 10x15cm 13x18cm Selects the paper size 32 Main Menu Submenu Menu Selections Options Descriptions Page The factory settings are shown in Bold...

Page 79: ...3 6 Contrast nnnno nnnon nnonn nonnn onnnn Adjusts the contrast 33 7 Color Enhance Enhance On Enhance Off 1 White Balance nnnno nnnon nnonn nonnn onnnn Adjusts the hue of the white areas 33 2 Sharpness nnnno nnnon nnonn nonnn onnnn Enhances the detail of the image 3 Color Density nnnno nnnon nnonn nonnn onnnn Adjusts the total amount of colour in the image Main Menu Submenu Menu Selections Options...

Page 80: ...er s Guide on the CD ROM 2 B W File Type TIFF PDF Selects the default file format for black and white scanning 3 ColorFile Type PDF JPEG Selects the default file format for colour scanning 3 Print Reports 1 Help List You can print these lists and reports 6 2 User Settings 4 Machine Info 1 Serial No Lets you check the serial number of your machine 67 0 Initial Setup 1 Date Time Puts the date and ti...

Page 81: ... Display 10 Chinese Characters 20 Alphabetical characters 1line Power Source AC 220 to 240 V 50 60 Hz Power Consumption Power Save Mode Standby Operating Average 4 W Average 6 W Average 20 W Dimensions Weight 7 1 kg Noise Operating 50 db or less 1 Temperature Operating Best Print Quality 10 to 35 C 20 to 33 C Humidity Operating Best Print Quality 20 to 80 without condensation 20 to 80 without cond...

Page 82: ...lain paper inkjet paper coated paper glossy paper 2 transparencies 1 2 and envelopes Paper size Letter Legal Executive A4 A5 A6 JIS B5 envelopes commercial No 10 DL C5 Monarch JE4 Photo card Index card and Post card 3 Width 89 mm 3 5 in 216 mm 8 5 in Height 127 mm 5 0 in 356 mm 14 0 in For more details see Paper weight thickness and capacity on page 11 Maximum paper tray capacity Approx 100 sheets...

Page 83: ...ize Scanner Glass Width Max 216 mm Scanner Glass Height Max 297 mm Copy Speed Monochrome Up to 20 pages minute A4 paper 1 Colour Up to 18 pages minute A4 paper 1 Multiple Copies Stacks up to 99 pages Enlarge Reduce 25 to 400 in increments of 1 Resolution Monochrome Scans up to 600 1200 dpi Prints up to 1200 1200 dpi Colour Scans up to 600 1200 dpi Prints up to 600 1200 dpi ...

Page 84: ...t compatible Compact I O card such as Compact LAN card and Compact Modem card are not supported Memory Stick Memory Stick Pro Not available for music data with MagicGate Memory Stick Duo with adapter MultiMediaCard SecureDigital miniSD with adapter xD Picture Card 2 USB Flash memory drive 3 Resolution Up to 1200 2400 dpi File Extension Media Format Image Format DPOF EXIF DCF Photo Print JPEG 4 Sca...

Page 85: ...fications 79 D PictBridge D Compatibility Supports the Camera Imaging Products Association PictBridge standard CIPA DC 001 Visit http www cipa jp pictbridge for more information Interface PictBridge USB Port ...

Page 86: ...nt Yes Windows 2000 Professional XP XP Professional x64 Edition Windows Vista Mac OS X 10 2 4 or greater WIA Compliant Yes Windows XP 1 Windows Vista Colour Depth 36 bit colour Processing Input 24 bit colour Processing Output Actual Input 30 bit colour Actual Output 24 bit colour Resolution Up to 19200 19200 dpi interpolated 2 Up to 600 2400 dpi optical Scanning Speed Monochrome Up to 3 82 sec Col...

Page 87: ...1 interface 2 Third party USB ports are not supported for Macintosh Printer Driver Windows 2000 Professional XP XP Professional x64 Edition Windows Vista driver supporting Brother Native Compression mode Brother Ink Driver For Mac OS X 10 2 4 or greater Resolution Up to 1200 6000 dpi 1200 2400 dpi 1200 1200 dpi 600 600 dpi 600 300 dpi 600 150 dpi Print Speed Monochrome Up to 27 pages minute 1 Colo...

Page 88: ...ista 1 GHz 32 bit x86 or 64 bit x64 processor 1GB 1 1GB Mac 4 OS X 10 2 4 or greater Printing Scanning Removable Disk 3 USB 2 PowerPC G4 G5 Intel Core Solo Duo PowerPC G3 350MHz 256MB 480MB Conditions 1 Microsoft Internet Explorer 5 5 or greater 2 Third party USB ports are not supported 3 Removable disk is a function of PhotoCapture Center 4 Presto PageManager on the CD ROM supports Mac OS X 10 3 ...

Page 89: ...l print may change depending on how often you use the machine and how many pages you print with each use The machine will automatically and periodically clean the print head assembly a process that uses a small amount of ink When the machine identifies a cartridge as empty there may be a small amount of ink left in it This is necessary to prevent air from drying out and damaging the print head ass...

Page 90: ...sages during On Screen Programming and shows the date and time when the machine is idle Menu mode Programming mode for changing your machine s settings OCR optical character recognition The bundled Presto PageManager software application converts an image of text to text you can edit PhotoCapture Center Allows you to print digital photos from your digital camera at high resolution for photo qualit...

Page 91: ...aper Size 23 Paper Type 22 E Envelopes 11 14 Error messages on LCD 55 Init Unable 55 Ink Empty 55 Near Empty 55 No Paper Fed 56 Out of Memory 56 Print Unable 56 Scan Unable 56 G Greyscale 80 H Help LCD messages 69 using menu keys 69 Menu Table 69 I Ink cartridges checking ink volume 66 ink dot counter 60 replacing 60 Innobella 83 J Jams paper 58 L LCD liquid crystal display 69 Contrast 57 Help Lis...

Page 92: ...de Print area 16 difficulties 52 drivers 81 improving quality 64 65 paper jams 58 reports 6 resolution 81 specifications 81 Printing on small paper 15 Programming your machine 69 Q Quality key copying 18 R Reducing copies 19 Reports Help List 6 how to print 6 User Settings 6 Resolution copy 77 print 81 scan 80 S Safety Instructions 48 Scanner glass cleaning 62 using 7 Scanning See Software User s ...

Page 93: ...Visit us on the World Wide Web http www brother com CHN ENG ...

Reviews: