background image

Routine Maintenance 

189

8

2

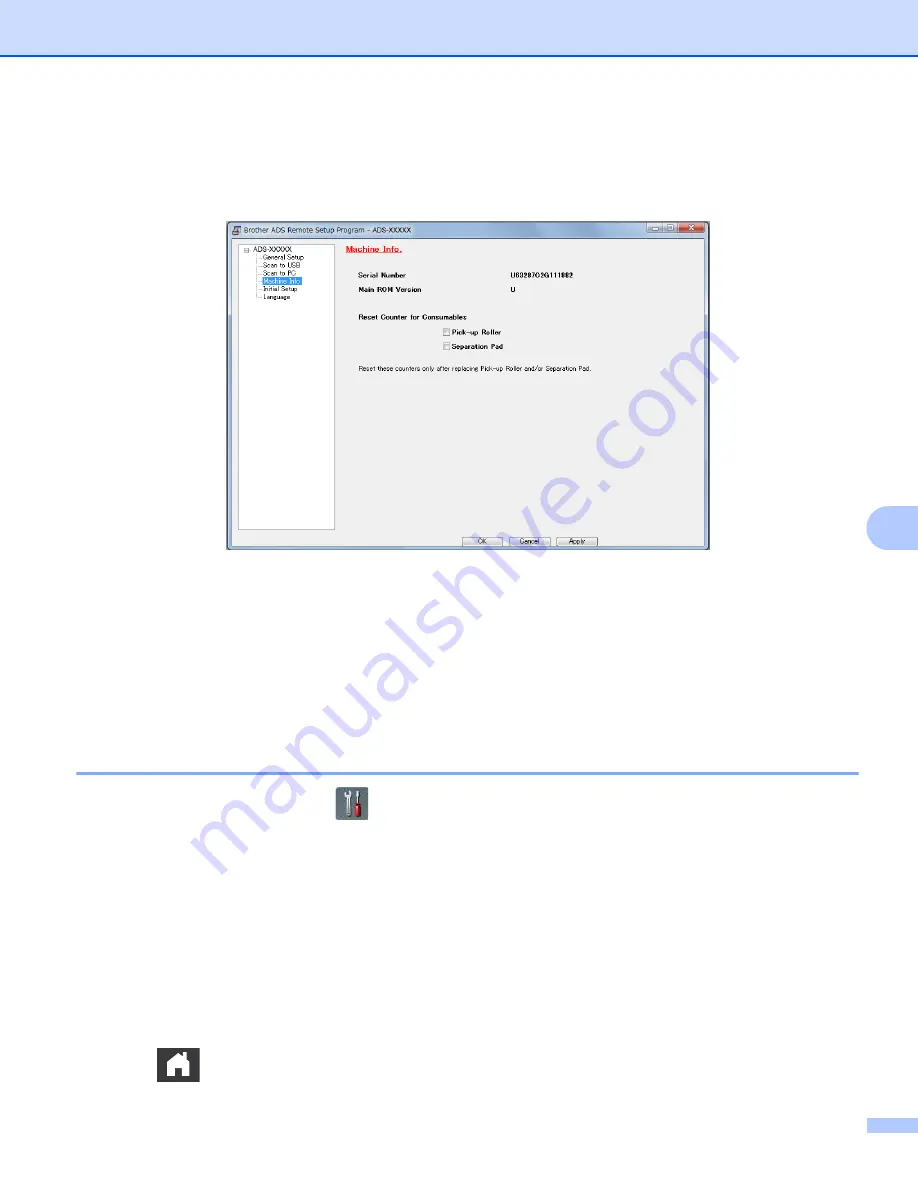
Click the 

Remote Setup

 button. The Remote Setup window appears.

3

Select 

Machine Info

. in the folder tree and then configure scan settings as needed (the example below 

uses Windows

®

).


4

Do one of the following:

To reset the Separation Pad counter, select the 

Separation Pad

 check box.

To reset the Pick-up Roller counter, select the 

Pick-up Roller

 check box.

5

Click 

Apply

.

6

Click 

OK

.

Reset the Usage Counters (ADS-2500We)

8

1

On your scanner’s LCD, press 

.

2

Press 

a

 or 

b

 to display 

Machine Info

.

3

Press 

Machine Info

.

4

Press 

Usage Counters

.

5

Do one of the following:

To reset the Separation Pad counter, press 

Separation Pad Count

.

To reset the Pick-up Roller counter, press 

Pick-up Roller Count

.

6

When the LCD displays a confirmation message, press 

Yes

.

7

Press .

Summary of Contents for ADS-2000e

Page 1: ...ADS 2000e ADS 2500We Version A USA User s GuideADS 2000e ADS 2500We ...

Page 2: ...d will help us notify you of enhancements to your product and special offers Complete and fax the Brother Warranty Registration And Test Sheet or for your convenience and most efficient way to register your new product register on line at http www brother com registration FAQs frequently asked questions The Brother Solutions Center is our one stop resource for all your Brother machine needs You ca...

Page 3: ...7 1 901 379 1215 fax In Canada http www brother ca support In USA Printer Customer Support Brother International Corporation 200 Crossing Boulevard Bridgewater NJ 08807 0911 In Canada Brother International Corporation Canada Ltd Customer Experience Team 1 rue Hotel de Ville Dollard des Ormeaux PQ Canada H9B 3H6 Internet addresses Brother Global Web Site http www brother com For Frequently Asked Qu...

Page 4: ...other Solutions Center 1 Web Connect Guide ADS 2500We only This Guide provides useful information about accessing internet services from the Brother machine as well as downloading images and uploading files directly from internet services PDF file Brother Solutions Center 1 Mobile Print Scan Guide for Brother iPrint Scan ADS 2500We only This Guide provides useful information about scanning from yo...

Page 5: ...m ControlCenter4 Windows Home Mode Basic Scan on page 50 Advanced Mode Basic Scan on page 58 For scanning from ControlCenter2 Macintosh Scan to Image on page 74 Scan to OCR Scan your document and convert it to text This text can be edited using your favorite word processing software For scanning from the Control Panel of the machine Save Scanned Documents on Your Computer on page 120 For scanning ...

Page 6: ... scanning from ControlCenter2 Macintosh Scan to E mail on page 76 Scan to File Scan your document and save it to a folder on your hard disk in one of the file types shown in the file type list If you want to scan your document as a PDF file select this method For scanning from the Control Panel of the machine Save Scanned Documents on Your Computer on page 120 For scanning from ControlCenter4 Wind...

Page 7: ...119 Scan Using the TWAIN ICA Driver for Macintosh Users Applications supporting TWAIN ICA driver such as Presto PageManager Apple Image Capture Use the Presto PageManager application included in the Brother MFL Pro software suite or other applications supporting TWAIN specifications for scanning After installing the Brother MFL Pro software suite you can also use the Apple Image Capture applicatio...

Page 8: ...r on the internet Scan Documents to a Shared Folder Network Location Windows ADS 2500We only on page 134 Scan to email Server ADS 2500We only Scan your document and send it directly to an email address from the machine In addition because this feature can assign an email address to the machine you can use the machine to send documents over your local network or the internet to computers or other I...

Page 9: ...nViewer Use your iOS device or Macintosh computer to view and edit images and documents that were scanned by a Brother machine and saved to iCloud You can download and install Brother ScanViewer from the App Store Brother ScanViewer Guide for iOS OS X View or Edit Scanned Data Android ADS 2500We only Brother Image Viewer Use your Android mobile device to view and edit documents that were scanned b...

Page 10: ...ry Storage 15 Beep Volume 15 Automatic Daylight Saving Time 16 Sleep Mode 16 Power Down Mode 17 Multifeed Detection 17 Reduced Noise Mode 18 Setting Lock 18 Set the Password 19 Change the Password 19 Turn Setting Lock On Off 20 User Restriction Functions 21 2 Document Specifications 24 Acceptable Documents 24 Unacceptable Documents 26 Carrier Sheet Recommendations 27 Notes for Using Carrier Sheets...

Page 11: ... Button in a Custom Tab 66 Change Scan Settings ControlCenter4 Windows 67 Scan Using ControlCenter2 Macintosh 73 Scan to Image 74 Scan to OCR 75 Scan to E mail 76 Scan to File 77 Change a Scan Button s Default Settings 78 Scan Specific and Irregular Sized Documents Using the Carrier Sheet 78 Scan Plastic Cards 80 Scan to an Office File 82 Scan Business Cards 83 Register Your Favorite Scan Settings...

Page 12: ...Profiles 137 Scan Using Web Services Windows Vista SP2 or Later Windows 7 Windows 8 and Windows 8 1 ADS 2500We 138 Configuring Settings for Scanning 138 Send Scanned Documents Directly to an Email Address ADS 2500We only 140 Select an email Address from the Address Book 140 Enter an email Address Manually 141 Set Up the Address Book ADS 2500We only 142 Register an email Address 142 Change an email...

Page 13: ...m 192 Error and Maintenance Messages 192 Document Jam 195 Long Paper Jam 197 Troubleshooting 198 If you are having difficulty with your machine 198 Machine Information 204 Check the Serial Number ADS 2000e 204 Check the Serial Number ADS 2500We 205 WLAN Enable Disable ADS 2500We only 206 Reset Functions 206 Reset the Machine ADS 2500We only 206 A Specifications 207 General 207 Scanner 209 Direct S...

Page 14: ...g system General Information 1 CAUTION CAUTION indicates a potentially hazardous situation which if not avoided may result in minor or moderate injuries IMPORTANT IMPORTANT indicates a potentially hazardous situation which if not avoided may result in damage to property or loss of product functionality NOTE Notes tell you how you should respond to a situation that may arise or give tips about how ...

Page 15: ... Cover 2 Document Guides 3 Automatic Document Feeder ADF 4 Front Cover 5 Output Tray 6 Document Stopper 7 USB port 8 Control Panel ADS 2500We only 9 Cover Release Lever 10 AC Power Connector 11 USB Connector 12 LAN Connector ADS 2500We only 13 Kensington Security Slot 1 2 4 5 6 7 8 9 10 11 12 13 3 ...

Page 16: ...2000e only on page 213 2 Power Indicator with LED The Power Indicator blinks depending on the status of the machine 3 Stop button Press the Stop button to Job Cancel Wake up Error Recovery Disconnect Remote Setup 4 Scan to PC button with LED Press the Scan to PC button to Scan to PC Wake up 5 Scan to USB button with LED Press the Scan USB button to Scan to USB Wake up 5 1 2 3 4 ...

Page 17: ... it is unavailable 2 Home Button Press to return to the Home Screen and Ready Mode The Home button does not light up when it is unavailable 3 Stop Button Press to stop or cancel your current action and return to Ready Mode The Stop button does not light up when it is unavailable 4 Touchscreen LCD Access the menus and options by pressing the Touchscreen 1 2 3 4 ...

Page 18: ...hine is idle Clock Mode displays the date time and current machine status 1 Date and Time Current date and current time 2 When WLAN is enabled a four level indicator shows the current wireless signal strength if you are using a wireless connection 3 Press to access all settings The information icon appears on the Touchscreen when there is an error or maintenance message For more information see Er...

Page 19: ...General Information 6 1 4 Shortcuts Press to set up shortcuts Once you have set up shortcuts press to view all of your shortcut options 5 Scan Press to access the Scan Mode 5 ...

Page 20: ...B function 5 to E mail Server Press to access the Scan to E mail Server function 6 to Web Press to access the Scan to Web function The information icon appears on the Touchscreen when there is an error or maintenance message For details see Error and Maintenance Messages on page 192 NOTE This product adopts the font of ARPHIC TECHNOLOGY CO LTD MascotCapsule UI Framework and MascotCapsule Tangiblet...

Page 21: ... with a sharp object such as a pen or stylus It may damage the machine The following example shows how to change a machine setting In this example the Document Size setting in Scan to USB is changed to Auto 1 Swipe left or right or press d or c to display Scan 2 2 Press to USB 3 Press Options 4 Press a or b to display Document Size 5 Press Document Size 6 Press a or b to display Auto 7 Press Auto ...

Page 22: ...r application Windows 1 Click the ControlCenter4 icon in the task tray and then select Open from the menu The ControlCenter4 window appears 2 Click the Device Settings tab the example below uses Home Mode Macintosh 1 Click the ControlCenter2 icon in the Dock The ControlCenter2 window appears ...

Page 23: ...rmation about Remote Setup see Set Up the Brother Machine from Your Computer on page 167 3 Select General Setup in the folder tree the example below uses Windows 4 Select how long the machine must be idle before it goes into Sleep Mode To exit Sleep Mode do one of the following Press any key Open the Top Cover Load your document 5 Click OK ...

Page 24: ...the task tray and then select Open from the menu The ControlCenter4 window appears 2 Click the Device Settings tab the example below uses Home Mode Macintosh 1 Click the ControlCenter2 icon in the Dock The ControlCenter2 window appears 2 Click the DEVICE SETTINGS tab 2 Click the Remote Setup button The Remote Setup window appears ...

Page 25: ...2 1 3 Select Language in the folder tree the example below uses Windows 4 Select a language from the Language on Remote Setup drop down list 5 Click OK NOTE You must close the Remote Setup window to save the language change ...

Page 26: ... Select the Reduced Noise Mode check box in Remote Setup to reduce acoustic noise while scanning Reducing noise may slow scan speed To start Remote Setup see Set Up the Brother Machine from Your Computer on page 167 the example below uses Windows ...

Page 27: ...can set how long the LCD backlight stays on after the Ready Screen is shown 1 Press 2 Press General Setup 3 Press LCD Settings 4 Press Dim Timer 5 Press Off 10Secs 20Secs or 30Secs 6 Press Set the Home Screen 1 You can set the Home Screen as Clock Scan 1 2 or Shortcut 1 8 For examples of these screens see Touchscreen LCD on page 5 When the machine is idle or you press the machine will go back to t...

Page 28: ...ry settings will be lost If you have chosen Set New Default for your Scan to USB and Scan to E mail Server preferred settings those settings will not be lost Also during a power failure the machine will retain the date and time for approximately 24 hours Beep Volume 1 When the Beep setting is On the machine will beep when you press a key or make a mistake You can choose a range of beep volume leve...

Page 29: ...r b to display Initial Setup 3 Press Initial Setup 4 Press Date Time 5 Press Auto Daylight 6 Press On or Off 7 Press Sleep Mode 1 You can enter how long the machine must remain idle the maximum setting is 90 Mins and the default setting is 15 Mins before it enters Sleep Mode The timer will restart if any operation is carried out on the machine If a wireless network is enabled the machine will not ...

Page 30: ...the same time When this feature is set to On the machine will detect a multifeed error When this function detects a multifeed confirm that the data scanned before the multifeed has been saved and then start scanning again at the next page or the beginning of the document NOTE Scan to USB only If you selected JPEG as the file type your Brother machine will save all data scanned before the multifeed...

Page 31: ...ample below uses Windows Setting Lock 1 Setting Lock lets you set a password to stop other people from accidentally changing your machine settings Make a careful note of your password If you forget your password you will have to reset all of the passwords stored in the machine While Setting Lock is On you cannot change the following settings without a password General Setup Shortcut Settings Netwo...

Page 32: ...r a four digit number for the password using numbers 0 9 Press OK 7 Re enter your password when the LCD displays Verify Press OK 8 Press Change the Password 1 1 Press 2 Press General Setup 3 Press a or b to display Security 4 Press Security 5 Press Setting Lock 6 Press Set Password 7 Enter your existing four digit password Press OK 8 Enter a new four digit number as the password Press OK 9 Re ente...

Page 33: ...e correct password Turn Setting Lock On 1 1 Press 2 Press General Setup 3 Press a or b to display Security 4 Press Security 5 Press Setting Lock 6 Press Lock OffiOn 7 The LCD prompts you to enter your four digit password Enter the password Press OK Turn Setting Lock Off 1 1 Press 2 The LCD prompts you to enter your four digit password Enter the password Press OK 3 Press ...

Page 34: ... same time The following settings can be available when Secure Function Lock or Active Directory Authentication is on 1 The available functions can be managed depending on the Login ID you set 2 The function restricts the scan functions other than Scan to USB and Scan to Web 1 Start Web Based Management 1 Start your web browser Restrict Function available Active Directory Authentication Secure Fun...

Page 35: ...mation see the Monitor the Machine s Status from Your Computer Macintosh on page 164 2 When the Web Based management screen appears click the Administrator tab In the left navigation bar click User Restriction Function 3 Do one of the following Click Secure Function Lock and then click Submit Go to 4 Click Active Directory Authentication and then click Submit Go to 5 4 In the left navigation bar c...

Page 36: ...tication in the Network User s Guide Once you set Active Directory Authentication the following screen appears on your machine s LCD Enter your Brother machine s Domain User ID and Password Once you connect Active Directory Server the following screen appears on your machine s LCD NOTE If you don t touch the LCD within one minute the LCD reverts to logoff screen automatically ...

Page 37: ...re than 0 2 in 5 mm no more than 50 sheets Standard Paper Size A4 8 3 11 7 in 210 297 mm A5 5 8 8 3 in 148 210 mm A6 4 1 5 8 in 105 148 mm A7 2 9 4 1 in 74 105 mm A8 2 0 2 9 in 52 74 mm B5 7 2 10 1 in 182 257 mm B6 5 0 7 2 in 128 182 mm B7 3 6 5 0 in 91 128 mm B8 2 5 3 6 in 64 91 mm Legal 8 1 2 14 in 215 9 355 6 mm Letter 8 5 11 in 215 9 279 4 mm Thick Paper Length 2 76 to 5 8 in 70 to 147 mm Widt...

Page 38: ...lect the Carrier Sheet Mode check box in the setting dialog box Long Paper Length 14 to 34 0 in 355 6 to 863 mm Width 2 0 to 8 5 in 51 to 215 9 mm Weight 14 to 29 lb 52 to 110 g m2 Thickness 3 to 5 mil 0 08 to 0 12 mm To scan thinner documents use the Carrier Sheet Maximum Number of Pages 1 page Plastic Card Non embossed Card Only Size ISO 3 37 2 13 0 03 in 85 6 54 0 0 76 mm Material Plastic PET T...

Page 39: ... perforated paper Documents printed on unusually shaped paper not square or rectangle Documents with photos notes or stickers affixed to them Documents that use carbonless paper Documents that use loose leaf paper or any paper with holes in it Documents with paper clips or staples Documents with wet ink Fabrics metallic sheets or overhead projector sheets Glossy or mirrored media Documents that ex...

Page 40: ... unusually shaped paper not square or rectangle Documents with photos notes or stickers affixed to them Documents that use carbonless paper Documents that use loose leaf paper or any paper with holes in it CAUTION To avoid cutting yourself do not slide or scrape your hand or fingers along the edge of the Carrier Sheet IMPORTANT To avoid warping do not place the Carrier Sheet in direct sunlight or ...

Page 41: ... the Carrier Sheet at the same time Insert only one document into the Carrier Sheet at a time Do not write on the Carrier Sheet as the writing may be seen in scanned documents If the Carrier Sheet becomes dirty wipe it with a dry cloth Do not leave documents in the Carrier Sheet for extended periods of time as the printing on the documents may bleed through onto the Carrier Sheet IMPORTANT If you ...

Page 42: ...29 3 3 Set Up Your Scanner 3 1 Open the Top Cover a 2 Pull the Output Tray a out of the machine and then unfold the Document Stopper s Scan Preparation 3 a 1 2 ...

Page 43: ...PORTANT Make sure documents with ink or correction fluid are completely dry DO NOT pull on the document while it is feeding DO NOT use paper that is curled wrinkled folded ripped stapled paper clipped pasted or taped DO NOT use cardboard or fabric Standard size Documents 3 1 Adjust the Document Guides a to fit the width of your document 2 Fan the pages several times along both the long edge and th...

Page 44: ... the pages 4 Position the pages so that the leading edges are aligned at a slight angle in the feed direction 5 Place your document face down top edge first in the ADF between the Guides until you feel it touch the inside of the machine gently ...

Page 45: ... 2 Place your card face down top edge first and lengthwise in the ADF between the Guides until you feel it touch the inside of the machine NOTE Load only one plastic card at a time Certain types of plastic cards may be scratched when scanned To prevent damage to the card we recommend using the Plastic Card Carrier sheet a ...

Page 46: ...tely dry 1 Adjust the Document Guides a to fit the width of your document 2 Place your document face down top edge first in the ADF between the Guides until you feel it touch the inside of the machine NOTE Load only one document at a time Support the document with your hand if the document is longer than the Top Cover a ...

Page 47: ...or correction fluid are completely dry 1 Fold your document in half and insert it into the Carrier Sheet NOTE Set the document in the center of the Carrier Sheet and align the top of the document with the top of the Carrier Sheet 2 Adjust the Document Guides a to fit the width of the Carrier Sheet a ...

Page 48: ...scanned page be sure to position the folded edge of the original document close to the edge of the Carrier Sheet Documents with Facing Pages 3 Follow the steps of Documents not printed on standard size paper on page 34 Receipts Clippings Photos and Other Documents 3 Make sure documents with ink or correction fluid are completely dry 1 Insert the document into the Carrier Sheet ...

Page 49: ...eet You can fold the receipt in two places so that it overlaps and then insert it into the Receipt Carrier Sheet if the receipt is longer than the Receipt Carrier Sheet 2 Adjust the Document Guides a to fit the width of the Carrier Sheet 3 Place the Carrier Sheet in the ADF between the Guides until you feel it touch the inside of the machine a ...

Page 50: ...the following Make sure you have installed the Brother software MFL Pro Suite by following the steps in the Quick Setup Guide If your Brother machine is connected via cable make sure that the interface cable is physically secure Prepare Your Network 4 ...

Page 51: ...machine than the one that was originally registered to your computer during the installation of MFL Pro Suite software follow the steps below 1 Click Brother Utilities on your desktop and then click the drop down list and select your model name if not already selected Click SCAN in the left navigation bar and then click Scanners and Cameras 2 Do one of the following Windows XP Right click the Scan...

Page 52: ...ws 7 Windows 8 and Windows 8 1 If the User Account Control screen appears do the following For users who have administrator rights Click Continue or Yes For users who do not have administrator rights Type the administrator password and click OK or Yes ...

Page 53: ...ppropriate connection method Specify your machine by address Type the IP address of the machine in IP Address and then click Apply or OK Specify your machine by name 4 1 Type the machine node name in Node Name or click Browse and choose the machine you want to use 2 Click OK ...

Page 54: ...nter The default setting is your computer name You can enter any name that you like 5 To avoid receiving unwanted documents type a four digit PIN in the Pin number and Retype Pin number fields If you send scan data to a computer protected by a PIN the machine s LCD prompts you to enter the PIN before the document can be scanned and sent to the computer ...

Page 55: ... Brother machine was added to your network automatically Otherwise add it to your network using ControlCenter2 To use the machine as a network scanner the machine must be configured with a TCP IP address You can set or change the address settings from the Control Panel 1 Click the ControlCenter2 icon in the Dock The ControlCenter2 window appears ...

Page 56: ...repare Your Network 43 4 2 Select Other from the Model pop up menu The Device Selector window appears 3 Click the button The setting window appears 4 Select your machine from the list and then click Add ...

Page 57: ...an Key Setting Select the Scan Key Setting check box to set the following options To scan from the machine s Control Panel to your computer type your computer s name in the Display Name field The name you type will appear as a destination option on your machine s LCD To avoid receiving unwanted scanned documents select the Enable PIN code protection check box type your PIN in the PIN code field an...

Page 58: ... address For information about installing BRAdmin Light from the supplied DVD ROM see the Network User s Guide If you require more advanced machine management use the latest version of BRAdmin Professional 3 utility that is available as a download from http support brother com 1 Click the ControlCenter4 icon in the task tray and then select Open from the menu The ControlCenter4 window appears 2 Cl...

Page 59: ...onfigure the settings for the to PC button on the machine see Change Scan to PC Settings Windows on page 147 ControlCenter4 has two operation modes Home Mode and Advanced Mode You can change the mode at any time Home Mode Lets you access your machine s main functions 1 Document Type option Click to select a document type 2 Custom Settings button Click to configure scan settings 3 Scan Size drop do...

Page 60: ...n Click to scan a document and convert it to text Advanced Mode Gives you more control over the details of your machine s functions You can customize one button scan actions to meet your scanning needs 1 Image button Click to scan a document directly into any graphic viewer editor application 2 OCR button Click to scan a document and convert it to text 3 E mail button Click to scan a document to y...

Page 61: ... from the menu The ControlCenter4 window appears NOTE If the icon is not displayed in the task tray click Brother Utilities on your desktop and then click the drop down list and select your model name if not already selected Click SCAN in the left navigation bar and then click ControlCenter4 2 Click Configuration and then select Mode Select ...

Page 62: ...Scan Using Your Computer 49 5 3 Select Home Mode or Advanced Mode and then click OK ...

Page 63: ...r from the drop down list configure the printer settings and then click OK The scanned document will print For Open with an Application Select the application from the drop down list and then click OK The image appears in the application you have chosen NOTE If you have installed the Evernote application in your computer you can select Evernote from the drop down and then click OK to upload the sc...

Page 64: ...OTE Load only one Carrier Sheet at a time 2 Click the ControlCenter4 icon in the task tray and then select Open from the menu The ControlCenter4 window appears NOTE If the icon is not displayed in the task tray click Brother Utilities on your desktop and then click the drop down list and select your model name if not already selected Click SCAN in the left navigation bar and then click ControlCent...

Page 65: ...the number of scanned pages The scanned image appears in the image viewer NOTE If the Scanning Completed dialog box does not appear and you want to display the number of scanned pages select the Display Scanning Results check box 9 Do one of the following Click the Save button to save the scanned data See Basic Scan on page 50 Click the Print button to print the scanned data See Basic Scan on page...

Page 66: ...r4 icon in the task tray and then select Open from the menu The ControlCenter4 window appears 3 Click the Scan tab 4 Select Custom in the Document Type drop down list and then click the Custom Settings button The Custom Scan Settings dialog box appears 5 Select the Plastic Card Mode check box 6 Configure other settings if needed see Change Scan Settings ControlCenter4 Windows on page 67 ...

Page 67: ... Scan on page 50 Click the Print button to to print the scanned data See Basic Scan on page 50 Click the Open with an Application button to open the scanned data in another application See Basic Scan on page 50 Click the Send E mail button to attach the scanned data to an email See Basic Scan on page 50 Click the OCR button to scan to an editable text file See Basic Scan on page 50 NOTE Plastic Ca...

Page 68: ...con in the task tray and then select Open from the menu The ControlCenter4 window appears 3 Click the Scan tab 4 Select the document type 5 Change the size of your document if needed 6 Configure other settings if needed see Change Scan Settings ControlCenter4 Windows on page 67 7 Click the Scan button The machine starts scanning and then the Scanning Completed dialog box appears and display the nu...

Page 69: ...d then select Open from the menu The ControlCenter4 window appears 3 Click the Scan tab 4 Select the document type 5 Select Business Card from the Scan Size drop down list 6 Configure other settings if needed see Change Scan Settings ControlCenter4 Windows on page 67 7 Click the Scan button The machine starts scanning and then the Scanning Completed dialog box appears and display the number of sca...

Page 70: ...cation The Open with an Application dialog box appears 9 Select BizCard MFC Application from the Target Application drop down list and then click OK The scanned data will be opened in the BizCard 6 application 0 Edit and save the scanned date using BizCard 6 ...

Page 71: ... you have chosen will open with the converted text data For E mail Configure the attached file settings and click Scan Your default email application will open and the image will be attached to a new email For File Select your Scan Location and other settings Click Scan The image will be saved in your chosen folder For Print Select your printer from the drop down list configure the printer setting...

Page 72: ...ntinuous Scanning and 2 sided Scanning as needed 3 Click OK The new settings will be used as the default settings Scan Using the Carrier Sheet 5 1 Load your document into the Carrier Sheet and load the Carrier Sheet into your machine see Receipts Clippings Photos and Other Documents on page 35 NOTE Load only one Carrier Sheet at a time 2 Click the ControlCenter4 icon in the task tray and then sele...

Page 73: ...7 Change other settings if needed see Change Scan Settings ControlCenter4 Windows on page 67 8 Click the Scan button The machine starts scanning NOTE Check the Don t show me again check box to not show the setting dialog box again Scan Plastic Cards 5 1 Load a plastic card see Business Cards and Plastic Cards on page 32 NOTE Load only one plastic card at a time 2 Click the ControlCenter4 icon in t...

Page 74: ...o use Image OCR E mail File or Print The setting dialog box appears the example below uses Image 5 Select the Plastic Card Mode check box 6 Change other settings if needed see Change Scan Settings ControlCenter4 Windows on page 67 7 Click the Scan button The machine starts scanning ...

Page 75: ...canned data to a Microsoft Word file or a Microsoft PowerPoint file on your selected Folder or SharePoint The OCR language is same as the language selected when you installed the ControlCenter4 In order to use this feature your Brother machine must be connected to a network that has access to the Internet through a wireless or Ethernet connection 1 Load your document see Standard size Documents on...

Page 76: ...ion 6 Change other settings if needed see Change Scan Settings ControlCenter4 Windows on page 67 7 Click Scan If a message dialog box regarding the Internet connection appears read the information and click OK Scan Business Cards 5 1 Load your document see Business Cards and Plastic Cards on page 32 2 Click the ControlCenter4 icon in the task tray and then select Open from the menu The ControlCent...

Page 77: ...t BizCard MFC Application from the Target Application drop down list 6 Change other settings if needed see Change Scan Settings ControlCenter4 Windows on page 67 7 Click Scan The scanned data will be opened in the BizCard 6 application 8 Edit and save the scanned date using BizCard 6 ...

Page 78: ...task tray and then select Open from the menu The ControlCenter4 window appears 2 Click Configuration and then select Create custom tab You can also create a custom tab by right clicking the tab area and selecting Create custom tab A custom tab will be created 3 If you want to change the name of custom tab right click the custom tab and select Rename custom tab NOTE You can also change the name of ...

Page 79: ...reate from the menu The settings dialog box appears NOTE You can also copy a custom button by selecting Copy custom button from the menu that appears when you right click on the Custom tab 3 Type the button name and change the settings if needed Click OK The setting options vary depending on the button you creat NOTE You can change or remove the tab button or settings you created Click Configurati...

Page 80: ...must be installed on your computer To save the document as a high compression PDF select 300 x 300 dpi from the Resolution drop down list High Compression PDF pdf from the File Type drop down list and True Gray or 24bit Color from the Scan Type drop down list To save Microsoft Office Word docx or Microsoft Office PowerPoint pptx select E mail or File Yes Yes Yes Yes Target Application Select the d...

Page 81: ...es Resolution Select a scanning resolution from the Resolution drop down list Higher resolutions take more memory and transfer time but produce a finer scanned image Yes Yes Yes Yes Yes Scan Type Select from several color depth options for scanned images Black White Use for text or line art images Gray Error Diffusion Use for photographic images or graphics Error Diffusion is a method for creating...

Page 82: ...gs dialog box If you select a 2 in 1 document size two scanned images will be combined into one document You can select Long Paper when you configure the settings as following Auto Deskew Off 2 sided Scanning Off Each Long Paper option can scan a large document up to following Long Paper Normal Width 8 1 2 in 215 9 mm 8 1 2 34 0 in 215 9 863 0 mm Long Paper Narrow Width 4 1 4 in 107 9 mm 4 1 4 34 ...

Page 83: ...ailable when setting Scan Type to Auto Gray Error Diffusion True Gray or 24bit Color Yes Yes Yes Yes Yes Continuous Scanning Scan multiple pages After the page is scanned you can select to continue scanning or finish Using this method you can scan more pages than the maximum capacity of the ADF Yes Yes Yes Yes Yes 2 sided Scanning If you select this box the machine scans both sides of the document...

Page 84: ...rregular shaped paper clippings NOTE Load only one Carrier Sheet at a time Set the document in the center of the Carrier Sheet and align the top of the document with the top of the Carrier Sheet Yes Yes Yes Yes Yes Plastic Card Mode Scan cards such as driver s licenses or insurance cards using these automatic settings Resolution 600 x 600 dpi Document Size 2 in 1 Auto 2 sided Scanning On Short edg...

Page 85: ...ackground Color Prevents bleedthrough on a two sided document and also allows you to remove the base color of documents such as newspapers to make the scanned data more recognizable 1 Yes Yes Yes Yes Yes Skip Blank Page Removes blank pages of the document from the scanning results 1 Yes Yes Yes Yes Yes Multifeed Detection Uses a ultrasonic sensor to detect when a multifeed has occurred When this f...

Page 86: ...computer For installation information see Scan Using Presto PageManager or TWAIN Applications Macintosh on page 109 E mail Default your default email software Lets you scan a page or document directly into an email application as a standard attachment You can choose the file type and resolution for the attachment File Lets you scan directly to a disk file You can change the file type and destinati...

Page 87: ...g edge binding or Short edge binding To change the application that you want to use choose the appropriate application from the Target Application pop up menu You can add an application to the list by clicking Add If you want to delete an application click Delete 4 Click Start Scanning Your default application will start and display the image NOTE If you choose Secure PDF pdf from the File Type li...

Page 88: ...to OCR dialog box appears 3 Configure the scan settings if needed To scan a 2 sided document select the 2 sided Scanning check box and choose Long edge binding or Short edge binding To change the word processing application that you want to use choose the appropriate application from the Target Application pop up menu You can add an application to the list by clicking Add If you want to delete an ...

Page 89: ...lication from the E mail Application pop up menu You can add an application to the list by clicking Add 1 If you want to delete an application click Delete 1 When you first start ControlCenter2 a default list of compatible email applications appears in the pop up menu If you are having trouble using a custom application with ControlCenter2 you should choose an application from the list 4 Click Sta...

Page 90: ...file name enter the file name you want to use for the document up to 100 characters in the File Name box The file name will be the file name you entered plus the current date and a sequential number Choose the file type for the saved image from the File Type pop up menu You can save the file to the default folder or choose your preferred folder by clicking Browse To show where the scanned image is...

Page 91: ...and Continuous Scanning as needed 3 Click OK The new settings will be used as the default settings Scan Specific and Irregular Sized Documents Using the Carrier Sheet 5 1 Load the Carrier Sheet see Receipts Clippings Photos and Other Documents on page 35 NOTE Load only one Carrier Sheet at a time 2 Click the ControlCenter2 icon in the Dock The ControlCenter2 window appears NOTE If the ControlCente...

Page 92: ...settings dialog box appears the example below uses Image 4 Select the Carrier Sheet Mode check box 5 Select a document size other than Auto from the Document Size pop up menu 6 Change other settings if needed see Change Scan Settings ControlCenter2 Macintosh on page 89 7 Click Start Scanning Your default application will start and display the image ...

Page 93: ...oad only one plastic card at a time 2 Click the ControlCenter2 icon in the Dock The ControlCenter2 window appears 3 Click the SCAN tab and then click the button for the Scan to action you want to change Image OCR E mail or File The settings dialog box appears the example below uses Image 4 Click the Plastic Card Mode check box ...

Page 94: ...application will start and display the image NOTE Click the Don t show me again check box not to show the setting dialog box again Plastic Card Mode automatically uses these settings Resolution 600 x 600 dpi Document Size 2 in 1 Auto 2 sided Scanning On Short edge binding Auto Deskew On Auto Image Rotation Off Multifeed Detection Off Original Layout Scan Result ...

Page 95: ...your Brother machine must be connected to a network that has access to the Internet through a wireless or Ethernet connection 1 Load your document see Standard size Documents on page 30 2 Click the ControlCenter2 icon in the Dock The ControlCenter2 window appears 3 Click the SCAN tab 4 Click the E mail or File button The settings dialog box appears the example below uses E mail ...

Page 96: ...garding the Internet connection appears read the information and click OK 6 Change other settings if needed see Change Scan Settings ControlCenter2 Macintosh on page 89 7 Click Start Scanning Scan Business Cards 5 1 Load your document see Business Cards and Plastic Cards on page 32 2 Click the ControlCenter2 icon in the Dock The ControlCenter2 window appears 3 Click the SCAN tab ...

Page 97: ... 5 Select BizCard 6 from the Target Application pop up menu 6 Change other settings if needed see Change Scan Settings ControlCenter2 Macintosh on page 89 7 Click Start Scanning The scanned data will be opened in the BizCard 6 application 8 Edit and save the scanned date using BizCard 6 ...

Page 98: ... image editor application on your computer as a destination Scan to OCR Converts scanned documents into editable text files You can choose the destination application for the editable text You must install Presto PageManager on your computer For installation information see Scan Using Presto PageManager or TWAIN Applications Macintosh on page 109 Scan to E mail Attaches the scanned images to an em...

Page 99: ...le holding down the Control key and the configuration window appears Follow these guidelines for button configuration Scan to Image OCR E mail File 5 General tab Enter a name in Name for Custom up to 30 characters to create the button name Choose the type of scan from the Scan Action selections ...

Page 100: ...pport Webmail services Use the Scan to Image or Scan to File feature to scan a document or picture and then attach the file of the scanned data to an email message If you choose Secure PDF pdf from the File Type list the Set PDF Password dialog box appears Enter your password in the Password and Re type Password box and then click OK NOTE Secure PDF pdf is available for Scan to Image Scan to E mai...

Page 101: ...e Type pop up menu Save the file to the default folder or choose your preferred folder by clicking the Browse button Choose the Resolution Scan Type Document Size and 2 sided Scanning settings If you want to specify the destination of the scanned image select the Show Save As window check box ...

Page 102: ...used to open scanned data Only applications installed on your computer including Presto PageManager Presto BizCard 6 and Evernote can be selected Add button Add an application to the pop up menu Enter the Application Name up to 30 characters and select your preferred application by clicking the Browse button Also select the File Type from the pop up menu Delete button Delete an application that yo...

Page 103: ... the Resolution pop up menu High Compression PDF pdf from the File Type pop up menu and True Gray or 24bit Color from the Scan Type pop up menu Several file types such as TIFF TIFF Multi Page PDF Secure PDF and JPEG support file size compression Select Uncompressed or Compressed to adjust the file size for TIFF or TIFF Multi Page For PDF Secure PDF and JPEG use the slider to adjust the file size n...

Page 104: ...resolutions take more memory and transfer time but produce a finer scanned image Yes Yes Yes Yes Scan Type Select from a range of scan color depth Black White Use for text or line art images Gray Error Diffusion Use for photographic images or graphics Error Diffusion is a method for creating simulated gray images without using true gray dots Black dots are put in a specific pattern to give a gray ...

Page 105: ...n 1 document size two scanned images will be combined into one document You can select Long Paper when you configure the settings as following Auto Deskew Off 2 sided Scanning Off Yes Yes Yes Yes 2 sided Scanning If you check this box the machine scans both sides of the document When using the automatic 2 sided duplex scan feature you must select Long edge binding or Short edge binding depending o...

Page 106: ...edger document from the Document Size pop up menu Important documents photos contracts Thin paper receipts Irregular shaped paper clippings NOTE Load only one Carrier Sheet at a time Set the document in the center of the Carrier Sheet and align the top of the document with the top of the Carrier Sheet Yes Yes Yes Yes Plastic Card Mode Scan cards such as driver s licenses or insurance cards using t...

Page 107: ... document again Yes Yes Yes Yes Contrast Adjust the setting 0 to 100 to get the best image The default value of 50 represents an average and is usually suitable for most images You can increase or decrease the contrast level by moving the slider to the right or left An increase emphasizes dark and light areas of the image while a decrease reveals more details in gray areas NOTE The Contrast settin...

Page 108: ...lor of documents such as newspapers to make the scanned data more recognizable 1 Yes Yes Yes Yes Skip Blank Page Removes blank pages of the document from the scanning results 1 Yes Yes Yes Yes Multifeed Detection Uses a ultrasonic sensor to detect when a multifeed has occurred When this function detects a multifeed confirm that the data scanned before the multifeed has been saved and then start sc...

Page 109: ...an example using the WIA driver see Scan Using Windows Photo Gallery or Windows Fax and Scan on page 106 NOTE Nuance PaperPort 12SE supports Windows XP SP3 or later Windows Vista SP2 or later Windows 7 Windows 8 and Windows 8 1 The WIA driver with Windows XP SP2 or later does not support 2 sided duplex scanning For more information about the application refer to the Nuance PaperPort 12SE help file...

Page 110: ... 2 Start Nuance PaperPort 12SE Do one of the following Windows XP Windows Vista and Windows 7 Click Start All Programs Nuance PaperPort12 PaperPort Windows 8 and Windows 8 1 Click PaperPort The Nuance PaperPort 12SE window appears ...

Page 111: ...om the Available Scanners list select TWAIN TW Brother ADS XXXXX or TWAIN TW Brother ADS XXXXX LAN where ADS XXXXX is the model name of your machine If you want to use the WIA driver select the Brother driver that has WIA as the prefix Click OK 6 Select the Display scanner dialog box check box in the Scan or Get Photo panel 7 Click the Scan button The Scanner Setup dialog box appears ...

Page 112: ...ettings see page 100 For more information about WIA Driver Settings see page 105 9 From the Document Size drop down list select your document size NOTE After you select a document size you can adjust the scanning area further by clicking the left mouse button and dragging it This is required when cropping an image for scanning 0 Click the Start button The machine starts scanning ...

Page 113: ... Higher resolutions take more memory and transfer time but produce a finer scanned image Scan Image Type Resolution Scan Type Photo Use for scanning photo images 300 x 300 dpi 24bit Color Web Use for attaching the scanned image to web pages 100 x 100 dpi 24bit Color Text Use for scanning text documents 200 x 200 dpi Black White Resolution 100 x 100 dpi 150 x 150 dpi 200 x 200 dpi 300 x 300 dpi 400...

Page 114: ...or most images You can set the Brightness level by dragging the slider to the right or left to lighten or darken the image You can also enter a value in the box to set the level If the scanned image is too light set a lower Brightness level and scan the document again If the image is too dark set a higher Brightness level and scan the document again 6 Contrast Adjust the setting 50 to 50 to get th...

Page 115: ...lect Long edge binding or Short edge binding depending on the layout of your original to make sure that the data file created appears correctly in the scanned document 2 sided Scan Setting Original Layout Scan Result Long edge binding Short edge binding ...

Page 116: ... and remove the base color of documents such as newspapers to make the scanned data more recognizable 3 Auto Deskew Corrects the skew within 5 degrees of the scanned data 4 Detect end of page Detects end of page and automatically adjusts the size of a page when the length of the document is shorter than the Document Size selected This function is available when the document size is a size other th...

Page 117: ... Skip Blank Page Removes blank pages of the document from the scanning results 9 Carrier Sheet Mode Scan the following document types using the Carrier Sheet For this mode you can select any settings other than Auto from the Document Size drop down list Important documents photos contracts Thin paper receipts Irregular shaped paper clippings NOTE Load only one Carrier Sheet at a time Set the docum...

Page 118: ...ally suitable for most images You can set the Brightness level by dragging the slider to the right or left to lighten or darken the image You can also enter a value in the box to set the level If the scanned image is too light set a lower Brightness level and scan the document again If the image is too dark set a higher Brightness level and scan the document again Contrast Adjust the setting 50 to...

Page 119: ... download Windows Photo Gallery or Windows Fax and Scan 1 Load your document 2 Open your software application to scan the document Do one of the following Windows Photo Gallery 1 Click File then Import from Camera or Scanner 2 Select the scanner you want to use 3 Click the Import button The settings dialog box appears Windows Fax and Scan Click File New Scan The settings dialog box appears 3 Adjus...

Page 120: ...Installation screen appears select your model name and then the desired language 3 Click Additional Applications 4 Click the Nuance PDF Converter Professional 8 button Follow the on screen instructions For information about how to scan using Nuance PDF Converter Professional 8 see the Nuance PDF Converter Professional 8 help by clicking on Help on the menu bar then Help NOTE Enter the Nuance seria...

Page 121: ...editing creating and sorting Installing NewSoft Presto BizCard 6 5 1 Insert the supplied DVD ROM into your DVD ROM drive 2 When the Brother Installation screen appears select your model name and then the desired language 3 Click Additional Applications 4 Click the NewSoft Presto BizCard 6 button Follow the on screen instructions For information about how to scan using Presto BizCard 6 see the Pres...

Page 122: ... desktop 3 Double click Brother Support 4 Click Presto PageManager to download the Presto PageManager installer 5 Double click the installer and then follow the on screen instructions NOTE Presto PageManager supports OS X v10 7 5 10 8 x and 10 9 x For more details about the application refer to the Presto PageManager help file You can access this from the Presto PageManager Help menu Scan Using Pr...

Page 123: ...om the Document Size pop up menu select your document size NOTE After you select a document size you can adjust the scanning area further by clicking the left mouse button and dragging it This is required when cropping an image for scanning 5 Click the Start button The machine starts scanning The Brother TWAIN screen supports languages specified in Presto PageManager ...

Page 124: ...tographic images or graphics Error Diffusion is a method for creating simulated gray images without using true gray dots Black dots are put in a specific pattern to give a gray appearance The Brother TWAIN screen supports languages specified in Presto PageManager Resolution Black White Gray Error Diffusion 256 Color True Gray 24bit Color 100 x 100 dpi Yes Yes Yes 150 x 150 dpi Yes Yes Yes 200 x 20...

Page 125: ...by dragging the slider to the right or left to lighten or darken the image You can also enter a value in the box to set the level If the scanned image is too light set a lower Brightness level and scan the document again If the image is too dark set a higher Brightness level and scan the document again NOTE The Brightness setting is only available when setting Scan Type to Black White Gray Error D...

Page 126: ...lect Long edge binding or Short edge binding depending on the layout of your original to make sure that the data file created appears correctly in the scanned document 2 sided Scan Setting Original Layout Scan Result Long edge binding Short edge binding ...

Page 127: ...r http support brother com the ICA driver has been already installed on your computer If you don t see your machine in the Print Fax or Print Scan list you can add your machine by clicking the button see Select your machine from Print Fax or Print Scan on page 117 You can also scan directly using the Image Capture application Scan Using Apple Image Capture 5 1 Launch the Image Capture application ...

Page 128: ...l see the machine in the DEVICES area If connected via wireless or Ethernet LAN you will see it in the SHARED area 3 Load your document 4 Select a size of your document for Scan Size 5 Select the destination folder or destination application for Scan To 6 Click the Scan button The machine starts scanning ...

Page 129: ...ext 2 Resolution Select the resolution you want to scan your document at 3 Scan Size or Size Select the paper size of the document 4 Orientation Select the orientation of the document 5 Duplex Select the Duplex check box to do 2 sided duplex scanning 6 Scan To Select the destination folder or destination application 7 Name Enter the prefix text used for the name of the scanned image 8 Format Selec...

Page 130: ...on Kind that you have chosen Select your machine from Print Fax or Print Scan 5 1 Select System Preferences in the Dock 2 Click the Print Fax icon or the Print Scan icon 3 Select the machine from the list on the left side of the screen NOTE If you do not see the Open Scanner button on the window remove your machine by clicking the button from the Print Fax or Print Scan list and then add your mach...

Page 131: ... modes are available for easy searching editing creating and sorting Installing NewSoft Presto BizCard 6 5 1 Download the full driver and software package from the Brother Solutions Center http support brother com 2 Double click the BROTHER icon on your desktop 3 Double click Brother Support 4 Click Presto BizCard to download the Presto BizCard 6 installer 5 Double click the installer and then fol...

Page 132: ...and Captiva QuickScan Pro 5 1 Insert the supplied DVD ROM into your DVD ROM drive 2 The DVD ROM top menu appears automatically Select your model name and then the desired language 3 Click Custom Installation 4 Click the ISIS Scanner Driver Application button 5 Click the ISIS Scanner Driver button Follow the on screen instructions 6 Click the Captiva QuickScan Pro Trial button Follow the on screen ...

Page 133: ... 1 Start the ControlCenter application Windows 1 Click the ControlCenter4 icon in the task tray and then select Open from the menu The ControlCenter4 window appears 2 Click the Device Settings tab the example below uses Home Mode Scan Using the Control Panel 6 ...

Page 134: ...the Scan to PC Settings button The Remote Setup window appears the example below uses Windows 3 Select a Scan to action you want to assign Image OCR E mail or File from the pop up menu 4 Click OK to close the Remote Setup window 5 Change other settings if needed see Change Scan to PC Settings Windows on page 147 or Change Scan to PC Settings Macintosh on page 154 ...

Page 135: ... Press the Scan to action you want to do and then OK 6 Press a or b to display the destination computer you want to save on Press the destination computer 7 Press Start The machine starts the scanning process NOTE You can configure the Scan to settings from your computer See Change Scan to PC Settings Windows on page 147 or Change Scan to PC Settings Macintosh on page 154 If you want to save the s...

Page 136: ...n a USB Flash Drive 6 ADS 2000e 1 Start the ControlCenter application Windows 1 Click the ControlCenter4 icon in the task tray and then select Open from the menu The ControlCenter4 window appears 2 Click the Device Settings tab the example below uses Home Mode ...

Page 137: ...Center2 window appears 2 Click the DEVICE SETTINGS tab 2 Click the Remote Setup button The Remote Setup window appears 3 Select Scan to USB in the folder tree and then configure scan settings as needed the example below uses Windows 4 Click Apply and then OK 5 Insert a USB flash drive into the machine ...

Page 138: ...p Blank Page as needed Press OK NOTE To select Long Paper up to 34in for Document Size use these settings Auto Deskew Off 2 sided Scan Off If you want to save the settings as a new default press Set New Default If you want to restore all settings to the factory settings press Factory Reset 7 Press Start The machine starts scanning and then the scanned data is saved on the USB flash drive NOTE If y...

Page 139: ...age Viewer for Android 1 Connect the machine to a mobile device with a USB cable that came with your mobile device NOTE The mobile device must be turned on before connecting to the machine 2 Load your document If your machine is ADS 2000e go to 3 If your machine is ADS 2500We go to 4 3 ADS 2000e Press the Scan to USB key The machine starts scanning and then the scanned data is saved on the mobile ...

Page 140: ...u want to restore all settings to the factory settings press Factory Reset 6 Press Start The machine starts scanning and then the scanned data is saved on the mobile device NOTE If you want to save the settings as a shortcut press Save as Shortcut For more information see Scanner Shortcuts ADS 2500We only on page 160 ...

Page 141: ...r Windows and Safari 5 0 for Macintosh Also make sure that JavaScript and Cookies are always enabled in whichever browser you use If a different web browser is used make sure it is compatible with HTTP 1 0 and HTTP 1 1 Start Web Based Management 6 Type http xxx xxx xxx xxx where xxx xxx xxx xxx is the IP address of your machine into your browser You can configure or change the settings in Scan to ...

Page 142: ...ser Defined File Name enter a file name in one of the two user defined fields and click Submit A maximum of 15 characters can be entered in each of the user defined name fields NOTE Do not use unsuitable characters in the file name for example or They may cause a sending error when using Scan to FTP ...

Page 143: ...ain name of the FTP server Enter the Host Address for example ftp example com up to 64 characters or the IP address for example 192 23 56 189 3 Enter the Username that has been registered with the FTP server for the machine up to 32 characters 4 Enter the Password for access to the FTP server up to 32 characters 5 Enter the destination folder where your document will be stored on the FTP server fo...

Page 144: ... scanned data If you select Secure PDF the machine will ask you to enter a 4 digit password using numbers 0 9 before it starts scanning If you select Signed PDF you must install a certificate to your machine using Web Based Management Select Signed PDF from Administrator in Web Based Management See the Network User s Guide PDF A is a PDF file format intended for long term archiving This format con...

Page 145: ...lect other than Auto XXX dpi XXX is a value of the quality for Quality and Auto Deskew is set to Off You can select A4 Letter Legal B5 A5 B6 A6 Business Card or Long Paper when you select other than Auto XXX dpi for Quality when Auto Deskew is set to Off You can select Long Paper when you configure the settings as following Quality other than Auto Auto Deskew Off Skip Blank Page Off 2 sided Scan O...

Page 146: ...e is complete go to 7 If the Scan to FTP profile is not complete go to 5 5 Press Options 6 Choose the settings for 2 sided Scan Scan Type Resolution File Type Document Size File Size Auto Deskew Skip Blank Page and User Name as needed Press OK NOTE If you want to save the profile as a shortcut press Save as Shortcut 7 Press Start The LCD displays Connecting When the connection to the FTP server is...

Page 147: ... THE Network User s Guide We recommend Microsoft Internet Explorer 8 0 9 0 Also make sure that JavaScript and Cookies are always enabled in whichever browser you use If a different web browser is used make sure it is compatible with HTTP 1 0 and HTTP 1 1 Type http xxx xxx xxx xxx where xxx xxx xxx xxx is the IP address of your machine into your browser You can configure or change the settings in S...

Page 148: ...Using the Control Panel 135 6 NOTE Do not use unsuitable characters in the file name for example or They may cause a sending error when using Scan to Network Configure the Scan to Network Default Settings 6 ...

Page 149: ...be stored on the CIFS server for example brother abc up to 60 characters 6 Follow the steps from 8 to 9 of Configure the FTP Default Settings on page 130 7 If you want to protect the profile choose On from Use PIN for Authentication and enter a 4 digit PIN number in PIN Code 8 Choose the authentication method You can choose Auto Kerberos or NTLMv2 If you choose Auto the authentication method will ...

Page 150: ...mplete go to 5 5 Press Options 6 Choose the settings for 2 sided Scan Scan Type Resolution File Type Document Size File Size Auto Deskew Skip Blank Page and User Name as needed Press OK NOTE If you choose Secure PDF for File Type the machine will ask you to enter a 4 digit password using numbers 0 9 before it starts scanning If you choose Signed PDF for File Type you must install and then configur...

Page 151: ...ur Brother machine are different 1 Load your document 2 Swipe left or right or press d or c to display Scan 1 3 Press to PC 4 Press d or c to display WS Scan 5 Press WS Scan and then OK 6 Press the type of scan you want to do 7 Press a or b to display the destination computer you want to send to Press the destination computer 8 Press Start The machine starts scanning process Configuring Settings f...

Page 152: ... Default 4 Click Edit The Edit Default Profile dialog box appears 5 Choose the Source Paper size Color format File type Resolution Brightness and Contrast settings 6 Click Save Profile The settings will be applied when scanning using the Web Services protocol NOTE If you are requested to choose a software application to scan choose Windows Fax and Scan or Windows Photo Gallery from the list ...

Page 153: ...t the same time 5 Press OK and then do one of the following If you want to use the default settings go to 8 If you want to change the default settings go to 6 6 Press Options 7 Select the settings for 2 sided Scan Scan Type Resolution File Type Document Size Auto Deskew and Skip Blank Page as needed Press OK NOTE If you want to save the settings as a new default press Set New Default If you want t...

Page 154: ...ress a or b until you find the name you are looking for 7 Press the name from the result 8 Press Apply NOTE If you want to register an email address in the Address Book see Set Up the Address Book ADS 2500We only on page 142 You can select up to 300 email addresses from the Address Book and enter up to 50 email addresses manually The scanned data will be sent to all of the addresses at the same ti...

Page 155: ...or right or press d or c to display Scan 2 2 Press to E mail Server 3 Press Address Book 4 Press Edit 5 Press Add New Address 6 Press Name 7 Enter a name and then press OK 8 Press Address 9 Enter an email address and then press OK 0 Press OK Change an email Address 6 1 Swipe left or right or press d or c to display Scan 2 2 Press to E mail Server 3 Press Address Book 4 Press Edit 5 Press Change 6 ...

Page 156: ...hen press OK D Press OK NOTE The LCD displays a list of shortcuts using the email address you changed The shortcut settings will automatically change Delete an email Address 6 1 Swipe left or right or press d or c to display Scan 2 2 Press to E mail Server 3 Press Address Book 4 Press Edit 5 Press Delete 6 Press a or b until you find the email address you want to delete 7 Press the email address P...

Page 157: ...il you find the email address you want to add to the group 0 Press the email address and then OK A Press OK Change a Group 6 You can rename a group add an email address to the group and delete an email address from the group 1 Swipe left or right or press d or c to display Scan 2 2 Press to E mail Server 3 Press Address Book 4 Press Edit 5 Press Change 6 Press a or b until you find the group you w...

Page 158: ...or b until you find the email address you want to add or delete C Press the email address D Press OK Delete a Group 6 1 Swipe left or right or press d or c to display Scan 2 2 Press to E mail Server 3 Press Address Book 4 Press Edit 5 Press Delete 6 Press a or b until you find the group name you want to delete 7 Press the group name and then OK 8 Press Yes ...

Page 159: ...Scan Using the Control Panel 146 6 Upload Scanned Documents to the Web ADS 2500We only 6 Scan to Web lets you scan a document and upload it directly to Web Services See the Web Connect Guide ...

Page 160: ...s in this guide are from Windows 7 Screens on your computer may vary depending on your operating system If the icon is not displayed in the task tray click Brother Utilities on your desktop and then click the drop down list and select your model name if not already selected Click SCAN in the left navigation bar and then click ControlCenter4 2 Click the Device Settings tab the example below uses Ho...

Page 161: ...48 6 3 Click the Device Scan Settings button The Device Scan Settings dialog box appears 4 Click the tab for the Scan to action you want to change Image OCR E mail or File 5 Change the settings The following settings can be changed ...

Page 162: ...upport file size compression Select Uncompressed or Compressed to adjust the file size for TIFF or TIFF Multi Page For PDF Secure PDF and JPEG use the slider to adjust the file size not available for Scan to OCR Yes Yes Yes Yes Target Application Select the destination application from the drop down list Yes Yes OCR Language Set to match the language of the scanned document s text Yes File Name Cl...

Page 163: ...uction it requires the most memory and has the longest transfer time Auto Uses suitable colors for your document automatically Yes Yes Yes Yes Document Size Document size is set to Auto by default You can scan documents of any size without making any adjustments to Document Size For faster scan speeds you can select the exact size of your document from the Document Size drop down list NOTE If you ...

Page 164: ...enter a value in the box to set the Contrast NOTE The Contrast setting is only available when setting Scan Type to Auto Gray Error Diffusion True Gray or 24bit Color Yes Yes Yes Yes Default Restore all settings to their factory default values Yes Yes Yes Yes Carrier Sheet Mode Scan the following documents using the Carrier Sheet For this mode you can select any setting other than Auto from the Doc...

Page 165: ...n to 600 dpi and Multifeed Detection to Off Load only one plastic card at a time Yes Yes Yes Yes Setting Description Applicable Feature Image OCR E mail File Auto Deskew Corrects the skew within 5 degrees of the scanned data Yes Yes Yes Yes Auto Image Rotation Changes the direction of the document based on the text orientation Yes Yes Yes Yes Bleed Through Prevention Remove Background Color Preven...

Page 166: ...ltifeed has occurred When this function detects a multifeed confirm that the data scanned before the multifeed has been saved and then start scanning again at the next page or the beginning of the document Yes Yes Yes Yes Display Scanning Results Shows the numbers of total pages saved and blank pages skipped on your computer screen Yes Yes Yes Yes Setting Description Applicable Feature Image OCR E...

Page 167: ...ontrolCenter2 icon in the Dock The ControlCenter2 window appears 2 While holding down the Control key click a button for the Scan to action you want to change Image OCR E mail or File The Scan to action setting dialog box appears the example below uses Image 3 Click the Device Button tab ...

Page 168: ...enter the password in the Set PDF Password dialog box Searchable PDF is a file format that includes the text data layer over a scanned image This layer allows you to search the text on the image data The OCR language setting must be set to match the language you want to make the searchable PDF for To save the document as a searchable PDF select Searchable PDF pdf from the File Type drop down list ...

Page 169: ...rom the Resolution pop up menu Higher resolutions take more memory and transfer time but produce a finer scanned image Yes Yes Yes Yes Scan Type Select from a range of scan color depth Black White Use for text or line art images Gray Error Diffusion Use for photographic images or graphics Error Diffusion is a method for creating simulated grey images without using true grey dots Black dots are put...

Page 170: ...ng Auto Deskew Off 2 sided Scanning Off Yes Yes Yes Yes Restore Defaults Restore all settings to their factory default values Yes Yes Yes Yes Carrier Sheet Mode Scan the following documents using the Carrier Sheet For this mode you can select any setting other than Auto from the Document Size pop up menu Large sized Documents A3 B4 and Ledger Fold the document in half and insert it in the Carrier ...

Page 171: ...tings set Plastic Card Mode off Resolution to 600 dpi and Multifeed Detection to Off Load only one plastic card at a time Yes Yes Yes Yes Setting Description Applicable Feature Image OCR E mail File Brightness Adjust the setting 0 to 100 to get the best image The default value of 50 represents an average and is usually suitable for most images You can set the Brightness level by dragging the slide...

Page 172: ... that you want to remove Yes Yes Yes Yes Auto Deskew Corrects the skew within 5 degrees of the scanned data Yes Yes Yes Yes Auto Image Rotation Changes the direction of the document based on the text orientation Yes Yes Yes Yes Bleed Through Prevention Remove Background Color Prevents bleedthrough on a two sided document and also allows you to remove the base color of documents such as newspapers ...

Page 173: ...pdates or announcements about Brother Web Connect features will be displayed on the LCD Read the information and then press OK 5 Do one of the following to USB 1 Press Options 2 Configure the following settings 2 sided Scan Scan Type Resolution Document Size File Name File Size Auto Deskew Skip Blank Page 3 Press OK to PC File to PC OCR to PC Image and to PC E mail 1 Select the type of scan and th...

Page 174: ...diately start the configured operation and not prompt you to change any settings A One Touch Shortcut is made in green color 0 Press OK Edit Rename or Delete a Shortcut 6 1 Press Shortcuts 2 Press the shortcut that you want to edit for one second 3 Do one of the following Edit Follow the step 5 on page 160 Follow the step 9 on page 161 to save this as a One Touch Shortcut Not available for Scan to...

Page 175: ...lect your model name if not already selected Click Tools in the left navigation bar and then click Status Monitor The Brother Status Monitor screen appears 1 Troubleshooting Click to access the Status Monitor troubleshooting web site 2 Visit the Genuine Supplies website Click to access the Brother genuine supplies web site 3 Pick up Roller Count Displays Pick up Roller use 4 Separation Pad Count D...

Page 176: ...error notifications Status Monitor Indicators 7 The Brother Status Monitor icon changes color based on your machine s status A green icon indicates that your scanner is in a normal stand by state A yellow icon indicates a warning A red icon indicates an error has occurred A gray icon indicates that your scanner is offline ...

Page 177: ...cintosh 7 The Status Monitor utility is a configurable software tool for monitoring the status of a device allowing you to get immediate notification of error messages such as document jam 1 Click the ControlCenter2 icon in the Dock The ControlCenter2 window appears 2 Click the DEVICE SETTINGS tab ...

Page 178: ... Click to access the troubleshooting web site by clicking the Troubleshooting button 2 Visit the Genuine Supplies website Click to access the Brother genuine supplies web site by clicking the Visit the Genuine Supplies website button 3 Pick up Roller Count Displays the Pick up Roller replacement cycle 4 Separation Pad Count Displays the Separation Pad replacement cycle 1 2 3 4 ...

Page 179: ...Off ControlCenter2 7 1 Click the ControlCenter2 icon in the Dock The ControlCenter2 window appears 2 Click Configuration and then select Preferences The ControlCenter2 Preferences window appears 3 Select or clear the Start ControlCenter on computer startup check box 4 Click OK ...

Page 180: ... box appears Remote Setup will not start Correct the error and then try to start Remote Setup again Windows If your computer is protected by a firewall and is unable to use Remote Setup you may need to configure the firewall settings to allow communication through port number 137 and 161 If you are using Windows Firewall and you installed MFL Pro Suite from the DVD ROM the necessary Firewall setti...

Page 181: ...mote Setup window appears NOTE You can also start Remote Setup by following the instructions below Windows Click Brother Utilities on your desktop and then click the drop down list and select your model name if not already selected Click Tools in the left navigation bar and then click Remote Setup Macintosh In the Finder menu bar click Go Applications Brother and then double click the Remote Setup...

Page 182: ...n Windows OK Click to start uploading data to the machine and exit the Remote Setup application If an error message is displayed re enter the correct data and then click OK Cancel Click to exit the Remote Setup application without uploading data to the machine Apply Click to upload data to the machine without exiting the Remote Setup application ADS 2000e ...

Page 183: ...If you are using Windows Firewall and you installed MFL Pro Suite from the DVD ROM the necessary Firewall settings have already been made Macintosh If you need to change the machine that was registered to your computer during the installation of Full Driver Software Package see the Quick Setup Guide or if the network environment has changed you must specify the new machine Open the Device Selector...

Page 184: ...of the machine with a dry soft lint free cloth to remove dust 2 Open the Top Cover Wipe the Control Panel with a dry soft lint free cloth to remove dust 3 Close the Top Cover 4 Pull the Output Tray a out and unfold the Document Stopper s Routine Maintenance 8 1 2 ...

Page 185: ...Routine Maintenance 172 8 5 Wipe the inside of the Output Tray with a dry soft lint free cloth to remove dust 6 Fold the Document Stopper a and firmly insert the Output Tray s into the machine 1 1 2 ...

Page 186: ...y scans Clean the inside of the scanner if a vertical line appears in the scanned data or if areas are missing in the scanned data 1 Unplug the machine from the AC power outlet 2 Open the Top Cover a and the Front Cover s 3 In the ADF unit clean the glass strips a s with a soft lint free cloth moistened with water a s a s ...

Page 187: ...s a on the inside of the Front Cover and then pull the Separation Pad Cover s down IMPORTANT Be careful when touching the Separation Pad and its surrounding area in the machine Otherwise you could cause injury to you and serious damage to the machine s a ...

Page 188: ... Pad s upward 6 Clean the Separation Pad with a soft lint free cloth slightly moistened with water 7 Attach the Separation Pad to the Separation Pad Cover 8 Securely close the Separation Pad Cover until the hooks fit into the Front Cover 9 Hold both sides of the Pick up Roller Cover a and pull the cover down a s a ...

Page 189: ...has a narrow opening and the shape of the shaft of the Pick up Roller matches this opening Rotate the Pick up Roller until you can fit the shaft into the opening of the holder B Pinch and pull the Pick up Roller out of the machine C Clean the Pick up Roller with a soft lint free cloth slightly moistened with water a ...

Page 190: ...nto the machine NOTE Confirm the left and right sides of the Pick up Roller before attaching it E Slide the Pick up Roller a to the left edge while turning the Pick up Roller F Close the Pick up Roller Cover G Close the Front Cover and the Top Cover L R a ...

Page 191: ...ything on it If you feel dirt or debris clean the glass again concentrating on that area You may need to repeat the cleaning process three or four times To test scan a document after each cleaning attempt When there is a spot of dirt or correction fluid on the glass strip the scanned sample shows a vertical line After the glass strip is cleaned the vertical line is gone ...

Page 192: ...tects that supplies are near the end of their life Part Names Numbers and Life Cycles 8 No Part Name Part No Standard Replacement Cycle 1 Separation Pad SP A0001 50 000 sheets 2 Pick up Roller PUR A0001 50 000 sheets 3 Carrier Sheet CS A3001 500 times 4 Plastic Card Carrier Sheet CS CA001 500 times ...

Page 193: ...ou cannot find the part you need and you have a Visa MasterCard Discover or American Express credit card you can order parts directly from Brother Visit us online for a complete selection of the Brother parts and supplies that are available for purchase NOTE In Canada only Visa and MasterCard are accepted In USA 1 877 552 MALL 1 877 552 6255 1 800 947 1445 fax http www brothermall com In Canada ht...

Page 194: ...S 2000e 8 Start the Status Monitor application Windows Double click the Status Monitor icon in the task tray The Status Monitor window appears Macintosh 1 Click the ControlCenter2 icon in the Dock The ControlCenter2 window appears 2 Click the DEVICE SETTINGS tab ...

Page 195: ... replace the used parts with new ones Check Supplies Replacement Cycle ADS 2500We 8 1 On the scanner s LCD press 2 Press a or b to display Machine Info 3 Press Machine Info 4 Press Usage Counters The LCD displays Separation Pad Count and Pick up Roller Count NOTE If the LCD indications warn you to replace the Separation Pad and or the Pick up Roller order the necessary parts and then replace the u...

Page 196: ...nts how many times the machine has scanned When the machine scans 50 000 times the Status Monitor displays a message to remind you to replace the Separation Pad 1 Open the Top Cover a and the Front Cover s 2 Press and hold the buttons a on the inside of the Front Cover and then pull the Separation Pad Cover s down a s s a ...

Page 197: ... Otherwise you could cause injury to you and serious damage to the machine 3 Press and hold the green buttons a of the Separation Pad and then pull the Separation Pad s upward 4 Attach a new Separation Pad to the Separation Pad Cover 5 Securely close the Separation Pad Cover until the hooks fit into the Front Cover a s ...

Page 198: ...atus Monitor has been cleared The LCD or LED indications does not indicate Replace Pad and Replace Parts Replace the Pick up Roller 8 Your machine is equipped with a scan counter that automatically counts how many times the machine has scanned When the machine scans 50 000 times the Status Monitor displays a message to remind you to replace the Pick up Roller 1 Open the Top Cover a and the Front C...

Page 199: ... right 4 The holder of the Pick up Roller has a narrow opening and the shape of the shaft of the Pick up Roller matches this opening Rotate the Pick up Roller until you can fit the shaft into the opening of the holder 5 Pinch and pull the Pick up Roller out of the machine a ...

Page 200: ... up Roller 8 Close the Pick up Roller Cover 9 Close the Front Cover and the Top Cover 0 Reset the counter see Reset the Usage Counters ADS 2000e on page 188 NOTE Confirm the following The value of Pick up Roller Count is 0 see Check Supplies Replacement Cycle ADS 2000e on page 181 The error message on the Status Monitor has been cleared The LCD or LED indications does not indicate Replace Roller a...

Page 201: ...ick the ControlCenter4 icon in the task tray and then select Open from the menu The ControlCenter4 window appears 2 Click the Device Settings tab the example below uses Home Mode Macintosh 1 Click the ControlCenter2 icon in the Dock The ControlCenter2 window appears 2 Click the DEVICE SETTINGS tab ...

Page 202: ...ation Pad check box To reset the Pick up Roller counter select the Pick up Roller check box 5 Click Apply 6 Click OK Reset the Usage Counters ADS 2500We 8 1 On your scanner s LCD press 2 Press a or b to display Machine Info 3 Press Machine Info 4 Press Usage Counters 5 Do one of the following To reset the Separation Pad counter press Separation Pad Count To reset the Pick up Roller counter press P...

Page 203: ... came with your machine If you do not pack the machine correctly any damage that may occur in transit may not be covered by your warranty The machine should be adequately insured with the carrier 1 Close the Panel Cover gently 2 Fold the Document Stopper into the Output Tray and firmly push the Output Tray into the machine ...

Page 204: ...ginal carton with the original packing material as shown below NOTE If you are returning your machine to Brother as part of the Exchange Service pack only the machine Keep all separate parts power cord Carrier Sheet and USB cable and printed materials to use with your Exchange machine 5 Close the carton and tape it shut ...

Page 205: ... Monitor or the LCD of the machine ADS 2500We only You can correct most errors and clear routine maintenance messages by yourself If you need more help the Brother Solutions Center offers the latest FAQs and troubleshooting tips Visit http support brother com NOTE For ADS 2000e users only See also LED Indications ADS 2000e only on page 213 Troubleshooting 9 Error message Cause Action Out of Memory...

Page 206: ...d you are scanning a document that contains multiple page sizes insert narrow pages straight and as close to the center of the machine as possible If the document will not be fed straight use Continuous Scanning Confirm the settings See Important in Document Jam on page 195 Clean the Pick up Roller and Separation Pad See Clean the Scanner on page 173 Multifeed Multiple pages were fed at the same t...

Page 207: ...FTP or Scan to Network See Scan Documents to an FTP Server ADS 2500We only on page 128 or Scan Documents to a Shared Folder Network Location Windows ADS 2500We only on page 134 No Certificate ADS 2500We only The certificate does not exist or is corrupted Configure the settings under Signed PDF in the Administrator tab in Web Based Management See Scan Documents to an FTP Server ADS 2500We only on p...

Page 208: ... is not jammed 2 Open the Front Cover by pinching the Cover Release Lever a 3 Pull the jammed document out of the machine NOTE Check for ripped paper inside the machine Remove any ripped paper you find inside the machine 4 Close the Front Cover 5 Press any button ADS 2000e or ADS 2500We NOTE When clearing the multifeed confirm that the data scanned before the multifeed was detected has been saved ...

Page 209: ...lean the Separation Pad and Pick up Roller To clean the Separation pad see Replace the Separation Pad on page 183 for instructions on how to pull the Separation Pad out from the machine Clean the rubber side of the Separation Pad with a soft lint free cloth moistened with water and then put the Separation Pad back into the machine To clean the Pick up Roller see Clean the Scanner on page 173 Stagg...

Page 210: ...ment Size When you scan from your PC Change Scan Settings ControlCenter4 Windows on page 67 Change Scan Settings ControlCenter2 Macintosh on page 89 When you scan from the machine ADS 2500We Confirm the following settings on the LCD Scan to USB FTP Network email Server 2 sided Scan Off Scan Type Color or Black and White Auto Deskew Off Skip Blank Page Off Scan to PC 2 sided Scan Off Auto Deskew Of...

Page 211: ...IA driver is chosen as the primary source in your scanning application For example in Nuance PaperPort 12SE click Scan Settings and then Select to select the Brother TWAIN WIA driver TWAIN errors appear when starting to scan Macintosh TWAIN driver has not been chosen as the primary source in your scanning application Make sure the Brother TWAIN driver is chosen as the primary source In Presto Page...

Page 212: ...s possible If the document does not stay straight while feeding use Continuous Scanning Set Auto Deskew to On The scan speed is too slow The resolution is not suitable for your document Decrease the scanner resolution Set scan size to a setting other than Auto The document was not fed Paper dust has accumulated on the surface of the Pick up Roller or Separation Pad Too many documents are loaded in...

Page 213: ...Separation Pad and Pick up Roller To clean the Separation pad see Replace the Separation Pad on page 183 to refer how to pull the Separation Pad out from the machine clean the rubber side of the Separation Pad with a soft lint free cloth moistened with water and then attach the Separation Pad in the machine To clean the Pick up Roller see Clean the Scanner on page 173 Clean the glass strips inside...

Page 214: ...t Skip Blank Page to off and set Scan Type to an option other than Auto Then you can select Long Paper for the document size Long Paper Jam on page 197 Cannot set Auto Deskew to On when trying to scan using Scan to USB The document size is set to an option other than Auto Set the document size to Auto A multifeed occurs The document is not loaded properly Load your document properly see Standard s...

Page 215: ...ote Setup See Set Up the Brother Machine from Your Computer on page 167 Cannot change the settings by using Web Based Management ADS 2500We only Setting Lock is set to ON Set Setting Lock to Off See Turn Setting Lock On Off on page 20 Cannot save the settings in Remote Setup or Web Based Management The machine is processing The machine is being configured from the machine s Control Panel Wait unti...

Page 216: ...cannot be installed Windows users If the Security Software warning appears on the computer screen during the installation change the Security Software settings to permit the Brother product setup program or other program to run Macintosh users If you are using a firewall function of anti spyware or antivirus security software temporarily disable it and then install the Brother software Cannot conn...

Page 217: ...olCenter application Windows 1 Click the ControlCenter4 icon in the task tray and then select Open from the menu The ControlCenter4 window appears 2 Click the Device Settings tab the example below uses Home Mode Macintosh 1 Click the ControlCenter2 icon in the Dock The ControlCenter2 window appears ...

Page 218: ...mote Setup window appears 3 Select Machine Info in the folder tree The window will display the Serial Number the example below uses Windows Check the Serial Number ADS 2500We 9 1 On your scanner s LCD press 2 Press Machine Info 3 Press Serial No The LCD will display the machine s serial number ...

Page 219: ...ctory settings Address Book ADS 2500We only You can reset the Address Book setting All Settings You can restore all settings to the factory settings Brother strongly recommends performing this procedure before transferring or disposing of the machine NOTE Unplug the interface cable before you choose Network or All Settings Reset the Machine ADS 2500We only 9 1 Press 2 Press a or b to display Initi...

Page 220: ...Hz Latin American Countries 220 240 V AC 50 60 Hz Power Consumption 2 Scanning 3 Approx 18 W Ready 4 Approx 1 5 W Sleep Approx 1 5 W Power Down Approx 0 3 W Memory Capacity Standard 256 MB Power Source USA 100 120 V AC 50 60 Hz Latin American Countries 220 240 V AC 50 60 Hz Touchscreen LCD Liquid Crystal Display Touchscreen 3 7 in 93 4 mm TFT Color LCD 1 Power Consumption 2 Scanning 3 Approx 20 W ...

Page 221: ...9 lb 3 6 kg ADS 2500We Temperature Operating 41 to 95 F 5 to 35 C Humidity Operating 20 to 80 ADF automatic document feeder Up to 50 pages Paper 20 lb 80 g m2 Legal size or less than 0 2 in 5 mm 11 8 in 299 mm 7 1 in 179 mm 8 7 in 220 mm 11 8 in 299 mm 19 4 in 493 mm 12 1 in 306 mm ...

Page 222: ... 6 mm Single Paper Width 2 0 to 8 5 in 51 to 215 9 mm Length 2 76 to 34 0 in 70 to 863 mm Color Black Yes Yes TWAIN Compliant Windows Windows XP 1 Windows Vista Windows 7 Windows 8 Windows 8 1 Macintosh OS X v10 7 5 10 8 x 10 9 x 2 WIA Compliant Windows Windows XP 1 Windows Vista Windows 7 Windows 8 Windows 8 1 ICA Compliant Macintosh OS X v10 7 5 10 8 x 10 9 x 2 ISIS Compliant Windows Windows XP ...

Page 223: ...nagement use the latest Brother BRAdmin Professional utility version that is available as a download from http support brother com USB Hi Speed USB 2 0 1 2 Use a USB 2 0 cable Type A B that is no more than 6 feet 2 0 meters long LAN 3 ADS 2500We only Use an Ethernet UTP cable category 5 or later Wireless LAN ADS 2500We only IEEE 802 11b g n Infrastructure Ad hoc Mode LAN You can connect your machi...

Page 224: ...valent 64 bit Intel 64 or AMD64 supported CPU 512 MB 1 GB 500 MB 1 0 GB Windows 7 2 Windows 8 2 Windows 8 1 2 1 GB 32 bit 2 GB 64 bit 1 GB 32 bit 2 GB 64 bit 650 MB 1 0 GB Macintosh Operating System OS X v10 7 5 OS X v10 8 x OS X v10 9 x Scanning USB 1 10 100Base TX Ethernet Wireless 3 802 11b g n Intel Processor 2 GB 2 GB 80 MB 1 0 GB Conditions 1 Third party USB ports are not supported 2 Nuance ...

Page 225: ...nter a space press Space Or you can press c to move the cursor NOTE The characters that are available may differ depending on your country Making corrections B If you entered an incorrect character and want to change it press d to move the cursor to highlight the incorrect character and then press Enter the correct character You can also back up and insert letters Press for each character you want...

Page 226: ...e illustrations in this chapter or The LED is off or or The LED is on or or The LED is blinking LEDs Machine Status Ready The machine is ready to scan Ready PC connected The machine is ready to scan and connected to your computer Ready USB connected The machine is ready to scan and connected to a USB device ...

Page 227: ...he following to wake up the machine Press any key Open the Top Cover Load your document The machine will enter Ready Mode Remote Setup Remote Setup is in process To cancel Remote Setup click the Cancel button in the Remote Setup window on your computer Scanning to PC Scan to your computer is in process NOTE The Scan to USB LED lights up when the USB flash drive is connected to the machine LEDs Mac...

Page 228: ...cting paper If there is no document loaded in the ADF or the paper ejection was temporarily stopped press the Stop button to finish ejecting the paper Checking Device The machine is checking the connected USB device NOTE The Scan to PC LED lights up when your computer is connected to the machine Downloading Firmware The machine is downloading the latest firmware LEDs Machine Status ...

Page 229: ...lace the Pick up Roller with a new one See Replace the Pick up Roller on page 185 Replace Separation Pad and Pick up Roller Replace the Separation Pad and the Pick up Roller with new ones See Replace the Separation Pad on page 183 and Replace the Pick up Roller on page 185 Front Cover is Open Close the Front Cover of the machine LEDs Machine Status ...

Page 230: ...Center2 Macintosh on page 89 See Change Scan to PC Settings Windows on page 147 See Change Scan to PC Settings Macintosh on page 154 Out of Memory The machine memory is full and the machine cannot scan the entire document To clear the error do one of the following Press any button Turn the machine off and then on by unplugging the machine from the AC power outlet and then plugging the machine in a...

Page 231: ... to PC Settings Windows on page 147 See Change Scan to PC Settings Macintosh on page 154 Confirm that the data scanned before the multifeed occurred has been saved and start scanning again from the next page or from the beginning NOTE The data scanned before the multifeed occurred is not saved when scanning using the Scan to USB key on the control panel unless the file type is JPEG Unusable USB De...

Page 232: ...is write protected Remove the protected USB flash drive press any button and then do one of the following Turn off the USB flash drive s write protection and then try again Use a USB flash drive that has write protection turned off Too Many Files Your machine cannot save to a USB flash drive if it contains too many files Remove the USB flash drive press any key and then do one of the following Del...

Page 233: ...gs Windows on page 147 See Change Scan to PC Settings Macintosh on page 154 See Save Scanned Documents on a USB Flash Drive on page 123 All Blank Page Skipped All scanned pages were skipped as blank pages Press any button and then and then do one of the following Place your document face down top edge first in the ADF Set Blank Page Skip to off by doing one of the following See Change Scan Setting...

Page 234: ...t cleared after turning the machine off and then on press Scan to PC and then Scan to USB The LEDs will light up as shown in the table below to identify the error LED Error Indication B 1 When pressing the Scan to PC key the LEDs will light up as shown in the table above 2 When pressing the Scan to USB key the LEDs will light up as shown in the table above Error Code Error Indicator Power Indicato...

Page 235: ...ndication below indicates the error code 0xA7 Make a note of the error code referring to the table above and report the code to your dealer or to Brother Customer Service When pressing the Scan to PC key When pressing the Scan to USB key ...

Page 236: ...96 L LCD Liquid Crystal Display Brightness 14 Dim Timer 14 M Memory Storage 15 N Nuance PaperPort 12SE Windows 96 P Power Failure 15 Presto PageManager Macintosh 109 R Remote Setup 167 S Scan Macintosh ICA Compliant 114 Presto PageManager 109 TWAIN Compliant 109 Windows Nuance PaperPort 12SE 96 TWAIN Compliant 96 WIA Compliant 96 Sleep Mode 16 Status Monitor Macintosh 164 Windows 162 T Text enteri...

Page 237: ... Visit us on the World Wide Web http www brother com These machines are approved for use in the country of purchase only Local Brother companies or their dealers will only support machines purchased in their own countries ...

Reviews: