background image

Page 36

Installing the Battery (Optional)

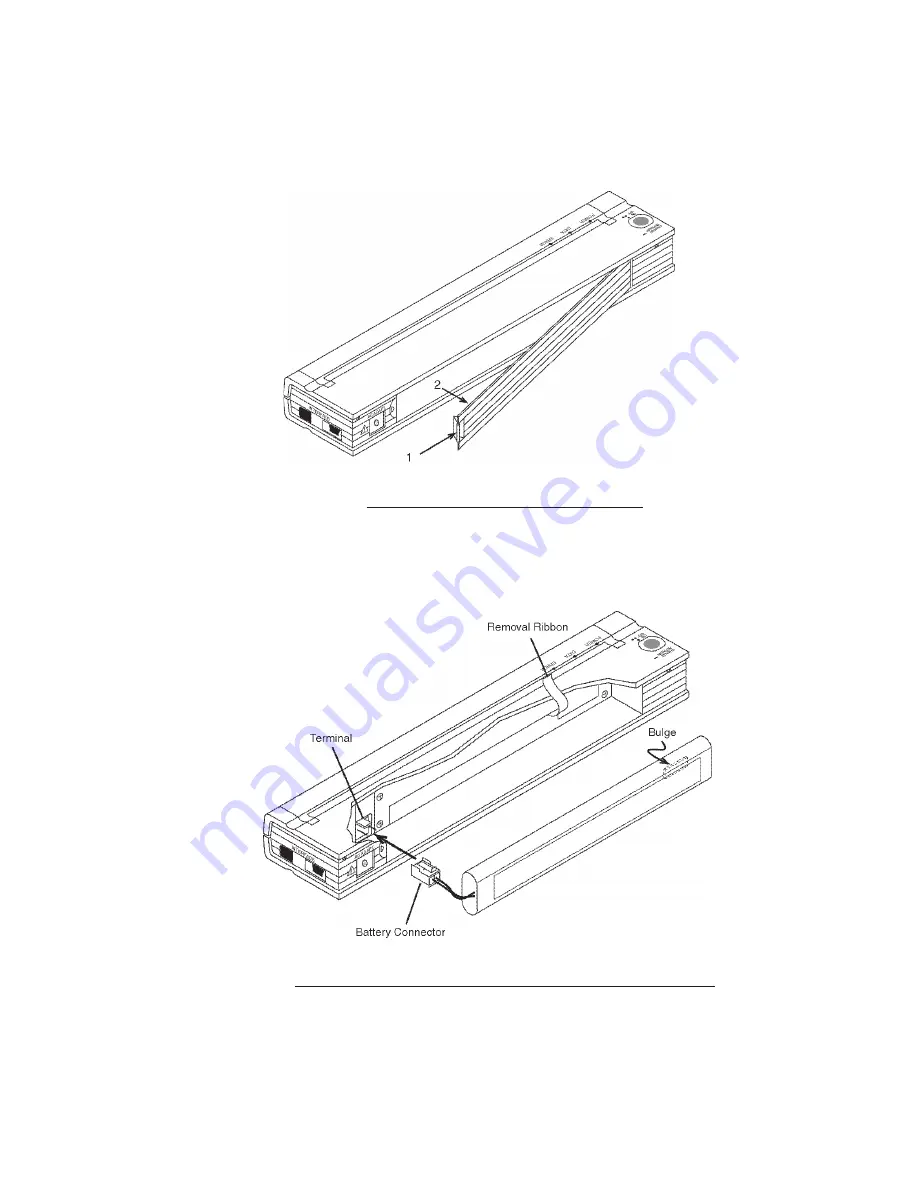
1. Open the printer’s battery cover by pressing the cover latch.  Push the cover away 

from the AC adapter receptacle.  See Figure 10.

Figure 10.  Opening the Battery Cover

2. Swing the cover open and remove it.

3. Gently push the battery connector into the terminal on the inside of the printer’s 

battery compartment.  See Figure 11.

Figure 11.  Pushing the battery connector into the terminal


Summary of Contents for 206627

Page 1: ...User s Guide PJ 522 and PJ 523 Mobile Printer l Before using this printer be sure to read this User s Guide l We suggest that you keep this manual in a handy place for future reference ...

Page 2: ... Mobile Solutions Inc All rights reserved Specifications subject to change without notice Printer name Shorter name Model Name Part Number Brother PocketJet 3 Engine PJ3 PJ 522 PJ522 Brother PocketJet 3 BT Engine PJ3 w BT PJ 522 BT PJ522 BT Brother PocketJet 3 Kit PJ3 Kit PJ 522 K PJ522 K Brother PocketJet 3 BT Kit PJ3 w BT PJ 522 BTK PJ522 BTK Brother PocketJet 3 Plus Engine PJ3 Plus PJ 523 PJ523...

Page 3: ...r 11 Windows Advanced Features Using PocketJet 3 Utility Configuration Utility 11 Windows Specific Operating System Features 12 Connecting to Your Computer 13 Via USB Cable 13 Via Infrared IrDA 14 Via Bluetooth Bluetooth Models Only 14 Printing 15 Turning the Printer OFF 16 Making Prints Lighter or Darker 16 PocketJet Utility Configuration Utility 17 Controllable Printer Features 17 Installing the...

Page 4: ...1 Indicator Lights 51 Indicator Light Table 51 Indicator Light Warnings 52 Self Test Feature 54 Chapter 6 Troubleshooting 55 Overview 55 Paper Problems 56 Printed Image Problems 56 Pages Don t Print 59 Pages Are Partially Printed 59 Chapter 7 Technical Information 60 Product Specifications 60 Declarations of Conformity 62 Radio Television Interference 66 United States FCC Regulations 66 Canadian R...

Page 5: ... to connect to worldwide 100 240 volt power sources The AC adapter automatically adjusts to the correct voltage when connected Check the power plug configurations and voltages used in your coun try If you need a different plug or power cord than supplied with your printer you can either purchase a plug adapter locally or contact your local reseller or Brother for assistance in acquiring a proper c...

Page 6: ...e trash or municpal waste stream which is illegal in some areas Brother payments to RBRC make it easy for you to drop the spent battery pack at local retailers of replacement NiMH batteries or at authorized Brother product service centers You may also contact your local recycling center for information on where to return the spent battery packs The involvement of Brother in this program is part of...

Page 7: ...Page vii ...

Page 8: ...Page viii ...

Page 9: ...Page ix ...

Page 10: ...Page x ...

Page 11: ...Page xi ...

Page 12: ...AC Cable CD Print Head Cleaning Cloth Quick Reference Card Thermal Paper 100 Sheets Printer Installation CD v 1 0 Device Drivers Configura tion Utilities User s Manuals English French Spanish Portuguese Made in USA 2009 Brother Mobile Solutions Inc All Rights Reserved P r i n t e r Q u i c k R e f e r e n c e C a r d Figure 1 The contents of a standard printer kit NOTE Supplies accessories and rep...

Page 13: ...ter as shown in Figure 2 2 Connect the AC power cord to the AC adapter 3 Plug the AC power cord into a nearby AC power outlet 100 240 VAC 50 60 Hz Figure 2 Connecting the printer to an AC power outlet NOTE AC power cord and AC Adapter are optional Please purchase appropriate adapter CH A RG E RE FR ES H O N O FF P O W E R D A T A B A T T E R Y AC ADAPT 1 AC Cable To power receptacle 3 2 Printer AC...

Page 14: ...vehicle DC supply to print or maintain the battery charge follow the steps below 1 Connect an appropriate power cord either with a cigarette plug or direct wired to the vehicle 12VDC supply as shown in Figure 3 These items are available as options See Chapter 8 2 Connect the power cord to the PocketJet 3 Turn on the vehicle power and then turn on the PocketJet Figure 3 Connecting the printer to DC...

Page 15: ...re that printing is complete before permitting a form feed The button must then be held down for 1 1 2 seconds to start the form feed To Quickly Charge the Battery With the printer off push the main switch and hold it down for two or more seconds until the POWER indicator begins to blink The POWER indicator light continues to blink until charging is complete To Power Off During Charge Mode Push th...

Page 16: ...POWER light is steady green The printer is operating on external power POWER light is red or orange The printer is operating on battery power Color and blink solid indicates approximate charge remaining POWER light is alternately blinking green yellow Battery is being discharged prior to charging POWER light is blinking green Battery is charging DATA light is steady green Unprinted data is in the ...

Page 17: ...te with your computer A CD with drivers and installation information is provided with your PocketJet The supplied CD and the Brother Mobile Solutions website both list driver version numbers If the website version is newer with a higher version number we recommend that you install the website version Browse to the Brother Mobile Solutions web site www brothermobilesolutions com or call 1 800 543 6...

Page 18: ...uter instructions before installing the PocketJet driver and the PocketJet Configuration Utility if you are going to use the Bluetooth interface CD Install 1 Insert the CD in your PC s CD drive 2 Select the model 3 Select the install item you wish to install 4 Follow all on screen instructions to install the software Your Windows operating system will be selected automatically 5 Click Finish to cl...

Page 19: ...d as explained above contact Brother Mobile Solutions Technical Support 1 800 543 6144 ext 1601 Un Install If you need to uninstall the printer driver because of conflicts or to update it follow these steps 1 In Windows select the Control Panel 2 Select Printers and Faxes 3 Right click on the desired print queue 4 Select Delete 5 Close the Control Panel 6 Re install the printer driver Accessing Ad...

Page 20: ...ations where 2 ply paper is needed this setting makes prints that are darker and print slower than the density mode set to 10 as listed above Form Feed Modes You can set how the printer ejects paper by using the following options Fixed Page Mode the paper always feeds at the end of a job to complete the vertical page size specified i e letter legal A4 or user defined size Use this with cut sheet p...

Page 21: ...et 3 this allows paper advancement from the print head area inside the printer to a position outside the printer This provides for a tear off position from a continuous roll feed that will include the entire printed image 3 The Paper Size selected does not affect this mode except to provide a maximum number of lines per page B Infinite Length Forms such as geological recordings or polygraph charts...

Page 22: ...ing the first one Perforated Roll Paper 1 Select End of Page mode 2 Select Perf Letter or Perf A4 paper size This is very important because the printable area is smaller when using perforated paper compared to cut sheet paper Windows Vista XP 2000 Professional Note Set Paper Type to Perforated Roll This modifies the printable area for any paper size including custom sizes This way you are not limi...

Page 23: ...ated Roll This modifies the printable area of all paper sizes Letter Legal A4 and Custom 2 Using Custom Forms a Select Start Settings Printers select Server Properties b On the Forms Page create a form for use with custom paper size c Allowed sizes Minimum width 102 mm 4 Maximum width 216 mm 8 5 Minimum length 51 mm 2 Maximum length 27 feet 8 23 m PJ 522 18 01 feet 5 49 m PJ 523 d All forms create...

Page 24: ...ION Install the driver software before connecting the printer to the computer via the USB cable 1 Install the printer driver See page 7 2 Make sure your printer is off before installing the interface cable 3 Insert the printer end of the cable into the interface connector on the side of the printer See example Figure 7 Figure 7 Connecting the PocketJet to your computer 4 Connect the other end of t...

Page 25: ... Bluetooth Models Only 1 Follow the recommendations of the manufacturer of your Bluetooth equipped host computer or adapter to install any necessary hardware and software 2 If pairing is necessary using a PIN code use the PocketJet Utility that accompanies your PocketJet3 Bluetooth printer to set the printer s PIN password See information on PIN setting in Bluetooth Menu page 19 NOTE The default P...

Page 26: ...e quickly The POWER indicator lights up See Figure 8 Figure 8 Turning the printer ON 3 Insert a sheet of Brother Genuine Thermal Paper into the paper input slot Place the print side of the paper away from you so that it faces the rear of the printer See Figure 9 NOTE You can print only one side of the paper This is the smooth coated side See Chapter 3 Tips on Using Paper Figure 9 Inserting a sheet...

Page 27: ...ing the Printer OFF Press the main switch twice quickly to turn the printer off NOTE If a battery is powering the printer and the Auto Off Timer feature is enabled the printer will turn itself off automatically after the selected period of inactivity Making Prints Lighter or Darker You can make prints lighter or darker by using the Print Density Setting in the printer driver dialog See Accessing A...

Page 28: ... Utility window will be overwritten by the installed driver settings If you are printing from a Windows system but are not using the Windows driver supplied by Brother all options can be configured If you are printing from a non Windows based system all options can be configured Installing the PocketJet 3 Utility When using the CD Installation program to install drivers for Windows Vista XP 2000 P...

Page 29: ...Plus and then select PocketJet 3 Utility or PocketJet 3Plus Utility The application will load and the active window will appear as follows Figure 5 Configuration Utility Then you may choose the appropriate PocketJet printer using either the File pull down or the Printer selector The display above shows the parameters for the printers as default These parameters may be different in other countries ...

Page 30: ...currently available print queues for your printer along with the port name to make it easier to select the proper printer in case you have more than one print queue available This will also modify the Printer selected on the main dialog Bluetooth Menu If your printer is enabled with Bluetooth you may use this menu to name your printer create your own PIN password for your printer Some hosts requir...

Page 31: ... to only a host that has the correct PIN code Setting a new Local Name allows identification of this particular printer where multiple printers are available and discoverable Both the PIN code and the Local Name must use alphanumeric characters A Z a z 0 9 only The Local Name can contain a space character but the PIN code cannot If you enter a character that is not allowed the following screen wil...

Page 32: ...r code and you may create a new code at any time by using the Configuration Utility If your OS or application requires a PIN code the factory default password is default case sensitive Please refer to Connecting to Your Computer on page 13 for information on physical connections between your computer and your PocketJet Bluetooth printer When you have completed the PIN and Local Name click on Save ...

Page 33: ...e options which are common to all operating systems include Auto On Auto Off and Pre feed Printer This selection lists print queues that exist for the printer In most cases only one queue will be displayed If the queue lists more than one printer select the one that corresponds to your connected printer If using text mode the following options should be set by the user In non text mode they will b...

Page 34: ...to 8 0 203 2mm with 0 13 3 3mm margins on either side Custom size allows the setting of length of the form bottom margin and left and right margins using those commands A Note about Text Mode The Printers can print either Raster Graphics or Text Mode The choice is determined automatically by the data stream sent from the host device to the printer Raster Graphics is the most common form of usage f...

Page 35: ...o feed the paper forward to a maximum page length of 14 or until the Paper Sensor detects that no paper remains in the input of the printer Note that either the end of a cut sheet or the black mark printed on the back of certain roll and perforated paper will be detected as the end of a page No Feed mode ignores all Form Feed commands and does not advance the paper after printing This can be of pa...

Page 36: ...the printer is running on battery power you may wish to have the printer turn off automatically to conserve the battery You may choose to disable this feature by selecting None or you may select either a 10 minute or 30 minute time out period If no data is received within the period selected the printer will turn itself off Pre Feed When the printer is powered on and paper is found in the paper in...

Page 37: ...at the ends of lines to position the printer for the next line of text Some host computers send one or the other of these and some send both each hoping to move to the left margin and down to the next line You can determine the effect of these characters when they are received If your host sends only a CR or LF to complete each line you should set this to LF CR LF CR CR LF so that both a carriage ...

Page 38: ...nes of form length The maximum setting is 127 lines For 6 lines per inch that will provide a page of a little more than 21 inches in length If using the Inches method for setting form length the physical height of the page is rounded down if needed to create an even number of print lines as determined by the Text Line Spacing command For example if your Text Line Spacing is set to 6 lines per inch...

Page 39: ...Bottom Margin is set to 4 lines 2 3 of blank space will be created at the bottom of each page The minimum and default space between pages will depend upon the setting of the Text Line Spacing but is a minimum of 1 2 For 6 lines per inch the minimum is 3 lines for 8 lines per inch 4 lines for 8 lines per inch at 0 12 spacing 5 lines Note that if the Form Feed Mode is set to No Feed the bottom margi...

Page 40: ...umber of columns of unprinted left margin The actual empty width created will depend upon the current character pitch as set by Default Pitch For example if the default pitch is set to 12 characters per inch and you set the right margin to 9 there will be a 3 4 9 x 1 12 right margin established If the current Default Pitch is set to Proportional 10 characters per inch pitch is used for this calcul...

Page 41: ...gin established If the current Default Pitch is set to Proportional 10 characters per inch pitch is used for this calculation The printable page width the space left on the page by the difference between left and right margins can be as little as 1 5 Text Line Spacing This setting is used to modify the amount of vertical space that is used for each line of text If you select 6 Lines Inch lines of ...

Page 42: ...character in 10 12 or 15 per inch mode will use the same amount of horizontal space If Proportional is selected each character uses an amount of horizontal space appropriate to the characters intrinsic width For example the letter i will occupy less horizontal space than the letter w The value supplied here will as noted above affect the actual width of margin settings Extended Characters This com...

Page 43: ...Page 32 Character Set Map This menu allows you to select the use of special characters appropriate for one of the languages selected See Appendix I for a chart of the special characters available ...

Page 44: ...lf Test Feature page 54 Clicking on Test Page will print a page showing the current printer configuration and image quality verification graphics See illustration below Note that the information in the page header can be helpful in problem solving printer model Bluetooth options FIrmware version Note also that this page can be printed from the Configuration Utility as well as from the Main Switch ...

Page 45: ...Page 34 ...

Page 46: ...nternal factory configuration of your printer this file s properties are set to Read Only and it should not be modified Save Config Clicking on this button will save the configuration as you see it to the file PJ3Default cfg or PJ3PlusDefault cfg on the same directory as exe file and then send this configuration information to the printer Be sure that all of the settings are adjusted to your likin...

Page 47: ...the cover away from the AC adapter receptacle See Figure 10 Figure 10 Opening the Battery Cover 2 Swing the cover open and remove it 3 Gently push the battery connector into the terminal on the inside of the printer s battery compartment See Figure 11 Figure 11 Pushing the battery connector into the terminal ...

Page 48: ...t inside the battery compartment Once the battery clears the outer edges of the compartment press it securely into position Make sure the label faces the outside of the battery compartment Otherwise the battery cover will not close properly NOTE The side of the battery opposite the warning label contains a heat sensor that stops the flow of electricity if the battery overheats 6 Attach the battery...

Page 49: ...out of its compartment NOTE If the battery removal ribbon is caught behind the battery insert a thin metal object such as a flat blade screwdriver between the battery and the case at the end away from the AC adapter receptacle and tilt it out of its compartment 3 Remove the battery from the compartment 4 Gently pull the battery connector from the terminal inside the printer Figure 13 Instructions ...

Page 50: ...e POWER indicator light begins to blink This puts the printer in Charge Mode and starts the charging of the battery The POWER indicator light blinks until charging is complete The maximum time to charge to 100 capacity is approximately 120 minutes When the printer finishes charging the battery it automatically turns itself off and the POWER indicator light goes off Note that when the printer is co...

Page 51: ...prints discharge the battery faster than lighter prints do Use the density adjustment from the driver dialog on your computer or use the Configuration Utility to adjust lightness and darkness See Accessing Advanced Software Features on page 8 ...

Page 52: ... paper is skewed after the printer pulls it into the starting position you can correct the situation as follows If the printer does not start to print immediately open the release cover as far back as it will go See Figures 15 and 16 pages 43 and 44 Pull the paper out close the cover and reinsert paper If the printer does start to print wait for the page to be printed and then reprint that page if...

Page 53: ...oid wrinkling and tearing keep paper in its box or bag until ready to use Do not fold crease or wrinkle paper prior to loading it into the printer When storing paper avoid high temperatures and humidity Avoid prolonged exposure to intense ultraviolet light Avoid contact with Diazo blueprint carbonless or castcoated papers Avoid contact with vinyl or acetate materials such as many notebook or repor...

Page 54: ...ld the switch down This can be repeated as many times as necessary If this does not move the jammed paper out of the printer use Method 2 below Note This method can also be used to finely position a sheet of paper for printing for instance on a pre printed form Method 2 1 Gently open the release cover as far back as it will go See Figure 15 Figure 15 Opening the release cover ...

Page 55: ...e paper out of the printer Pulling in either direction is acceptable See Figure 16 Figure 16 Pulling jammed paper out of the printer 3 Close the release cover 4 Reinsert a new sheet of paper in the printer and restart the job ...

Page 56: ... of paper or a higher density setting 1 Make sure the printer is powered on without paper loaded NOTE If paper is loaded and detected by the printer when you attempt to initiate Cleaning Mode a Form Feed will be executed instead 2 Press the main switch for about two seconds The Data LED will illuminate red 3 Insert the black cleaning cloth that came with the printer into the printer s paper input ...

Page 57: ...ng cloth The cleaning cloth is for head and roller cleaning only Do not use it to clean any other part of the printer Don t throw the cleaning cloth away after you clean the print head It should last for the life of the printer Keep the cleaning cloth with your printer supplies and use it whenever you need to clean the print head ...

Page 58: ...per is loaded and detected by the printer when you attempt to initiate Cleaning Mode a Form Feed will be executed instead 2 Press the main switch for about two seconds The Data LED will illuminate red 3 Insert the black cleaning cloth that came with the printer into the printer s paper input slot with the rough black side which contains the cleaning material towards the front of the printer See Fi...

Page 59: ...ng cloth is for head cleaning and platen roller cleaning only Do not use it to clean any other part of the printer Don t throw the cleaning cloth away after you clean the platen roller It should last for the life of the printer Keep the cleaning cloth with your printer supplies and use it whenever you need to clean the platen roller or the print head ...

Page 60: ...e printer become dirty clean it using a dry cloth NOTE Avoid saturating the cloth Do not allow water to get inside the printer Avoid the use of benzene alcohol paint thinner or cleaners that are abrasive alkaline or acidic Such cleaners may damage the printer s case ...

Page 61: ...Page 50 Notes ...

Page 62: ...nking Alternating Blinking POWER DATA ERROR Doesn t matter External power in use Battery in use 14 0 Volts Battery in use 13 1 Volts Battery in use 10 0 Volts Battery in use 6 6 Volts Battery is discharging Battery is charging Printer is receiving data Unprinted data remains in buffer Printer is receiving flash upgrade Printer is in service mode ...

Page 63: ...roperly See page 2 Connecting to an AC Outlet Optional Make sure the AC power outlet is live If you are using a DC adapter make sure power is connected and that the fuse is good No Battery Found When Charging If this indication occurs immediately when attempting to charge the battery the printer did not detect a battery when you tried to initiate a battery charging cycle Make sure the battery has ...

Page 64: ... intended to be printed The printer will stop while the head cools down and then will resume printing This condition is normal when printing documents with a great deal of black content To avoid or delay the onset of this condition you can print using a lighter density setting reduce the amount of black space being printed by removing background shading and colors for example background on Excel g...

Page 65: ...e main switch for two seconds and release to place the printer in Service Mode The DATA light will illuminate red 3 Insert a piece of Brother Genuine Thermal paper in the printer The test page will print automatically After the print is complete the printer will return to an idle state 4 To print multiple pages repeat steps 1 3 Note Test pages can also be printed from the Windows based Configurati...

Page 66: ...inter to your computer Make sure you have installed and selected the proper printer driver as explained in Chapter 2 Using the Printer Look through the troubleshooting tips in this chapter for help correcting the problem If none of these suggestions works If you are in the U S call Brother Technical Support at 1 800 543 6144 extension 1601 from 8 AM to 5 00 PM Mountain Time Monday through Friday I...

Page 67: ...y Heavy paper may not feed through the printer If the release cover is closed and you are using Brother Genuine Thermal paper the printer may have a damaged drive system Call Technical Support at 1 800 543 6144 ext 1601 Printed Image Problems The printed image is out of alignment Make sure you are using the Brother Genuine Thermal paper Make sure you are inserting the paper correctly See page 41 I...

Page 68: ...structions in Cleaning the Print Head page 45 If the pages continue to have white vertical lines the print head may need maintenance Call technical support All pages have a black vertical line Clean the print head Follow the instructions in Cleaning the Print Head page 45 If the pages continue to have black vertical lines the print head may need maintenance Call technical support Light patches of ...

Page 69: ...hat data is still in the printer after the page has completed printing The side margins are incorrect Check to make sure the correct margins have been set in the configuration utility and your software application Adjust the left margin as needed Make sure the software application or the printer driver has been set to print the same size paper that you are loading into the printer If the applicati...

Page 70: ...e is properly connected to both the printer and the host computer or that the infrared unit is properly connected and oriented toward the infrared unit on the computer See page 13 Connecting to your Computer Pages Are Partially Printed The green DATA indicator light goes out while a page remains in the printer The software application may not have sent a full page of data Restart the print job The...

Page 71: ...00 dpi Print Width 8 04 8 21 Paper Size Letter 216 x 279mm 8 5 x 11 Legal 216 x 356 mm 8 5 x 14 A4 210 x 297 mm 8 27 x 11 69 Minimum of 2 maximum of paper roll length Power Options Battery Rechargeable 14 4V NiMH Battery AC Adapter AC adapter 110 240VAC to 15 VDC DC Car adapter 2 types Cigarette Plug or Wired type Interface USB USB Ver 2 0 Full Speed A mini B Printer Peripheral IrDA Ver 1 0 IrCOMM...

Page 72: ...s 2000 Professional XP Windows Vista USB Bluetooth IrDA others REGULATORY EMI FCC Class B EN50024 1998 EN61000 3 2 EN61000 3 3 Safety Power Supply CE EN60950 ERL European UL Testing to UL1950 See Declarations of Conformity for additional details ...

Page 73: ...Page 62 For PocketJet 3 units sold in the U S A the following decliaration of conformity applies ...

Page 74: ...Page 63 For PocketJet 3 Plus units sold in the U S S the following declaration of conformity ap plies ...

Page 75: ...Page 64 For PocketJet 3 Bluetooth units sold in the U S A the following declaration of conformity applies ...

Page 76: ...Page 65 For PocvketJet 3 Plus Bluetooth units sold in the U S A the following declaration of con formity applies ...

Page 77: ...or televi sion reception which can be determined by turning the equipment off and on the user is encouraged to try to correct the interference by one or more of the following measures Reorient or relocate the receiving antenna Increase the separation between the equipment and the receiver Connect the equipment to an outlet on a circuit different from that to which the receiver is connected Consult...

Page 78: ...is device must accept any interference including interfer ence that may cause undesired operation of this device Ce dispositif est conforme aux normes CNR 210 d Industrie Canada L utilisation de ce dispositif est autorisée seulement aux conditions suivantes 1 il ne doit pas produire de brouillage et 2 l utilisateur du dispositif doit être prêt à accepter tout brouillage radioélectrique reçu même s...

Page 79: ...ations with an index mark to assist in separation Fanfold Brother Genuine Thermal Paper 1000 sheets per box Note Fanfold papers are perforated and indexed every 11 Accessories Note Depending on the kit purchased these items may be included USB cable NiMH battery Car Adapter Carrying case with room for a spare battery Vehicle Mount printer and roll paper Desktop Caddy Cleaning cloth AC Adapter and ...

Page 80: ... are outside the U S contact the dealer where you purchased your printer for infor mation about ordering supplies accessories and replacement parts Uploadable Fonts Custom fonts may be developed for this printer to meet unique customer applications For further information in N America call 1 800 543 6144 or 303 460 1600 All other areas call your local dealer ...

Page 81: ...7 G W g w ç ù o τ 8 8 H X h x ê ÿ Φ 9 9 I Y i y ë Ö Θ A J Z j z è Ü Ω B K k ï δ C L l î ⁿ D M m ì ø E N n Ä Є F O _ o Å ƒ International Character Set Table 23 24 40 5B 5C 5D 5E 60 7B 7C 7D 7E USA France à ç é ù é Germany Ä Ö Ü ä ö ü ß UK Denmark I Æ Ø Å æ ø å Sweden É Ä Ö Å Ü é ä ö å ü Italy é ù à ò è ì Spain I Pts Ñ ñ Japan Norway É Æ Ö Å Ü é æ ø å ü Denmark II É Æ Ö Å Ü é æ ø å ü Spain II á Ñ é ...

Page 82: ...ther com Internet www brothermobilesolutions com Technical Support In US 1 800 543 6144 ext 1601 8 a m to 5 p m Mountain Time M F Outside US Contact your local reseller or any of the Authorized Service Centers Ordering Supplies Accessories or Replacement Parts In US 1 800 543 6144 7 a m to 4 p m Mountain Time M F Outside US Contact your printer dealer ...

Reviews: