


2
1.
Habilitation
Homologation
*ECE = norme européenne pour les
équipements de sécurité
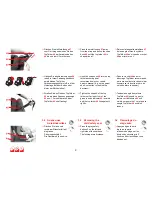
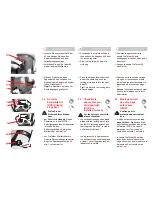
• Le siège auto est conçu, contrôlé et
homologué conformément aux
exigences de la norme européenne
pour les équipements de sécurité
pour enfants (ECE R 44/04). Le
signe de contrôle E (dans un cercle)
et le numéro d'homologation se
trouvent sur l'étiquette
d'homologation (autocollant sur le
siège auto).
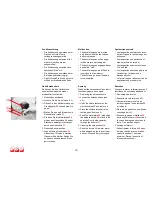
Siège auto Britax /
RÖMER
Examen et
homologation selon
ECE* R 44/04
Groupe
Poids
SAFEFIX plus TT
I
9 à 18 kg
1.
Suitability
Certification
*ECE = European Standard for Child Safety
Equipment
• The child safety seat has been
designed, tested and certified to the
requirements of the European
Standard for Child Safety
Equipment (ECE R 44/04). The seal
of approval E (in a circle) and the
approval number are located on the
approval label (sticker on the child
safety seat).
Britax / RÖMER
child safety seat
Tested and certified
according to ECE*
R 44/04
Group
Body
weight
SAFEFIX plus TT
I
9 to 18 kg
1.
Eignung
Zulassung
*ECE = Europäische Norm für
Sicherheitsausrüstung
• Der Auto-Kindersitz ist ausgelegt,
geprüft und zugelassen
entsprechend den Anforderungen
der europäischen Norm für
Kindersicherheits-Einrichtungen
(ECE R 44/04). Das Prüfzeichen E
(in einem Kreis) und die
Zulassungsnummer befinden sich
auf dem Zulassungsetikett
(Aufkleber am Auto-Kindersitz).
Britax / RÖMER
Auto-Kindersitz
Prüfung und
Zulassung nach
ECE* R 44/04
Gruppe
Körper-
gewicht
SAFEFIX plus TT
I
9 bis 18 kg
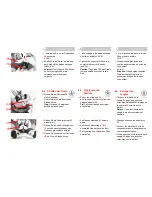
6. Consignes d'entretien .................15
6.1 Entretien du fermoir de ceinture
15
6.2 Nettoyage ..............................17
6.3 Retrait de la housse ..............19
6.4 Remise en place de la housse ..
20
6.5 Démontage des sangles .......21
6.6 Montage des sangles ............22
7. Remarques relatives à l'élimination
24
8. Sièges ultérieurs .........................24
9. 2 ans de garantie .........................25
10. Carte de garantie / Procès-verbal
de remise .....................................29
6. Care instructions .........................15
6.1 Care for the harness buckle ..15
6.2 Cleaning ................................17
6.3 Removing the cover ..............19
6.4 Re-fitting the cover ................20
6.5 Removing the harness ..........21
6.6 Installing the harness ............22
7. Notes regarding disposal ...........24
8. Next child safety seat .................24
9. 2-year warranty ...........................25
10. Warranty Card / Transfer Check 28
6. Pflegeanleitung ...........................15
6.1 Pflege des Gurtschlosses .....15
6.2 Reinigung ..............................17
6.3 Abziehen des Bezuges .........19
6.4 Aufziehen des Bezuges ........20
6.5 Ausbauen der Gurte ..............21
6.6 Einbauen der Gurte ...............22
7. Hinweise zur Entsorgung ...........24
8. Folgesitze ....................................24
9. 2 Jahre Garantie ..........................25
10. Garantiekarte / Übergabe-Check 27


