background image

9

Care & Cleaning

Before cleaning, switch the On/Off switch 

to the Off position and unplug the sandwich 

press. Allow your sandwich press to cool before 

cleaning. 
Always clean your sandwich press after each 

use to prevent a buildup of baked-on foods.
Wipe cooking plates with a soft cloth. If cooked 

on food is not removed by this method reheat 

the unit for 1–2 minutes, then brush with a little 

oil or melted butter. 

NOTE

• 

The cooking plates are coated with a  

non-stick surface; do not use abrasives.

• 

Do not use spray-on non-stick coatings as 

this will affect the performance of the  

non-stick surface on the cooking plates.

STORAGE

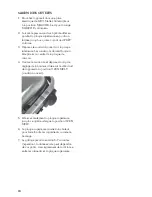
1.  Switch the On/Off switch to the Off 

position and unplug the sandwich press.

2.  Allow the sandwich press to fully cool.
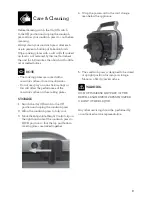
3.  Move the Adjustable Height Control clip on 

the right hand side of the sandwich press to 

LOCK position so that the top and bottom 

cooking plates are locked together.

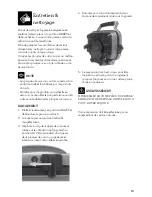
4.  Wrap the power cord in the cord storage 

area below the appliance.

5.  The sandwich press is designed to be stored 

at upright position for compact storage. 

Store on a flat, dry, level surface.

WARNING

DO NOT IMMERSE ANY PART OF THE
BREVILLE SANDWICH PRESS IN WATER
OR ANY OTHER LIQUID.

Any other servicing should be  performed by 

an authorized service representative.

Summary of Contents for Perfect Press BSG600

Page 1: ...the Perfect Press Instruction Book BSG600 ...

Page 2: ...SE AND SAVE FOR FUTURE REFERENCE Remove and safely discard any packaging material or promotional labels before using the sandwich press for the first time To eliminate a choking hazard for young children remove and safely discard the protective cover fitted to the power plug of this appliance Ensure that the surface where the appliance operates is stable level clean and dry When using this applian...

Page 3: ...the appliance clean Refer to care and cleaning section If any of the contained instructions or warnings are not understood please contact Breville Consumer Support for assistance ADDITIONAL SAFEGUARDS When using electrical appliances basic safety precautions should always be followed including the following To protect against electrical shock do not immerse cord plugs or this appliance in water or...

Page 4: ...t gas or electric burner or in a heated oven Do not touch hot surfaces Appliance surfaces are hot during and after operation To prevent burns or personal injury always use protective hot pads or insulated oven mitts or use handles or knobs Extreme caution must be used when moving an appliance containing hot oil or other liquids To disconnect turn any control to off then remove plug from wall outle...

Page 5: ...e arranged so that it will not drape over the countertop or table top where it can be pulled on by children or tripped over unintentionally and 3 the extension cord must include a 3 prong grounding plug BREVILLE ASSIST PLUG Your Breville appliance comes with a unique Assist Plug conveniently designed with a finger hole to ease removal from the power outlet CALIFORNIA PROPOSITION 65 Applicable to C...

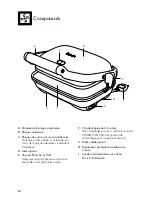
Page 6: ...oking plate has easy wipe corners D On Off switch E Power and Ready lights Indicate when the sandwich press is heating or ready to use F Adjustable Height Control clip With 3 settings for OPEN MELT CRUSH CONTROL and LOCK position for vertical storage G Non slip feet H Convenient cord wrap in base I Power cable with Breville Assist Plug ...

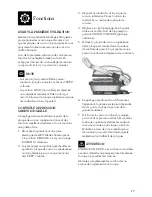
Page 7: ...l illuminate 2 Allow the sandwich press to preheat with the top cooking plate in the closed position until the green READY light illuminates 3 Place sandwich on the bottom cooking plate Always place sandwiches in the center of the bottom cooking plate 4 Move the Adjustable Height Control clip on the right hand side of the sandwich press to the CRUSH CONTROL position 5 Close the top cooking plate T...

Page 8: ...m plate Always place sandwiches in the center of the bottom cooking plate 4 Open the lid and move the Adjustable Height Control clip on the right hand side of the sandwich press to OPEN MELT position 5 Slowly lower the top plate until it sits in the OPEN MELT position 6 The top plate will radiate the desired heat to melt ingredients such as cheese 7 Toasting melts should take approximately 5 7 min...

Page 9: ... this will affect the performance of the non stick surface on the cooking plates STORAGE 1 Switch the On Off switch to the Off position and unplug the sandwich press 2 Allow the sandwich press to fully cool 3 Move the Adjustable Height Control clip on the right hand side of the sandwich press to LOCK position so that the top and bottom cooking plates are locked together 4 Wrap the power cord in th...

Page 10: ...the Perfect Press Manuel d instructions BSG600 ...

Page 11: ...ANTES MESURES DE SÉCURITÉ LISEZ TOUTES LES INSTRUCTIONS AVANT USAGE ET CONSERVEZ LES À TITRE DE RÉFÉRENCE Retirez et jetez en lieu sûr tout matériel d emballage et étiquettes promotionnels avant d utiliser le presse sandwich pour la première fois Afin d éliminer le risque de suffocation chez les jeunes enfants retirez et jetez en lieu sûr l enveloppe protectrice recouvrant la fiche de l appareil A...

Page 12: ...rsonnes responsables de leur sécurité Ne laissez pas l appareil sans surveillance lorsqu il est en marche Gardez l appareil propre Consultez la section Entretien Nettoyage Si un doute persiste quant aux instructions ou avertissements contenus dans ce livre veuillez contacter le Soutien aux consommateurs de Breville PRÉCAUTIONS SUPPLÉMEN TAIRES Lorsque vous utilisez un appareil électrique des mesur...

Page 13: ... des blessures N utilisez pas l appareil à l extérieur Ne laissez pas le cordon pendre d une table ou d un comptoir ou toucher des surfaces chaudes Ne placez pas l appareil sur ou près d un brûleur à gaz ou électrique ou dans un four chaud Ne touchez pas les surfaces chaudes de l appareil qui deviendront très chaudes durant et après l utilisation Afin de prévenir le risque de brûlures ou de blessu...

Page 14: ...don d alimentation qui réduit le risque de blessures ou dommages pouvant résulter du fait de tirer trébucher ou s enchevêtrer dans un cordon plus long Si une rallonge est utilisée 1 la puissance nominale inscrite sur le cordon ou la rallonge doit être au moins équivalente ou supérieure à la puissance nominale de l appareil 2 la corde ne doit pas pendre d un comptoir ou d une table où des enfants p...

Page 15: ...lement avec un anneau pour laisser passer un doigt et faciliter le retrait de la prise électrique PROPOSITION 65 DE LA CALIFORNIE Applicable aux résidents de la Californie seulement Cet appareil contient des produits chimiques connus de l État de la Californie comme pouvant causer le cancer des malformations congénitales ou autres problèmes de reproduction ...

Page 16: ...lement D Interrupteur E Voyants Marche et Prêt Indiquent quand le presse sandwich se réchauffe ou est prêt à être utilisé F Clip de réglage de la hauteur Avec 3 réglages pour les sandwichs ouverts CRUSH CONTROL et position de verrouillage pour rangement vertical G Pieds antidérapants H Rangement pratique du cordon sous la base I Cordon d alimentation avec fiche Assist de Breville C G D H I F B E A...

Page 17: ...llumera 2 Laissez le presse sandwich préchauffer en gardant la plaque de cuisson supérieure en position fermée jusqu à ce que le voyant vert PRÊT s allume 3 Déposez le sandwich sur la plaque de cuisson inférieure Placez toujours les sandwichs au centre de la plaque de cuisson 4 Déplacez la clip de réglage de la hauteur située sur le côté droit de l appareil à la position CRUSH CONTROL grillage uni...

Page 18: ...oivent toujours être placés au centre de la plaque de cuisson 4 Ouvrez le couvercle et déplacez la clip de réglage de la hauteur située sur le côté droit de l appareil à la position OPEN MELT sandwich ouvert 5 Abaissez lentement la plaque supérieure jusqu à ce qu elle atteigne la position OPEN MELT 6 La plaque supérieure irradiera la chaleur pour faire fondre les ingrédients comme le fromage 7 Le ...

Page 19: ... affectera la performance de la surface antiadhésive des plaques de cuisson RANGEMENT 1 Mettez l interrupteur en position ARRÊT et débranchez le presse sandwich 2 Laissez le presse sandwich refroidir complètement 3 Déplacez la clip de réglage de la hauteur située sur le côté droit de l appareil à la position LOCK verrouiller afin que les deux plaques de cuisson supérieure et inférieure soient verr...

Page 20: ... may vary slightly from the actual product BSG600 USC B16 Web www breville ca support Web www brevilleusasupport com USA Mail Breville USA 19400 S Western Ave Torrance CA 90501 1119 Phone 1 866 273 8455 1 866 BREVILLE Email askus brevilleusa com Canada Mail Breville Canada 3595 boulevard Côte Vertu Saint Laurent Québec H4R 1R2 Phone 1 855 683 3535 Email askus breville ca Breville Consumer Support ...

Reviews: