


6
Aesculap
®
Acculan 4
Acculan 4 Charger GA320
6.
Working with the device
6.1
System set-up
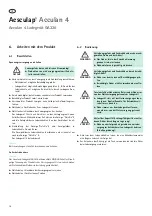
Connecting to the power supply
►
Carry out a visual inspection before connecting the product to the
mains power:
– Check the mains power cord for any damage.
– Check the charger for any damage (e.g. bent, short-circuited con-
tacts of the charging bays).
►
Do not use the product if it is damaged, defective or dirty.
►
Set aside the product if it is damaged.
►
Clean product if dirty, see Validated reprocessing procedure.
►
Plug the mains power cord into the device connector
7
.
►
Plug in the mains plug at the mains power socket.
After being connected to the mains power, the charger performs a self-
test. During this time the "Power On”
3
indicator and the
indicator fields for charging bays
2
must be illuminated on the front
panel of the device.
►
Carry out a visual inspection of the "Power On" indicator
3
and the
indicator fields for charging bays
1
.
The indicator fields for the charging bays
2
go out and only
the "Power On"
3
indicator remains lit.
The charger is ready.
Note
In case of any deviation from the sequence described above, see Trouble-
shooting list
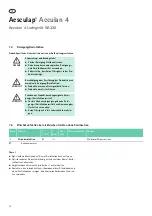
Putting out of operation
Note
The Acculan 4 Charger GA320 does not have a power ON/OFF switch. The
all-pole disconnection of the product from the main power supply is only
guaranteed when the power cord/mains connection line is unplugged.
►
Unplug the power cord from the mains power socket.
►
Unplug power cord from the device connector
7
.
6.2
Safe operation
►
As excessive battery temperatures will prolong the charging time,
allow batteries to cool down prior to charging.
►
To remove the battery, if necessary use a cloth as the batteries become
heated during the charging process.
DANGER
Risk of death by electric shock!
►
Connect the product only to a grounded power
supply.
WARNING
Risk of injury and material damage due to inappro-
priate use of batteries!
►
Only insert batteries that are indicated in the
Intended Use.
►
Insert batteries in their correct position.
WARNING
Risk of injury and material damage due to damaged
batteries!
►
Check batteries for any damage before charg-
ing.
►
Do not use or recharge damaged batteries.
CAUTION
Total battery failure can occur by leaving the bat-
teries in the charger while disconnected from the
power supply!
►
Always leave charger connected to the power
supply. Indicator lamp for readiness must illumi-
nate.
►
Always remove batteries from the charger when
it is disconnected from the power supply.
CAUTION
Loss of capacity/performance due to prolonged
storage of discharged batteries!
►
After a successfully completed charging process,
leave the battery in the operational charger
(trickle charging).
Summary of Contents for Aesculap GA320
Page 2: ......
Page 3: ...9 5 6 7 4 2 3 1 8...
Page 88: ...86 Aesculap Acculan 4 Acculan 4 GA320 6 6 1 7 3 2 3 1 2 3 Acculan 4 GA320 7 6 2...
Page 89: ...87 GA346 GA666 GA676 A B 1 1 7 7 1 7 2 VAH FDA CE 7 3 7 A B...
Page 90: ...88 Aesculap Acculan 4 Acculan 4 GA320 7 4 7 5 I 1 T C F t I 1 Meliseptol Wipes sensitive...
Page 91: ...89 7 6 8 B Braun Aesculap 9 Aesculap 7...
Page 139: ...137 GA346 GA666 GA676 A B 1 1 7 7 1 CJK CJK 7 2 VAH FDA CE 7 3 7 A B...
Page 140: ...138 Aesculap Acculan 4 Acculan 4 GA320 7 4 7 5 RT 1 1 C F I 1 Meliseptol Wipes...
Page 141: ...139 7 6 8 B Braun Aesculap 9 Aesculap ON 7 ON...