background image

B 3  HOT

10

ITALIANO

sede.

2

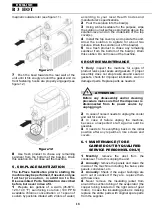
Lubrificare il pistone rubinetto, il raschiatore

esterno e il giunto esagonale (nei punti A, B e C
indicati in figura 13) utilizzando esclusivamente il
grasso fornito dal fabbricante o altro 

grasso per

uso alimentare

.

figura 13

3

Riassemblare il rubinetto sul contenitore con

sequenza inversa rispetto a quanto fatto per lo
smontaggio (vedere figura 11).

4

Rimontare la guarnizione di tenuta del conte-

nitore sulla sua sede.
NOTA:


la tesa di maggior diametro deve essere

appoggiata alla parete posteriore (vedere figura
14). 

figura 14

5

Inserire il giunto esagonale nell’evaporatore

accompagnandolo fino in fondo. (vedere figura

15)

figura 15

6

Calzare la spirale esterna sull'evaporatore

accoppiandone l'estremità anteriore al giunto

esagonale entrambi con medesima sagoma esa-

gonale (vedere figura 16).

figura 16

7

Montare il contenitore e spingerlo verso la

parete posteriore, accertandosi che calzi com-

pletamente sulla guarnizione e che contempora-

neamente i suoi agganci inferiori siano impegnati

negli appositi risalti del piano gocciolatoio

Summary of Contents for B 3 HOT

Page 1: ...MANUALE D ISTRUZIONI OPERATOR S MANUAL B 3 HOT ...

Page 2: ... 1 HOT are in conformity with the following Standards Following the provisions of the Directives 2014 30 CE 2014 35 CE EN60335 1 2012 A11 2014 EN60335 2 24 2010 EN60335 2 75 2004 A1 2005 A11 2006 A2 2008 A12 2010 EN 55014 1 2006 A1 2009 A2 2011 EN 55014 2 2014 A1 2001 A2 2008 EN 61000 3 2 2014 EN61000 3 3 2013 EN60335 1 2012 A11 2014 EN60335 2 24 2010 EN60335 2 75 2004 A1 2005 A11 2006 A2 2008 A12...

Page 3: ...C on restricting the use of hazardous substances in electric and electronic equip ment and on the disposal of waste material The crossed out wheelie bin symbol applied to equipment or packaging means that the product should be collected separately from other types of waste at the end of its useful life The separate collection of equipment that has reached the end of its life cycle is organised and...

Page 4: ...tributore a una rete monofase servendosi di una presa completa di messa a terra secondo quanto stabi lito dalle norme vigenti Nel caso la disconnes sione dell apparecchio dalla rete elettrica sia affidata ad un interruttore onnipolare tale inter ruttore deve garantire una distanza di apertura dei contatti che consenta la disconnessione com pleta nelle condizioni della categoria di sovraten sione I...

Page 5: ...adatto per l uso in ambienti esterni 15 Non schiacciare il cavo di alimentazione 16 Non conservare sostanze o liquidi pericolosi o tossici all interno dell apparecchio 17 Il coperchio deve rimanere sempre chiuso 5 ISTRUZIONI PER L USO 1 Lavare e sanitizzare il distributore prima di utilizzarlo seguendo quanto previsto nelle pre senti istruzioni al capitolo 5 3 PULIZIA 2 Riempire i contenitori con ...

Page 6: ...orare ed estrarre Viceversa nel caso la macchina lavori in ambienti particolarmente caldi l utilizzo del termostato può essere ridotto al minimo 5 2 MODALITA DI UTILIZZO DEL DISTRIBUTORE 1 LIBERA si utilizza quando si necessita di estrarre grandi quantità di crema o per svuotare la macchina In questa modalità non è presente il beccuccio applicato al rubinetto 2 DECORAZIONE si utilizza per nappare ...

Page 7: ...asca si scaldi Procedere quindi con l azio nare l interuttore mescolatore B e la sua eroga zione 5 5 PULIZIA 1 Pulizia e lavaggio sono fondamentali per garantire la perfetta conservazione del prodotto e la massima efficienza del vostro distributore Le procedure descritte nel seguito devono essere considerate di carattere generale e possono variare per effetto della regolamentazione sanita ria vige...

Page 8: ...edere figura 8 e successivamente il giunto esagonale vedere figura 9 figura 8 figura 9 6 Togliere la guarnizione di tenuta del conteni tore dalla sua sede vedere figura 10 figura 10 7 Disassemblare il rubinetto con la sequenza indicata vedere figura 11 figura 11 8 Sfilare il cassetto raccogligocce e svuotarlo ...

Page 9: ...ione di acqua calda 45 60 C e prodotto sanitizzante approvato dalle autorità del vostro paese rispettando le specifiche del produttore In mancanza di un prodotto sanitizzante specifico preparare una soluzione di acqua e ipoclorito di sodio varechina in proporzione di 1 cucchiaio ogni 2 litri di acqua 3 Immergere nella soluzione tutte le parti da sanitizzare per il tempo indicato dal fabbricante de...

Page 10: ... sulla sua sede NOTA la tesa di maggior diametro deve essere appoggiata alla parete posteriore vedere figura 14 figura 14 5 Inserire il giunto esagonale nell evaporatore accompagnandolo fino in fondo vedere figura 15 figura 15 6 Calzare la spirale esterna sull evaporatore accoppiandone l estremità anteriore al giunto esagonale entrambi con medesima sagoma esa gonale vedere figura 16 figura 16 7 Mo...

Page 11: ...e ogni possibile residuo di soluzione sani tizzante dal fondo dei contenitori Asciugare l interno dei contenitori con un tovagliolo di carta del tipo usa e getta 7 Non procedere ad ulteriori operazioni di risciacquo 6 MANUTENZIONE 1 Ogni giorno controllare il distributore e veri ficare che non ci siano perdite di prodotto dalle guarnizioni Se si notano perdite controllare prima di tutto che il dis...

Page 12: ...as that indicated on the data plate Plug the unit into a grounded protected single phase electrical supply according to the applicable electrical codes and the specifications of your machine The electrical disconnect switch shall have a contact separation in all poles providing full disconnection under over voltage category III conditions Do not use extension cords 7 The unit doesn t come presanit...

Page 13: ...to the instructions in this manual See chapter 5 3 CLEANING AND SANITIZING PROCEDURES 2 Fill the bowls with product to the maximum level mark Do not overfill The exact quantity of product expressed as liters and gallons is shown by marks on the bowl 3 In case of products to be diluted with water potable water pour water into bowl first then add correct quantity of product In case of natural squash...

Page 14: ...nit has a thermostat to control the product temperature and 2 switches to activate the heater and the mixer figura 1 Main switch A Mixer switch B Thermostat C It controls the temperature of the product in the bowl Turning the knob counterclockwise you de crease the temperature The minimum is the temperature of the ambient while turning it clockwise you increase the temperature at 45 C For the oper...

Page 15: ... 1 Remove cover from the bowl 2 Remove the bowl by lifting its faucet side up and off the fastening hooks see figure 2 and slide it out see figure 3 figure 2 figure 3 3 Slide the outer spiral out see figure 4 and then Outside magnetic rotor assembly see figure 5 figure 4 figure 5 ATTENTION Before any disassembly and or cleaning procedure make sure that the dispenser is disconnected from its power ...

Page 16: ...nner clean the evaporator cylinder s using a soft bristle brush 4 Rinse all cleaned parts with cool clean water 5 5 3 SANITIZING Sanitizing should be performed immediately prior to starting the machine Do not allow the unit to sit for extended periods of time after sanitization 1 Wash hands with a suitable antibacterial ATTENTION Before any disassembly and or cleaning procedure make sure that the ...

Page 17: ...BLY 1 Slide the drip tray into place 2 Lubricate faucet piston outer spiral and outside magnetic rotor see points A B and C of figure 8 only with the grease supplied by the manufacturer or other food grade approved lubricant figure 8 3 Assemble the faucet by reversing the disassembly steps see figure 7 4 Fit bowl gasket around its seat Note the largest brim of gasket must face against the rear wal...

Page 18: ... product to chase any remaining sanitizer from the bottom of the bowl s Drain this solution Do not rinse out the machine 6 ROUTINE MAINTENANCE 1 Daily inspect the machine for signs of product leaks past seals and gaskets If proper assembly does not stop leaks around seals or gaskets check for improper lubrication worn or damaged parts Replace parts as needed 2 In case of noise it needs to unplug t...

Page 19: ...19 7 In order to prevent any damages to the dispenser all plastics parts must be lubricated only with grease supplied by the manufacturer or with another lubricating product suitable for polycarbonate ...

Page 20: ...02461 H0099 R0 9 18E25 ...

Reviews: