background image

11 


3/ USING YOUR APPLIANCE 


A. Operating instructions 


1

. Vacuum Sealing


7.


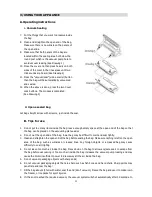
Put the things that you want to preserve inside 
the bag. 

8.


Clean and straighten the open end of the bag, 
Make sure there is no wrinkle on the panels of 
the open ends. 

9.


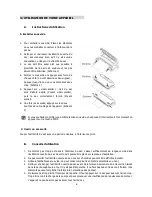
Make sure that both panels of the bag are 
located within the sealing area but below the 
round post which is the vacuum pump hole to 
avoid vacuum leaking (See Drawing 1) 

10.


Close the cover and then press heavily on both 
sides of the cover in the lines areas until two 
click sounds are heard.(See Drawing 2) 

11.


Press the “vacuum/seal” (vider+sceller) button 
then the bag will be automatically vacuumed 
and sealed. 

12.


When the above is done, press the two Cover 
Lock buttons. The process is completed.   

      (See Drawing 3) 


2. Open a sealed bag 


Cut bag straight across with scissors, just inside the seal. 


B.


Tips for use 


1.


Do not put too many items inside the bag: leave enough empty space at the open end of the bag so that 
the bag can be placed on the vacuuming plate easier. 

2.


Do not wet the open end of the bag. A wet bag may be difficult to melt and seal tightly.   

3.


Clean and straighten the open end of the bag before sealing the bag. Make sure nothing is left on the open 
area  of  the  bag,  such  as  wrinkles  or  creased  lines.  Any  foreign  objects  or  a  creased  bag  may  cause 
difficulty to seal it tightly. 

4.


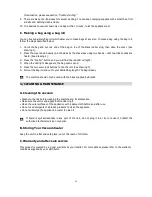
Do not leave too much air inside the bag. Press down on the bag to allow any/excess air to escape from 
the bag before vacuuming it. Too much air inside the bag increases the vacuum pump loading and may 
cause the motor insufficient power to draw away all the air inside the bag. 

5.


Do not vacuum packaging objects with sharp ends/ 

6.


Do not vacuum packaging objects that are sharp such as fish bones and hard shells. Sharp points may 
penetrate and tear the bag! 

7.


Fill the bag about 2/3 full with water, seal the end (don't vacuum). Freeze the bag and use it to make ice in 
the freezer, or ice packs for sport injuries. 

8.


If it has not reached the required vacuum, the vacuum system will shut automatically after 30 seconds. In 

Summary of Contents for SOU-110

Page 1: ...FR MANUEL D INSTRUCTION EN INSTRUCTION MANUAL Emballeuse sous vide Vacuum Sealer SOU 110...

Page 2: ...otre nouvelle emballeuse sous vide BRANDT Bien entendu dans un souci permanent de satisfaire le mieux possible vos exigences vis vis de nos produits notre service consommateurs est votre disposition e...

Page 3: ...emballeuse sous vide 5 B Avant la premi re utilisation 5 3 UTILISATION DE VOTRE APPAREIL 6 A Instructions d utilisation 6 B Conseils d utilisation 6 C Les rouleaux de sacs 7 4 ENTRETIEN ET NETTOYAGE D...

Page 4: ...it entre la prise de courant et la prise d appareil faire remplacer la prise de courant par une prise ad quate par un technicien qualifi 4 La s curit lectrique de l appareil n est garantie que si celu...

Page 5: ...rdon ou la prise endommag 22 Si vous n allez jamais plus utiliser l appareil couper le cordon d alimentation apr s l avoir d branch B Donn es Techniques C Protection de l environnement Arriv en fin de...

Page 6: ...interrompre tout moment en appuyant sur la touche STOP 2 Ouvrir un sac scell Couper l extr mit du sac avec une paire de ciseaux l int rieur du joint B Conseils d utilisation 1 Ne mettez pas trop de ch...

Page 7: ...euse sous vide et le voyant rouge s allumera 3 Lorsque le voyant LED dispara t le sac sera scell 4 Appuyez sur les deux boutons de verrouillage voir sch ma 3 pour lib rer le rouleau 5 Sortez le roulea...

Page 8: ...en assurer sceller la poche avec un peu d air l int rieur plonger la poche dans l eau et la serrer Les bulles indiqueront une fuite La ressouder ou utiliser une autre poche Les poches n ont pas t scel...

Page 9: ...oing effort to satisfy your demands with regard to our products as best as possible our after sales service department is at your disposal and ready to listen in order to respond to all of your questi...

Page 10: ...2 PREPARING YOUR APPLIANCE 12 A Description of the vacuum sealer 12 B Before using your vacuum sealer 12 3 USING YOUR APPLIANCE 13 A Operating instructions 13 B Tips for use 13 4 CARING FOR AND CLEANI...

Page 11: ...nt of their use being absolutely necessary always ensure that they conform to current safety standards and take care not to exceed the indicated maximum voltage 6 Never use adaptors if the voltage is...

Page 12: ...ects on the environment and health and enables the constituent materials to be recycled which saves energy and resources To remind you that you must dispose of this appliance correctly the symbol show...

Page 13: ...end of the bag so that the bag can be placed on the vacuuming plate easier 2 Do not wet the open end of the bag A wet bag may be difficult to melt and seal tightly 3 Clean and straighten the open end...

Page 14: ...l is done 4 Press the two cover lock buttons to file the roll See drawing 3 5 Pull out the bag roll and cut to your desired bag length The bag is ready The machine should only be used with the bags su...

Page 15: ...The bag could have a hole in it To check this seal the bag with some air inside submerge the bag in water and squeeze it Bubbles will indicate that there is a leak Seal it again or use another bag Th...

Reviews: