background image

Installation

 WF2613

Bradley

 • 

215-1451 Rev. F; ECN 13-00-001 

3/5/2013 21

Vernatherm Thermostatic Mixing Valve (S01-525) Parts List — 

Repair Kit S65-259

Item

Part No.

Qty.

Description

4

S39-413

1

Thermostat

6

125-001BX

1

O-Ring

7

125-157

1

O-Ring

9

6

5

4

3

2

7

8

Spring

Thermostat

Piston

Stem

O-Ring

O-Ring

Cap

Nut 3/8-24 Hex Jam

10

Seal Cup

1

Valve Body

Summary of Contents for Terrazzo WF2613

Page 1: ...stalling the Drain 6 Assembling Pedestal 6 Anchoring Pedestal 7 Installing Drain Spud in Bowl 7 Installing Supplies w Optional Soap Dispenser 8 9 Valve Connections for Infrared 10 Electrical Connections for Infrared 11 Adjust the Temperature 12 Cleaning and Maintenance 13 Soap Valve Parts List and Maintenance 14 15 Sprayhead Parts List and Troubleshooting 16 Infrared Troubleshooting 17 Solenoid Va...

Page 2: ...ation Information Terrazzo Material Terrazzo is a mosaic looking natural stone and concrete material polished to a high gloss and sealed with clear polyurethane resin for long lasting beauty Terrazzo is precast and composed of 85 stone and 15 binder with steel reinforcing rods cast into the bowl Adaptive Infrared The sprayhead is controlled by a solenoid valve allowing the user to activate a flow ...

Page 3: ...zo 1372 483 743 994 1083 921 1299 1511 660 711 946 260 Type Pipe Length 54 Less Soap Dispenser 21 1 2 546mm 54 With Soap Dispenser 30 762mm 54 Less Soap Dispenser With Towel Dispenser 55 1 2 1410mm 54 With Soap Dispenser With Towel Dispenser 48 1219mm 54 With Cube Adapter 32 813mm 54 With Cube Adapter With Towel Dispenser 50 1270mm 54 With Cube Adapter And Soap Dispenser 40 1016mm Subtract 4 from ...

Page 4: ... Floor 10 254 4 102 4 102 A A B 8 3 8 213 8 1 2 216 7 1 4 184 9 3 4 248 54 1372 bowl 54 1372 bowl Center of Washfountain Center of Washfountain Type O Off line vent with supplies from above UPC and IPC restrict the vertical distance from the fixture outlet to the trap weir to not more than 24 Check state and local codes for variances Top View Top View Side View Side View Notes For All Models All p...

Page 5: ...be increased proportionately Overhead supplies must be reduced to 1 2 copper tube to pass through support tube Check valve inlets are 1 2 NPT Dimensions shown in parentheses are millimeters For Maximum rigidity of sprayheads support tube assembly use 1 1 2 NPT galvanized pipe for vent Use of plastic or copper for vent is not recommended Dim Right Wall Left Wall Std Ht Juv Ht Std Ht Juv Ht A 11 1 4...

Page 6: ...rmity to local codes and ordinances is the responsibility of the installer All piping shown in dotted lines to be supplied by installer 2 Assembling the Pedestal Drain Thru Floor Optional Wall Bracket 140 146 LH Left Hand 140 146 RH Right Hand Rear Leg 193 006 Std Ht 193 006A Juv Ht Lower Support 194 041 Upper Support 194 042 Diagonal Support 194 043 Std Ht 194 043A Std Ht 5 16 Carriage Bolt 160 0...

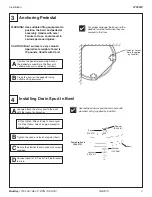
Page 7: ...sing suitable lifting equipment 4 Installing Drain Spud in Bowl ALoosely attach the drain spud to the bowl with the locknut and washer Seal between drain spud and drain hole with plumber s putty supplied by installer For proper drainage the bowl and the pedestal must be level when they are secured to the floor Strainer S45 067 Holes for Anchor Bolts Supplied by Installer Spud 112 015 Washer 142 06...

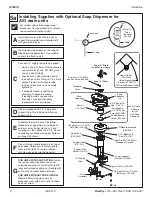
Page 8: ...e assembly on top of sprayhead Rotate until infrared module locks in with tie bar Drop two infrared module wires down into the pedestal FOR UNITS WITH SOAP OPTION Install the spacer soap dispenser and cover using the coupling nut third tie rod 8 5 8 long and second coupling nut Secure with acorn nut and socket head set screw FOR UNITS WITHOUT SOAP OPTION Secure infrared module cover and dispenser ...

Page 9: ...TS WITH SOAP OPTION Place the spacer soap dispenser and cover in position on top of IR module Slide tie bar over 1 1 2 vent pipe 1 2 below top of soap dispenser lid and secure with the two cap screws included with the tie bar Slide the dispenser cover over 1 1 2 vent pipe and secure with the two cap screws included with the tie bar FOR UNITS WITHOUT SOAP OPTION Slide tie bar over 1 1 2 vent pipe 1...

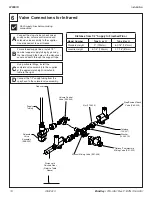
Page 10: ...complete valve assembly to the supplies at the approximate height indicated in table to the right Connect the 1 2 supply tubing from the sprayhead to the solenoid valve assembly Manual Mixing Valve S01 038 Optional Thermostatic Mixing Valve S01 525 Distance to Finished Floor Refer to Table Above Supply Tubing Stop Strainer Check Valve S60 003 Tailpiece 129 007 Washer 124 001A Reducer Nut 110 005 S...

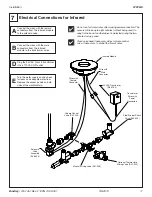
Page 11: ...s panels on both sides of the washfountain Do not use for two minutes after making power connection The sensors will take up to eight minutes without being used to adapt to the bowl if another object is detected during the two minute start up period Clean sprayhead if necessary Adjust volume control valve if necessary to control the flow of water Transformer Wires with Femal Connectors Wire with M...

Page 12: ...e cold water flow is reduced If the cold water is reduced properly reopen the hot water supply Shut the cold water inlet off by closing the cold water stop strainer check valve While the cold water supply is off check to make sure that the hot water flow has shut down A Check the temperature when approximately 1 0 GPM water flow is reached and adjust if necessary the range of the valve is 95 F 115...

Page 13: ... steel brushes Special Situations for Material Fingerprints and Smears To remove fingerprints or smears use a high quality stainless steel cleaner and polish in accordance with the manufacturer s instructions Many of these products leave a protective coating that helps prevent future smears and fingerprints Grease and Oil To remove grease and oil use a quality commercial detergent or caustic clean...

Page 14: ...p with each upward stroke The soap dispenser has been standard on washfountains since 1983 and is not well suited for very thick lotion soaps NOTICE Lotion soap will clog liquid soap valves Use only lotion soap valves with lotion soap Soap Valve Liquid S09 007S Soap Valve Lotion S09 057S Parts List Item Part No Description Valve Assembly S09 057 Attaching Parts S09 057S Qty 1 124 001D Washer 1 2 1...

Page 15: ...ispensers PCMX or Isapropanol based antibacterial soaps within viscosity and pH limits will also work with Bradley dispensers Soaps satisfying these basic guidelines will provide consistent flow and reduce clogs Most soap dispenser problems are caused by soap that is too thick or corrosive or by a lack of maintenance Many soaps come in concentrate form which must be diluted with water Often the so...

Page 16: ...r pressure at the open slots Clean the sprayhead 1 Disassemble the sprayhead and dislodge any dirt lime build up and foreign debris with a wire brush 2 Sprayheads with rubber grommet spray rings may be cleaned by rubbing a coin over the grommet 3 Throttle down the volume control water spray should strike the bowl without splashing outside of the bowl Water flow diminishes from the sprayhead Strain...

Page 17: ...to activate The sensor may take up to 8 minutes to readjust if it activated during those 2 minutes If the condition persists make sure the LEDs at the ends of the sensor cables are pushed all the way in to the backs of the lenses If the sensor is blinking fast and the water is not turning on go through the troubleshooting guide for the solenoid Slow blink Sensor is detecting something in it s view...

Page 18: ... to the transformer and solenoid 2 Connect the wire from the transformer to the solenoid valve Both transformer wires should now be connected to the solenoid valve which should turn on immediately and run continuously If the solenoid valve does not turn on and you have made sure that there is 24 volt power coming from the transformer you know that the solenoid has failed and will need to be replac...

Page 19: ...heck Valve Item Part No Qty Description 1 118 039 1 Valve Body Brass 1 118 039A 1 Valve Body Plated 2 160 131 1 Set Screw 3 S21 014 1 Stop Assembly Celcon 3 S21 026 1 Stop Assembly Brass 4 156 006 1 Strainer 5 124 001BV 2 Fiber Washer 6 153 068 2 Plug Brass 7 129 007 1 Tail Piece Brass 7 129 007A 1 Tail Piece Plated 8 110 005 1 Tail Piece Nut Brass 8 110 005A 1 Tail Piece Nut Plated 9 124 001AF 1 ...

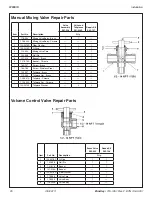
Page 20: ...1 4 119 059 Mixing Valve Core 1 1 1 5 152 038 Roll Pin 1 1 1 6 121 016 Bonnet Brass 1 1 1 6 121 016A Bonnet Chrome 7 160 197 Screw Brass 1 1 7 160 189 Screw Stainless Steel 129 007 Tailpiece Brass 2 110 005 Tailpiece Nut Brass 2 129 007A Tailpiece Chrome 110 005A Tailpiece Nut Chrome 124 001AF Tailpiece Washer 2 2 Item Part No Description Brass Valve S02 045 Repair Kit S45 198 Qty 1 125 001BC O Ri...

Page 21: ...rnatherm Thermostatic Mixing Valve S01 525 Parts List Repair Kit S65 259 Item Part No Qty Description 4 S39 413 1 Thermostat 6 125 001BX 1 O Ring 7 125 157 1 O Ring 9 6 5 4 3 2 7 8 Spring Thermostat Piston Stem O Ring O Ring Cap Nut 3 8 24 Hex Jam 10 Seal Cup 1 Valve Body ...
Page 22: ...ot as it should be the piston needs to be cleaned Follow the method outlined below for cleaning the piston and valve body Remove the thermostat Lift the piston out with a needle nose pliers and remove the spring Any cleaner suitable for brass and stainless steel may be used if cleaning with suitable cleaner is not sufficient to remove debris a 400 grit sandpaper may be used to polish and hone the ...

Reviews: