background image

10

ENGLISH

Trigger 2

Enables any two PV1D presets to be selected in turn 
by a 12V control signal on the Trigger 2 input. Selecting 

In

 engages this control feature and selecting 

Out


disengages it. 

Out 

should be selected if your PV1D is 

integrated within an RS232 home automation system. 
The default is 

Out

.

Pressing the    button while 

In

 is highlighted sets 

Trigger 2

 as the switching mode and allows the user 

to select which Presets correspond to 12V and 0V at 
the Trigger 2 input. If 

In

 is the selected mode, Preset 

switching via the front panel buttons in normal mode is 
then disabled.

The default presets are Preset 1 for 0V and Preset 2 
for 12V.

Audio

The 

Audio

 option in the setup home page provides 

access to all the PV1D audio setup parameters.
Select 

Audio

 to move on to the next setup stage.

About

Displays the PV1D model number and internal software 
(firmware) version.

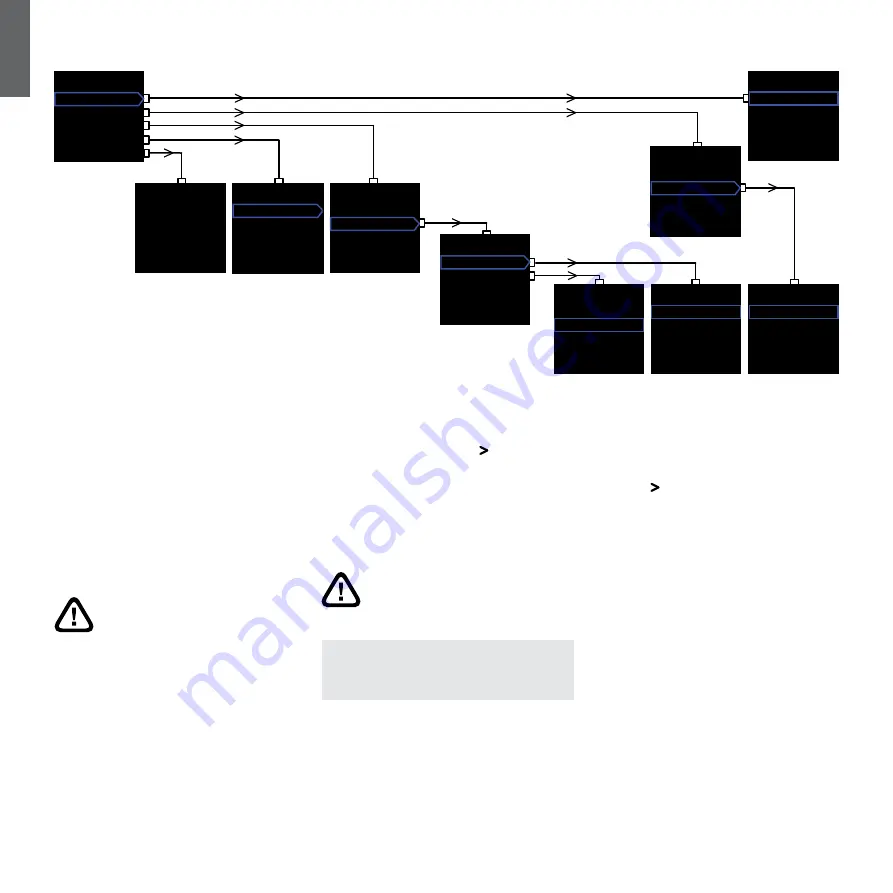
When the PV1D enters setup mode it will display the 
setup Home Menu illustrated above left.
 
The five menu items provide the following functions:

Display

By default, the display is set to dim and the navigation 
buttons fade completely after 30 seconds of button 
inactivity to reduce visual distraction in normal 
operation. Alternatively, the display may be set to go 
off altogether. As soon as any button area is pressed, 
the display and buttons become fully bright and always 
remain bright when in setup mode.

On/Off

In this context, 

Off

 refers to the Standby condition. 


To fully disconnect the PV1D from mains  


power, it is necessary to switch off the  


power outlet socket or withdraw the  


power plug.

Select 

RS-232

 if an RS-232-based home automation 

system is to be used to switch between on and off, or 
if you wish to disable the Auto function.

If 

Auto

 is selected, the PV1D will switch on 

automatically when an input audio signal is detected 
and off following a specified time after the input signal 
stops.
The automatic switch-off delay time can be set in the 
subsequent menu by pressing the      button when 
Auto is highlighted. Accessing the delay time will also 
select 

Auto

 as the switching method.

If 

Trigger 1

 is selected, 12V at the Trigger 1 input will 

switch the PV1D on and 0V will switch it off.

The default on/off method is 

Auto

 and the default turn-

off time is 30 minutes.


To proceed with PV1D setup, ensure  


that the On/Off parameter is initially  


set to RS-232. Reset it if required  


when all other parameters have  


been configured.

  Note: The logo On/Standby button on the PV1D may  
  always be used to switch between On and Standby,  
  regardless of the setting of the On/Off parameter on  
  the screen.

Display

Dim
Off


About

Model                

PV1D

Software            

1.0.0


Audio

Inputs
Speaker               

List


Presets


Trigger 2

Out
In

Trigger On (12V)

Preset 1
Preset 2
Preset 3
Preset 4
Preset 5

Trigger Off (0V)

Preset 1
Preset 2
Preset 3
Preset 4
Preset 5

Auto Off Delay

30 min
60 min
90 min
120 min
180 min


Trigger

Off                  

Preset 1

On                  

Preset 2


On/Off

RS-232
Auto                 

30 min

Trigger 1

Setup

Display                

Dim

On/Off                

Auto

Trigger 2            


Audio
About


5.2 Initial Setup

Summary of Contents for PV1D

Page 1: ...uksales bwgroup com B W Group North America T 19786642870 E marketing bwgroupusa com B W Group Asia Ltd T 85234729300 E info bwgroup hk SubApp is a trademark of B W Group Ltd THX is a registered trade...

Page 2: ...Bowers Wilkins John Bowers el fundador de nuestra compa a crey firmemente que el dise o imaginativo la ingenier a innovadora y la tecnolog a avanzada eran las claves para desbloquear el disfrute del...

Page 3: ...V1D provides input sensitivity options that enable its optimum matching with source electronics and variable gain control to match its volume level with that of the main speakers With all the levels o...

Page 4: ...ile than most subwoofers in terms of positioning thanks to its on board equalisation and optimisation system that can compensate to some extent for less than ideal positioning Section 5 4 describes us...

Page 5: ...simultaneously as the PV1D enables either input to be selected within setup presets Section 5 describes the use of setup presets and the diagram above illustrates the PV1D connection panel 1 Speaker...

Page 6: ...Section 7 for more 6 Mini USB socket From time to time it may be necessary to update the subwoofer s internal software firmware This is done from a computer running the updater program and a USB to m...

Page 7: ...uently toggles between that and the Volume Trim adjustment screen Accesses first the Volume Trim adjustment screen and subsequently toggles between that and the manual Preset selection screen Increase...

Page 8: ...n this context Off refers to the Standby condition To fully disconnect the PV1D from mains power it is necessary to switch off the power outlet socket or withdraw the power plug Select RS 232 if an RS...

Page 9: ...onnected to the LFE output of an audiovisual processor the balance between the PV1D and the other speakers will be adjusted when the processor s speaker level setup procedure is carried out In this ca...

Page 10: ...irst named on the list after None The low pass filter User parameters are Freq uency Slope and Phase Select Freq to set the low pass cut off frequency of the filter to match the high pass 6dB cut off...

Page 11: ...inputs The default is 0dB Low Pass Enables the preset to specify that the PV1D low pass filter is either In or Out of circuit A preset configured for use with home theatre program material via PV1D co...

Page 12: ...The drive unit suspension will also loosen up during the first hours of use The time taken for the speaker to achieve its intended performance will vary depending on previous storage conditions and h...

Page 13: ...he indicator flashes Release the button iii Press and hold the button until the indicator flashes Release the button iv The indicator will switch to white while the PV1D settings are stored and switch...

Page 14: ...gut durchdacht werden damit dieser erstklassige Subwoofer optimal aufspielen kann Wir empfehlen Ihnen daher sich Zeit zu nehmen und diese Bedienungsanleitung gr ndlich zu lesen Ob Musik oder Filme der...

Page 15: ...uksales bwgroup com B W Group North America T 19786642870 E marketing bwgroupusa com B W Group Asia Ltd T 85234729300 E info bwgroup hk SubApp is a trademark of B W Group Ltd THX is a registered trade...

Reviews: