background image

5. BLUE TOOTH HANDFREE SYSTEM

To enter the Bluetooth mode, select the MODE
button or press the Bluetooth icon.

In Bluetooth interface, the icons descriptions are as
follows:

: AUDIO & VIDEO SETUP interface as in page 10.

: Transfers audio between the Car Audio System and mobile phone.

: Tapping it can exit to Mode Menu.

: Clear the phone numbers entered.

: Same as + button in a mobile phone.

The other icons are same as ones in the front panel and Remote Control.

1) Turn on the Bluetooth mode of the mobile phone;

2) Select Finding Bluetooth Device . It will show the name of the Bluetooth Device if

found. Select it and it will ask you to input a password, input the password 0000
and then enter it. Then it will tell you pair OK.

3) Some mobile phones, automatically connect with the BT device of this car audio

system after pairing is successful; for some mobile phones, you need to select the
paired BT device and press the CONNECTION button . When connection is ok, the
LCD of the car audio system will show LINK OK.

* If pairing fails, long press the PAIR button on the remote control to enter to pairing

mode, the LCD will display PAIR START, then pair and connect with mobile phone
again, and repeat the process 1 to 3.

In the connection status, find the paired and connected Bluetooth Device, press
the disconnection button to disconnect.

In the disconnection status, find the paired and disconnected Bluetooth Device,
press the connection button to connect.

1.

Enter Bluetooth mode

2. Pairing and connection

3. Use the mobile phone to connect or disconnect

Bluetooth interface

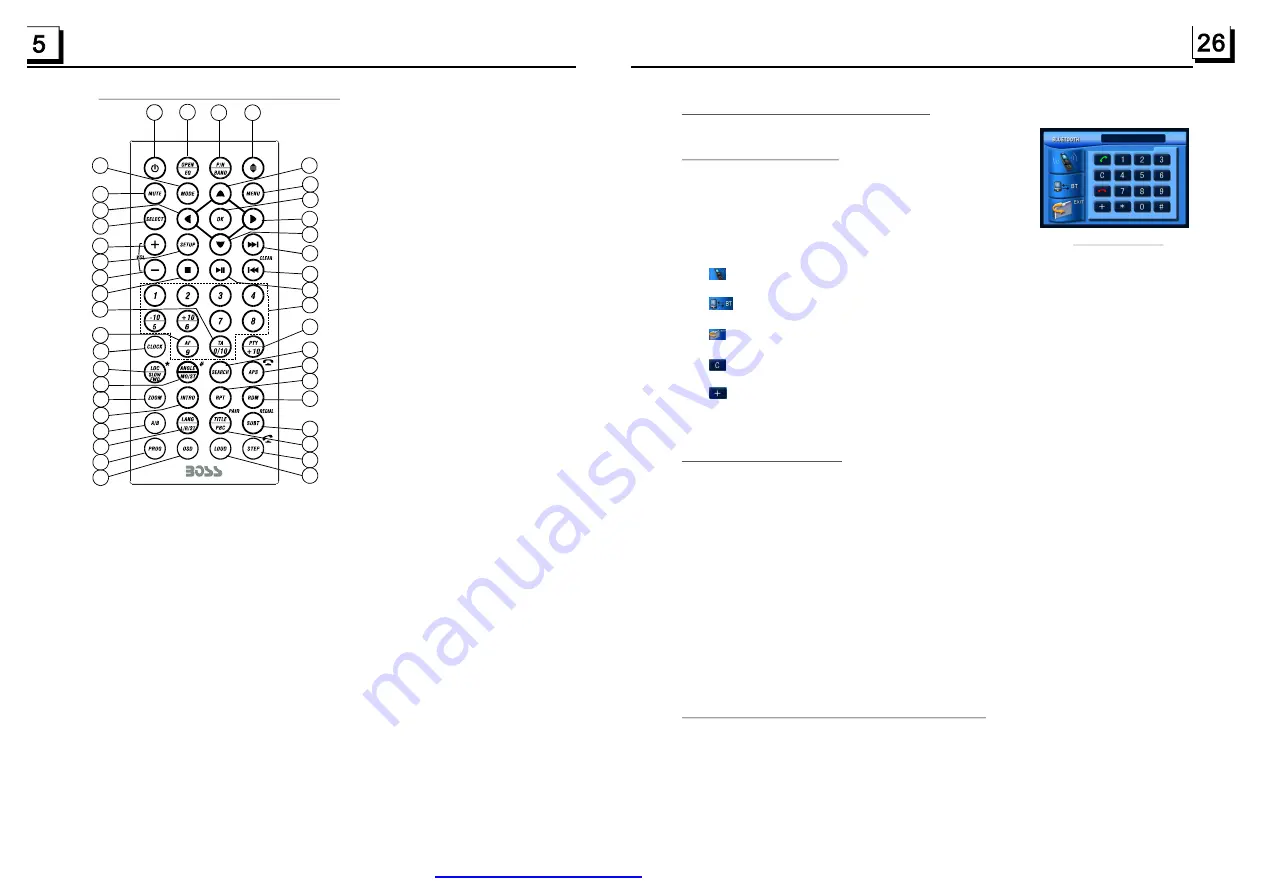
1.5 The Remote Control Description

16. SEARCH BUTTON

17. RDM BUTTON

18. RPT BUTTON

19. SUBTITLE/REDIAL BUTTON

20. TITLE/PBC/PAIR BUTTON

21. VIEW-ANGLE/ST/# BUTTON

22. ZOOM BUTTON

23. AUDIO BUTTON

24. CLK BUTTON

25. A-B BUTTON

26. INT BUTTON

27. EQ/OPEN BUTTON

28. LO C/SLOW-FWD/* BUTTON

29. MUTE BU TTON

30. STOP BUTTO N

31. VOLUME- BU TTO N

32. < BUTTO N

33. O K BUTTON

34.  BUTTON

35. BAND and P/ N BUTTON

36. PRO G BUTTON

37. O SD BUTTON

38. LOUD BUTTON

39. T EL BUTTON

40. TA BUTTON

41. AF BUTTON

1. ANG BUTTON

2. MENU BUTTO N

3. POWER BUTTON

4. ^ BUTTON

5. >>| BUTTON

6. > BUTTON

7. |<< BUTTON

8. v BUTTON

9. SEL BUTTON

12. 10+/PTY BUTTON

13. SETUP BUTTON

14. MODE BUTTON

15. APS/Hang Up BU TTO N

10. PLAY/PAUSE BUTTON

11. NUMBER(0~ 10,+ 10

-10) BUTTONS

1

2

3

4

5

6

7

9

8

10

11

12

13

14

15

16

17

18

19

20

21

22

23

24

25

26

27

28

29

30

31

32

33

34

35

40

41

39

36

37

38

PDF created with FinePrint pdfFactory trial version 

http://www.pdffactory.com

Summary of Contents for BV9974B

Page 1: ......

Page 2: ... the rear panel of the unit indicate this player is a class laser product only use weak laser and no hazardous radiation outside of the unit 1 Read through this instruction manual before installation and use 2 Before removing the unit remove the disc from the unit first 3 Do not open the cover or touch any of the components exposed out of the unit only for qualified technicians 4 Do not expose the...

Page 3: ...age 18 4 18 Change the Video Signal System 18 4 19 Look over the Playback Status 18 4 20 Program Playback 19 4 21 Playback IMAGE files 19 4 22 Playback MP4 files 20 4 23 ESP and Function 20 4 24 DVD System Menu Setup Operation 20 Parental Control 24 Region Code 25 5 Trouble Shooting 28 7 Specification 29 Contents ID3 Bluetooth Hand free System 26 6 7 Specification General Specification Power Suppl...

Page 4: ...wer switch is on Ensure that the power cord is not damaged or the fuse is not blown Ensure that the power plug is connected to the inlet tightly NO SOUND BUT HAVE PICTURE Ensure that the player s audio output has a good connection with amplifier s audio input Check whether the audio connector is damaged Check whether you have turned down the volume Ensure that you have set the right AUDIO setup of...

Page 5: ...s Disc Maintenance 1 To h 1 Do not use petrol thinner Commercial cleaner or anti static spray to wipe disc keep the disc clean andle the disc by its edge do not touch the disc surface of the play side 2 Do not stick paper or tape on the disc If there is anything on the disc surface wipe it up with a soft cloth before using 3 Do not expose the disc to direct sunlight or nearby heat sources such as ...

Page 6: ...ART then pair and connect with mobile phone again and repeat the process 1 to 3 In the connection status find the paired and connected Bluetooth Device press the disconnection button to disconnect In the disconnection status find the paired and disconnected Bluetooth Device press the connection button to connect 1 Enter Bluetooth mode 2 Pairing and connection 3 Use the mobile phone to connect or d...

Page 7: ...ective region code If the region codes of them do not match with each other the DVD player can not play the disc Appendix The region code of DVD The Motion Picture Association of America MPAA divided the world into 6 regions and gave every region a code namely region code The region codes and the countries or areas represented by the region codes as follows Region 1 America Canada East Pacific Inl...

Page 8: ...cting Socket 1 Wiring Connecting Socket 2 Radio Antenna jack Black Black WIRING CONNECTING SOCKET 2 WIRING CONNECTING PLUG 2 BROWN AV RCAAUX IN RED R WHITE L YELLOW VIDEO Parental Control Q Why after inserting DVD disc in the disc slot a dialogue window appears that asks to input a 4 digits password A This is because the movie you are playing is rated with the Parental Control and the current rati...

Page 9: ...h PRO LOGIC Dolby stereo effect choose the item so it will output audio signal with vivid theatre effect STEREO If you choose this item when outputting audio signal with 5 1 channels it will output the left and right channels of signal when outputting audio signal with 2 channels it will output the common 2 channels of stereo signal VSS If you choose this item when playing a disc recorded with 5 1...

Page 10: ... MUTE mode Pressing the POWER button on the front panel shortly also can turn on off MUTE mode 6 After sliding the monitor into the chassis pressing the CLK button can display clock time on the small LCD 7 To select a desired To turn on off LOUD mode Press the LOUD button on the remote to turn on off LOUD mode When turning on LOUD mode it will enhance bass level immediately when bass is not enough...

Page 11: ...number memory bank The AS operation is implemented in each bank of the selected band When the AS operation is finished it will scan each preset station for 5 seconds in FM or AM band from M1 when APS button is pressed briefly 3 Radio Operation FM1 FM2 FM3 AM1 For the DVD System Menu there are 6 setup titles They display as follows 4 24 1 SYSTEM SETUP TV SYSTEM TV TYPE PASSWORD RATING DEFAULT This ...

Page 12: ...the status of the AF switching mode is displayed by AF segment on the display Segment off AF switching mode off Segment on AF switching mode on and has RDS information Segment flashing AF switching mode on but RDS information is not received yet 3 During JPEG playback press one of the v buttons to change the angle of viewing picture that is displaying as follows 90 deg cw 90deg ccw UP DOWN v LEFT ...

Page 13: ...ayback press the PROG button to enter a program interface as follows for DVD for VCD MP3 WMA CD 2 Use the direction buttons to move cursor onto the desired place for inputting the sequence number 3 Use the number button to input desired sequence number of title chapter track with desired sequence 4 Use the direction button to move cursor onto Play item then press the OK button to play the programm...

Page 14: ...interface for MP3 WMA MP4 JPEG Keyboard interface 1 Keyboard interface 2 SET Menu 1 SET Menu 2 ZOOMx2 ZOOMx3 ZOOMx4 ZOOMx1 2 ZOOMx1 3 ZOOMx1 4 ZOOM OFF Press one of the v buttons to select the area you want to enlarge When playing DVD press the SUBTITLE button repeatedly to select the language of the caption or turn off the caption depend on the media used When playing VCD MP3 WMA CD the button is...

Page 15: ...rol to view in different angle This function is only for the DVD media with ANGLE function In video image mode during playback press the ZOOM button continuously to enlarge a certain area of the images on the screen with these multiples 15 4 2 Pause Playback 4 3 Stop Playback 4 4 Select Chapter Track with the or Button 4 5 Select Chapter Track with the Number Buttons 4 6 Select Chapter Track with ...

Page 16: ...to select your desired title and then press the OK or PLAY button to open the root menu of the selected title 3 Press the direction buttons to select your desired chapter finally press the OK or PLAY button to play the selected chapter During playback pressing the MENU button can directly display the root menu of the title that is playing 1 When starting to turn on the PBC function it will play fr...

Reviews: