background image

AUX OPERATION

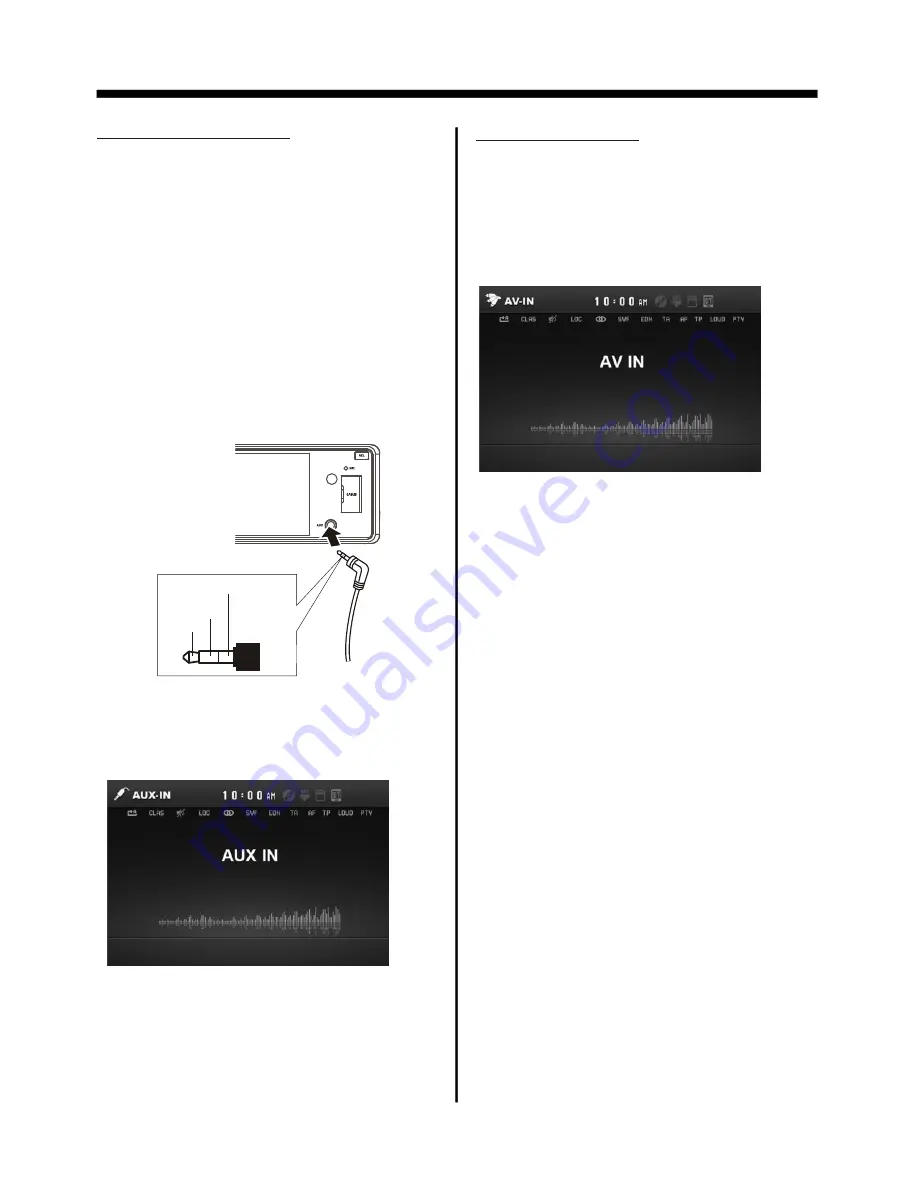
On the front panel of this unit, there is an
AUX IN jack, follow the diagram below to 
connect analogue replay devices(only
for the Audio connect, if you want to 
connect the Video, please plug the  
<Video input > on the back of the unit .) . 
Use this jack to replay sound of other 
replay equipment such as disc players, 
computers, etc. Via the loudspeakers.


3). You now hear the sound from the
external device played back through
the loudspeakers .

4). use the VOL+/-  on the front panel to 
adjust the volume level.

AUX/AV OPERATION

1). Please connect the external device 
with stereo jack plug the Aux in socket .

2). Press the SRC repeatedly to select 
the AUX mode, the message will like 
following as below :

AUX IN JACK FRONT PANEL

Ground

Right

Left

AV Operation

Please plug the <Video input > 
on the back of the unit .

Press the SRC repeatedly to select the
AV mode, the message will like 
following as below :


  In AUX

/

AV mode, you can use SEL, +, -, 


VOL, MUTE, EQ , SW and LOUD buttons

  to adjust audio and video.

Note: To ensure safety while driving and
           to comply with lows, drivers should
           not watch video or operate the 
           video device while driving.

All manuals and user guides at all-guides.com

Summary of Contents for BV7348B

Page 1: ...All manuals and user guides at all guides com a l l g u i d e s c o m...

Page 2: ...HIS DEVICE IS INTENDED FOR CONTINUOUS OPERATION This product incorporates copyright protection technology that is protected by method claims of certain U S Patents and other intellectual property righ...

Page 3: ...solvents such as benzine thinner or conventional record cleaners as they may mar the surface of the disc Handling and Cleaning Dirt dust scratches and warping disc will cause misoperation Do not place...

Page 4: ...ger if there is a sudden stop like an emergency stop 30 INSTALLATION If installation angle exceeds 30 from horizontal the unit might not give its optimum performance Avoid installing the unit where it...

Page 5: ...EN button 3 put it in the protective case for safe keeping PROTECTIVE CASE FRONT PANEL KEY PLATE PLASTIC FRAME KEY PLATE If you want to take CHASSIS out of the SLIDE BRACKET HOUSING first remove the P...

Page 6: ...age the connectors Connector ATTACHING CONTROL PANEL 1 First insert the right side of the front panel into the main unit Bulge Hollow Bulge Hollow 3 Push it back to the position for playing 2 Push the...

Page 7: ...ITE BLACK GREEN GREEN BLACK REAR LCH SPK AUTO ANTENNA BLUE GROUND B MEMORY BACK UP B IGNITION SWITCH B RED YELLOW BLACK REAR RCH SPK FRONT LCH SPK LIGHT GREEN FUSE FUSE KEY GROUND BLACK KEY 1 BROWN KE...

Page 8: ...ck is reproduced in video play mode 6 LO DX SUBTITLE Changing of the SUBTITLE language on multi subtitle language Digital Video disc In radio mode Press this button for distance reception when you are...

Page 9: ...ss shortly to scan the preset station press longer to enter into automatic memory storing function 10 Press and hold to Press and hold this button to a desired work source Digital Video SEL 19 ZOOM Pr...

Page 10: ...hen Remove the battery holder as the direction indicated by the arrow See 2 Replace the battery Set a new battery property with side up as illustrated See 3 Insert the battery holder Push in the holde...

Page 11: ...e is found RADIO DISC USB CARD AUX IN AV IN BT Control Panel Control Panel Base of Control Panel 3 VOL Multifunction Button In normal mode this button is used to increase or decrease the volume 4 utto...

Page 12: ...nformation about using an AUX IN audio source refer to AUX operation 17 USB PORT For information about connecting a USB device 19 CARD SLOT For information about connecting a memory card device 1 PRES...

Page 13: ...te TV aspect 4 3 or 16 9 according to the connected TV set Normal PS For 4 3 TV Played back in the PAN SCAN style If connected to wide screen TV the left and right edges are cut off Normal LB For 4 3...

Page 14: ...factory default password is 0000 The password must be used to make General setup interface2 GENERAL WALLPAPER BLUETOOTH ON ABOUT clock setup interface AUDIO SETUP To turn to audio quality adjustment T...

Page 15: ...ll the end to select auto icon then tap ENTER to confirm and the back light change automatically Video setup interface The RESET button is to be activated for the following reasons A Initial installat...

Page 16: ...ally When an FM stereo broadcast is hard to receive Press ST MO button on the remote control to select the MONO or STEREO mode When Stereo mode is activated the ST symbol will appear You can use the b...

Page 17: ...l to retrieve a station which had been stored in the memory in advance the chose number is shown on display the function REG ON prevents the radio from switching to alternative frequency which have a...

Page 18: ...ever the new AF frequency is stronger than the station that is currently tuned in the radio switched to this frequency for a short time for a short time and the message In Radio mode long press the 9...

Page 19: ...track chapter on disc Longer press again to cancel this mode FOR VCD longer press the 3 INT button on the remote control It display will following menu as below SEQ PLAY INTRO 1 Note when select INTRO...

Page 20: ...between PBC ON and PBC off mode MONO LEFT MONO RIGHT STEREO MIX MONO For VCD CD during playback Press AUDIO on the remote control It is possible to switch the sound between monaural and stereo sound N...

Page 21: ...onnect them During operation of the device named Boss Audio as a hands free BT elect the item to find a When it finds the BT of the A V system the name will be displayed t will pair and connect When c...

Page 22: ...t successfully for one time Afterwards you only need to take on the power and the function of BT will work in three minutes automati cally if you want to operate the function of BT c If you want not t...

Page 23: ...to adjust the volume level AUX AV OPERATION 1 Please connect the external device with stereo jack plug the Aux in socket 2 Press the SRC repeatedly to select the AUX mode the message will like followi...

Page 24: ...to begin playback or viewing in the case of JPEG files To skip to the next or last track press the or Press the or buttons for Fast Forward or Fast Reverse playback REPEAT play modes are also availabl...

Page 25: ...unction is same as the operation on CD MP3 WMA Please to MP3 WMA operation for more details Change DISC to Card The operations are same as USB mode refer to see USB operation Change Card to DISC The o...

Page 26: ...e play mode select 4 Movie play mode select 5 Current play track SKIP AHEAD BACK In playback mode press the or button on front panel to skip ahead or back one item in the list Or press the or button o...

Page 27: ...ton to do selection First select Assign begin setting then select the input 0 38 and press SEL or ENTER to confirm 0 38 Then select a function icon such as will show in button 1 position and select to...

Page 28: ...vements in technology Supply Voltage 12V DC 11V 15V Current Consumption Less than10 A Maximum Power Output 4 x 80W Signal System Compositive video 1 0Vp p 75 Discs Played 1 DIGITAL VIDEO VIDEO Disc 5...

Page 29: ...antenna cable firmly The signals are too weak Select a station manually SYMPTOM CAUSE SOLUTION Video image appears black white The color system is set incorrectly Please switch to correct color system...

Reviews: