background image

10. USB DRIVE OPERATIONS

START THE USB DEVICE MODE

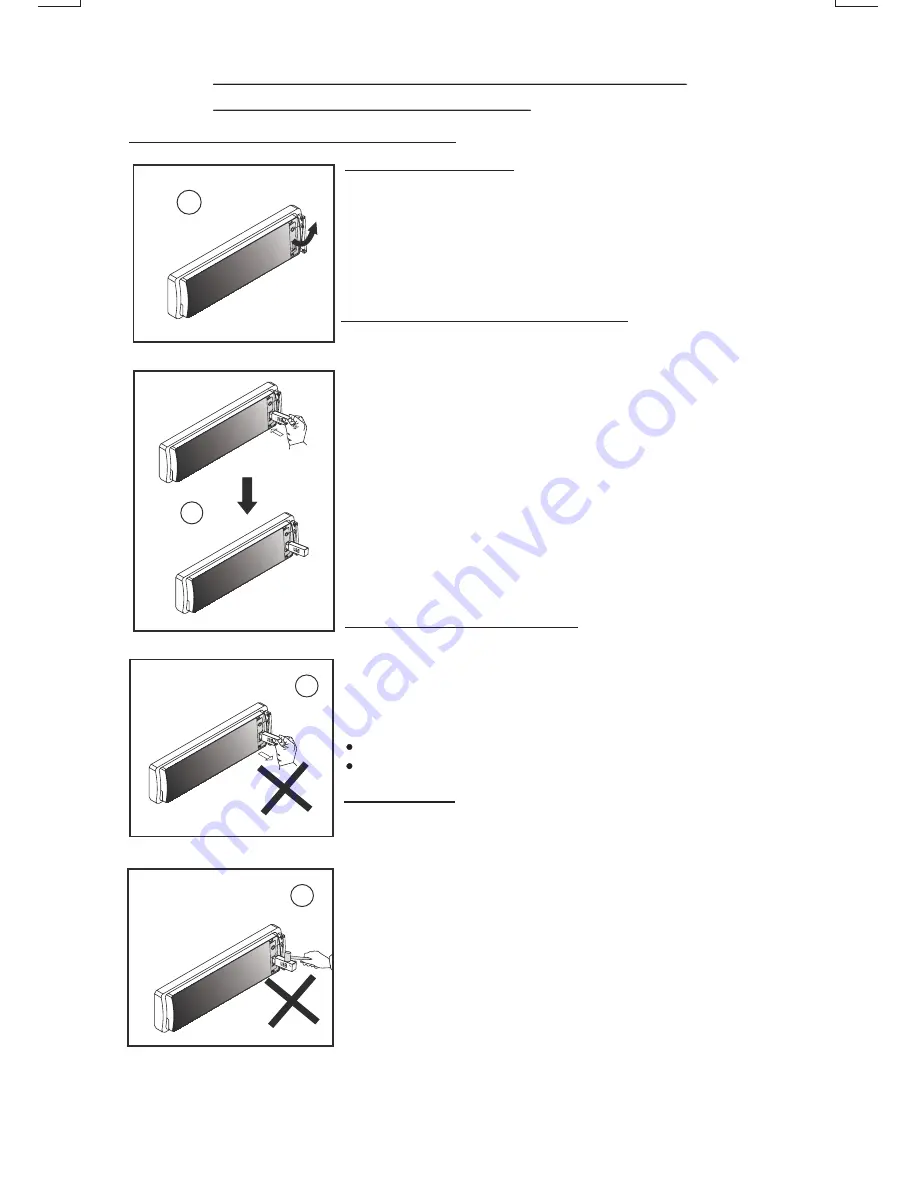
2. Plug in the USB drive / device completely as indicated in picture 2

(P.2)

and display will show “USB PLAY” to indicate that the USB drive /
device is being plugged in correctly & the download has begun.

3.Does not matter the unit is in what mode (TUNER,  CD, SD etc), 

once a USB drive / device is being plugged into the unit, unit will 
automatically switch to USB mode.

4.All the USB files playback function is same as normal CD or MP3 

disc playback.(Please refer to section CD operations & MP3 
operations)

1.  Always unplugged the USB gently from the unit, excessive force 

used will cause permanent & serious damage to the unit & the 
USB drive / device.

(P.3)

TO STOP USB PLAYBACK

1.The USB drive / device is unplugged, the unit automatically switch 

to radio mode. Or user can use mode button to switch to other 
mode.

2.User can use the mode button to choose USB mode (only if USB 

drive / device is inserted in the unit ) or any other modes, when they 
are in any mode.

WARNING

COMPATIBILITY

Due to the fast changing technology world, this unit may or may not 
be compatible to all the USB drive / device available with all the future 
technology, especially those USB drive / device which require to 
install a driver. Always choose a compatible USB drive / device which 
is compatible with this unit.

1.The USB socket is covered by the USB plastic cover as  indicated in 

picture 1 

 (P.1).

 Flip open the USB plastic cover, and the USB 

socket will become accessible.

E - 10

USB 1.1 > 320KBPS
FILE MANAGE: FAT12 / FAT16/ FAT 32

NOTE:

This unit is not compatible with portable Hard-Disk.

PLEASE READ THIS INSTRUCTION CAREFULLY
BEFORE OPERATING THE UNIT 

2.  Please never intentionally or accidentally hit on the USB drive / 

device when it is plugged in. This will cause permanent & serious 
damage to the unit & USB drive / device.

(P4)

3. Please never try to plug in any USB drive / device with excessive

weight or excessive size into the unit. Please always use USB drive /
device with reasonable weight & size which will not overload the unit,
which will not make performing normal operation on the front panel
impossible. Excessive weight or size USB drive / device may cause 
permanent & serious damage to the unit. And may cause access to 
the buttons / knobs on the front panel impossible.

The unit may take a while to detect or download the USB files, detect &
download time may vary depends on the type of USB drive / device.

NOTE:

P.1

P. 2

P. 3

P. 4

Summary of Contents for 820UA

Page 1: ...24 10 R 03 0500...

Page 2: ...e 15 Source 16 Front Audio Anschluss 17 Taste USB 1 Teclapararemoveropainelfrontal 2 TeclaMute 3 Teclaparaejetarodisco 4 TeclaLigar desligar 5 TeclaDisplay informa oMP3 iD3 6 TeclaLocal Distante 7 Tec...

Page 3: ...g from under the stickers Do not stick paper or tape on the disc P 2 Before playing clean the discs with an optional cleaning cloth Wipe each disc from the centre out P 4 Do not use solvents such as b...

Page 4: ...ngle exceeds 30 from horizontal the unit might not give its optimum performance Avoid installing the unit where it would be subject to high temperature such as from direct sunlight or from hot air fro...

Page 5: ...o remove the frame When re attaching the frame point the side with a groove down wards and attach it c Insert the levers supplied with the unit into the grooves at both sides of the unit as shown in f...

Page 6: ...case and be careful not to drop it or subject it to strong shocks When the release button is pressed and the D C P is unlocked the car s vibrations may cause it to fall To prevent damage to the D C P...

Page 7: ...NEGRO BLANCO NEGRO VERDE GRIS BLANCO ROJO AMARILLO NEGRO VIOLETA AZUL ALTAVOZ TRASERO DERECHO ALTAVOZ TRASERO IZQUIERDO ALTAVOZ FRONTAL DERECHO ALTAVOZ FRONTAL IZQUIERDO ALTAVOZ FRONTAL DERECHO SALID...

Page 8: ...rently in what mode When in USB or SD mode if the USB or SD is being removed unit will automatically switch to radio mode Connect the external signal to AUX in jack located at the front of the panel t...

Page 9: ...R FAD While the selected function is displayed turn Volume Knob to adjust the level within 5 seconds otherwise the unit will return to volume adjustment mode E 7 6 MUTE BUTTON MUTE 8 BAND LOUDNESS BUT...

Page 10: ...utton briefly to enter Preset Scan mode it will scan all the preset stations in the memories you can hear that it will stay on each station for about 5 seconds 2 AUTO MEMORY STORE Press AS PS button f...

Page 11: ...to skip to previous skip Press and hold Track Up Down Button to fast forward or fast reverse CD player starts when you release the button E 9 9 CD OPERATIONS 16 CD SLOT Insert the disc into CD slot Th...

Page 12: ...rive device available with all the future technology especially those USB drive device which require to install a driver Always choose a compatible USB drive device which is compatible with this unit...

Page 13: ...ck Please refer to section CD operations MP3 operations 1 Please make sure to insert the SD card in the correct direction orientation as indicated in picture P 7 Wrong insert will cause permanent seri...

Page 14: ...ne Up Down Buttons Both operations will be described But Encoder Volume Knob is available on some models only Please skip this description if your model is not equipped with this feature THERE ARE FOU...

Page 15: ...CTORY BY USING ENCODER VOLUME KNOB Under MP3 play mode press MP3 MENU BUTTON three times Then the first Directory name is shown Rotate ENCODER VOLUME KNOB ROTATE ANTI CLOCKWISE First to navigate throu...

Page 16: ...Preset Scan Band Loudness Mute FM Mono Stereo Change to CD Mode Preset EQ Display Clock CD Player Mode Power On Off Pause CD Scan Repeat Shuffle Select Vol Bas Tre Fad Bal Adjust Vol Bas Tre Fad Bal T...

Page 17: ...preavviso 87 5 107 9MHz 87 5 108MHz 10 7 Mhz migliore di 15dB a S N 30 dB 25dB a 1KHz 50dB Raggio di Frequenza Frequenza intermedia Sensibilit Separazione Stereo Rapporto S N SEZIONE RADIO FM Aliment...

Page 18: ...connection The operation keys do not work No sound The built in microcomputer is not operating properly due to noise Press the RESET button Front panel is not properly fixed into its place Sound skips...

Reviews: