background image

10 - English

Physical Setup

7. 

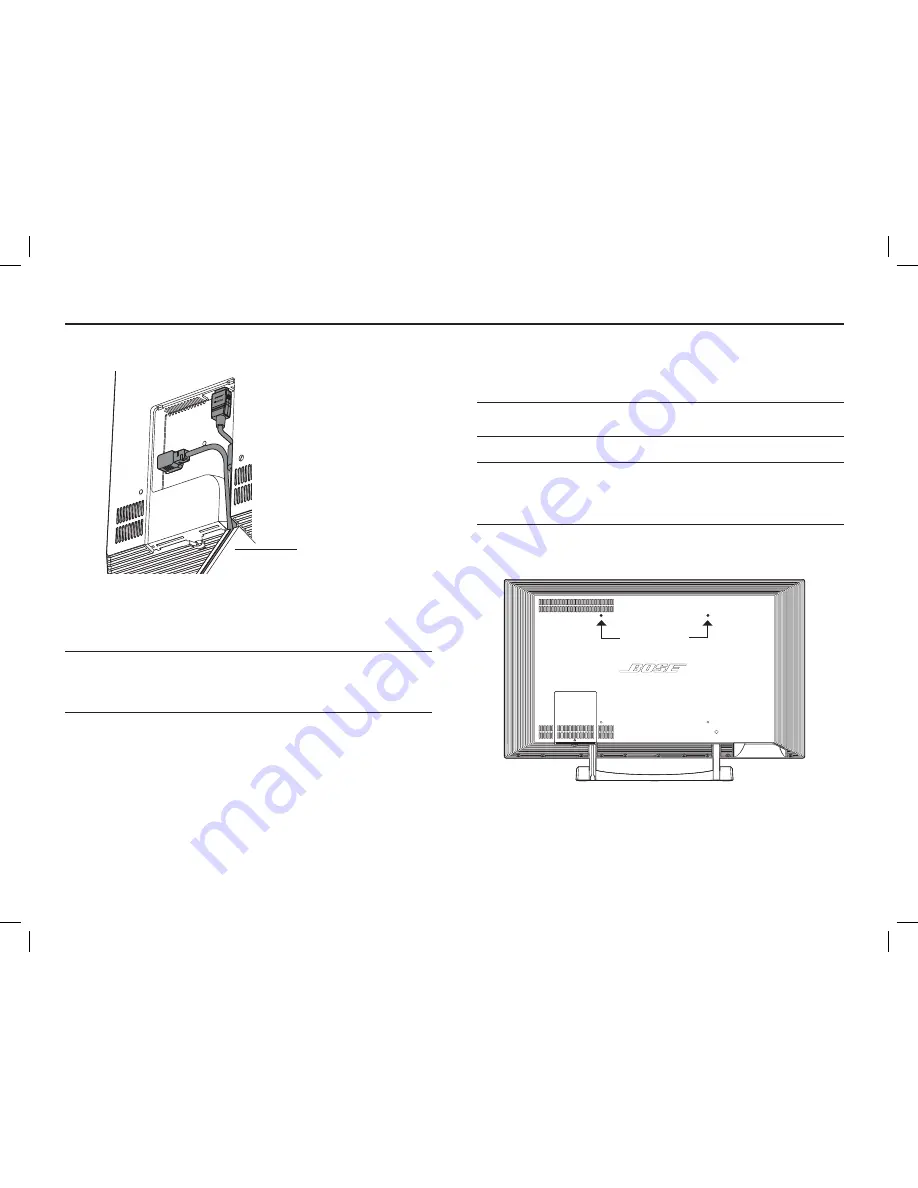
Route both cords through the leg of the stand and re-attach 

the connector cover.

Leg of stand

8. 

Plug the AC power cord from the monitor into a live AC 

(mains) outlet.

9. 

Restore the connector cover.

CAUTION: 

Bose

®

 strongly recommends installing the supplied 

two anti-tip straps that, when properly installed, provide an extra 

measure of security in the event that the monitor accidentally 

starts to tip over.

Installing the anti-tip straps

It is important that you install both straps according to the 

 following  instructions.

WARNING:

 Do not use the anti-tip straps for any application 

other than the one specified in this setup guide.

CAUTION: 

If you are unsure of the construction methods used 

in the space where you are setting up the monitor, or if you 

do not understand these instructions or have any concerns or 

 questions, please contact a professional installer.

1. 

Using the provided 5/32 in. (4 mm) hex wrench, remove the 

top two bolts from the rear panel of the monitor.

Bolts to 

remove

Summary of Contents for VideoWave III

Page 1: ...Setup Guide Gu a de instalaci n Guide d installation VideoWave III entertainment system...

Page 2: ...ons Do not incinerate WARNINGS Contains small parts that may be a choking hazard Not suitable for children under age 3 Never place the equipment on an unstable surface The equipment may fall causing s...

Page 3: ...water 6 Clean only with a dry cloth 7 Do not block any ventilation openings Install in accordance with the manufacturer s instructions 8 Do not install near any heat sources such as radiators heat re...

Page 4: ...ing in conjunction with any other antennas or transmitters This device complies with Industry Canada licence exempt RSS standard s Operation is subject to the following two conditions 1 This device ma...

Page 5: ...Physical Setup Monitor placement and connections 7 Monitor placement recommendations 7 Placing the monitor with the stand 8 Installing the anti tip straps 10 Wall mounting the monitor 12 Control conso...

Page 6: ...itor 2 The smaller box contains the control console monitor stand screws and two numbered boxes Box 1 1 contains the system parts used during the physical setup Box 2 contains the system parts used du...

Page 7: ...r experience The system features ADAPTiQ audio calibration technology which customizes the sound during setup based on where the system is positioned as well as the size shape and furnishings of the r...

Page 8: ...he stand 1 Unpack the stand stand screws and monitor 2 Lower the monitor onto the stand carefully lining up the holes in the bottom of the monitor with the supports on the stand WARNING The 46 in moni...

Page 9: ...t the screws into the holes on the back of the monitor and tighten using the provided 5 32 in 4 mm hex wrench 5 Place the monitor on a flat stable surface capable of supporting the combined weight of...

Page 10: ...ntally starts to tip over Installing the anti tip straps It is important that you install both straps according to the following instructions WARNING Do not use the anti tip straps for any application...

Page 11: ...uds 3 Locate the two wall studs closest to the straps Each strap should be attached to the wall stud closest to it CAUTION Do not attach both straps to the same stud 4 Hold the bracket on the end of e...

Page 12: ...screw pattern The mount must be able to support the weight of the monitor The 46 in monitor weighs 120 lbs 54 kg The 55 in monitor weighs 135 lbs 61 kg Articulating wall mounts are not recommended bec...

Page 13: ...d monitor according to the instructions included with the wall brackets 4 Lift the monitor out of its packing material WARNING The 46 in monitor weighs 120 lbs 54 kg The 55 in monitor weighs 135 lbs 6...

Page 14: ...control console to the monitor Until your system setup is complete and your external devices are connected keep the control console posi tioned for easy access to its rear connection panel CAUTION If...

Page 15: ...ol console 4 Plug the AC power cord into the power supply Fully insert the plug in as far as it can go 5 Plug the other end of the power cord into a live AC mains power outlet 6 To begin the interacti...

Page 16: ...nnect audio video devices to your system When it is time to connect devices the Unify system will guide you in choosing the right cable The USB flash drive can be used to update the system software Se...

Page 17: ...g green Starting up Solid green On and ready to use Orange Shutting down or off and charg ing iPod or iPhone dock dock available for purchase from Bose Note When the system starts up the monitor emits...

Page 18: ...perform this step exactly as it appears on your monitor It ensures that the remote can communicate with the control console 6 Follow the onscreen instructions to complete your system setup The Unify...

Page 19: ...Press the Setup button on the control console to activate the Unify system menu See Changing Your System Setup in the VideoWave III entertainment system Operating Guide For help in trying to resolve...

Page 20: ...2013 Bose Corporation The Mountain Framingham MA 01701 9168 USA AM370618 Rev 00...

Reviews: