background image

RPS

Upgrading Existing RPS Installations | en

61

Bosch Security Systems, Inc.

Installation Guide

4998141259 | 09 | 2008.10

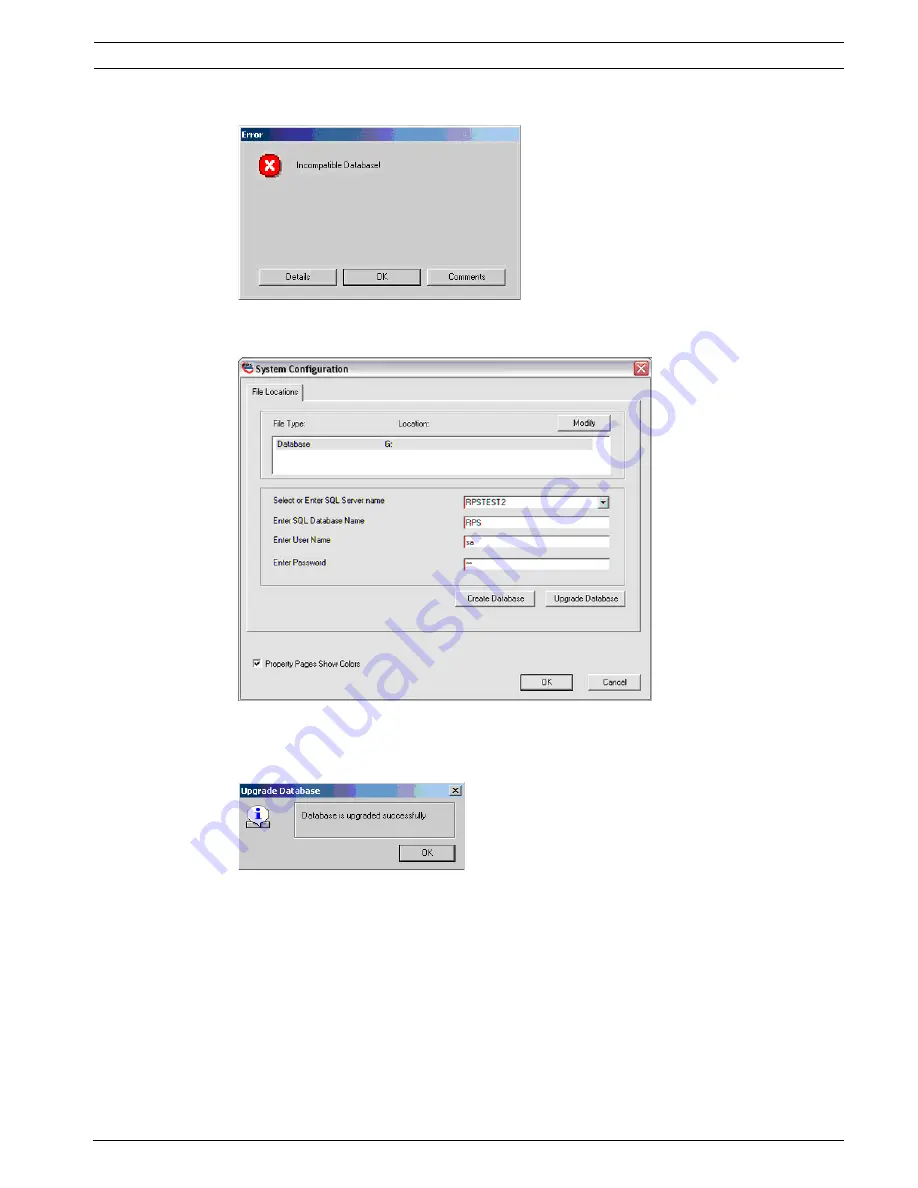
10. An error dialog opens. Click 

OK

.

Figure 4.31

RPS Incompatible Database Message Dialog

11. In the RPS System Configuration dialog, click 

Upgrade Database

.

Figure 4.32

RPS System Configuration Dialog

12. A confirmation dialog opens. 

Click 

OK

.

Figure 4.33

RPS Upgrade Database Dialog

Summary of Contents for RPS D5500CU

Page 1: ...RPS D5500CU en Installation Guide ...

Page 2: ......

Page 3: ... 3 3 6 Installing SQL Server Management Studio Express 25 3 4 Installing RPS with SQL Server or SQL Express 28 3 4 1 New Installations for Standalone PCs 28 3 4 2 Installation Using SQL Server 35 3 4 3 Installation Using SQL Express on a Network 41 3 4 4 Using a Networked Drive to Store Database Files 47 4 Upgrading Existing RPS Installations 48 4 1 Upgrading RPS Client and Access Database to SQL ...

Page 4: ... 7 2 Changing the Password 82 8 Recovering Old Database Files 83 9 RPS Operation and Control Panel Account Notes 84 9 1 RPS Notes 84 9 1 1 Installation and Administration 84 9 1 2 General Operation 84 9 1 3 Modems 84 9 2 Control Panel Account Notes 85 9 2 1 2000 Series 85 9 2 2 D6412 D4412 and DS7240 DS7220 85 9 2 3 D7024 and DS9400 86 9 2 4 D8112 86 9 2 5 D9112B1 D7212B1 86 9 2 6 DS7400XiV4 EXP 8...

Page 5: ...er the terms of this nonexclusive non transferable except as specifically permitted herein license a You may use a machine readable form of the Software on a single computer or a single server at a time or as otherwise defined in the installation operation manual of the Bosch product and only for the operation of Bosch products b You may not modify translate create derivative works decompile disas...

Page 6: ...NG WARRANTIES THAT THE SOFTWARE IS ERROR FREE OR WILL RUN UNINTERRUPTED OR WARRANTIES OF MERCHANTABILITY FITNESS FOR A PARTICULAR PURPOSE OR AGAINST INFRINGEMENT NEITHER BOSCH NOR ITS SUPPLIERS SHALL BE LIABLE FOR ANY LOSS OF PROFITS LOSS OF USE INTERRUPTION OF BUSINESS LOSS OF DATA NOR FOR INDIRECT SPECIAL INCIDENTAL OR CONSEQUENTIAL DAMAGES OF ANY KIND WHETHER UNDER THIS LICENSE OR OTHERWISE OR ...

Page 7: ... the laws of the State of New York and the United States of America including U S copyright laws 8 TERM AND TRANSFER You may terminate this Agreement at any time by returning the Software to Bosch or destroying the Software together with all copies in any form Bosch may terminate this Agreement if you fail to comply with its terms and conditions in any material respect Upon termination you may not...

Page 8: ...soft Windows 2003 Server Microsoft Windows XP Professional with Service Pack 2 Microsoft Windows XP Home Edition RAM Minimum 128 MB limited overall performance of RPS Recommended 256 MB or higher Hard Drive Space Approximately 250 MB for RPS installation Accounts and history require additional hard drive space Video VGA monitor capable of supporting 1024 x 768 resolution RPS supports 24 bit color ...

Page 9: ... Premium Edition with Service Pack 1 Microsoft Windows XP Professional with Service Pack 2 Microsoft Windows XP Home Edition with Service Pack 2 Microsoft Windows XP Tablet Edition with Service Pack 2 Microsoft Windows XP Media Edition with Service Pack 2 Microsoft Windows 2000 Professional Edition with Service Pack 4 Microsoft Windows 2000 Server Edition with Service Pack 4 Microsoft Windows 2000...

Page 10: ... configure and use most major brands and types of modems with RPS Refer to Modem Specifications in the RPS Help file for more information Ports One serial port for modem communication and one parallel port for printer connections Browser Microsoft Internet Explorer version 6 or later Software Microsoft NET Framework 2 0 Windows Installer 3 1 Microsoft Data Access Components MDAC Processor 1 GHz 32...

Page 11: ... costly damage by protecting the AC power source and the phone line for the modem Several manufacturers offer devices that provide combined AC and telephone line protection Contact your computer dealer for more information on these devices 3 2 Installing RPS 1 Insert the RPS CD ROM into your CD ROM drive The RPS startup program should automatically start Figure 3 1 RPS Startup 2 If the startup pro...

Page 12: ...truction window for installing each component required for RPS 3 3 Installing RPS Together with SQL Express 3 3 1 Prerequisites for a New Installation Use the following steps to install RPS for the first time or to replace a previous version that was removed using Add Remove Programs i NOTICE For new installations of RPS 5 x you must install Microsoft NETTM Framework 2 0 If you are upgrading or re...

Page 13: ...ller 3 1 from the RPS instruction dialog 2 The Windows Installer 3 1 welcome dialog opens Click Next Figure 3 3 Windows Installer 3 1 Welcome Dialog 3 The License Agreement dialog opens Click I Agree then click Next Figure 3 4 License Agreement Dialog 4 The Updating Your System dialog shows the status of the installation i NOTICE Windows Installer 3 1 is only needed on Windows 2000 and Windows XP ...

Page 14: ...RPS 4998141259 09 2008 10 Installation Guide Bosch Security Systems Inc Figure 3 5 License Agreement Dialog 5 When the installation completes click Finish to restart the PC Figure 3 6 Windows Installer 3 1 Completing Dialog ...

Page 15: ...ect Install NET Framework 2 0 from the RPS instruction dialog 2 The Microsoft NET Framework 2 0 Setup welcome dialog opens Click Next Figure 3 7 NET Setup Welcome Dialog 3 The End User License Agreement dialog opens Select I accept the terms of the License Agreement then click Install Figure 3 8 NET End User License Dialog i NOTICE NET Framework 2 0 is not required for Windows Vista operating syst...

Page 16: ...0 Installation Guide Bosch Security Systems Inc 4 The Installing Components dialog show the installation progress Figure 3 9 NET Installing components Dialog 5 When the Setup Complete dialog opens click Finish Figure 3 10 NET Setup Complete Dialog ...

Page 17: ... RPS instruction dialog 2 The End User License Agreement dialog opens Select I accept all of the terms of the preceding license agreement then click Next Figure 3 11 MDAC End User License Agreement Dialog 3 The Installing the Software dialog opens Click Finish Figure 3 12 MDAC Installing the Software Dialog 4 When the Setup is Complete dialog opens click Close i NOTICE MDAC is required only for Wi...

Page 18: ...installer from the RPS installation CD ROM or select Install Microsoft SQL Server 2005 Express SP2 from the RPS instruction dialog The Extracting Files dialog shows briefly Figure 3 14 SQL Express Extracting Files Dialog 2 The End User License Agreement dialog opens Select I accept the licensing terms and conditions then click Next Figure 3 15 SQL Express End User License Agreement Dialog ...

Page 19: ...ens Click Install The dialog shows the progress of the installation Figure 3 16 SQL Express Installing Prerequisites Dialog 4 The Microsoft SQL Server Installation Wizard welcome screen opens Click Next Figure 3 17 Microsoft SQL Server Installation Wizard Welcome Dialog 5 When the System Configuration Check dialog finishes click Next ...

Page 20: ...Guide Bosch Security Systems Inc Figure 3 18 SQL System Configuration Check Dialog 6 The Microsoft SQL Server Installation dialog shows the status of the installation When the installation finishes click Next Figure 3 19 Microsoft SQL Server Installation Dialog ...

Page 21: ...he Registration Information dialog opens Click Next Figure 3 20 SQL Registration Information Dialog 8 The Feature Selection dialog opens a Click the X next to Connectivity Components b Select Entire feature will be installed on local hard drive c Click Next Figure 3 21 SQL Feature Selection Dialog ...

Page 22: ...d Mode b Type a SQL Server password in both password fields c Click Next Figure 3 22 SQL Authentication Mode Dialog 10 The Configuration Options dialog opens Select Enable User Instances then click Next Figure 3 23 SQL Configurations Dialog i NOTICE You will need the SQL Server password later when logging into RPS The password is case sensitive ...

Page 23: ...c Installation Guide 4998141259 09 2008 10 11 The Error and Usage Report Settings dialog opens Click Next Figure 3 24 SQL Error and Usage Report Settings Dialog 12 The Ready to Install dialog opens Click Install Figure 3 25 SQL Ready to Install Dialog ...

Page 24: ...ecurity Systems Inc 13 The Setup Progress dialog opens When the installation is finished click Next Figure 3 26 SQL Setup Progress Dialog 14 The Completing Microsoft SQL Server 2005 Setup dialog opens Click Finish Figure 3 27 Completing Microsoft SQL Server 2005 Setup Dialog ...

Page 25: ... from the RPS installation CD ROM or select Install SQL Server Management Studio Express from the RPS instruction dialog 2 The SQL Server Management Studio Express Setup dialog opens Click Next Figure 3 28 SQL Server Management Studio Express Setup Dialog 3 The License Agreement dialog opens Select I accept the terms in the license agreement then click Next Figure 3 29 SQL Studio License Agreement...

Page 26: ...nstallation Guide Bosch Security Systems Inc 4 The Registration Information dialog opens Click Next Figure 3 30 SQL Studio Registration Information Dialog 5 The Feature Selection dialog opens Click Next Figure 3 31 SQL Studio Feature Selection Dialog ...

Page 27: ...nc Installation Guide 4998141259 09 2008 10 6 The Ready to Install the Program dialog opens Click Install Figure 3 32 SQL Studio Ready to Install Dialog 7 When the installation finishes click Finish Figure 3 33 SQL Studio Installation Complete Dialog ...

Page 28: ...king protocols are disabled by default in SQL Server Express If someone simply installs SQL Server Express and chooses all the defaults SQL Server Express can only have connections originating on the local machine where SQL Server is installed To enable SQL Server Express to accept remote connections configure SQL Server Express to listen on TCP IP Launch the SQL Server Configuration Manager from ...

Page 29: ...Installing RPS en 29 Bosch Security Systems Inc Installation Guide 4998141259 09 2008 10 Figure 3 35 RPS Preparing to Install 4 When the Welcome dialog opens click Next Figure 3 36 RPS InstallShield Welcome ...

Page 30: ...is acceptable click Next Otherwise click Browse to select a different directory then click Next Figure 3 37 RPS Choose Destination Dialog 6 The New Database Creation dialog opens If the default directory for the database files is acceptable click Next Otherwise click Browse to select a different directory then click Next Figure 3 38 RPS New Database Creation Dialog ...

Page 31: ...4998141259 09 2008 10 7 The Select Features dialog opens Select the desired features and control panel types for this RPS installation then click Next Figure 3 39 RPS Select Features 8 The Select Program Folder dialog opens Click Next Figure 3 40 RPS Select Program Folder ...

Page 32: ...lation Click Next Figure 3 41 RPS Start Copying Files The Setup Status dialog indicates the installer s progress 10 When the InstallShield Wizard Complete dialog opens click Finish The PC restarts Figure 3 42 RPS InstallShield Wizard Complete 11 After logging onto the PC start RPS either by selecting Start Bosch RPS 5 x or by double clicking the RPS 5 x shortcut on the PC s desktop 12 Select Start...

Page 33: ...e RPS System Configuration dialog a Paste the text copied in the previous step into the Select or Enter SQL Server name field b Type a database name into the Enter SQL Database Name field c In the Enter User Name and Enter Password fields type sa for the User Name and the password used when SQL Exporess was installed d Click Create Database which creates a database in SQL Express with the name you...

Page 34: ...g 18 In the RPS Logon Information dialog enter your RPS user name and password then click OK Figure 3 46 RPS Logon Information 19 The Panel Filter dialog opens If you want to see a subset of all accounts enter the filter criteria into the Panel Information fields then click OK If you want to see all accounts click OK Refer to the RPS General Help in RPS for more information on the panel filter Fig...

Page 35: ... setup language preference then click OK Figure 3 48 RPS Choose Setup Language 3 At the RPS InstallShield Welcome dialog click Next Figure 3 49 RPS InstallShield Wizard Welcome 4 The Choose Destination Location dialog opens If the default directory is acceptable click Next Otherwise click Browse to select a different directory then click Next Figure 3 50 RPS Choose Destination Location ...

Page 36: ...fferent directory on the network Figure 3 51 RPS New Database Creation 6 In the Choose Folder dialog browse to the desired network directory then click OK i NOTICE To determine which network directory should contain the RPS database consult your network or database administrator RPS does not support Universal Naming Convention UNC Select a mapped network drive ...

Page 37: ...8 10 7 The New Database Creation dialog returns and shows the new directory path Click Next Figure 3 52 RPS New Database Creation 8 The Select Features dialog opens Select the desired features and control panel types for this RPS installation then click Next Figure 3 53 RPS Select Features ...

Page 38: ...Program Folder dialog opens Click Next Figure 3 54 RPS Select Program Folder 10 The Start Copying Files dialog opens listing your selections from the previous steps and confirming that the PC s hard drive has enough unused space for the RPS installation Click Next Figure 3 55 RPS Start Copying Files Dialog ...

Page 39: ...x or by double clicking the RPS 5 x shortcut on the PC s desktop 13 In the RPS System Configuration dialog a Select or enter the SQL server name into the Select or Enter SQL Server name field b Type a database name into the Enter SQL Database Name field c In the Enter User Name and Enter Password fields type the same name and password used when the SQL server was installed d Click Create Database ...

Page 40: ...n Information dialog enter your RPS user name and password then click OK Figure 3 59 RPS Logon Information The Panel Filter dialog opens If you want to see a subset of all accounts enter the filter criteria into the Panel Information fields then click OK If you want to see all accounts click OK Refer to the RPS General Help in RPS for more information on the panel filter Figure 3 60 RPS Panel Filt...

Page 41: ...PS installer from the RPS CD ROM 3 Select your setup language preference then click OK Figure 3 61 RPS Choose Setup Language 4 At the RPS InstallShield Welcome dialog click Next Figure 3 62 RPS InstallShield Wizard Welcome 5 The Choose Destination Location dialog opens If the default directory is acceptable click Next Otherwise click Browse to select a different directory then click Next Figure 3 ...

Page 42: ...ry on the network Figure 3 64 RPS New Database Creation 7 In the Choose Folder dialog browse to the desired network directory then click OK Figure 3 65 RPS Choose folder i NOTICE To determine which network directory should contain the RPS database consult your network or database administrator RPS does not support Universal Naming Convention UNC Select a mapped network drive ...

Page 43: ...urns and shows the new directory path Click Next Figure 3 66 RPS New Database Creation 9 The Select Features dialog opens Select the desired features and control panel types for this RPS installation then click Next Figure 3 67 RPS Select Features i NOTICE All networked workstations should have the same control panel types selected ...

Page 44: ...Select Program Folder dialog opens click Next Figure 3 68 RPS Select Program Folder 11 The Start Copying Files dialog opens listing your selections from the previous steps and confirming that the PC s hard drive has enough unused space for the RPS installation Click Next Figure 3 69 RPS Start Copying Files ...

Page 45: ... by double clicking the RPS 5 x shortcut on the PC s desktop 14 In the RPS System Configuration dialog a Select or enter the SQL server name into the Select or Enter SQL Server name field b Type a database name into the Enter SQL Database Name field c In the Enter User Name and Enter Password fields type sa for the User Name and the password used when SQL Express was installed d Click Create Datab...

Page 46: ...rmation dialog enter your RPS user name and password then click OK Figure 3 73 RPS Logon Information The Panel Filter dialog opens If you want to see a subset of all accounts enter the filter criteria into the Panel Information fields then click OK If you want to see all accounts click OK Refer to the RPS General Help in RPS for more information on the panel filter Figure 3 74 RPS Panel Filter Dia...

Page 47: ...he account open No Click No to try to override the lock and ignore changes made by the operator who currently has the account open Cancel Click Cancel to close the Panel Already Open dialog without attempting to override a locked account The account opens in View Only mode If you wish to override the locked account by clicking Yes or No a progress indicator appears while RPS attempts to override t...

Page 48: ...tall SQL Express from the RPS CD ROM 2 Open the RPS installer from the RPS CD ROM 3 Select your setup language preference then click OK Figure 4 1 RPS Choose Setup Language 4 When the Welcome dialog opens click Next Figure 4 2 RPS InstallShield Welcome Dialog 5 The Select Features dialog opens Select the desired features and control panel types for this RPS installation then click Next Figure 4 3 ...

Page 49: ... dialog opens click Next Figure 4 4 RPS Select Program Folder Dialog 7 The Start Copying Files dialog opens listing your selections from the previous steps and confirming that the PC s hard drive has enough unused space for the RPS installation Click Next The Setup Status dialog indicates the installer s progress Figure 4 5 RPS Start Copying Files ...

Page 50: ...g onto the PC start RPS either by selecting Start Bosch RPS 5 x or by double clicking the RPS 5 x shortcut on the PC s desktop 10 If necessary and if you do not know the SQL Server name select Start Microsoft SQL Server 2005 SQL Server Management Studio Express The SQL Server 2005 Connect to Server dialog opens Figure 4 7 SQL Server 2005 Connect to Server Dialog 11 From the Connect to Server dialo...

Page 51: ...me field c In the Enter User Name and Enter Password fields type the same name sa for SQL Express and password used when the SQL database was installed d Click Create Database which creates a database in SQL Express with the name you provided Figure 4 8 RPS System Configuration Dialog The database Merge Utility opens 13 In the Database Merge Utility dialog select the Source Database Details tab th...

Page 52: ...Location field is not pointing to the correct directory click and navigate to the correct directory then click Merge Database Figure 4 10 RPS Destination Database Details Dialog 15 In the confirmation dialog click OK Figure 4 11 Database Merge Success 16 Close the MS SQL Server Management Studio dialog 17 In the RPS System Configuration dialog click OK 18 In the RPS Logon Information dialog type t...

Page 53: ...alog opens If you want to see a subset of all accounts enter the filter criteria into the Panel Information fields then click OK If you want to see all accounts click OK Refer to the RPS General Help in RPS for more information about the panel filter Figure 4 13 RPS Panel Filter Dialog 19 Create and configure the control panel account ...

Page 54: ...rver Database From the Server 1 Open the SQL Server Management Studio Figure 4 14 Path to SQL Server Management Studio 2 Log into the database Figure 4 15 SQL Server 2005 Connect to Server 3 In SQL Server select File Open File Figure 4 16 SQL Server File Open File Path 4 Locate the SQL upgrade script file on the RPS CD ROM then click Open ...

Page 55: ...ading Figure 4 18 SQL Server 2005 Upgrade RPS Database 7 Select Query Execute When you see Query executed successfully on the bottom of the window the database is upgraded Figure 4 19 SQL Server 2005 Query Execute 8 Close Microsoft SQL Server Studio 9 If you have not already done so upgrade the RPS dat files Refer to Section 4 6 Upgrading RPS dat Files on the Server on page 66 i NOTICE You must no...

Page 56: ...ver 1 Open the SQL Server Management Studio 2 Log into the database Figure 4 20 Path to SQL Server Management Studio 3 In SQL Server select File Open File Figure 4 21 SQL Server File Open File 4 Locate the SQL upgrade script file on the RPS CD ROM then click Open 5 Log into the database again then click Connect Figure 4 22 SQL Server 2005 Connect to Database Engine ...

Page 57: ... 7 Select Query Execute When you see Query executed successfully on the bottom of the dialog the database is upgraded Figure 4 24 SQL Server 2005 Query Execute 8 Close Microsoft SQL Server Studio 9 If you have not already done so upgrade the RPS dat files Refer to Section 4 6 Upgrading RPS dat Files on the Server page 66 for more information i NOTICE You must now upgrade all clients to the same RP...

Page 58: ...aller from the RPS CD ROM 3 Select your setup language preference then click OK Figure 4 25 RPS Choose Setup Language 4 When the Welcome dialog opens click Next Figure 4 26 RPS InstallShield Wizard Welcome Dialog i NOTICE If you have already upgraded the database for SQL Server or SQL Express from the server you can skip this section and proceed to Section 4 5 Upgrading the RPS Client Only if usin...

Page 59: ...e 4998141259 09 2008 10 5 The Select Features dialog opens Select the desired features and control panel types for this RPS installation then click Next Figure 4 27 RPS Select Features Dialog 6 When the Select Program Folder dialog opens click Next Figure 4 28 RPS Select Program Folder Dialog ...

Page 60: ...drive has enough unused space for the RPS installation Click Next The Setup Status dialog indicates the installer s progress Figure 4 29 RPS Start Copying Files 8 When the InstallShield Wizard Complete dialog opens click Finish The PC restarts Figure 4 30 RPS InstallShield Wizard Complete Dialog 9 After logging onto the PC start RPS either by selecting Start Bosch RPS 5 x or by double clicking the...

Page 61: ...998141259 09 2008 10 10 An error dialog opens Click OK Figure 4 31 RPS Incompatible Database Message Dialog 11 In the RPS System Configuration dialog click Upgrade Database Figure 4 32 RPS System Configuration Dialog 12 A confirmation dialog opens Click OK Figure 4 33 RPS Upgrade Database Dialog ...

Page 62: ...ck OK Figure 4 34 RPS Logon Information Dialog The Panel Filter dialog opens If you want to see a subset of all accounts enter the filter criteria into the Panel Information fields then click OK If you want to see all accounts click OK Refer to the RPS General Help in RPS for more information on the panel filter Figure 4 35 RPS Panel Filter Dialog 14 Create and configure the control panel account ...

Page 63: ... installer from the RPS CD ROM 2 Select your setup language preference then click OK Figure 4 36 RPS Choose Setup Language Dialog 3 When the Welcome dialog opens click Next Figure 4 37 RPS InstallShield Wizard Welcome Dialog 4 The Select Features dialog opens Select the desired features and control panel types for this RPS installation then click Next Figure 4 38 RPS Select Features Dialog ...

Page 64: ...og opens click Next Figure 4 39 RPS Select Program Folder Dialog 6 The Start Copying Files dialog opens listing your selections from the previous steps and confirming that the PC s hard drive has enough unused space for the RPS installation Click Next The Setup Status dialog indicates the installer s progress Figure 4 40 RPS Start Copying Files Dialog ...

Page 65: ...After logging onto the PC start RPS either by selecting Start Bosch RPS 5 x or by double clicking the RPS 5 x shortcut on the PC s desktop 9 Log into RPS 10 In the RPS System Configuration dialog click Modify and change the location so that it points to the network database again Also confirm that the SQL database information is correct Figure 4 42 RPS System InstallShield Configuration Dialog 11 ...

Page 66: ...ure 4 43 RPS Logon Information Dialog 13 Create and configure the control panel account 4 6 Upgrading RPS dat Files on the Server 1 Use Windows Explorer to open the SQL Dat File Upgrade zip file from the RPS CD ROM 2 Extract the contents of the zip file into the existing RPS Database directory and replace all existing files Figure 4 44 RPS Logon Information 3 Upgrade all RPS clients connected to t...

Page 67: ...lace your RPS database files on a network drive so that many workstations can access a single database 1 Locate the RPS Database directory on the local drive 2 Using Windows Explorer right click on the Database directory then select Sharing and Security Figure 5 1 Windows Explorer Sharing and Security 3 In the Properties dialog select Share this folder then click Permissions Figure 5 2 Windows Exp...

Page 68: ...and Read permissions then click OK to close the Permissions and Properties dialogs Figure 5 3 Windows Explorer Permissions for Database 5 Copy the Database directory to the new location on the network drive 6 Start RPS and log on when the RPS Logon Information dialog opens Figure 5 4 RPS Logon Information 7 Select Config System The System Configuration dialog opens ...

Page 69: ... the SQL Server database already exists enter the SQL Server Name SQL Database Name User Name and Password then click OK If the SQL Server database does not already exist enter the SQL Server Name and the desired SQL Database Name User Name and Password for the database then click Create Database When the Database Created Successfully dialog opens click OK Figure 5 6 RPS Create Database 9 The Plea...

Page 70: ...ng that the account is already opened for editing by another operator the operator s log in name displays in the message box The operator opening a second instance of the database can view the contents of the account but cannot edit any of the information in the account i NOTICE If an operator logs on to two different terminals with the same user name and accesses the same account from both termin...

Page 71: ...ry 4 Install the earlier version of RPS During the installation process when you reach the Select Database Configuration dialog click Use Existing Database then click Next Figure 5 8 RPS Select Database Configuration 5 When the Use Existing Database dialog opens click Browse and specify the location of the Access database Figure 5 9 RPS Use Existing Database 6 Finish the installation by following ...

Page 72: ...ete the RPS directory 4 Open SQL Server Management Studio or SQL Server Management Studio Express 5 Right click on the RPS database then select Tasks Restore Database Figure 5 10 SQL Server 2005 6 The Restore Database dialog opens Under Source for restore select From device then click Figure 5 11 SQL Server 2005 Restore Database i NOTICE The following procedure assumes that you used SQL Management...

Page 73: ...ems Inc Installation Guide 4998141259 09 2008 10 7 When the Specify Backup dialog opens click Add Figure 5 12 SQL Server Specify Backup 8 In the directory containing the SQL installation select the bak file then click OK Figure 5 13 SQL Server Locate Backup File ...

Page 74: ...ecify Backup dialog identifies the Backup location click OK Figure 5 14 SQL Server Specify Backup 10 Under Select the backup sets to restore click the checkbox under Restore then click OK Figure 5 15 SQL Server Restore Database 11 The database restores successfully Click OK Figure 5 16 SQL Server Successful Database Restore ...

Page 75: ...n process when you reach the Select Database Configuration dialog click Use Existing Database then click Next Figure 5 17 RPS Select Database Configuration 13 When the Use Existing Database dialog opens click Browse and specify the location of the Access database Figure 5 18 RPS Use Existing Database 14 Finish the installation by following the instructions on the screen ...

Page 76: ... each of the RPS directories on all workstations running RPS Use the drag and drop feature in Windows to move the PegDefs folder to each PC on the network Click and hold the PegDefs folder with the right mouse button and drag the folder to the RPS directory on the target workstation PC Release the right mouse button A small dialog opens and asks if you want to Move Copy Create a Shortcut to the fo...

Page 77: ...QL Express Database 1 From the PC s Start Programs menu select Microsoft SQL Management Studio or Microsoft SQL Management Studio Express 2 When the Connect to Server dialog opens click Connect Figure 5 19 SQL Server 2005 Connect to Server 3 Right click the RPS database then select Tasks Back Up Figure 5 20 SQL Server 2005 Tasks Back Up ...

Page 78: ...9 2008 10 Installation Guide Bosch Security Systems Inc 4 When the Back Up Database dialog opens click OK Figure 5 21 SQL Server 2005 Back Up Database 5 When the Backup Completed Successfully dialog opens click OK Figure 5 22 Backup Completed Successfully ...

Page 79: ...grams dialog opens Figure 6 1 Add Remove Programs Window 2 Scroll down the list until you see RPS Click RPS to select it 3 Click Change Remove The RPS Setup Maintenance dialog opens Figure 6 2 RPS Setup Maintenance Window i NOTICE To modify the current RPS installation you must use the original installation files If RPS was installed from the CD ROM you must use the CD ROM If RPS was installed fro...

Page 80: ...Maintenance dialog opens Refer to Figure 6 2 4 Click Repair and then click Next A progress indicator dialog opens When the repair is complete the Install Complete dialog opens 5 Click Finish to end the RPS Setup Maintenance process 6 3 Removing RPS To remove RPS and all of its features 1 Select Start Settings Control Panel Add Remove Programs The Add Remove Programs dialog opens Refer to Figure 6 ...

Page 81: ...ion dialog opens For the user name enter admin For the password enter 1111 or default The password is not case sensitive For example password and PASSWORD are identical entries Figure 7 1 Logon Information Window 3 Click OK to continue i NOTICE Limit access to RPS to authorized individuals as it contains provisions for setting security passwords Establish appropriate security levels and set passwo...

Page 82: ...nge the default password 1 From RPS select Config Password Figure 7 2 Accessing the Change Password Window 2 When the Change Password dialog opens a Enter the old password b Enter the new password c Enter the new password again d Click OK The new password takes effect the next time you log in Figure 7 3 Logon Information Window ...

Page 83: ... click Modify 7 When the Modify Location dialog opens browse to the folder named database 000 in the RPS directory This is the folder where your old accounts were placed when you first upgraded RPS 8 Click OK and exit RPS 9 Restart RPS 10 Verify that your accounts appear in the Panel List 11 Export your accounts Refer to Export in the RPS General Help File for more information 12 Remove the old ve...

Page 84: ...Windows Firewall Go to Step 2 2 Select the Exceptions tab 3 Click Add Port 4 In the Name field enter the name of the port For example RPS_Port 5 In the Port Number field enter the port number assigned to your network interface module For example if your network interface module uses Port 7700 enter 7700 6 Click UDP 7 Click OK 8 Click OK again 9 Test the connection from within RPS once RPS is insta...

Page 85: ...vailable on control panels with firmware version 1 04 or greater Output Function Types If Output Function Types 1 8 to 1 13 and 2 11 are assigned to an output you should not be able to turn the output on or off or toggle it in RPS however the control panel does not force some of these restrictions when using RPS Bypassing Unbypassable Zones in RPS Some zones that are not bypassable at the control ...

Page 86: ...n 2 04 or higher If Gentex is selected and sent to a control panel with firmware version 2 03 or lower the NAC response is set to Steady Remote Program Enabled If Remote Program Enabled is set to No RPS still allows you to receive data from the control panel however for security reasons you cannot view any of the PINs or change any program information Panel out of Sync Message with Defaulted DS940...

Page 87: ...he End Session dialog RPS clears the control panel s date and time settings You cannot retrieve current history events if these settings are cleared You must retrieve all of the control panel s history log entries If you cannot connect to a DS7400XiV4 EXP using a Hayes 2400 Modem use the following initialization init string AT C1 D2X0 Q0S9 1S7 255S10 254 9 2 7 Control Panel Help Files Some of the ...

Page 88: ...88 en RPS Operation and Control Panel Account Notes RPS 4998141259 09 2008 10 Installation Guide Bosch Security Systems Inc ...

Page 89: ......

Page 90: ...Bosch Security Systems Inc 130 Perinton Parkway Fairport NY 14450 USA 800 289 0096 www boschsecurity com Bosch Security Systems Inc 2008 ...

Reviews: