English 6
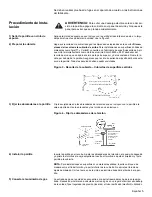
Figure 5 - Rough-in Box Area
CAUTION:
Do not attempt any adjustment of the pressure regulator,
except conversion to propane.
Connect the gas supply line to the unit pressure regulator using a 1/2" flex gas line
connector between wall shut-off valve and pressure regulator (see complete pro-
cedure in Figure 6.)
Figure 6 - Gas and Electrical Location
Secure regulator to cooktop gas inlet using approved Teflon tape. Turn to hand
tighten plus 1/4 turn, not exceeding 1 turn for alignment.
Check supply line connections for leaks using a soap solution. Do not use a flame
of any sort.
1. Turn on gas.
2. Apply a non-corrosive leak detection fluid to all joints and fittings in the gas
connection between the shut-off valve and the range. Include gas fittings and
joints in the range if connections may have been disturbed during installation.
Bubbles appearing around fittings and connections indicate a leak.
3. If a leak appears, turn off supply line gas shut-off valve and tighten connec-
tions.
4. Retest for leaks by turning on the supply line gas shut-off valve. When leak
check is complete (no bubbles appear), test is complete.
5. Wipe off all detection fluid residue.
Important Notes for Gas Connection:
•
The appliance and its individual gas shutoff valve must be disconnected from
the gas supply piping system during any pressure testing of that system at
test pressures in excess of 1/2 psig (3.5kPa).
Opening for Gas
Connection and
Electrical Cord
for 30” models - 12-5/8“ (320.8 mm)
for 36” models - 15-1/2“ ( 394 mm)
C of Cutout
L


