Blade Installation and
Removal
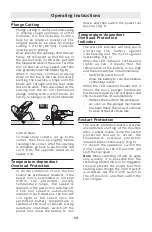
To prevent damage,
d o n o t t u r n b l a d e
ejector lever when there is no blade in
the blade clamp or when inserting the
blade.
BLADE INSTALLATION
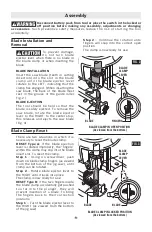
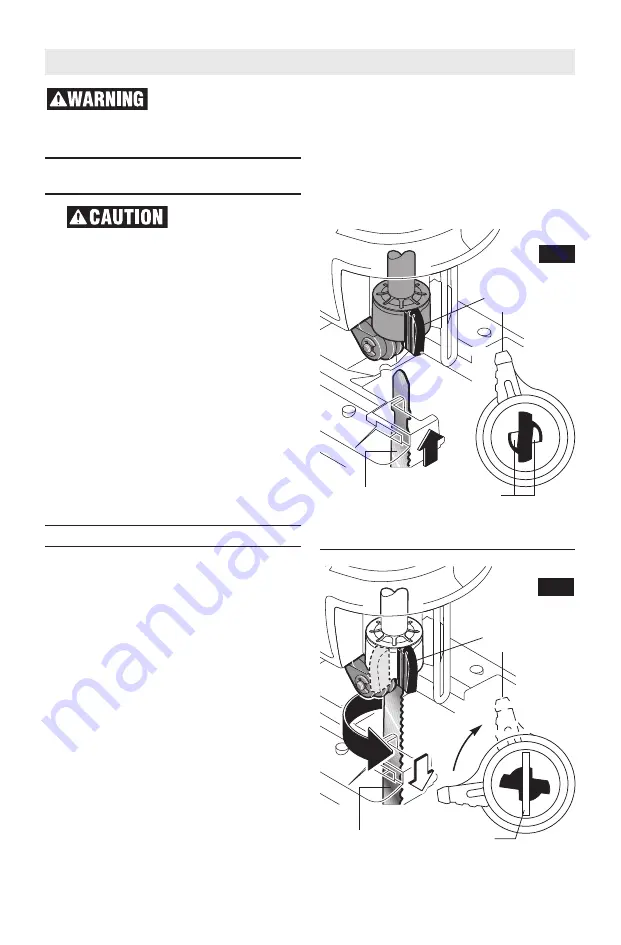
Insert the saw blade (teeth in cutting
direction) into the slot in the blade
c l a m p u n t i l t h e b l a d e e j e c t o r l e v e r
rotates to the LEFT, indicating that the
clamp has engaged. (When inserting the
saw blade, the back of the blade must
rest in the groove of the guide roller
Fig. 2.)
BLADE EJECTION
The tool should be held so that the
blade is safely ejected. To remove the
saw blade, rotate the blade ejector
lever to the RIGHT to the center stop;
this releases and ejects the saw blade
(Fig. 3).
Blade Clamp Reset
There are two situations in which it is
necessary to reset the blade clamp:
RESET Type A:
If the blade ejection
lever is rotated improperly, the “fingers”
within the clamp may slip into the blade
insert slot. To reset the clamp:
Step 1
– Using a a screwdriver, push
down on blade clamp fingers (as viewed
from the bottom of the jig saw), until
clamp can be rotated.
Step 2
– Rotate blade ejector lever to
the RIGHT until it locks into place.
The clamp is now ready for use.
RESET Type B:
If the two fingers inside
the blade clamp accidentally get pushed
t o o f a r i n t o t h e p l u n g e r , t h e y w i l l
prevent insertion of a blade. To bring
the fingers back to their correction
positions:
Step 1
– Turn the blade ejector lever to
the RIGHT (as viewed from the bottom
of the jig saw)
Step 2
– Continue the rotation unto
fingers will snap into the correct open
position.
The clamp is now ready for use.
-9-
Assembly
FIG. 2
FIG. 3
BLADE
CLAMP
LEVER
BLADE
CLAMP
LEVER
FINGERS
BLADE CLAMP IN OPEN POSITION
(As viewed from the bottom)
BLADE CLAMP IN LOCKED POSITION
(As viewed from the bottom)
BLADE
BLADE
BLADE
Disconnect battery pack from tool or place the switch in the locked or
off position before making any assembly, adjustments or changing
accessories.
Such preventive safety measures reduce the risk of starting the tool
accidentally.
Summary of Contents for JS120
Page 54: ... 54 Notes Remarques Notas ...
Page 55: ... 55 Notes Remarques Notas ...

