English |
21
Bosch Power Tools
1 609 929 S05 | (22.9.09)
Checking the Levelling Accuracy of the
Vertical Lines
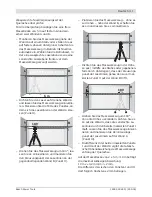
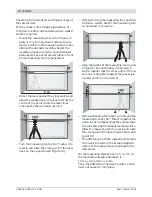
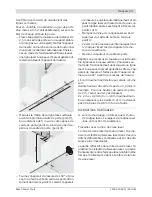
For this check, a door opening is required with
at least 2.5 metres of space (on a firm surface)
to each side of the door.
– Position the measuring tool on a firm, level
surface (not on a tripod) 2.5 m away from
the door opening. Switch on the measuring
tool to operation with automatic levelling.
Select an operating mode in which a vertical
laser plane is generated in front of the meas-
uring tool.
– Mark the centre of the vertical laser line at
the floor of the door opening (point
I
), at a
distance of 5 metres beyond the other side of
the door opening (point
II
) and at the upper
edge of the door opening (point
III
).
– Rotate the measuring tool by 180° and posi-
tion it on the other side of the door opening
directly behind point
II
. Allow the measuring
tool to level in and align the vertical laser line
in such a manner that its centre runs exactly
through points
I
and
II
.
– Mark the centre of the laser line at the upper
edge of the door opening as point
IV
.
– The difference
d
of both marked points
III
and
IV
results in the actual deviation of the
measuring tool to the plumb line.
– Measure the height of the door opening.
Repeat the measuring procedure for the second
vertical laser plane. For this, select an operating
mode in which a vertical laser plane is generated
aside of the measuring tool, and turn the meas-
uring tool by 90° before beginning with the
measuring procedure.
The maximum admissible deviation is calculated
as follows:
Doubled height of the door opening x 0.2 mm/m
Example: For a door-opening height of 2 m, the
maximum deviation may be
2 x 2 m x
r
0.2 mm/m =
r
0.8 mm. Consequent-
ly, points
III
and
IV
may be no more than 0.8 mm
(max.) apart from each other for each of both
measurements.
Working Advice
f
Always use the centre of the laser line for
marking.
The width of the laser line changes
with the distance.
Working with the Laser Target Plate
The laser target plate
15
increases the visibility
of the laser beam under unfavourable condi-
tions and at large distances.
The reflective part of the laser target plate
15
improves the visibility of the laser line. Thanks
to the transparent part, the laser line is also vis-
ible from the back side of the laser target plate.
Working with the Tripod (Accessory)
A tripod offers a stable, height-adjustable meas-
uring support. Position the measuring tool with
the 1/4" tripod mount
10
onto the thread of the
tripod
21
or a commercially available camera tri-
pod. For fastening to a commercially available
construction tripod, use the 5/8" tripod mount
9
. Tighten the measuring tool with the tripod
mounting stud.
2,5 m
2,5 m
2 m
d


