


English–3
2 609 932 090 • (02.12) T
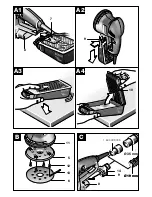
External Vacuuming (see Fig.
)
(Accessory pages)
Slide the extraction adapter
14
onto the outlet piece
8
and take care that the latching lever engages. For re-
moval, press the latching lever in at the rear and pull off
the extraction adapter.
When sanding vertical surfaces, hold the machine so
that the extraction hose points downwards.
The vacuum cleaner must be suitable for the material
to be worked.
When vacuuming dry dust that is especially detrimen-
tal to health or carcinogenic, use a special vacuum
cleaner.
Always use the correct supply voltage!
The voltage of the power source must agree with the
value given on the nameplate of the machine. Ma-
chines designated for 230 V can also be operated with
220 V.
Switching On/Off
To
switch on
the machine, press the On-Off switch
2
.
Lock
the depressed On-Off switch
2
by pressing the
lock-on button
3
.
To
switch off
the machine, release the On-Off switch
2
or push and then release it.
Preselect the required speed with the thumbwheel
1
(also while running) (GEX 270 AE).
The required speed is dependent on the material and
can be determined by practical trials.
After longer periods of working at low speed, allow the
machine to cool by running for approx. 3 minutes at
maximum speed with no load.
■
Before any work on the machine itself, pull the
power plug.
Sanding Plate Brake
An integrated sanding plate brake reduces the speed
when running at no load so that scoring is avoided
when placing the machine on the work piece.
A continuously increasing no-load speed over the
course of time indicates that the sanding plate brake is
worn and must be replaced by an authorized custom-
er service location for Bosch power tools.
Sanding Surfaces
Place the machine with the complete sanding sheet on
the surface to be worked.
Ensure uniform sanding pressure. Less sanding pres-
sure increases the sanding capacity and protects the
machine and the sanding tool.
The removal capacity and the sanding pattern are de-
termined mainly by the selection of the sanding sheet
(grain size), the speed of the sanding plate and the ap-
plication pressure.
Rough Sanding
Attach a sanding sheet with coarse grain (see
Applica-
tion Table
).
Apply only light sanding pressure to achieve increased
material removal.
Fine Sanding
Attach a sanding sheet with fine grain (see
Application
Table
).
With moderate pressure, move the machine in a circu-
lar pattern or alternately in lengthwise and crosswise
directions over the work piece.
Do not tilt the machine to avoid sanding through the
work piece (e.g. when sanding veneer).
After finishing the work, switch off the machine and lift
it from the work piece.
Putting into Operation
C
Working Instructions