background image

6

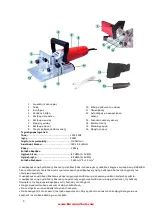
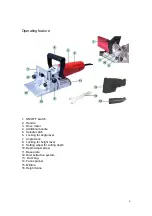
Operating feature

1. ON/OFF switch
2. Handle
3. Drive motor
4. Additional handle
5. Spindle catch
6. Locking for angle lever
7. Angle fence
8. Locking for height lever
9. Setting wheel for cutting depth
10. Depth adjust screw
11. Base plate
12. Dust extraction system
13. Dust bag
14. Face spanner
15. Midline
16. Height fence

Summary of Contents for BBJ9000

Page 1: ...BBJ9000 ΦΡΕΖΟΚΑΒΙΛΙΕΡΑ Μετάφραση του πρωτοτύπου των οδηγιών χρήσης Owner s manual www BormannTools com ...

Page 2: ...βγάλετε από την πρίζα Κρατήστε το καλώδιο μακριά από ζεστές επιφάνειες λάδι αιχμηρά αντικείμενα ή κινούμενα μέρη Χαλασμένα ή μπερδεμένα καλώδια αυξάνουν τον κίνδυνο ηλεκτροπληξίας Όταν χρησιμοποιείτε ένα ηλεκτρικό εργαλείο σε εξωτερικό χώρο χρησιμοποιήστε προέκταση κατάλληλη για εξωτερική χρήση Η χρήση ενός κατάλληλου καλωδίου για εξωτερική χρήση μειώνει τον κίνδυνο ηλεκτροπληξίας Εάν η λειτουργία...

Page 3: ...αλασμένο θα πρέπει να δοθεί σε εξουσιοδοτημένο σέρβις για επισκευή Πολλά ατυχήματα μπορεί να προκύψουν από ένα κακό συντηρημένο εργαλείο Κρατήστε το εξάρτημα κοπής αιχμηρό Το εξάρτημα κοπής που είναι αιχμηρό είναι πιο απίθανο να μπλοκάρει και πιο εύκολο να ελεγχθεί Χρησιμοποιήστε τα εργαλεία τα εξαρτήματα και τα ανταλλακτικά σύμφωνα με τις οδηγίες αυτές λαμβάνοντας υπόψιν τις συνθήκες εργασίας και...

Page 4: ... αναίτια επαφή με τον δίσκο ενώ βρίσκετε το εργαλείο σας σε λειτουργία Ο κατασκευαστής δεν ευθύνεται για φθορές αν το εργαλείο σας δεν χρησιμοποιηθεί με προσοχή και μέσα τα πλαίσια αυτών των οδηγιών χρήσης Μην εκθέτετέ το εργαλείο σας σε συνθήκες βροχής και υγρασίας Είσαστε πάντα σε εγρήγορση όταν χρησιμοποιείτε το παρόν εργαλείο ώστε να μπορείτε να προλαβαίνετέ γρηγορά επικίνδυνες καταστάσεις Η ά...

Page 5: ...2 695m s2 K 1 5 m s2 Η αναφερόμενη τιμή μετάδοσης δόνησης μετρήθηκε βάσει τυποποιημένης μεθόδου ελέγχου και μπορεί να μεταβληθεί ή και σε εξαιρετικές περιπτώσεις να κυμαίνεται άνω της αναφερόμενης τιμής ανάλογα από τον τρόπο χρήσης του ηλεκτρικού εργαλείου H αναφερόμενη μετάδοση δονήσεων μπορεί να χρησιμοποιηθεί και για σύγκριση με άλλο ηλεκτρικό εργαλείο Η αναφερόμενη τιμή μετάδοσης δόνησης μπορε...

Page 6: ...εν εμπίπτει στις οδηγίες του παρόντος εργαλείου Άνοιγμα της συσκευασίας Αφαιρέστε όλα τα εξαρτήματα και τα περιεχόμενα της συσκευασίας και ακουμπήστε τα σε μια σταθερή και επίπεδη επιφάνεια Αφαιρέστε όλα τα υλικά συσκευασίας από τον χώρο συναρμολόγησης Βεβαιωθείτε ότι το εργαλείο έχει έρθει στα χεριά σας όπως πρέπει χωρίς κάποιο πρόβλημα και χωρίς κάποια ζημιά Βεβαιωθείτε ότι έχετε όλα τα εξαρτήμα...

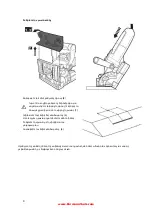
Page 7: ...ρα των 25mm πάχος χρησιμοποιήστε δυο καβίλιες ανά ένωση Η απόσταση μεταξύ τους πρέπει να είναι τουλάχιστον 10cm Μέγεθος καβίλιας 0 47 x 15 x 4 mm 10 53 x 19 x 4 mm 20 56 x 23 x 4 mm Επιλέγοντας το βάθος κοπής Επιλέξτε το κατάλληλο βάθος κοπής με την βοήθεια του τροχού ρύθμισης 9 Το νούμερο στον επιλογέα βάθους αντιστοιχεί στα διαφορά μεγέθη της καβίλιας Μπορείτε να ρυθμίσετε το βάθος κοπής χρησιμο...

Page 8: ... BormannTools com Ρυθμίζοντας το ύψος κοπής Ξεβιδώστε τους λεβιέδες κλειδώματος 8 Το ύψος κατεργασίας εμφανίζεται στο παράθυρο με το βελάκι Ρυθμίστε το ύψος στην ένδειξη Επανασφίξτε τους λεβιέδες κλειδώματος ...

Page 9: ...ς τα πάνω μέχρι να βγει από τον φράχτη γωνίας 7 Ξεβιδώστε τους λεβιέδες κλειδώματος 6 Η επιλεγμένη γωνιά σηματοδοτείτε από το βέλος Ρυθμίστε την γωνιά με την βοήθεια του μοιρογνωμίου Ξανασφίξτε τον λεβιέ κλειδώματος 6 Η ρύθμιση της κάθετης θέση της καβίλιας είναι πιο σημαντική από όλες ειδικά όταν πρόκειται για ενώσεις με φαλτσογωνία ή με διαφορετικού πάχους υλικά ...

Page 10: ...κομμάτι κατεργασίας σας και βεβαιωθείτε ότι το σημάδι στον φράχτη θα είναι στο ίδιο σημείο με το μεσαίο σημάδι στο κομμάτι κατεργασίας σας Βεβαιωθείτε ότι ο δίσκος σας δεν ακουμπάει στο κομμάτι κατεργασίας σας Ενεργοποιήστε το εργαλείο σας και αφήστε το να φτάσει σε στροφές πλήρως λειτουργίας πριν προχωρήσετε σε επαφή με το κομμάτι επεξεργασίας σας Σπρώξτε το εργαλείο σας μπροστά αργά αργά μέχρι ν...

Page 11: ...δίσκο και επανασυνδέστε το εργαλείο σας ακολουθώντας την αντιστροφή πορεία Σφίξτε καλά την φλάντζα C 5 Τοποθετήστε την βάση και σφιχτέ όλες τις βίδες Προσοχη Πάντα χρησιμοποιείτε το συγκεκριμένο εργαλείο με την προστατευτική του βάση Η βάση αυτή προστατεύει τον χρήστη από σπασμένα κομμάτια του δίσκου και από μη θελημένη επαφή με τον δίσκο Σύστημα εξαγωγής σκόνης Ο αντάπτορας για το σύστημα εξαγωγή...

Page 12: ...κια σε ένα εξειδικευμένο τεχνικό ΠΡΟΣΟΧΗ Τα καρβουνάκια πρέπει να αντικαθίστανται από εξειδικευμένο ηλεκτρολόγο ή από κάποιο εξουσιοδοτημένο τμήμα service Δεν υπάρχουν αλλά εξαρτήματα μέσα στο εργαλείο σας που να χρειάζονται επιπλέον συντήρηση Αν το καλώδιο παροχής ρεύματος φθαρεί τότε πρέπει να αντικατασταθεί από εγκεκριμένο τμήμα service Αποθήκευση και μεταφορά Κρατήστε το εργαλείο σας στην αρχι...

Page 13: ...ock d Do not abuse the cord Never use the cord for carrying pulling or unplugging the power tool Keep cord away from heat oil sharp edges or moving parts Damaged or entangled cords increase the risk of electric shock e When operating a power tool outdoors use an extension cord suitable for outdoor use Use of a cord suitable for outdoor use reduces the risk of electric shock f If operating a power ...

Page 14: ... for misalignment or binding of moving parts breakage of parts and any other condition that may affect the power tools operation If damaged have the power tool repaired before use Many accidents are caused by poorly maintained power tools f Keep cutting tools sharp and clean Properly maintained cutting tools with sharp cutting edges are less likely to bind and are easier to control g Use the power...

Page 15: ...utor assume no warranty for damages if the biscuit joiner changed without authorization or the necessary safety precautions were ignored Do not expose the tool in rain or moisture Be always attentive when using the product so that you can early identify hazards Rapid intervention can prevent serious injury and property damage Turn off the product when problems arise Repair the product by a qualifi...

Page 16: ...tor 4 Additional handle 5 Spindle catch 6 Locking for angle lever 7 Angle fence 8 Locking for height lever 9 Setting wheel for cutting depth 10 Depth adjust screw 11 Base plate 12 Dust extraction system 13 Dust bag 14 Face spanner 15 Midline 16 Height fence ...

Page 17: ...l represents the main applications of the tool However if the tool is used for different applications with different accessories or poorly maintained the vibration emission may differ or even exceed the values declared in this instruction manual This may significantly increase the exposure level over the total working period An estimation of the level of exposure to vibration should also take into...

Page 18: ... devices if available 3 make sure that the delivery is complete and free from damage If you determine that parts are missing or damaged please contact your dealer The use of an incomplete or damaged product will cause danger for persons and property 4 make sure that you have all the accessories and tools for the installation and operation WARNING The product and its packaging are not toys Children...

Page 19: ...Butt joint Selecting biscuit dowels Always use the largest possible biscuit dowels for a strong joint For materials over 25 mm 1 in thick also 2 superimposed biscuit dowels The distance between two lines should be at least 10 cm biscuit dowel size Dimensions 0 47 15 4mm 10 53 19 4mm 20 56 23 4mm ...

Page 20: ...heel 9 The designations on the setting wheel reflect the various sizes of biscuit dowels You can adjust the cutting depth setting using the screw 10 Setting the cutting height Undo the locking levers 8 The set height is indicated by the arrow Set the required height on the scale ...

Page 21: ...ing levers 6 The set angle is indicated by the arrow Set the required angle on the scale Retighten the locking levers 6 Possibilities Change 1 Step Memory System 1 mm grid 2 Stop square 1 grid 3 Thickness biscuit dowels 4 mm 4 Combination Optional The setting of the vertical position of the jointer is important above all for mitre joining or combined with varying material thick nesses workpiece th...

Page 22: ...e workpiece the marking on the workpiece facing the marking on the moving fence if applicable Make sure that the disc cutter does not yet touch the surface Switch the product on and wait until it runs at full speed before cutting into the workpiece Push the product slowly forward at an even speed until the desired depth is reached Pull the product backward from the workpiece before switching it of...

Page 23: ...sure that flange D does not become misplaced 4 Insert the new routing disc and reassemble the appliance by reversing the above steps When doing so tighten flange C firmly 5 Fit base and securely tighten the screw Warning Always use the guard base guard system The guard protects the operator from broken disc cutter fragments and unintentional contact with the disc cutter Dust extraction system The ...

Page 24: ...e carbon brushes checked only by a qualified electrician Important The carbon brushes should not be replaced by anyone but a qualified electrician There are no parts inside the equipment which require additional maintenance If the connection cable of the power tool is damaged it must be replaced by a specially equipped for cable that is available through the customer service organization Storage a...

Page 25: ...s of EU ClassⅡ double insulation tool Read these instructions carefully before use WARNING Wear eye protection Wear hearing protection Wear respiratory protection The rating plate on your tool may show symbols These represent important information about the product or instructions on its use ...

Reviews:

Related manuals for BBJ9000