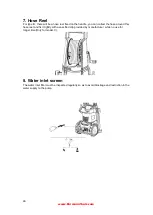
background image

27


www.BormannTools.com 

9. Unblock  lance 

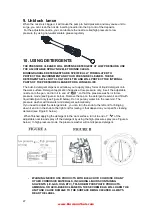
When the nozzle is clogged, it will cause the pump to build pressure and may cause unit to 

surge ,you can clean the nozzle inserting needle into the tip to rid of the deposits.


For the adjustable nozzle ,you can lubricate the

 nozzle collar(high pressure to low 

pressure )by using non-water soluble grease regularly . 


10. USING DETERGENTS 


THE PRESSURE CLEANER WILL DISPENSE DETERGENT AT LOW PRESSURE. USE 

THE ADJUSTABLE SPRAY NOZZLE TO RINSE CLEAN. 


BIODEGRADABLE DETERGENTS ARE SPECIFICALLY FORMULATED TO 

PROTECT THE ENVIRONMENT AND YOUR PRESSURE CLEANER.  THESE 

DETERGENTS WILL NOT CLOG THE FILTER AND WILL PROTECT THE INTERNAL 

PARTS OF THE PRESSURE CLEANER FOR A LONGER LIFE. 


The built-in detergent dispenser will allow you to apply many forms of liquid detergent onto 

the work surface. Detergent application happens at low

-pressure only. Insert the 

adjustable 

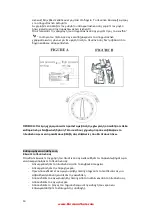
nozzle onto the gun, and turn it to 

end of “


”, 

so that the pressure washer is in low-

pressure mode (see Figure A below). Remove the cap on the detergent reservoir and fill with 

liquid detergent only (see Figure B below). Do not put any water into the reservoir. The 

pressure washer will mix water and detergent automatically. 

If you need to adjust the detergent rate , you


can turn the knob to the left end for bringing 

down it and turn the knob to the right end for raising it ,that depend on your specific cleaning 

demand (see Figure C below) . 
 

When finished applying the detergent to the work surface, turn it to end of “

” of the 

adjustable nozzle and spray off the detergent by using the high

-pressure spray (see Figure A 

below). In high-

pressure mode, the pressure washer will not dispense

 detergent. 


WARNING: NEVER USE PRODUCTS WITH BLEACH OR CHLORINE OR ANY 

OTHER CORROSIVE MATERIALS, INCLUDING LIQUIDS CONTAINING 

SOLVENTS (I.E. GAS, OILS ETC), TRI-SODIUM PHOSPHATE PRODUCTS, 

AMMONIA, OR ACID-BASED CLEANERS. THESE CHEMICALS WILL HARM THE 

UNIT AND CAUSE DAMAGE TO THE SURFACE BEING CLEANED. ALWAYS 

READ THE LABEL.


Summary of Contents for 019084

Page 1: ...BPW4000 Πλυστικό Μετάφραση του πρωτοτύπου των οδηγιών χρήσης Owner s manual Art Nr 019084 WWW BORMANNTOOLS COM ...

Page 2: ...ς ανάκρουσης από την ξαφνική λειτουργία του πλυστικού και του πιστολιού ΠΡΟΣΟΧΗ Το συγκεκριμένο εργαλείο έχει αναπτυχθεί και σχεδιαστεί για την χρήση με το απορρυπαντικό που περιέχετε στην συσκευασία αλλά και αυτά που προτείνονται από τον κατασκευαστή Η χρήση του πλυστικού με αλλά διαφορετικά απορρυπαντικά από αυτά που αναφέρθηκαν προηγούμενος μπορεί να προκαλέσει ατυχήματα και φθορά στο πλυστικό ...

Page 3: ...ωλήνα που προτείνει ο κατασκευαστής πριν την χρήση του μηχανήματος Εάν το καλώδιο 9 έχει ζημιά θα πρέπει να αλλάζεται από εξουσιοδοτημένο τεχνικό προσωπικό με αυθεντικό ανταλλακτικό Μην ακουμπήσετε το καλώδιο 9 με βρεγμένα χέρια Εάν χρειάζεται χρησιμοποιήστε μόνο αδιάβροχες προεκτάσεις και εξασφαλίστε ότι το βύσμα του καλωδίου και της προέκτασης είναι αδιάβροχες Μην κατάλληλες προεκτάσεις μπορεί ν...

Page 4: ...μένοι σωλήνες και συνδέσεις μπορούν να οδηγήσουν επίσης σε τραυματισμούς Για να μειώσετε τον κίνδυνο τραυματισμού από κλότσημα κατά την διάρκεια της ενεργοποίησης του πλυστικού σας κρατήστε το πιστόλι και με τα δυο σας χεριά πριν την ενεργοποίηση του Αποτυχία να συμμορφωθείτε στις παραπάνω οδηγίες μπορεί να έχει ως αποτέλεσμα τον τραυματισμό σας από ηλεκτροπληξία ΠΡΟΣΟΧΗ Ποτέ μην στοχεύετε με το π...

Page 5: ... Μην αγγίζετε τις υποδοχές ρεύματος με βρεγμένα χεριά Σωστή χρήση του πλυστικού Αυτή η συσκευή προορίζεται για χρήση με κρύο νερό μόνο Μην χρησιμοποιείτε ζεστό νερό με το συγκεκριμένο πλυστικό 1 Χρησιμοποιήστε το πλυστικό με την πίεση εισαγωγής νερού που αναγράφετε στα χαρακτηριστικά του Μην χρησιμοποιήσετε το πλυστικό σας χωρίς σύνδεση με παροχή νερού Η χρήση του συγκεκριμένου πλυστικού χωρίς παρ...

Page 6: ...Πιστόλι Κ Ρυθμίσιμη άκρο ψεκασμού L Βελόνα καθαρισμού Κάποια εξαρτήματα μπορεί να διαφέρουν από αυτά που θα βρείτε μέσα στην συσκευασία σας όπως επίσης και κάποια προσθετά εξαρτήματα ανάλογα με την έκδοση του πλυστικού που έχετε ΒΗΜΑ 1 Συνδέστε τον αγωγό υψηλής πίεσης c στο πιστόλι σας H Εισάγετε και συνδέστε με τον ταχυσύνδεσμο σφιχτά για να αποφύγετε οποιαδήποτε διαρροή Όταν τα δυο στοιχεία θα ε...

Page 7: ...ω φωτογραφία Οι βίδες είναι πακεταρισμένες μαζί με το κυρίως σώμα Βήμα 3 Εγκαταστήστε το γάντζο για το πιστόλι και το στήριγμα του καλωδίου ρεύματος Βιδώστε το στήριγμα του πιστολιού σφιχτά όπως φαίνεται και στην παρακάτω φωτογραφία Τις βίδες θα τις βρείτε μέσα την συσκευασία μαζί με το κυρίως σώμα ...

Page 8: ...έστε με τον ταχυσύνδεσμο σφιχτά για να αποφύγετε οποιαδήποτε διαρροή Αν τραβώντας τα δυο αυτά εξαρτήματα δεν μπορούν να διαχωριστούν τότε είναι και σωστά στην θέση τους Όταν θα πιέσετε το κομβίο απασφάλισης σύμφωνα με την κατεύθυνση του βέλους τότε θα μπορέσετε να αποσυνδέσετε και τον σωλήνα υψηλής πίεσης Βήμα 6 Συνδέστε την παροχή νερού σας στο πίσω μέρος του πλυστικού σας Πριν συνδέσετε όμως τον...

Page 9: ...τε ότι στην παροχή που θα χρησιμοποιήσετε υπάρχει ρελέ και όλες οι απαραίτητες ασφάλειας για την σωστή ηλεκτρική του εγκατάσταση Αν δεν γνωρίζετε να κάνετε αυτόν τον έλεγχο καλυτέρα θα ήταν να συμβουλευτείτε ένα αδειοδοτημένο ηλεκτρολόγο εγκαταστάσεων Απενεργοποιώντας την λειτουργία του πλυστικού σας ΠΡΟΣΟΧΗ Πάντα απενεργοποιείτε το πλυστικό σας πριν αποσυνδέσετε ή κλείσετε την παροχή νερού Σοβαρή...

Page 10: ... χρησιμοποιείτε και όταν έχετε σκοπό να σταματήσετε την εργασία σας για μεγάλο χρονικό διάστημα 3 Εξαερισμός πλυστικού Είναι πολύ σημαντικό να μην λειτουργήσει το πλυστικό σας χωρίς νερό μέσα σε όλα τα στοιχεία του Διαβάστε τις οδηγίες συναρμολόγησης για να δείτε τον σωστό τρόπο για την εκκίνηση του πλυστικού σας Για την ορθότερη λειτουργία του πλυστικού σας συνδέστε την παροχή νερού πριν συνδέσετ...

Page 11: ...να καθαρίσετε τα ρούχα σας ή τα παπούτσια σας 6 Περιστρέψτε το άκρο του πιστολιού Περιστρέψτε το άκρο του πιστολιού σας για να ρυθμίσετε την κατεύθυνση του ψεκασμού Πιέστε το κομβίο στην θέση UNLOCK ώστε να ενεργοποιηθεί η λειτουργία της περιστροφής Μετα μπορείτε να γυρίσετε με το χέρι σας το άκρο του πιστολιού σας ώστε ένα βρείτε την πιο βολική γωνιά αγία αέρας και για την εργασία που θέλετε να π...

Page 12: ... Χρησιμοποιήστε μετα το ρυθμιζόμενο άκρο για να ξεπλύνετε την περιοχή που ψεκάσατε με απορρυπαντικό Τα βιοδιασπώμενα απορρυπαντικά είναι ειδικά σχεδιασμένα για αυτήν την λειτουργία Τα συγκεκριμένα απορρυπαντικά δεν θα μπλοκάρουν το φίλτρο του πλυστικού σας και τις σωληνώσεις Επίσης ένα τέτοιο απορρυπαντικό θα προστατεύσει το πλυστικό σας και τα εξαρτήματα του για μεγαλύτερη διάρκεια ζωής Το ενσωμα...

Page 13: ...ρίνη ή οποιοδήποτε άλλο καθαριστικό με διαβρωτική δράση Τέτοιου είδους χημικά μπορούν να βλάψουν το πλυστικό σας και να προκαλέσουν βλάβη στις επιφάνειες που θα πέσουν πάνω Καθαρισμός και αποθήκευση Κλειστέ το πλυστικό σας Όταν θα τελειώσετε την χρήση του πλυστικού σας ακολουθήστε τα παρακάτω βήματα για να απενεργοποιήσετε το πλυστικό σας Απενεργοποιήστε το πλυστικό σας από το κομβόι λειτουργίας Α...

Page 14: ...στε άμεσος το πλυστικό σας Συνεχομένη λειτουργία του πλυστικού σας για πάνω από μερικά δευτερόλεπτα μπορεί να προκαλέσει ζημιά στο πλυστικό σας Πάντα αποθηκεύετε το πλυστικό σας και τα εξαρτήματα του σε θερμοκρασίες άνω των 00 C ΠΡΟΣΟΧΗ Αποτυχία να ακολουθήσε τις παραπάνω οδηγίες μπορεί να οδηγήσει σε καταστροφή του πλυστικού σας Συντήρηση Το συγκεκριμένο πλυστικό είναι εξοπλισμένο με κλειστό κύκλ...

Page 15: ... physical sensory or mental skills or lack of experience and knowledge Not for commercial use This machine can be used by persons with reduced physical sensory or mental abilities Or lack of experience and knowledge when they are supervised or safe Use of the machine and understand the resulting dangers Use suitable personal protective equipment PSA for high pressure cleaners in operation Eg safet...

Page 16: ...ally and the machine is switched off After solving the fault turn the switch back on and turn the machine back on 1 Read all instructions before using the product Save all safety instructions 2 Do not operate the pressure cleaner when fatigued or under the influence of alcohol or drugs 3 Risk of injection or injury do not direct the high pressure water stream at any people or animals 4 Do not allo...

Page 17: ... hose while the unit is pressurized is dangerous and may cause injury 8 Always turn off the power disconnector when the machine is left unattended 9 Keep water spray away from electrical wiring or fatal electric shock may result 10 Must be connected to the water supply before use then open gun trigger and open the cleaner switch 11 After the machine long stalled again before use please dial the fe...

Page 18: ...o the product Servicing a double insulated product requires extreme care and knowledge of the system and should be done only by qualified service personnel Replacement parts for a double insulated product must be identical to the parts they replace A double insulated product is marked with the words DOUBLE INSULATION or DOUBLE INSULATED This symbol may also be marked on the product USE OF EXTENSIO...

Page 19: ...ed Operating Instructions for more details Always test the spray in an open area first 4 NEVER move the unit by pulling on the high pressure hose Use the handle provided on the top of the unit 5 Always hold the high pressure gun and wand with two hands Keep one hand on the gun trigger while supporting the wand with the other hand see diagram 6 When dispensing detergent the pressure cleaner applies...

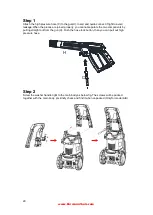
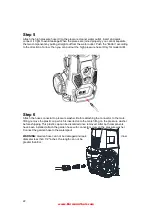
Page 20: ... joined properly you cannot separate the two components by pulling straight out from the gun H Push the hose lock button then you can pull out high pressure hose Step 2 Screw the washer handle tight to the main body as below fig The screws will be packed together with the main body pls kindly check and find it when unpacked Only for model A B C H ...

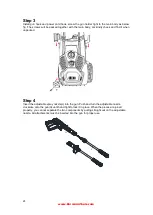
Page 21: ... kindly check and find it when unpacked Step 4 Insert the adjustable spray nozzle J into the gun Push and turn the adjustable nozzle clockwise onto the gun H until hand tight to lock it in place When the pieces are joined properly you cannot separate the two components by pulling straight out on the adjustable nozzle All attachments must be inserted into the gun for proper use H J ...

Page 22: ...pressure hose Only for model A B Step 6 Attach the hose connector to pressure washer Before attaching the connector to the male fitting remove the plastic cap which is inserted onto the male fitting on the pressure washer before shipping This plastic cap can be discarded once removed After both components have been installed attach the garden hose with connector screw on the pressure washer Connec...

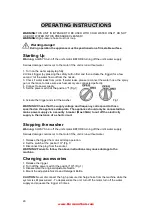
Page 23: ... start the washer Fig 1 WARNING Check that the supply voltage and frequency correspond to those specified on the appliance data plate The appliance should only be connected to a mains power supply via a security breaker Max 30mA to cut off the electricity supply in the instance of a short circuit Stopping the washer Warning ALWAYS turn off the unit s motor BEFORE turning off the unit s water suppl...

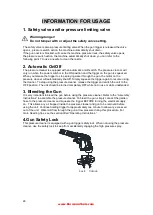
Page 24: ... off Simply squeeze the trigger again to resume using the cleaner To stop using the pressure cleaner release the trigger and switch the unit to the OFF position The unit should be turned completely OFF while not in use or while unattended 3 Bleeding the Gun It is very important to bleed the gun before using the pressure cleaner Refer to the Assembly Instructions to assemble the pressure cleaner To...

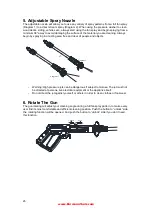
Page 25: ...sting area free and clear of people and objects Warning High pressure jets can be dangerous if subject to misuse The jet must not be directed at persons live electrical equipment or the appliance itself Do not direct the jet against yourself or others in order to clean clothes or foot wear 6 Rotate The Gun The gun rotating will adjust your cleaning angle during a full fan spray pattern to make eve...

Page 26: ...can collect the hose around this hose reel and fix it tightly with a specified clip provided by manufacturer while no use for longer time Only for model C 8 Water inlet screen The water inlet filter must be inspected regularly so as to avoid blockage and restriction in the water supply to the pump ...

Page 27: ...able nozzle onto the gun and turn it to end of so that the pressure washer is in low pressure mode see Figure A below Remove the cap on the detergent reservoir and fill with liquid detergent only see Figure B below Do not put any water into the reservoir The pressure washer will mix water and detergent automatically If you need to adjust the detergent rate you can turn the knob to the left end for...

Page 28: ...Term Storage FOLLOW ALL OF THE ABOVE SHUT DOWN PROCEDURES ADDING THE FOLLOWING STEPS After disconnecting the water supply and before disconnecting the high pressure hose turn the pressure cleaner on for 2 3 seconds until any remaining water in the pump exits TURN UNIT OFF IMMEDIATELY CONTINUED USE OF THE PRESSURE CLEANER WITHOUT WATER SUPPLY ATTACHED WILL CAUSE SEVERE DAMAGE TO THE UNIT Always sto...

Page 29: ...ssure To achieve the best results clean one side at a time Allow the detergent to rest on the surface for a few minutes but do not let the detergent dry Rinse at high pressure using the fan spray in a sweeping motion keeping the tip of the spray nozzle at least 8 inches from the cleaning surface Maintain a further distance from the cleaning area when using a direct spray Wipe surface dry for a pol...

Reviews: